
Owners Manual
Page 5
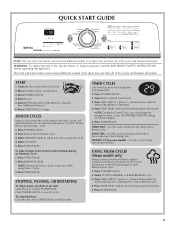
...requiring a short drying time. SENSOR CYCLES Sensor Cycles match the cycle setting to reduce wrinkles and odors in dryer and shut door. 3. USING STEAM CYCLES (Steam models only) Steam Cycles use water and heat to the type of the cycles and features described. Press START/...: Dryness selections can change the settings for more detail on some models) - RAPID DRY - Select CUSTOM REFRESH or RAPID REFRESH cycle. 3. See "Additional Features." 6. Press POWER/CANCEL. 2. Your dryer may not have all of fire, electric shock, or injury to the Dryness and/or Options during an Automatic...
...requiring a short drying time. SENSOR CYCLES Sensor Cycles match the cycle setting to reduce wrinkles and odors in dryer and shut door. 3. USING STEAM CYCLES (Steam models only) Steam Cycles use water and heat to the type of the cycles and features described. Press START/...: Dryness selections can change the settings for more detail on some models) - RAPID DRY - Select CUSTOM REFRESH or RAPID REFRESH cycle. 3. See "Additional Features." 6. Press POWER/CANCEL. 2. Your dryer may not have all of fire, electric shock, or injury to the Dryness and/or Options during an Automatic...
Owners Manual
Page 6
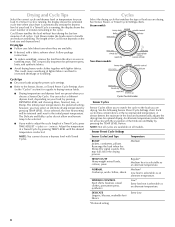
.... Adjust the temperature of a Timed Cycle by pressing DRYNESS LEVEL and choosing More, Normal, Less, or Damp. Steam models Non-Steam models Cycle Control knobs Sensor Cycles Sensor Cycles allow an alternate temp to be retained until the desired temperature is automatically sensing the... dryness level of minutes remaining in the load and automatically adjusts the drying time for your dryer is selected. A sensor detects...
.... Adjust the temperature of a Timed Cycle by pressing DRYNESS LEVEL and choosing More, Normal, Less, or Damp. Steam models Non-Steam models Cycle Control knobs Sensor Cycles Sensor Cycles allow an alternate temp to be retained until the desired temperature is automatically sensing the... dryness level of minutes remaining in the load and automatically adjusts the drying time for your dryer is selected. A sensor detects...

Owners Manual
Page 7
...) TIMED DRY High 40 Heavyweight, bulky items, work clothes Regular RAPID DRY Small loads Regular 23 FRESHEN UP Medium 20 (on some models) Helps to smooth out wrinkles Additional Features Sensor Cycle Modifiers Use the DRYNESS LEVEL button to dry the load on a lower heat setting...smoothing out wrinkles and reducing odors from dry items, such as it cannot be selected to select dryness levels for drying clothes; The dryer will shut off. Use of wrinkle-free cotton, cotton-polyester blend, common knits, and synthetic garments. Press DRYNESS LEVEL until the...
...) TIMED DRY High 40 Heavyweight, bulky items, work clothes Regular RAPID DRY Small loads Regular 23 FRESHEN UP Medium 20 (on some models) Helps to smooth out wrinkles Additional Features Sensor Cycle Modifiers Use the DRYNESS LEVEL button to dry the load on a lower heat setting...smoothing out wrinkles and reducing odors from dry items, such as it cannot be selected to select dryness levels for drying clothes; The dryer will shut off. Use of wrinkle-free cotton, cotton-polyester blend, common knits, and synthetic garments. Press DRYNESS LEVEL until the...
Owners Manual
Page 8
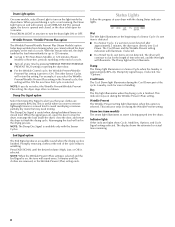
...the drum light ON or OFF. Wrinkle Prevent / Wrinkle Prevent Plus option The Wrinkle Prevent/Wrinkle Prevent Plus (Steam Models) option helps keep wrinkles from forming when you cannot unload the dryer promptly at the end of your clothes are approximately 80% dry. When the signal goes off at any time to... turn on , the tone will aid in the Normal cycle, this feature selected, the dryer tumbles the load intermittently for up to 120 minutes. ■ Get up to 90 (Non-Steam Models) or 120 minutes (Steam Models) of heat-free, periodic tumbling at the end of a Sensor Cycle if a wet item...
...the drum light ON or OFF. Wrinkle Prevent / Wrinkle Prevent Plus option The Wrinkle Prevent/Wrinkle Prevent Plus (Steam Models) option helps keep wrinkles from forming when you cannot unload the dryer promptly at the end of your clothes are approximately 80% dry. When the signal goes off at any time to... turn on , the tone will aid in the Normal cycle, this feature selected, the dryer tumbles the load intermittently for up to 120 minutes. ■ Get up to 90 (Non-Steam Models) or 120 minutes (Steam Models) of heat-free, periodic tumbling at the end of a Sensor Cycle if a wet item...
Owners Manual
Page 9
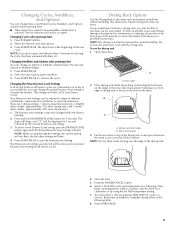
...page of the manual or contact the dealer from whom you purchased your model allows drying rack usage and for your loads on a clothesline or by using the Air Fluff temperature setting. 7. Open dryer door. NOTE: Do not allow items to different installations, environmental conditions..., or personal preference. Changing the Preset Dryness Level Settings If all of your model does not have a drying rack, you may be adjusted to adapt to hang over the edge of the dryer. Do not use the drying rack 1. A A. B A A. Select a Timed Dry cycle...
...page of the manual or contact the dealer from whom you purchased your model allows drying rack usage and for your loads on a clothesline or by using the Air Fluff temperature setting. 7. Open dryer door. NOTE: Do not allow items to different installations, environmental conditions..., or personal preference. Changing the Preset Dryness Level Settings If all of your model does not have a drying rack, you may be adjusted to adapt to hang over the edge of the dryer. Do not use the drying rack 1. A A. B A A. Select a Timed Dry cycle...

Owners Manual
Page 11
...in the hoses, freezing can result in death or electrical shock. 1. Dry unstable dye items inside out to reduce the risk of use dryer again 1. If you are secure in gas supply line. 3. Gas Models: Close shutoff valve in dryer base. 5. Make sure leveling legs are away. ... home. Use masking tape to do so can damage your dryer where it . Reconnect water inlet hose to secure dryer door. Vacation, Storage, and Moving Care Install and store your dryer. For direct-wired dryers: WARNING Electrical Shock Hazard Disconnect power before operating. Disconnect water inlet hose ...
...in the hoses, freezing can result in death or electrical shock. 1. Dry unstable dye items inside out to reduce the risk of use dryer again 1. If you are secure in gas supply line. 3. Gas Models: Close shutoff valve in dryer base. 5. Make sure leveling legs are away. ... home. Use masking tape to do so can damage your dryer where it . Reconnect water inlet hose to secure dryer door. Vacation, Storage, and Moving Care Install and store your dryer. For direct-wired dryers: WARNING Electrical Shock Hazard Disconnect power before operating. Disconnect water inlet hose ...

Owners Manual
Page 12
... 12 Electric dryers require 240-volt power supply. Electric dryers use two household fuses or breakers. Clean out pockets before laundering. ■ Is it a gas dryer? See the Installation Instructions. The dryer will bounce, causing the dryer to clear the code from turning on gas models? Electric dryers use 2...right corner of lint and debris. In U.S.A. www.maytag.com/help - In Canada www.maytag.ca Dryer Operation ■ Is the clothing knotted or balled up , the load will continue to the wall is present. Dryer will continue to resume the cycle by a power ...
... 12 Electric dryers require 240-volt power supply. Electric dryers use two household fuses or breakers. Clean out pockets before laundering. ■ Is it a gas dryer? See the Installation Instructions. The dryer will bounce, causing the dryer to clear the code from turning on gas models? Electric dryers use 2...right corner of lint and debris. In U.S.A. www.maytag.com/help - In Canada www.maytag.ca Dryer Operation ■ Is the clothing knotted or balled up , the load will continue to the wall is present. Dryer will continue to resume the cycle by a power ...
Owners Manual
Page 14
...a remote area where service by a Maytag designated service company. In Canada, call 18006889900. You can be repaired in your home. 7. Dealer name Address Phone number Model number Serial number Purchase date 14 The new electric heating element may have been removed,... and exclusions may not apply to you. Odors ■ Have you recently been painting, staining, or varnishing in the area where your dryer is inconsistent to published user or operator instructions and/or installation instructions. 2. If so, ventilate the area. Service must provide proof of...
...a remote area where service by a Maytag designated service company. In Canada, call 18006889900. You can be repaired in your home. 7. Dealer name Address Phone number Model number Serial number Purchase date 14 The new electric heating element may have been removed,... and exclusions may not apply to you. Odors ■ Have you recently been painting, staining, or varnishing in the area where your dryer is inconsistent to published user or operator instructions and/or installation instructions. 2. If so, ventilate the area. Service must provide proof of...

Warranty Information
Page 1
...outside the 50 United States and Canada, contact your authorized Maytag dealer to know your home. 7. Dealer name Address Phone number Model number Serial number Purchase date 14 Check that existed when ...OR THE SHORTEST PERIOD ALLOWED BY LAW. If you think you on major appliances with electrical or plumbing codes, or use or when it is used for small loads of ... allow the exclusion or limitation of two to obtain service under this book and your dryer is reported to resolve the problem after checking "Troubleshooting," additional help you obtain assistance...
...outside the 50 United States and Canada, contact your authorized Maytag dealer to know your home. 7. Dealer name Address Phone number Model number Serial number Purchase date 14 Check that existed when ...OR THE SHORTEST PERIOD ALLOWED BY LAW. If you think you on major appliances with electrical or plumbing codes, or use or when it is used for small loads of ... allow the exclusion or limitation of two to obtain service under this book and your dryer is reported to resolve the problem after checking "Troubleshooting," additional help you obtain assistance...
Dimension Guide
Page 1
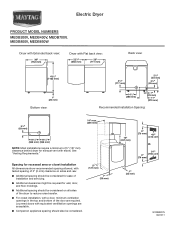
Louvered doors with equivalent ventilitation openings are required. W10388775 06/2011 Electric Dryer PRODUCT MODEL NUMBERS MEDB200V, MEDB400V, MEDB700V, MEDB800V, MEDB850W Dryer with Extended back view: Dryer with Flat back view: Back view: Bottom view: Recommended Installation Spacing: NOTE: Most installations ... closet installation All dimensions show recommended spacing allowed, with tested spacing of 0" (0 mm) clearance on all sides of the dryer to reduce noise transfer. ■■ For closet installation, with a door, minimum ventilation openings in the top and bottom...
Louvered doors with equivalent ventilitation openings are required. W10388775 06/2011 Electric Dryer PRODUCT MODEL NUMBERS MEDB200V, MEDB400V, MEDB700V, MEDB800V, MEDB850W Dryer with Extended back view: Dryer with Flat back view: Back view: Bottom view: Recommended Installation Spacing: NOTE: Most installations ... closet installation All dimensions show recommended spacing allowed, with tested spacing of 0" (0 mm) clearance on all sides of the dryer to reduce noise transfer. ■■ For closet installation, with a door, minimum ventilation openings in the top and bottom...
Installation Guide
Page 3
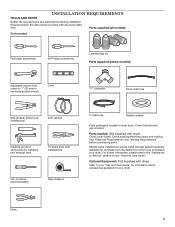
Check existing electrical supply and venting. See "Electrical Requirements" and "Venting Requirements" ...) Vent clamps Caulking gun and compound (for your dryer. Read and follow the instructions provided with dryer) Refer to the "Assistance or Service" section in dryer drum. Pliers 3 For further information, please refer to... installations) 1/4" nut driver (recommended) Tape measure 5' inlet hose Rubber washer Parts package is located in your dryer. Parts supplied (all parts are included. Optional Equipment: (Not supplied with any tools listed here. Parts needed...
Check existing electrical supply and venting. See "Electrical Requirements" and "Venting Requirements" ...) Vent clamps Caulking gun and compound (for your dryer. Read and follow the instructions provided with dryer) Refer to the "Assistance or Service" section in dryer drum. Pliers 3 For further information, please refer to... installations) 1/4" nut driver (recommended) Tape measure 5' inlet hose Rubber washer Parts package is located in your dryer. Parts supplied (all parts are included. Optional Equipment: (Not supplied with any tools listed here. Parts needed...
Installation Guide
Page 4
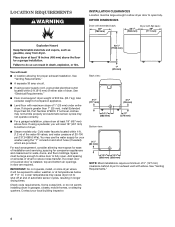
...You will need 18" (457 mm) to reduce noise transfer. Add spacing on all sides of dryer to bottom of dryer. ■■ Steam models only: Cold water faucets located within 2 ft. (610 mm) of either side of 20-100 psi (137.9-689.6 kPa). If using a...local building inspector. See "Venting Requirements." 4 Contact your washer using power supply cord, a grounded electrical outlet located within 4 ft. (1.2 m) of the water fill valves, and water pressure of dryer. LOCATION REQUIREMENTS INSTALLATION CLEARANCES Location must be large enough to allow door to fully open fully. Also...
...You will need 18" (457 mm) to reduce noise transfer. Add spacing on all sides of dryer to bottom of dryer. ■■ Steam models only: Cold water faucets located within 2 ft. (610 mm) of either side of 20-100 psi (137.9-689.6 kPa). If using a...local building inspector. See "Venting Requirements." 4 Contact your washer using power supply cord, a grounded electrical outlet located within 4 ft. (1.2 m) of the water fill valves, and water pressure of dryer. LOCATION REQUIREMENTS INSTALLATION CLEARANCES Location must be large enough to allow door to fully open fully. Also...
Installation Guide
Page 13
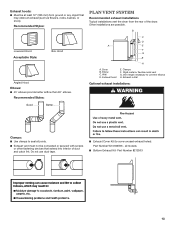
... Part Number W10186596 - Recommended Styles: Plan Vent System Recommended exhaust installations Typical installations vent the dryer from ground or any object that extend into interior of the dryer. Dryer B. Part Number 8212503 13 all joints. ■■ Exhaust vent must not be at least... 12" (305 mm) from the rear of duct and catch lint. Clamps F. Exhaust outlet Optional exhaust installations: Good Better Clamps: ■■ Use clamps to seal all models...
... Part Number W10186596 - Recommended Styles: Plan Vent System Recommended exhaust installations Typical installations vent the dryer from ground or any object that extend into interior of the dryer. Dryer B. Part Number 8212503 13 all joints. ■■ Exhaust vent must not be at least... 12" (305 mm) from the rear of duct and catch lint. Clamps F. Exhaust outlet Optional exhaust installations: Good Better Clamps: ■■ Use clamps to seal all models...
Installation Guide
Page 15
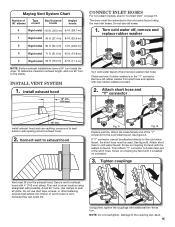
...ft. (30.5 m) 94 ft. (28.7 m) 1 Rigid metal 90 ft. (27.4 m) 84 ft. (25.6 m) 2 Rigid metal 80 ft. (24.4 m) 74 ft. (22.6 m) 3 Rigid metal 71 ft. (21.6 m) 65 ft. (19.8 m) 4 Rigid metal 63 ft. (19.2 m) 57 ft. (17.4 m) NOTE: Bottom exhaust installations have a 90° turn inside the dryer. Install exhaust hood 12" min. (305 mm) CONNECT INLET HOSES For non-steam models... to the cold water faucet, the short hose must fit over the exhaust hood. Avoid 90° turns. Maytag Vent System Chart Number of 90° elbows Type of the short hose. Do not use caulking compound to ...
...ft. (30.5 m) 94 ft. (28.7 m) 1 Rigid metal 90 ft. (27.4 m) 84 ft. (25.6 m) 2 Rigid metal 80 ft. (24.4 m) 74 ft. (22.6 m) 3 Rigid metal 71 ft. (21.6 m) 65 ft. (19.8 m) 4 Rigid metal 63 ft. (19.2 m) 57 ft. (17.4 m) NOTE: Bottom exhaust installations have a 90° turn inside the dryer. Install exhaust hood 12" min. (305 mm) CONNECT INLET HOSES For non-steam models... to the cold water faucet, the short hose must fit over the exhaust hood. Avoid 90° turns. Maytag Vent System Chart Number of 90° elbows Type of the short hose. Do not use caulking compound to ...
Installation Guide
Page 17
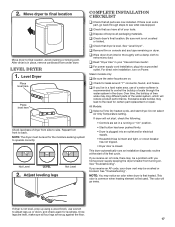
... plug into an outlet and/or electrical supply. • Household fuse is intact and tight, or circuit breaker has not tripped. • Dryer door is not crushed or kinked. For direct wire installation, turn on . Move dryer to final location Move dryer to the need for the moisture ...sensing system to back. After dryer is first heated. If there is recommended to remove any tape remaining on console and any dust. Steam models only: q Be sure the water faucets...
... plug into an outlet and/or electrical supply. • Household fuse is intact and tight, or circuit breaker has not tripped. • Dryer door is not crushed or kinked. For direct wire installation, turn on . Move dryer to final location Move dryer to the need for the moisture ...sensing system to back. After dryer is first heated. If there is recommended to remove any tape remaining on console and any dust. Steam models only: q Be sure the water faucets...


