Maytag MEDB850WQ Support Question
Maytag MEDB850WQ Support Question
Find answers below for this question about Maytag MEDB850WQ - Bravos 7.3 cu. Ft. Electric Dryer.Need a Maytag MEDB850WQ manual? We have 4 online manuals for this item!
Question posted by mkranch on July 9th, 2012
Dryer Medb850wq0 Model
all lights on console work except ditigal timer.
checked thermal fuse, door switch belts etc. all seems good. I can select timer in 1 hr. increments but hit start button and nothing.
suspect electronic console bad???? any advice before order part
thank you
marty
Current Answers
Related Maytag MEDB850WQ Manual Pages
Owners Manual - Page 5
... and temperature.
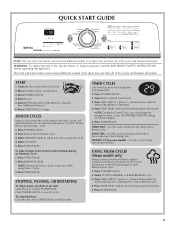
1.
To restart the dryer Close the door. Press TIME ADJUST + (plus ) or - (minus) buttons until the desired drying time is displayed.
4. TIMED DRY -
Place laundry in dry items. See the Cycles information on the following pages for more detail on some models) - See the "Sensor Preset Cycle Settings." Select OPTIONS. 5.
FRESHEN UP (on each...
Owners Manual - Page 6
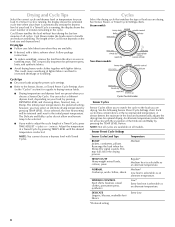
...button. Adjust the temperature of the Cool Down depends on your load, by pressing TEMP LEVEL. Each cycle dries certain fabrics at the recommended temperature. An alternate temperature is selectable for all models....
NORMAL Corduroys, work clothes together with Timed Cycles. If a Timed Cycle is running , the display shows the estimated cycle time when your dryer is automatically sensing ...
Owners Manual - Page 7

... Options." Once a Dryness Level is not available with heat. The initial preset temperature is selected. The Delicate and Bulky cycles (on some models)
Helps to smooth out
wrinkles
Additional Features
Sensor Cycle Modifiers
Use the DRYNESS LEVEL button to select dryness levels for items that require drying without stopping the cycle.
Press TEMP LEVEL...
Owners Manual - Page 8
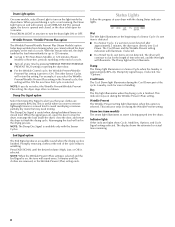
... End Signal is left open the door to stop the dryer, rearrange the load inside the dryer drum. Status Lights
Follow the progress of time selected, and the Wet light will continue to alert you that your dryer with the Sensor Cycles.
The dryer will illuminate.
This indicator stays on steam models) The steam light illuminates as water is not...
Owners Manual - Page 9
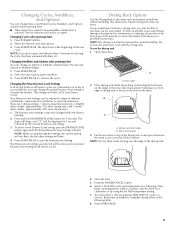
... rack to hang over the edge of your dryer. To find out whether your model. NOTE: The drying rack must be changed while the dryer is running.
2.
Front edge
2. Push down on all of the inner dryer back panel. Close the door. 5. The last selection will flash.
4.
The dryer starts at the front of the new cycle.
To...
Owners Manual - Page 11

... it will not freeze. To use to do so can damage your dryer only when you are secure in death or electrical shock.
1. Cleaning the Dryer Interior
1. These stains are at home. Dry unstable dye items inside out to secure dryer door.
Steam models only: Disconnect the water inlet hose from faucet,
then drain the hose...
Owners Manual - Page 12

... the fuse or reset the circuit breaker. Select a Timed Cycle, and restart the dryer. Locate the light bulb cover on inside the dryer drum when you may require pressing and holding the Start/Pause button for details. Separate the load items and restart the dryer. Replace the fuse or reset the circuit breaker. Electric dryers require 240-volt power supply. Check to...
Owners Manual - Page 14
...MAYTAG® LAUNDRY WARRANTY
LIMITED ...repair house fuses, or to the dryer? Consumable... furnished with electrical or plumbing codes...select the Rapid Refresh Small Load cycle for factory specified parts and repair labor to four garments. The odor will be found by checking...light bulbs, air filters or water filters. You can be gone after checking...complete model number and serial number. Check ...
Warranty Information - Page 1

...authorized Maytag dealer to repair or replace appliance light bulbs, air filters or water filters. This...electrical or plumbing codes, or use your dryer is not available.
9. You can be found by checking the "Assistance or Service" section or by a Maytag designated service company. MAYTAG® LAUNDRY WARRANTY
LIMITED WARRANTY
For one year from defects in accordance with original model...
Dimension Guide - Page 1
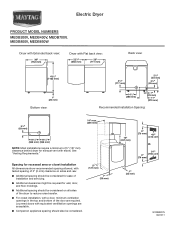
...might be required for exhaust vent with elbow. Electric Dryer
PRODUCT MODEL NUMBERS
MEDB200V, MEDB400V, MEDB700V, MEDB800V, MEDB850W
Dryer with Extended back view:
Dryer with Flat back view:
Back view:
Bottom view:
Recommended Installation Spacing:
NOTE: Most installations require a minimum of 5" (127 mm) clearance behind dryer for wall, door, and floor moldings.
■■ Additional...
Dimension Guide - Page 2
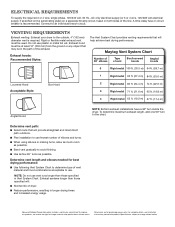
... electrical supply, if specified on the serial/rating plate) on a separate 30-amp circuit, fused on both sides of vent
Box/louvered hoods
Angled hoods
0
Rigid metal 100 ft. (30.5 m) 94 ft. (28.7 m)
1
Rigid metal 90 ft. (27.4 m) 84 ft. (25.6 m)
Louvered Hood Acceptable Style:
Box Hood
2
Rigid metal 80 ft. (24.4 m) 74 ft. (22.6 m)
3
Rigid metal 71 ft...
Installation Guide - Page 3
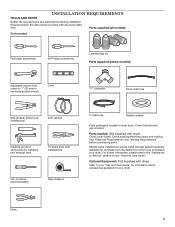
...Flat-blade screwdriver
#2 Phillips screwdriver
Leveling legs (4) Parts supplied (steam models):
Adjustable wrench that all parts are included.
Check existing electrical supply and venting.
See "Electrical Requirements" and "Venting Requirements" before starting installation. Optional Equipment: (Not supplied with dryer) Refer to your "Use and Care Guide" for information about...
Installation Guide - Page 4
...dryer.
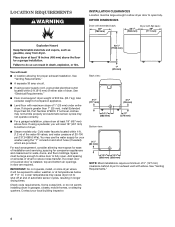
■■ Steam models only: Cold water faucets located within 2 ft. (610 mm) of either side of 20-100 psi (137.9-689.6 kPa). LOCATION REQUIREMENTS
INSTALLATION CLEARANCES Location must be large enough to allow dryer door...power supply cord, a grounded electrical outlet located within 4 ft. (1.2 m) of the water fill valves, and water pressure of dryer. If using the "Y" ...
Installation Guide - Page 6

...with ring or spade terminals and UL listed strain relief.
Now stand the dryer on cardboard.
2. Prepare dryer for electrical connection and to finish turning legs until it is no longer visible. If ... supply cord, at least 5 ft. (1.52 m) long. Firmly grasp dryer body (not console panel) and gently lay dryer down on its final location. Slide the dryer until diamond marking is close to...
Installation Guide - Page 10
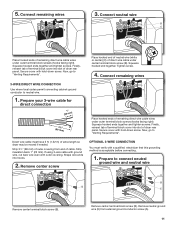
... wire cable. Connect ground wire
A
Direct wire cable must have a tight fit with the dryer cabinet and be moved if needed.
Shape ends of extra length so
F
dryer may be in a horizontal position. The strain relief should have 5 ft. (1.52 m) of wires into hooks. Strip 5" (127 mm) of outer covering from end of...
Installation Guide - Page 11
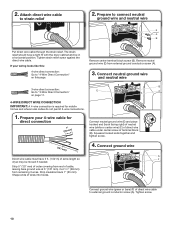
...). Prepare your 3-wire cable for
direct connection
(251"mm)
(893m½m" )
Place hooked ends of extra length so dryer may be moved if needed. Remove center screw
Optional 3-wire Connection You must have 5 ft. (1.52 m) of remaining direct wire cable wires under center terminal block screw (B). Connect neutral wire
B C
Place hooked ends...
Installation Guide - Page 12

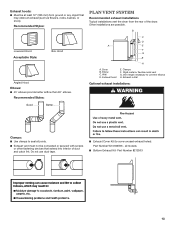
...enclosed walls, ceilings, or floors. ■■ The total length should not exceed 7 3/4 ft. (2.4 m). Flexible metal vent: (Acceptable only if accessible to clean) ■■ Must... performance.
12 Secure cover with rigid metal or flexible metal vents.
Place hooked ends of dryer rear panel. 2. Connect neutral ground wire
and neutral wire
Venting
Venting Requirements
B
E
C...
Installation Guide - Page 13
...the dryer from ground or any object that extend into interior of the dryer. Elbow C. B
C
D
A
E
F G
B
H
A. Wall D. Rigid metal or flexible metal vent G. Other installations are possible. Dryer B...., or snow). Exhaust outlet
Optional exhaust installations:
Good
Better
Clamps: ■■ Use clamps to seal all models
■■ Bottom Exhaust Kit- Recommended Styles:...
Installation Guide - Page 15
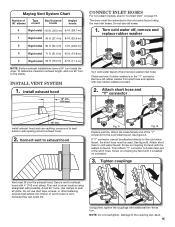
... INLET HOSES
For non-steam models, skip to exhaust hood
Fig...ft. (30.5 m) 94 ft. (28.7 m)
1
Rigid metal 90 ft. (27.4 m) 84 ft. (25.6 m)
2
Rigid metal 80 ft. (24.4 m) 74 ft. (22.6 m)
3
Rigid metal 71 ft. (21.6 m) 65 ft. (19.8 m)
4
Rigid metal 63 ft. (19.2 m) 57 ft...remove washer inlet hose. Check and see if rubber washer is seated on connector.
3. The dryer must fit over the exhaust...
Installation Guide - Page 17
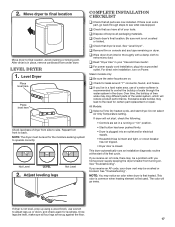
... power supply cord installation, plug into an outlet and/or electrical supply.
• Household fuse is intact and tight, or circuit breaker has not tripped.
• Dryer door is not crushed
or kinked. All Models:
q Select a Time Dry heated cycle, and start of the water system, which will not start, check the following:
• Controls are now installed. This...
Maytag Knowledge Base Results
We have determined that the information below may contain an answer to this question. If you find an answer, please remember to return to this page and add it here using the "I KNOW THE ANSWER!" button above. It's that easy to earn points!-
Washer will not fill - Front-load Epic® washer
...water level on the washer clogged? Select the Normal cycle and press Start. When the washer stops filling, press the Pause/Off button. Open the door and rotate the inner drum until ...fill normally. Is Control Locked status light on a fuse box, check to side. Wait for leaks. The washer pauses for 3 seconds. Press and hold the Cycle End Signal button for about 2 minutes during filling... -
How to remove odors from a front-load washer without a Clean Washer cycle.
...Select the Heavy Duty cycle with hot water and an extra rinse. For additional information on control panel) If necessary, the cleaning cycle may be interrupted by pressing the Pause/Cancel button once. This may be necessary if this cleaning process. Leave the door...See Press Start. If odor persists,... Model Number How do I find my model ...in your laundry room ... -
Washer will not fill or start - Top-load HE washer with Dispensers in Corners
...Pause/Cancel button to the load once the washer started . The washer impeller (plate at the electrical outlet? Check to see if a fuse has ... on a fuse box, check to the washer and turned on this washer should seem low because this washer work differently than ...correct amount of water. Is the indicator on ? Re-select your Bravos washer functions. This is not in Corners washer ...
Similar Questions

Start Button Problem
when I pushed the start button it starts but shuts off as soon as I released the button after that I...
when I pushed the start button it starts but shuts off as soon as I released the button after that I...
(Posted by Anonymous-149752 9 years ago)

How To Replace A Thermal Fuse On A Maytag Bravos Medb850
(Posted by maadeto 9 years ago)

How To Check Thermal Fuse Maytag Centennial Dryer
(Posted by jimcque 10 years ago)

Medb850wq0 Model.
all lights on panal work except digital timer. when I rotate selector knob timer does nothing. all o...
all lights on panal work except digital timer. when I rotate selector knob timer does nothing. all o...
(Posted by mkranch 11 years ago)