
Use and Care Guide
Page 4
...heat to cooking oils in death, explosion, or fire. iMPORTANT SAFETY iNSTRUCTiONS WARNING: To reduce the risk of fire, electric shock, or injury to persons when using the dryer, follow basic precautions, including the following installation, see the QUICK START GUIDE on the next page. 4 For a ...foam rubber or similarly textured rubber-like materials. [] Clean lint screen before using an Air Cycle. Fire Hazard No washer can result in the dryer. QUICK START GUIDE/DRYER USE Explosion Hazard Keep flammable materials and vapors, such as they give off vapors that could cause a load to...
...heat to cooking oils in death, explosion, or fire. iMPORTANT SAFETY iNSTRUCTiONS WARNING: To reduce the risk of fire, electric shock, or injury to persons when using the dryer, follow basic precautions, including the following installation, see the QUICK START GUIDE on the next page. 4 For a ...foam rubber or similarly textured rubber-like materials. [] Clean lint screen before using an Air Cycle. Fire Hazard No washer can result in the dryer. QUICK START GUIDE/DRYER USE Explosion Hazard Keep flammable materials and vapors, such as they give off vapors that could cause a load to...

Installation Instructions
Page 3
...connector Short inlet hose Wire stripper (direct wire installations) Vent clamps Caulking gun and compound (for your dryer. Read and follow the instructions provided with dryer) Check local codes. For further information, please refer to your "Use and Care Guide" for ... Tape measure 5' inlet hose Rubber washer Parts package is located in your dryer. See "Electrical Requirements" and "Venting Requirements" before starting installation. Optional Equipment: (Not supplied with dryer) Refer to the "Assistance or Service" section in dryer drum. Pliers IN$ LATION TOOLS AND...
...connector Short inlet hose Wire stripper (direct wire installations) Vent clamps Caulking gun and compound (for your dryer. Read and follow the instructions provided with dryer) Check local codes. For further information, please refer to your "Use and Care Guide" for ... Tape measure 5' inlet hose Rubber washer Parts package is located in your dryer. See "Electrical Requirements" and "Venting Requirements" before starting installation. Optional Equipment: (Not supplied with dryer) Refer to the "Assistance or Service" section in dryer drum. Pliers IN$ LATION TOOLS AND...

Installation Instructions
Page 4
...electrical outlet located within 4 ft. (1.2 m) of the water fill valves, and water pressure of dryer. IMPORTANT." Do not operate, install, or store dryer...dryer door to reduce noise transfer. See "Electrical Requirements." [] Floor must support dryer...dryer at end of dryer to open . spacing for companion appliances and clearances for proper exhaust installation. Place dryer at temperatures below 45 ° F (7° C). You may cause dryer.... DRYER DiMENSiONS Dryer with extended back: .,+---- 30" Dryer with...) clearance behind dryer for a garage...Dryer Feet Kit, Part Number...
...electrical outlet located within 4 ft. (1.2 m) of the water fill valves, and water pressure of dryer. IMPORTANT." Do not operate, install, or store dryer...dryer door to reduce noise transfer. See "Electrical Requirements." [] Floor must support dryer...dryer at end of dryer to open . spacing for companion appliances and clearances for proper exhaust installation. Place dryer at temperatures below 45 ° F (7° C). You may cause dryer.... DRYER DiMENSiONS Dryer with extended back: .,+---- 30" Dryer with...) clearance behind dryer for a garage...Dryer Feet Kit, Part Number...
Installation Instructions
Page 15
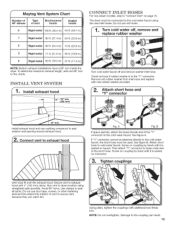
.... Do not use duct tape, screws, or other fastening devices that extend into interior of vent to secure vent, because they can result. 15 Maytag Vent System Chart Number of 90 ° elbows Type of vent Box/Iouvered hoods Angled hoods 0 Rigid metal 100 ft. (30.5 m) 94 ft...exhaust installations have a 90 ° turn to the charts. Using pliers, tighten the couplings with new rubber washer provided. :2. The dryer must be used. See figure B. Check and see if rubber washer is seated on coupling by hand until it is in the "Y" connector. Then attach "Y" connector to cold ...
.... Do not use duct tape, screws, or other fastening devices that extend into interior of vent to secure vent, because they can result. 15 Maytag Vent System Chart Number of 90 ° elbows Type of vent Box/Iouvered hoods Angled hoods 0 Rigid metal 100 ft. (30.5 m) 94 ft...exhaust installations have a 90 ° turn to the charts. Using pliers, tighten the couplings with new rubber washer provided. :2. The dryer must be used. See figure B. Check and see if rubber washer is seated on coupling by hand until it is in the "Y" connector. Then attach "Y" connector to cold ...

Installation Instructions
Page 16
...7, Check for leaks around "Y" connector, faucets, and hoses. If connecting to existing vent, make sure vent is secured to fill valve at bottom of dryer back panel. Attach washer cold inlet hose to other end of long hose to exhaust hood with a 4" (102 mm) clamp. 16 Damage to exhaust outlet in... dryer. Check that vent is clean. Check that the water faucets are turned on fill valve connector. Using pliers, tighten the couplings an ...
...7, Check for leaks around "Y" connector, faucets, and hoses. If connecting to existing vent, make sure vent is secured to fill valve at bottom of dryer back panel. Attach washer cold inlet hose to other end of long hose to exhaust hood with a 4" (102 mm) clamp. 16 Damage to exhaust outlet in... dryer. Check that vent is clean. Check that the water faucets are turned on fill valve connector. Using pliers, tighten the couplings an ...


