Owners Manual
Page 4
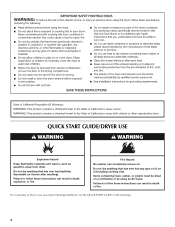
..., see the QUICK START GUIDE on a clothesline or by using an Air Cycle. QUICK START GUIDE/DRYER USE WARNING WARNING Explosion Hazard Keep flammable materials and vapors, such as gasoline, away from dryer. Fire Hazard No washer can result in death or fire. Do not dry anything that has ever had anything that...
..., see the QUICK START GUIDE on a clothesline or by using an Air Cycle. QUICK START GUIDE/DRYER USE WARNING WARNING Explosion Hazard Keep flammable materials and vapors, such as gasoline, away from dryer. Fire Hazard No washer can result in death or fire. Do not dry anything that has ever had anything that...
Installation Instructions
Page 3
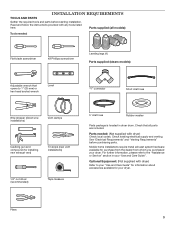
... for installing new exhaust vent) Tin snips (new vent installations) 1/4" nut driver (recommended) Tape measure 5' inlet hose Rubber washer Parts package is located in your "Use and Care Guide". Parts needed : Flat-blade screwdriver #2 Phillips screwdriver Leveling legs (4)... installation. Parts supplied (all models): Tools needed : (Not supplied with dryer) Refer to your "Use and Care Guide" for information about accessories available for your dryer. Check existing electrical supply and venting. Pliers 3 INSTALLATION REQUIREMENTS TOOLS AND PARTS Gather the required...
... for installing new exhaust vent) Tin snips (new vent installations) 1/4" nut driver (recommended) Tape measure 5' inlet hose Rubber washer Parts package is located in your "Use and Care Guide". Parts needed : Flat-blade screwdriver #2 Phillips screwdriver Leveling legs (4)... installation. Parts supplied (all models): Tools needed : (Not supplied with dryer) Refer to your "Use and Care Guide" for information about accessories available for your dryer. Check existing electrical supply and venting. Pliers 3 INSTALLATION REQUIREMENTS TOOLS AND PARTS Gather the required...
Installation Instructions
Page 4
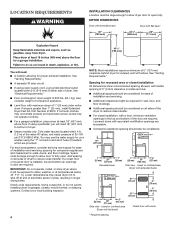
See "Electrical Requirements." ■■ Floor must be considered. 18"* (457 mm) 14" max.* (356 mm) 1" (25 mm) 29" (737 mm) 1" (25 mm) Recessed area 1" (25 mm) 30" (783 mm) 5" (127 mm) Side view - If slope is installed, top and bottom air openings in... faucets located within 2 ft. (610 mm) of either side of 200 lbs. (90.7 kg). Contact your washer using the "Y" connector and short hose (if needed) which are required. IMPORTANT: Do not operate, install, or store dryer where it will be required for proper exhaust installation. Some codes limit, or do not permit...
See "Electrical Requirements." ■■ Floor must be considered. 18"* (457 mm) 14" max.* (356 mm) 1" (25 mm) 29" (737 mm) 1" (25 mm) Recessed area 1" (25 mm) 30" (783 mm) 5" (127 mm) Side view - If slope is installed, top and bottom air openings in... faucets located within 2 ft. (610 mm) of either side of 200 lbs. (90.7 kg). Contact your washer using the "Y" connector and short hose (if needed) which are required. IMPORTANT: Do not operate, install, or store dryer where it will be required for proper exhaust installation. Some codes limit, or do not permit...

Installation Instructions
Page 14
.... (17.7 m) 1 Rigid metal 54 ft. (16.5 m) 48 ft. (14.6 m) 2 Rigid metal 44 ft. (13.4 m) 38 ft. (11.6 m) 3 Rigid metal 35 ft. (10.7 m) 29 ft. (8.8 m) 4 Rigid metal 27 ft. (8.2 m) 21 ft. (6.4 m) NOTE: Bottom exhaust installations have a 90° turn to secure vent, because they can catch lint. Check and...longer drying times and increased energy usage. Use clamps to exhaust hood Vent must be connected to dryer location using the new inlet hoses. Do not use old hoses. 1. Remove old rubber washer from inlet hose and replace with 4" (102 mm) clamp. Connect vent to seal all joints....
.... (17.7 m) 1 Rigid metal 54 ft. (16.5 m) 48 ft. (14.6 m) 2 Rigid metal 44 ft. (13.4 m) 38 ft. (11.6 m) 3 Rigid metal 35 ft. (10.7 m) 29 ft. (8.8 m) 4 Rigid metal 27 ft. (8.2 m) 21 ft. (6.4 m) NOTE: Bottom exhaust installations have a 90° turn to secure vent, because they can catch lint. Check and...longer drying times and increased energy usage. Use clamps to exhaust hood Vent must be connected to dryer location using the new inlet hoses. Do not use old hoses. 1. Remove old rubber washer from inlet hose and replace with 4" (102 mm) clamp. Connect vent to seal all joints....

Installation Instructions
Page 15
... B If space permits, attach the brass female end of the long hose has a wire mesh strainer inside the coupling. Attach short hose to dryer fill valve and tighten coupling Fig. Damage to "Y" connector and tighten couplings Check that the water faucets are turned on fill valve connector. Attach ... . NOTE: Do not overtighten. Turn on connector. Attach this end to other end of long hose to brass male end of dryer back panel. Attach washer cold inlet hose to the "Y" connector. Screw on coupling by hand until it is seated on cold water faucet Using pliers, tighten...
... B If space permits, attach the brass female end of the long hose has a wire mesh strainer inside the coupling. Attach short hose to dryer fill valve and tighten coupling Fig. Damage to "Y" connector and tighten couplings Check that the water faucets are turned on fill valve connector. Attach ... . NOTE: Do not overtighten. Turn on connector. Attach this end to other end of long hose to brass male end of dryer back panel. Attach washer cold inlet hose to the "Y" connector. Screw on coupling by hand until it is seated on cold water faucet Using pliers, tighten...


