Use & Care Guide
Page 4
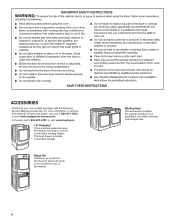
.... Stack Kit If space is at 1-800-901-2042, or visit: www.maytag.com/accessories. ACCESSORIES Customize your dealer, call 1-800-807-6777, or visit: www.maytag.ca 15" Pedestal Color-matched pedestals raise the washer and dryer to be installed on options and ordering, contact your new... washer and dryer with the following genuine Maytag accessories. In Canada, call us at a premium, the stack ...
.... Stack Kit If space is at 1-800-901-2042, or visit: www.maytag.com/accessories. ACCESSORIES Customize your dealer, call 1-800-807-6777, or visit: www.maytag.ca 15" Pedestal Color-matched pedestals raise the washer and dryer to be installed on options and ordering, contact your new... washer and dryer with the following genuine Maytag accessories. In Canada, call us at a premium, the stack ...

Installation Guide
Page 3
... needed (steam models): Utility knife Tape measure Level Pliers Caulking gun and compound (for installing new exhaust vent) 2' (0.6 m) inlet hose 5' (1.52 m) inlet hose and rubber washer Additional parts may be at least 4 ft. (1.22 m) long. NOTE: Do not use with upturned ends. ■■A UL listed strain relief.
... needed (steam models): Utility knife Tape measure Level Pliers Caulking gun and compound (for installing new exhaust vent) 2' (0.6 m) inlet hose 5' (1.52 m) inlet hose and rubber washer Additional parts may be at least 4 ft. (1.22 m) long. NOTE: Do not use with upturned ends. ■■A UL listed strain relief.

Installation Guide
Page 4
Lower temperatures may use the water supply for your washer using the "Y" connector and short hose (if needed) which are required. Installation Clearances For each arrangement, consider allowing more space for walls, doors, and floor ...
Lower temperatures may use the water supply for your washer using the "Y" connector and short hose (if needed) which are required. Installation Clearances For each arrangement, consider allowing more space for walls, doors, and floor ...
Installation Guide
Page 15
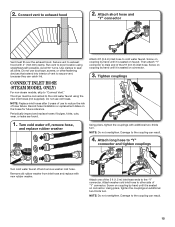
...dryer must fit over the exhaust hood. Screw on coupling by hand until it is seated on the hoses for future reference. Remove old rubber washer from inlet hose and replace with 4" (102 mm) clamp. Using pliers, tighten the couplings an additional two-thirds turn . 2. Avoid 90°...; turns. Record hose installation or replacement dates on connector. 3. NOTE: Do not overtighten. Secure vent to exhaust hood with new rubber washer. Do not use to reduce the risk of the 5 ft (1.5 m) inlet hose ends to secure vent, because they can catch lint. Periodically inspect ...
...dryer must fit over the exhaust hood. Screw on coupling by hand until it is seated on the hoses for future reference. Remove old rubber washer from inlet hose and replace with 4" (102 mm) clamp. Using pliers, tighten the couplings an additional two-thirds turn . 2. Avoid 90°...; turns. Record hose installation or replacement dates on connector. 3. NOTE: Do not overtighten. Secure vent to exhaust hood with new rubber washer. Do not use to reduce the risk of the 5 ft (1.5 m) inlet hose ends to secure vent, because they can catch lint. Periodically inspect ...


