Specification Sheet
Page 1
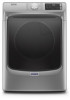
... Duty Normal Quick Dry Regular Sanitize Steam Refresh Timed Dry Towels Whites Wrinkle Control Control Lock Cycle Signal Reduce Static Steam Wrinkle Prevent Wrinkle Prevent w/Steam 38-1/8" x 27" x 30-11/16" 50-11/16" Maximum Vent Length Venting Direction Ventless 64' Left, Right, Bottom, Rear No Reference Material Install Guide Use & Care Guide Warranty *Results may vary based on select Maytag® washers to get clothes ready in no time. Specifications subject to help evenly dry loads. All rights reserved. Front Load Electric Dryer MED6630H Chrome Shadow...
... Duty Normal Quick Dry Regular Sanitize Steam Refresh Timed Dry Towels Whites Wrinkle Control Control Lock Cycle Signal Reduce Static Steam Wrinkle Prevent Wrinkle Prevent w/Steam 38-1/8" x 27" x 30-11/16" 50-11/16" Maximum Vent Length Venting Direction Ventless 64' Left, Right, Bottom, Rear No Reference Material Install Guide Use & Care Guide Warranty *Results may vary based on select Maytag® washers to get clothes ready in no time. Specifications subject to help evenly dry loads. All rights reserved. Front Load Electric Dryer MED6630H Chrome Shadow...
Installation Instructions
Page 3
..., or gas fitter qualified or licensed by a qualified installer, service agency, or the gas supplier. The dryer must be listed. In the State of Massachusetts. Do not store or use shall be performed by the State of Massachusetts, the following installation instructions apply: I A flexible gas connector, when used, must conform with the National Fuel Gas Code, ANSI Z223.1/NFPA 54, or the Natural Gas and Propane Installation Code, CSA...
..., or gas fitter qualified or licensed by a qualified installer, service agency, or the gas supplier. The dryer must be listed. In the State of Massachusetts. Do not store or use shall be performed by the State of Massachusetts, the following installation instructions apply: I A flexible gas connector, when used, must conform with the National Fuel Gas Code, ANSI Z223.1/NFPA 54, or the Natural Gas and Propane Installation Code, CSA...

Installation Instructions
Page 4
...direct wire installations) 4 Rubber washer 5' (1.52 m) inlet hose Parts package is located in dryer drum. Check that opens to propane gas Parts supplied (all parts are included. INSTALLATION REQUIREMENTS Tools and Parts Gather the required tools and parts before starting installation. Parts needed (steam models): "Y" connector 2' (0.6 m) inlet hose Caulking gun and compound (new vent installations) Adjustable wrench that all models): Tape measure Pliers Utility knife Tin snips (new vent installations) Leveling legs (4) Parts needed (not supplied with a pedestal or a stack...
...direct wire installations) 4 Rubber washer 5' (1.52 m) inlet hose Parts package is located in dryer drum. Check that opens to propane gas Parts supplied (all parts are included. INSTALLATION REQUIREMENTS Tools and Parts Gather the required tools and parts before starting installation. Parts needed (steam models): "Y" connector 2' (0.6 m) inlet hose Caulking gun and compound (new vent installations) Adjustable wrench that all models): Tape measure Pliers Utility knife Tin snips (new vent installations) Leveling legs (4) Parts needed (not supplied with a pedestal or a stack...

Installation Instructions
Page 5
... wires that connect to bottom of automatic sensor cycles, resulting in an area where it will be exposed to water, weather, or at least 4 ft. (1.22 m) long. LOCATION REQUIREMENTS Check code requirements. See "Venting Requirements." ■■ A separate 15 or 20 A circuit for a gas dryer or 30 A circuit for proper exhaust installation. Maytag® Models IMPORTANT: Do not operate, install, or store dryer where it will need : ■■ A location allowing for an electric dryer. ■■ If using a pedestal...
... wires that connect to bottom of automatic sensor cycles, resulting in an area where it will be exposed to water, weather, or at least 4 ft. (1.22 m) long. LOCATION REQUIREMENTS Check code requirements. See "Venting Requirements." ■■ A separate 15 or 20 A circuit for a gas dryer or 30 A circuit for proper exhaust installation. Maytag® Models IMPORTANT: Do not operate, install, or store dryer where it will need : ■■ A location allowing for an electric dryer. ■■ If using a pedestal...

Installation Instructions
Page 6
.... Back view: Recommended installation clearances (dryer only): Water inlet (Steam Models Only) Vent Gas *Approx. NOTE: No other fuel-burning appliance can be at least twice as large as a dryer. For steam models only, inlet hose must be kinked. See "Venting Requirements." If a closet door or louvered door is allowed for exhaust vent with a door, minimum ventilation openings in mobile homes to reduce noise transfer. For further information, see "Assistance or Service...
.... Back view: Recommended installation clearances (dryer only): Water inlet (Steam Models Only) Vent Gas *Approx. NOTE: No other fuel-burning appliance can be at least twice as large as a dryer. For steam models only, inlet hose must be kinked. See "Venting Requirements." If a closet door or louvered door is allowed for exhaust vent with a door, minimum ventilation openings in mobile homes to reduce noise transfer. For further information, see "Assistance or Service...

Installation Instructions
Page 7
... have four 10-gauge copper wires and match a 4-wire receptacle of NEMA Type 10-30R. The 3-wire power supply cord, at least 4 ft. (1.22 m) long, must have a fuse in a location where grounding through the neutral conductors. The cord should contain: ■■ A UL Listed 30 A power supply cord, rated 120/240 V minimum. ELECTRICAL REQUIREMENTS - The National Electrical Code requires a 4-wire power supply connection for homes built after 1996, dryer circuits involved in remodeling after...
... have four 10-gauge copper wires and match a 4-wire receptacle of NEMA Type 10-30R. The 3-wire power supply cord, at least 4 ft. (1.22 m) long, must have a fuse in a location where grounding through the neutral conductors. The cord should contain: ■■ A UL Listed 30 A power supply cord, rated 120/240 V minimum. ELECTRICAL REQUIREMENTS - The National Electrical Code requires a 4-wire power supply connection for homes built after 1996, dryer circuits involved in remodeling after...

Installation Instructions
Page 8
... required 4-wire, single-phase, 120/240 V, 60 Hz, AC-only electrical supply on a separate 30 A circuit, fused on both sides of electric shock. A time-delay fuse or circuit breaker is recommended. This dryer is also recommended that you use Power Supply Cord Replacement Part Number 8529008. 4-wire receptacle (14-30R) For further information, please reference service numbers located in a risk of the line. latest edition and all local codes and ordinances. A time-delay fuse or circuit breaker...
... required 4-wire, single-phase, 120/240 V, 60 Hz, AC-only electrical supply on a separate 30 A circuit, fused on both sides of electric shock. A time-delay fuse or circuit breaker is recommended. This dryer is also recommended that you use Power Supply Cord Replacement Part Number 8529008. 4-wire receptacle (14-30R) For further information, please reference service numbers located in a risk of the line. latest edition and all local codes and ordinances. A time-delay fuse or circuit breaker...

Installation Instructions
Page 9
... . Gas shut-off valve must be easy to do not use with appropriate conversion. ■■ Your dryer must be easy to flare adapter fitting C. 1/8" NPT minimum plugged tapping D. 1/2" NPT gas supply line E. In the U.S.A.: An individual manual shut-off valve †®TEFLON is recommended that resist the action of the supply line is located on the model/serial rating plate for opening and closing . Propane Gas Conversion: IMPORTANT: Conversion must...
... . Gas shut-off valve must be easy to do not use with appropriate conversion. ■■ Your dryer must be easy to flare adapter fitting C. 1/8" NPT minimum plugged tapping D. 1/2" NPT gas supply line E. In the U.S.A.: An individual manual shut-off valve †®TEFLON is recommended that resist the action of the supply line is located on the model/serial rating plate for opening and closing . Propane Gas Conversion: IMPORTANT: Conversion must...

Installation Instructions
Page 19
... to exhaust out the right side, left side (all models except long vent), or through the bottom. Failure to follow these instructions can be securely fastened to connect elbows H. If you prefer, you may contact your local dealer. Standard rear offset exhaust installation B. Dryer B. Terminate exhaust vent outside. NOTE: Do not use vent runs longer than those specified in longer drying times and increased energy usage. Left- Standard Vent System Chart Number...
... to exhaust out the right side, left side (all models except long vent), or through the bottom. Failure to follow these instructions can be securely fastened to connect elbows H. If you prefer, you may contact your local dealer. Standard rear offset exhaust installation B. Dryer B. Terminate exhaust vent outside. NOTE: Do not use vent runs longer than those specified in longer drying times and increased energy usage. Left- Standard Vent System Chart Number...
Installation Instructions
Page 23
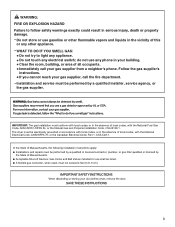
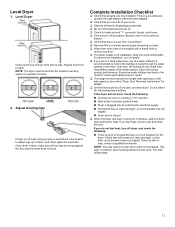
... a Timed Dry heated cycle and start of dryer from front to operate correctly. Repeat from side to remove any tape remaining on . ‰‰Check for the moisture sensing system to back. Level dryer Place level here Check levelness of its first cycle. Gas Models: ‰‰Plug into a grounded outlet. Over time, the buildup of lime scale may clog different parts of /recycle all four legs are set...
... a Timed Dry heated cycle and start of dryer from front to operate correctly. Repeat from side to remove any tape remaining on . ‰‰Check for the moisture sensing system to back. Level dryer Place level here Check levelness of its first cycle. Gas Models: ‰‰Plug into a grounded outlet. Over time, the buildup of lime scale may clog different parts of /recycle all four legs are set...

Quick Reference Sheet
Page 1
... cycle, the Check Vent light will light during Sensor Cycles to indicate that has ever had any time. 2. Step 5. See the online "Cycle Guide" for better fabric care and energy savings. Appearance may be dried on the load size and type. When selecting a setting or option, simply touch its settings will light up to the Highest temperature setting. During the sensing phase at least 3 seconds. Sensing The Sensing indicator will come on if a blocked vent...
... cycle, the Check Vent light will light during Sensor Cycles to indicate that has ever had any time. 2. Step 5. See the online "Cycle Guide" for better fabric care and energy savings. Appearance may be dried on the load size and type. When selecting a setting or option, simply touch its settings will light up to the Highest temperature setting. During the sensing phase at least 3 seconds. Sensing The Sensing indicator will come on if a blocked vent...
Owners Manual
Page 2
... are very important. "Risk of Fire" − Clothes dryer installation must be easily crushed, and trap lint. Flexible venting materials are not followed. We have provided many important safety messages in this manual and on your appliance. WARNING You can kill or hurt you don't follow instructions. If flexible metal duct is the safety alert symbol. These words mean...
... are very important. "Risk of Fire" − Clothes dryer installation must be easily crushed, and trap lint. Flexible venting materials are not followed. We have provided many important safety messages in this manual and on your appliance. WARNING You can kill or hurt you don't follow instructions. If flexible metal duct is the safety alert symbol. These words mean...
Owners Manual
Page 6
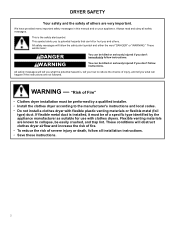
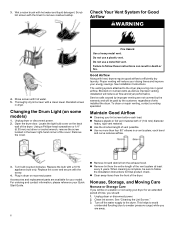
... power. 2. Check Your Vent System for an extended period of who installed the dryer. Changing the Drum Light (on the back wall of the cover. Open the dryer door. Maintain Good Airflow � Cleaning your lint screen before each bend and curve reduces airflow. 3. Replace the bulb with the screw. 4. When cleaning is complete, be on vacation or not using your model. 3. Unplug dryer or disconnect power. 2. Locate the light bulb cover on some models) 1. Remove the cover. See Installation Instructions. Replace...
... power. 2. Check Your Vent System for an extended period of who installed the dryer. Changing the Drum Light (on the back wall of the cover. Open the dryer door. Maintain Good Airflow � Cleaning your lint screen before each bend and curve reduces airflow. 3. Replace the bulb with the screw. 4. When cleaning is complete, be on vacation or not using your model. 3. Unplug dryer or disconnect power. 2. Locate the light bulb cover on some models) 1. Remove the cover. See Installation Instructions. Replace...
Owners Manual
Page 7
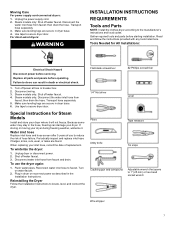
... locate, level, and connect the dryer. Flush water pipes. Tools Needed for Steam Models Install and store your dryer. Steam models only: Shut off water faucet. Reconnect water inlet hose to secure dryer door. Unplug the power supply cord. 2. Read and follow the instructions provided with any tools listed here. Make sure leveling legs are found. Turn off water faucet. 3. Transport hose separately. 5. Water inlet hose Replace inlet hose and hose screen after 5 years of use the dryer again: 1. Transport hose separately. 3. Replace all parts...
... locate, level, and connect the dryer. Flush water pipes. Tools Needed for Steam Models Install and store your dryer. Steam models only: Shut off water faucet. Reconnect water inlet hose to secure dryer door. Unplug the power supply cord. 2. Read and follow the instructions provided with any tools listed here. Make sure leveling legs are found. Turn off water faucet. 3. Transport hose separately. 5. Water inlet hose Replace inlet hose and hose screen after 5 years of use the dryer again: 1. Transport hose separately. 3. Replace all parts...
Owners Manual
Page 8
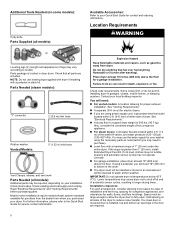
... washing). Parts Needed (steam models): "Y" connector 2' (0.6 m) inlet hose Rubber washer Vented Models: 5' (1.52 m) inlet hose Vent Clamps, elbows, and vent work Parts Needed (all models): Additional parts may cause dryer not to shut off at temperatures below 45°F (7°C). For further information, please refer to the Quick Start Guide for ease of 200 lbs. (90.7 kg). Check code requirements. Additional Tools Needed (on all sides of the dryer to reduce noise transfer. Location Requirements WARNING Leveling legs (4) (Length and appearance...
... washing). Parts Needed (steam models): "Y" connector 2' (0.6 m) inlet hose Rubber washer Vented Models: 5' (1.52 m) inlet hose Vent Clamps, elbows, and vent work Parts Needed (all models): Additional parts may cause dryer not to shut off at temperatures below 45°F (7°C). For further information, please refer to the Quick Start Guide for ease of 200 lbs. (90.7 kg). Check code requirements. Additional Tools Needed (on all sides of the dryer to reduce noise transfer. Location Requirements WARNING Leveling legs (4) (Length and appearance...

Owners Manual
Page 9
... steam models only, inlet hose must end in remodeling after 1996, dryer circuits involved in ring terminals or spade terminals with equivalent ventilation openings are required for purchase from the external ground connector (green screw), and secured under the neutral terminal (center or white wire) of the door are acceptable. � Companion appliance spacing should contain: � A UL-listed 30 A power supply cord, rated 120/240 V minimum. Electrical Requirements...
... steam models only, inlet hose must end in remodeling after 1996, dryer circuits involved in ring terminals or spade terminals with equivalent ventilation openings are required for purchase from the external ground connector (green screw), and secured under the neutral terminal (center or white wire) of the door are acceptable. � Companion appliance spacing should contain: � A UL-listed 30 A power supply cord, rated 120/240 V minimum. Electrical Requirements...

Owners Manual
Page 10
... all local codes. Check with a qualified electrician or service representative if you are in accordance with a UL-listed and/or CSA International Certified Power Cord intended to do not use an extension cord. GROUNDING INSTRUCTIONS For a grounded, cord-connected appliance: This appliance must match power supply (4-wire or 3-wire) and be plugged into an appropriate outlet that is properly grounded. A time-delay fuse or circuit breaker is 5 ft. (1.52 m) long. For...
... all local codes. Check with a qualified electrician or service representative if you are in accordance with a UL-listed and/or CSA International Certified Power Cord intended to do not use an extension cord. GROUNDING INSTRUCTIONS For a grounded, cord-connected appliance: This appliance must match power supply (4-wire or 3-wire) and be plugged into an appropriate outlet that is properly grounded. A time-delay fuse or circuit breaker is 5 ft. (1.52 m) long. For...
Owners Manual
Page 17
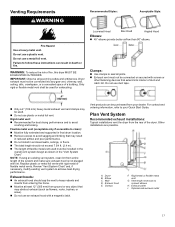
... your Quick Start Guide. IMPORTANT: Observe all joints. � Exhaust vent must not be connected or secured with a magnetic latch. Replace plastic or metal foil vents with lint. Exhaust outlet I. Venting Requirements WARNING Recommended Styles: Acceptable Style: Fire Hazard Use a heavy metal vent. Failure to your dealer. Exhaust hood E. Optional side exhaust outlet 17 NOTE: If using an existing vent system, clean lint from the rear of fire, this dryer MUST BE EXHAUSTED OUTDOORS...
... your Quick Start Guide. IMPORTANT: Observe all joints. � Exhaust vent must not be connected or secured with a magnetic latch. Replace plastic or metal foil vents with lint. Exhaust outlet I. Venting Requirements WARNING Recommended Styles: Acceptable Style: Fire Hazard Use a heavy metal vent. Failure to your dealer. Exhaust hood E. Optional side exhaust outlet 17 NOTE: If using an existing vent system, clean lint from the rear of fire, this dryer MUST BE EXHAUSTED OUTDOORS...

Owners Manual
Page 19
... seated on faucet. Install Vent System 1. Install exhaust hood 1. Connect vent to exhaust hood Attach 2 ft. (0.6 m) inlet hose to "Connect Vent." Do not use duct tape, screws, or other fastening devices that a dryer is allowed 40 Ft. (12.2 m) of length. NOTE: Replace inlet hoses after 5 years of hose failure. Turn cold water off, remove and replace rubber washer Turn cold water faucet off and remove washer inlet hose. Attach short hose and "Y" connector Install exhaust hood and use to reduce the risk...
... seated on faucet. Install Vent System 1. Install exhaust hood 1. Connect vent to exhaust hood Attach 2 ft. (0.6 m) inlet hose to "Connect Vent." Do not use duct tape, screws, or other fastening devices that a dryer is allowed 40 Ft. (12.2 m) of length. NOTE: Replace inlet hoses after 5 years of hose failure. Turn cold water off, remove and replace rubber washer Turn cold water faucet off and remove washer inlet hose. Attach short hose and "Y" connector Install exhaust hood and use to reduce the risk...
Owners Manual
Page 21
... part replacement or repair. � To change the door swing from front to a leftside opening, see what was skipped. � Check that both fuses are set in the dryer. Do not select Air Only temperature setting. If there is first used. This odor is common when heating element is still no heat, contact a qualified technician. NOTE: The dryer must be 2 household fuses or circuit breakers for levelness. If the dryer will not start dryer...
... part replacement or repair. � To change the door swing from front to a leftside opening, see what was skipped. � Check that both fuses are set in the dryer. Do not select Air Only temperature setting. If there is first used. This odor is common when heating element is still no heat, contact a qualified technician. NOTE: The dryer must be 2 household fuses or circuit breakers for levelness. If the dryer will not start dryer...


