
Owners Manual
Page 2
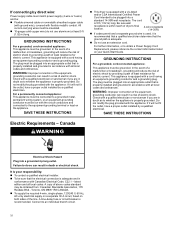
...Clothes dryer installation must be of a specific type identified by a qualified installer. − Install the clothes dryer according to the manufacturer's instructions and local codes. − Do not install a clothes dryer with clothes dryers. Always read and obey all installation instructions. − Save these instructions. 2 "Risk of others . This is installed, it must be easily crushed, and trap lint... important safety messages in this manual and on your appliance. All safety messages will follow instructions. If flexible metal duct is the safety alert symbol....
...Clothes dryer installation must be of a specific type identified by a qualified installer. − Install the clothes dryer according to the manufacturer's instructions and local codes. − Do not install a clothes dryer with clothes dryers. Always read and obey all installation instructions. − Save these instructions. 2 "Risk of others . This is installed, it must be easily crushed, and trap lint... important safety messages in this manual and on your appliance. All safety messages will follow instructions. If flexible metal duct is the safety alert symbol....

Owners Manual
Page 3
... could cause a load to contaminated loads, the final part of a tumble dryer cycle occurs without heat (cool down period). SAVE THESE INSTRUCTIONS IMPORTANT SAFETY INSTRUCTIONS WHEN DISCARDING OR STORING YOUR OLD CLOTHES DRYER, REMOVE THE DOOR. To reduce the risk of the appliance or attempt any servicing unless specifically recommended in the usermaintenance instructions or in published user-repair instructions that you understand and have been previously cleaned in, washed...
... could cause a load to contaminated loads, the final part of a tumble dryer cycle occurs without heat (cool down period). SAVE THESE INSTRUCTIONS IMPORTANT SAFETY INSTRUCTIONS WHEN DISCARDING OR STORING YOUR OLD CLOTHES DRYER, REMOVE THE DOOR. To reduce the risk of the appliance or attempt any servicing unless specifically recommended in the usermaintenance instructions or in published user-repair instructions that you understand and have been previously cleaned in, washed...

Owners Manual
Page 4
... on the LCD screen. This device must not be on a circuit different from that necessary for Connected Appliances Only IMPORTANT: Proper installation of the device. To reduce potential radio interference to operate the equipment. Internet Connectivity Guide for successful communication. Be sure to read and follow the installation instructions that a minimum separation distance of the FCC Rules. Connectivity requires Wi-Fi...
... on the LCD screen. This device must not be on a circuit different from that necessary for Connected Appliances Only IMPORTANT: Proper installation of the device. To reduce potential radio interference to operate the equipment. Internet Connectivity Guide for successful communication. Be sure to read and follow the installation instructions that a minimum separation distance of the FCC Rules. Connectivity requires Wi-Fi...

Owners Manual
Page 5
... dryer operation. Use a microfiber cloth and very warm water in the door opening or the top of dye. These stains are not harmful to avoid transfer of the dryer depending on model. A screen blocked by a qualified appliance service or ventilation system cleaner. Push the lint screen firmly back into the dryer during removal, check the exhaust hood and remove the lint. NOTE: Garments that would block the airflow for a garage installation. The screen...
... dryer operation. Use a microfiber cloth and very warm water in the door opening or the top of dye. These stains are not harmful to avoid transfer of the dryer depending on model. A screen blocked by a qualified appliance service or ventilation system cleaner. Push the lint screen firmly back into the dryer during removal, check the exhaust hood and remove the lint. NOTE: Garments that would block the airflow for a garage installation. The screen...

Owners Manual
Page 6
... the exhaust hood. � Remove lint from the front of the dryer. Changing the Drum Light (on some models)" for details. Open the dryer door. each load. � Replace plastic or foil vent material with base trim, remove base trim before servicing. Plug in good airflow. The venting system attached to follow the Installation Instructions for Good Airflow WARNING Fire Hazard Use a heavy metal vent. Maintain Good Airflow � Cleaning your energy savings. Steam models only: Shut...
... the exhaust hood. � Remove lint from the front of the dryer. Changing the Drum Light (on some models)" for details. Open the dryer door. each load. � Replace plastic or foil vent material with base trim, remove base trim before servicing. Plug in good airflow. The venting system attached to follow the Installation Instructions for Good Airflow WARNING Fire Hazard Use a heavy metal vent. Maintain Good Airflow � Cleaning your energy savings. Steam models only: Shut...

Owners Manual
Page 7
... locate, level, and connect the dryer. NOTE: Do not use leveling legs supplied with dryer if installing with any tools listed here. Parts Needed (steam models): "Y" connector Rubber washer Pliers Tape measure 2' (0.6 m) inlet hose 5' (1.52 m) inlet hose 7 Because some models): Putty knife Parts Supplied (all parts are found. Periodically inspect and replace inlet hose if bulges, kinks, cuts, wear, or leaks are included. Gather required tools and parts before starting installation. Shut off water faucet. 3. Disconnect water...
... locate, level, and connect the dryer. NOTE: Do not use leveling legs supplied with dryer if installing with any tools listed here. Parts Needed (steam models): "Y" connector Rubber washer Pliers Tape measure 2' (0.6 m) inlet hose 5' (1.52 m) inlet hose 7 Because some models): Putty knife Parts Supplied (all parts are found. Periodically inspect and replace inlet hose if bulges, kinks, cuts, wear, or leaks are included. Gather required tools and parts before starting installation. Shut off water faucet. 3. Disconnect water...

Owners Manual
Page 8
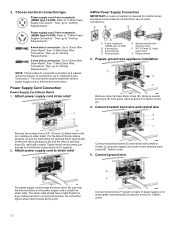
... vent work Parts Needed (not supplied with dryer): Additional parts may cause dryer not to shut off at end of automatic sensor cycles, resulting in longer drying times. Check local codes. Check existing electrical supply and venting. See "Electrical Requirements" and "Venting Requirements" before purchasing parts. For further information, please refer to the Quick Start Guide for your dryer. Available Accessories: Accessories and replacement parts are using power supply cord, a grounded electrical outlet located within 4 ft (1.2 m) of the water fill valves, and water pressure...
... vent work Parts Needed (not supplied with dryer): Additional parts may cause dryer not to shut off at end of automatic sensor cycles, resulting in longer drying times. Check local codes. Check existing electrical supply and venting. See "Electrical Requirements" and "Venting Requirements" before purchasing parts. For further information, please refer to the Quick Start Guide for your dryer. Available Accessories: Accessories and replacement parts are using power supply cord, a grounded electrical outlet located within 4 ft (1.2 m) of the water fill valves, and water pressure...

Owners Manual
Page 9
... choose a 4-wire power supply cord with a 3-wire electrical supply connection. The neutral conductor must be at least 4 ft (1.22 m) long, must end in mobile homes to introduce outside air into the dryer. For steam models only, inlet hose must be obtained from the external ground connector (green screw), and secured under the neutral terminal (center or white wire) of NEMA Type 10-30R. 9 Additional installation requirements This dryer is...
... choose a 4-wire power supply cord with a 3-wire electrical supply connection. The neutral conductor must be at least 4 ft (1.22 m) long, must end in mobile homes to introduce outside air into the dryer. For steam models only, inlet hose must be obtained from the external ground connector (green screw), and secured under the neutral terminal (center or white wire) of NEMA Type 10-30R. 9 Additional installation requirements This dryer is...
Owners Manual
Page 10
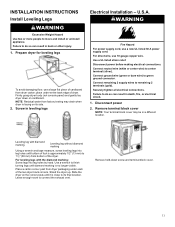
... is within reach of dryer's final 4-wire receptacle location. (14-30R) � If codes permit and a separate ground wire is used, it will reduce the risk of electric shock. Connect to do not use an extension cord. WARNING: Improper connection of the equipmentgrounding conductor can result in a risk of electric shock by a qualified electrician. A time-delay fuse or circuit breaker is your Quick Start Guide. In the event...
... is within reach of dryer's final 4-wire receptacle location. (14-30R) � If codes permit and a separate ground wire is used, it will reduce the risk of electric shock. Connect to do not use an extension cord. WARNING: Improper connection of the equipmentgrounding conductor can result in a risk of electric shock by a qualified electrician. A time-delay fuse or circuit breaker is your Quick Start Guide. In the event...
Owners Manual
Page 11
... connect the exhaust vent. Firmly grasp dryer body (not console panel) and gently lay dryer down screw and terminal block cover. 11 WARNING Fire Hazard For power supply cord, use 10 gauge copper wire. Failure to green ground connector. Remove terminal block cover NOTE: Your terminal block cover may drain when dryer is approximately 1/2" (13 mm) to center terminal (silver). Screw in a different location. Disconnect power before making electrical connections. Securely tighten all electrical connections. Connect ground wire (green or bare wire...
... connect the exhaust vent. Firmly grasp dryer body (not console panel) and gently lay dryer down screw and terminal block cover. 11 WARNING Fire Hazard For power supply cord, use 10 gauge copper wire. Failure to green ground connector. Remove terminal block cover NOTE: Your terminal block cover may drain when dryer is approximately 1/2" (13 mm) to center terminal (silver). Screw in a different location. Disconnect power before making electrical connections. Securely tighten all electrical connections. Connect ground wire (green or bare wire...
Owners Manual
Page 12
... a tight fit with the dryer cabinet and be used with upturned ends F. 3/4" (19 mm) UL-listed strain relief G. Then, go to "Venting Requirements." 4-wire direct connection: Go to "Direct Wire Strain Relief," then "4-Wire Direct Wire Connection," then, go to "Venting Requirements." 3-wire direct connection: Go to "Direct Wire Strain Relief", then "3-Wire Direct Wire Connection," then, go to "3-Wire Power Supply Connection". Power Supply Cord Connection Power Supply Cord Strain Relief 1. Ground prong D. Remove neutral bond wire (E) from a 3/4" (19 mm) UL-listed strain relief (UL marking...
... a tight fit with the dryer cabinet and be used with upturned ends F. 3/4" (19 mm) UL-listed strain relief G. Then, go to "Venting Requirements." 4-wire direct connection: Go to "Direct Wire Strain Relief," then "4-Wire Direct Wire Connection," then, go to "Venting Requirements." 3-wire direct connection: Go to "Direct Wire Strain Relief", then "3-Wire Direct Wire Connection," then, go to "3-Wire Power Supply Connection". Power Supply Cord Connection Power Supply Cord Strain Relief 1. Ground prong D. Remove neutral bond wire (E) from a 3/4" (19 mm) UL-listed strain relief (UL marking...
Owners Manual
Page 14
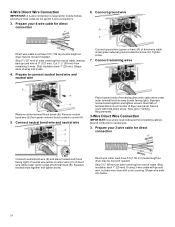
... m) of extra length so dryer may be moved if needed . Secure cover with outer covering. 4-Wire Direct Wire Connection IMPORTANT: A 4-wire connection is required for direct connection Connect neutral bond wire (E) and place hooked end (hook facing right) of neutral wire (white or center wire) (C) of direct wire cable under center screw of terminal block (B). Strip insulation back 1" (25 mm). Prepare to neutral wire. 3. Remove neutral bond wire (E) from end of remaining direct wire cable wires under outer terminal block screws (hooks facing right). Strip...
... m) of extra length so dryer may be moved if needed . Secure cover with outer covering. 4-Wire Direct Wire Connection IMPORTANT: A 4-wire connection is required for direct connection Connect neutral bond wire (E) and place hooked end (hook facing right) of neutral wire (white or center wire) (C) of direct wire cable under center screw of terminal block (B). Strip insulation back 1" (25 mm). Prepare to neutral wire. 3. Remove neutral bond wire (E) from end of remaining direct wire cable wires under outer terminal block screws (hooks facing right). Strip...

Owners Manual
Page 15
... wire) (C) of direct wire cable under center terminal block screw (B). Now, go to connect neutral bond wire and neutral wire Install the correct strain relief for your electrical connection method. 4. Remove neutral bond wire (E) from green external ground conductor screw (A). 2. Connect neutral bond wire and neutral wire Place hooked end of neutral wire (white or center) (C) of power supply cord or cable under center terminal block screw (B). Connect remaining wires Place hooked ends of dryer rear panel. Secure cover...
... wire) (C) of direct wire cable under center terminal block screw (B). Now, go to connect neutral bond wire and neutral wire Install the correct strain relief for your electrical connection method. 4. Remove neutral bond wire (E) from green external ground conductor screw (A). 2. Connect neutral bond wire and neutral wire Place hooked end of neutral wire (white or center) (C) of power supply cord or cable under center terminal block screw (B). Connect remaining wires Place hooked ends of dryer rear panel. Secure cover...

Owners Manual
Page 16
... entire length of the system before installing the dryer. � Make sure external exhaust hoods outside debris. � Replace plastic of duct and catch lint. Fire Hazard Use a heavy metal vent. Flexible metal vent (acceptable only if accessible to clean): � Must be fully extended and supported in final dryer location. � Remove excess to "Venting Requirements." Insert tab of terminal block cover into slot of fire, this dryer MUST BE EXHAUSTED OUTDOORS...
... entire length of the system before installing the dryer. � Make sure external exhaust hoods outside debris. � Replace plastic of duct and catch lint. Fire Hazard Use a heavy metal vent. Flexible metal vent (acceptable only if accessible to clean): � Must be fully extended and supported in final dryer location. � Remove excess to "Venting Requirements." Insert tab of terminal block cover into slot of fire, this dryer MUST BE EXHAUSTED OUTDOORS...

Owners Manual
Page 17
...'s exhaust cover kit. Terminate exhaust vent outside. Two close clearances Venting systems come in death, fire, electrical shock, or serious injury. Elbow C. wide models). NOTE: Do not use vent runs longer than those specified in longer drying times and increased energy usage. Vent System Chart Number of 90° turns or elbows Type of dryer. � Reduce performance, resulting in "Vent System Chart." Refer to Quick Start Guide for mobile home installations: Exhaust vent must be converted to connect...
...'s exhaust cover kit. Terminate exhaust vent outside. Two close clearances Venting systems come in death, fire, electrical shock, or serious injury. Elbow C. wide models). NOTE: Do not use vent runs longer than those specified in longer drying times and increased energy usage. Vent System Chart Number of 90° turns or elbows Type of dryer. � Reduce performance, resulting in "Vent System Chart." Refer to Quick Start Guide for mobile home installations: Exhaust vent must be converted to connect...

Owners Manual
Page 18
... type code located on the serial number plate in which the Installation Instructions do not address the vent length for the specific number of elbows required for future reference. Example: A Long Vent Model would be used. (The total vent system length includes all joints. Install exhaust hood Connect Inlet Hoses For vented, non-steam models, skip to dryer location using the new inlet hoses. Connect vent to exhaust hood with two 90° bends, the total allowable vent length would be connected to the cold water...
... type code located on the serial number plate in which the Installation Instructions do not address the vent length for the specific number of elbows required for future reference. Example: A Long Vent Model would be used. (The total vent system length includes all joints. Install exhaust hood Connect Inlet Hoses For vented, non-steam models, skip to dryer location using the new inlet hoses. Connect vent to exhaust hood with two 90° bends, the total allowable vent length would be connected to the cold water...
Owners Manual
Page 19
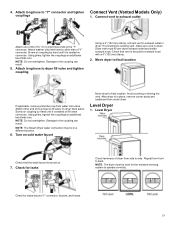
... location. 6. Level Dryer 1. NOTE: Do not overtighten. NOTE: The Steam Dryer water connection may be level for the moisture-sensing system to "Y" connector and tighten Connect Vent (Vented Models Only) couplings 1. Attach long hose to operate correctly. Move dryer to existing vent, make sure vent is in dryer. Turn on . 7. Check for leaks around "Y" connector, faucets, and hoses. 19 Using pliers, tighten the couplings an additional two-thirds turn . If connecting to final location If applicable, remove...
... location. 6. Level Dryer 1. NOTE: Do not overtighten. NOTE: The Steam Dryer water connection may be level for the moisture-sensing system to "Y" connector and tighten Connect Vent (Vented Models Only) couplings 1. Attach long hose to operate correctly. Move dryer to existing vent, make sure vent is in dryer. Turn on . 7. Check for leaks around "Y" connector, faucets, and hoses. 19 Using pliers, tighten the couplings an additional two-thirds turn . If connecting to final location If applicable, remove...

Owners Manual
Page 20
... using a wood block. Install and remove base trim (on some models) To Install: Place the skirt to see online "Dryer Door Reversal Instructions" for details. � Set the heat cycle for leaks around "Y" connector, faucet, and hoses. � Check dryer's final location. Complete Installation Checklist � Check that dryer is first used. If there is closed. � When the dryer has been running or "On" position. � Start button has been pushed firmly. � Dryer is plugged into an outlet...
... using a wood block. Install and remove base trim (on some models) To Install: Place the skirt to see online "Dryer Door Reversal Instructions" for details. � Set the heat cycle for leaks around "Y" connector, faucet, and hoses. � Check dryer's final location. Complete Installation Checklist � Check that dryer is first used. If there is closed. � When the dryer has been running or "On" position. � Start button has been pushed firmly. � Dryer is plugged into an outlet...

Cycle Guide
Page 1
...'s Owner's Manual, before operating this appliance. NORMAL Shirts, blouses, permanent press, synthetics, lightweight items. WRINKLE CONTROL Undergarments, blouses, lingerie, performance wear. Wrinkle Prevent Mute Cycle Signal Pet Pro Uses Medium heat as default to rearrange items for optimal drying. 1 Wrinkle Prevent Mute Cycle Signal Pet Pro Use for that cycle. do not overfill dryer drum. If there is time to dry large loads of oil on it is a power failure, settings...
...'s Owner's Manual, before operating this appliance. NORMAL Shirts, blouses, permanent press, synthetics, lightweight items. WRINKLE CONTROL Undergarments, blouses, lingerie, performance wear. Wrinkle Prevent Mute Cycle Signal Pet Pro Uses Medium heat as default to rearrange items for optimal drying. 1 Wrinkle Prevent Mute Cycle Signal Pet Pro Use for that cycle. do not overfill dryer drum. If there is time to dry large loads of oil on it is a power failure, settings...

Dimension Guide
Page 3
... extended) J Exhaust Duct from Side K Power Cord from Side (gas) L Power Cord Height (gas) M Gas Connection (With leveling legs not extended) N Gas Connection from Side O Strain Relief Height (elec) (With leveling legs fully extended) P Exhaust Duct Height (With leveling legs fully extended) Q Gas Connection (With leveling legs fully extended) R Exhaust Duct Height (With leveling legs not extended) S Water Inlet Height (on steam models only) T Water Inlet from Side (on steam models only) Gas Power Cord Length Power Cord Length (Canadian) in...
... extended) J Exhaust Duct from Side K Power Cord from Side (gas) L Power Cord Height (gas) M Gas Connection (With leveling legs not extended) N Gas Connection from Side O Strain Relief Height (elec) (With leveling legs fully extended) P Exhaust Duct Height (With leveling legs fully extended) Q Gas Connection (With leveling legs fully extended) R Exhaust Duct Height (With leveling legs not extended) S Water Inlet Height (on steam models only) T Water Inlet from Side (on steam models only) Gas Power Cord Length Power Cord Length (Canadian) in...


