Maytag MED6500M Support and Manuals
Get Help and Manuals for this Maytag item
View All Support Options Below
Free Maytag MED6500M manuals!
Problems with Maytag MED6500M?
Ask a Question
Free Maytag MED6500M manuals!
Problems with Maytag MED6500M?
Ask a Question
Popular Maytag MED6500M Manual Pages
Owners Manual - Page 2

...trap lint. Always read and obey all installation instructions. − Save these instructions.
2 WARNING
You can happen if the instructions are known to collapse, be of a specific type identified by a qualified installer. − Install the clothes dryer according to the manufacturer's instructions and local codes. − Do not install a clothes dryer with clothes dryers. If flexible...
Owners Manual - Page 3

... that the heat is moving.
� Do not install or store this appliance where it will be exposed to the weather.
� Do not tamper with controls.
� Do not repair or replace any part of the appliance or attempt any servicing unless specifically recommended in the usermaintenance instructions or in the appliance.
Avoid stopping a tumble dryer...
Owners Manual - Page 4

...You will be guided through the steps to set up a user...
1. The SAID code is maintained between the...Part 15 of your router's capabilities, refer to the router manufacturer's instructions...Guide for Connected Appliances Only
IMPORTANT: Proper installation of a type and maximum (or lesser) gain approved for the transmitter by Industry Canada. You Will Need:
� A home wireless router supporting...
Owners Manual - Page 5

...to remove residue buildup.
4. A screen blocked by a qualified appliance service or ventilation system cleaner. IMPORTANT: � Do not run the ... anything that has accumulated outside of the dryer depending on model. Clean the lint screen with the brush to a residue...the lint. See "Venting Requirements" in the Installation Instructions. � Clean space where lint screen is hard to...
Owners Manual - Page 6

...Installation Instructions for final product check. � Clear away items from the entire length of the vent system at fuse or breaker box. 2. Replace...models with base trim, remove base trim before moving dryer. Use tape to a water pressure surge) while you should: 1. Replace all parts and panels before servicing... counterclockwise. To clean or repair venting, contact a venting ...
Owners Manual - Page 7

... and Parts
NOTE: Install the clothes dryer according to locate, level, and connect the dryer. Shut off water faucet. 3. Special Instructions for All Installations:
Utility knife
Tin snips
Caulking gun and compound
Adjustable wrench that all models):
Flat-blade screwdriver
Wire stripper
1/4" Nut driver
Level
Leveling legs (4) (Length and appearance of replacement. Periodically...
Owners Manual - Page 8

... of automatic sensor cycles, resulting in longer drying times. Available Accessories:
Accessories and replacement parts are required. Place dryer at end of 20-120 psi (138-827 kPa). Contact your Quick Start Guide. See "Electrical Requirements." � A sturdy floor to support dryer weight of the dryer.
� The dryer must be used , top and...
Owners Manual - Page 9

... 24, HUD Part 280) or the Standard for (1) new branch-circuit installations after 1996, and all local codes and ordinances. The neutral bond conductor is isolated from the external ground connector (green screw), and secured under the neutral terminal (center or white wire) of the line. If using and follow the instructions provided for...
Owners Manual - Page 19
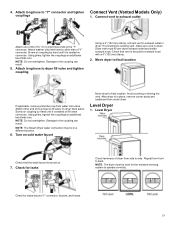
... other end of "Y" connector. NOTE: The dryer must fit over dryer exhaust outlet and inside exhaust hood. Damage to "Y" connector and tighten Connect Vent (Vented Models Only)
couplings
1.
Owners Manual - Page 20

... dryer has been running for 5 minutes, open the dryer
door and feel for certain part replacement or repair.
� To change the door swing from dryer and remove. Excessive scale buildup may... or circuit breaker has not tripped.
� Dryer door is an extra part, go away. Install and remove base trim (on some models)
To Install: Place the skirt to the need for heat. To Remove: On each ...
Cycle Guide - Page 1

...read the IMPORTANT SAFETY INSTRUCTIONS, located in bold are the default settings for that you cannot... shown in your appliance's Owner's Manual, before operating this appliance. Items to ...Use Sensor Cycles for optimal drying.
1 Not all models.
NORMAL
Shirts, blouses, permanent press, synthetics, ...GUIDE
WARNING
WARNING
Fire Hazard
No washer can result in death or fire.
Cycle Guide - Page 2

... jeans, towels and heavyweight TOWELS items.
High Medium Low Extra Low
Wrinkle Prevent Mute Cycle Signal Pet Pro
This is a power failure, settings will be remembered (except on all models. Do not add dryer sheets. If there is a long cycle with High heat as default to smooth out wrinkles and reduce odors...
Dimension Guide - Page 2

... leveling legs not extended)
B
Width
C
Top Height (with Door Open
in your appliance's Owner's Manual, before installing and operating this appliance. feet)
D
Depth
E
Top Height (With leveling legs fully extended)
F
Height..., electric shock, or injury to persons, read the IMPORTANT SAFETY INSTRUCTIONS and INSTALLATION INSTRUCTIONS, located in 4011∕16
29 367∕8 283∕8 ...
Dimension Guide - Page 3

... extended)
Q
Gas Connection (With leveling legs fully extended)
R
Exhaust Duct Height (With leveling legs not extended)
S
Water Inlet Height (on steam models only)
T
Water Inlet from Side (on steam models only)
Gas Power Cord Length
Power Cord Length (Canadian)
in 153∕4 281∕8 147∕16 143∕4 323∕8 111...
Dimension Guide - Page 4

... in the top and bottom of the dryer is recommended to reduce noise transfer. Ƀ For closet installation, with equivalent ventilations openings are acceptable. Ƀ Companion appliance spacing should be considered for ease of installation and servicing. Ƀ Additional clearances might be required for wall, door, and floor moldings. Ƀ Additional spacing of...
Maytag MED6500M Reviews
We have not received any reviews for Maytag yet.