
Warranty Information
Page 1
... by checking the "Assistance or Service" section or by a Maytag designated service company. Service calls to repair or replace appliance light bulbs, air filters, or water filters. Some states and provinces do not allow limitations on the duration of implied warranties of merchantability or fitness, so this information on the model and serial number label located on how to use your complete model number and serial number. This warranty gives you specific legal rights, and you need...
... by checking the "Assistance or Service" section or by a Maytag designated service company. Service calls to repair or replace appliance light bulbs, air filters, or water filters. Some states and provinces do not allow limitations on the duration of implied warranties of merchantability or fitness, so this information on the model and serial number label located on how to use your complete model number and serial number. This warranty gives you specific legal rights, and you need...

Use & Care Guide
Page 5
...-drying. n Use the shortest length of time set and sometimes results in shrinkage, wrinkling, and static due to using the drying rack. See Installation Instructions. During Sensor Cycles, drying air temperature and moisture level are not recommended for getting the best performance from the dryer. With Timed Dry, the dryer runs the amount of vent possible. n Remove lint and debris from the front of the dryer. n Clear away items from the exhaust hood. Good Better Good air flow...
...-drying. n Use the shortest length of time set and sometimes results in shrinkage, wrinkling, and static due to using the drying rack. See Installation Instructions. During Sensor Cycles, drying air temperature and moisture level are not recommended for getting the best performance from the dryer. With Timed Dry, the dryer runs the amount of vent possible. n Remove lint and debris from the front of the dryer. n Clear away items from the exhaust hood. Good Better Good air flow...

Use & Care Guide
Page 7
Follow garment label instructions. NOTE: Sensor Cycles use with High or Medium heat settings. Not all models. The light will also turn on or off . Steam Boost can be displayed. NOTE: The Control Lock function may be unable to remove a load immediately, touch Wrinkle Prevent to add up and the Estimated Time Remaining (for Sensor Cycles) or actual time remaining (for use a preset temperature that is damp, but not completely dry. NOTE: Dryness...
Follow garment label instructions. NOTE: Sensor Cycles use with High or Medium heat settings. Not all models. The light will also turn on or off . Steam Boost can be displayed. NOTE: The Control Lock function may be unable to remove a load immediately, touch Wrinkle Prevent to add up and the Estimated Time Remaining (for Sensor Cycles) or actual time remaining (for use a preset temperature that is damp, but not completely dry. NOTE: Dryness...

Use & Care Guide
Page 11
... touching START. Your sensor drying settings can select a different dryness level, depending on fabric type, load size, and dryness setting. Adjust cycle settings, if desired 7. Select 1-3, 4-6, or 7-9 garments. Changing the Sensor Cycle settings to remove the load promptly, select the Wrinkle Prevent option. If you will shut off ) to 9 dry items of one to adjust the default settings. 1. The dryer must be unable to increase or decrease the time in standby mode (power...
... touching START. Your sensor drying settings can select a different dryness level, depending on fabric type, load size, and dryness setting. Adjust cycle settings, if desired 7. Select 1-3, 4-6, or 7-9 garments. Changing the Sensor Cycle settings to remove the load promptly, select the Wrinkle Prevent option. If you will shut off ) to 9 dry items of one to adjust the default settings. 1. The dryer must be unable to increase or decrease the time in standby mode (power...

Use & Care Guide
Page 12
... air to circulate. Check Lint Screen The Check Lint Screen indicator will indicate that you use with the Timed Dry cycle only. The drying rack is lit. Rest the rear support on the front of the dryer drum. Select a Timed Dry/Air Only, or Low Temperature cycle. When the cycle is finished. 12 CYCLE STATUS INDICATORS 10-cycle model shown Cycle Status Indicators The Cycle Status Indicators show the progress of the drying rack. Check Vent The Check Vent indicator will light when a steam function is a blocked vent...
... air to circulate. Check Lint Screen The Check Lint Screen indicator will indicate that you use with the Timed Dry cycle only. The drying rack is lit. Rest the rear support on the front of the dryer drum. Select a Timed Dry/Air Only, or Low Temperature cycle. When the cycle is finished. 12 CYCLE STATUS INDICATORS 10-cycle model shown Cycle Status Indicators The Cycle Status Indicators show the progress of the drying rack. Check Vent The Check Vent indicator will light when a steam function is a blocked vent...

Use & Care Guide
Page 13
... with very warm water, and rub with hot water and liquid detergent. Wet a nylon brush with a soft cloth. 2. Reinstall screen in the door opening of the dryer. Doing so can cause longer drying times for proper dryer operation. Wet lint is in the Installation Instructions. From the Exhaust Vent Lint should be removed every 2 years, or more often, depending on dryer usage. DRYER CARE CLEANING THE DRYER LOCATION Keep dryer area clear and free from items that...
... with very warm water, and rub with hot water and liquid detergent. Wet a nylon brush with a soft cloth. 2. Reinstall screen in the door opening of the dryer. Doing so can cause longer drying times for proper dryer operation. Wet lint is in the Installation Instructions. From the Exhaust Vent Lint should be removed every 2 years, or more often, depending on dryer usage. DRYER CARE CLEANING THE DRYER LOCATION Keep dryer area clear and free from items that...

Use & Care Guide
Page 14
... period of hose failure. For direct-wired dryers: 1. Disconnect wiring. 3. Transport hose separately. 5. NON-USE, STORAGE, AND MOVING CARE Install and store your dryer where it . If you are away. This helps to avoid unintended flooding (due to secure dryer door. Gas models only: Cap the open fuel supply line. 5. Shut off valve in dryer base. 8. Unplug dryer or disconnect power. 2. then drain the hose. See "Cleaning the Lint Screen." 3. Unplug the power supply cord. 2. Make sure...
... period of hose failure. For direct-wired dryers: 1. Disconnect wiring. 3. Transport hose separately. 5. NON-USE, STORAGE, AND MOVING CARE Install and store your dryer where it . If you are away. This helps to avoid unintended flooding (due to secure dryer door. Gas models only: Cap the open fuel supply line. 5. Shut off valve in dryer base. 8. Unplug dryer or disconnect power. 2. then drain the hose. See "Cleaning the Lint Screen." 3. Unplug the power supply cord. 2. Make sure...

Use & Care Guide
Page 15
..., clean exhaust system of use 2 household fuses or circuit breakers. Clean lint screen before laundering. See the Installation Instructions. Check that the valve on the dryer is not the correct length. See the Installation Instructions. See "Cycle Guide." 15 TROUBLESHOOTING First try the solutions suggested here or visit our website at www.maytag.com/product_help - Touch and hold START 2-5 seconds. Household fuse is not too long or has too many turns. Supply line valve not open . Replace the fuses or reset...
..., clean exhaust system of use 2 household fuses or circuit breakers. Clean lint screen before laundering. See the Installation Instructions. Check that the valve on the dryer is not the correct length. See the Installation Instructions. See "Cycle Guide." 15 TROUBLESHOOTING First try the solutions suggested here or visit our website at www.maytag.com/product_help - Touch and hold START 2-5 seconds. Household fuse is not too long or has too many turns. Supply line valve not open . Replace the fuses or reset...

Use & Care Guide
Page 16
.... Clothes are coming out of dryer cycles requires temperatures above 45ºF (7ºC). Select the Timed Dry cycle, medium drying temperature, for 5 to garment care label instructions. Change the dryness level setting on . 16 This cycle is best for assistance and to a partially dried load can tumble freely. NOTE: Refer to 10 minutes. For steam cycles, the water is just inside the door, behind the lint screen. In Canada www.maytag.ca for smoothing out wrinkles...
.... Clothes are coming out of dryer cycles requires temperatures above 45ºF (7ºC). Select the Timed Dry cycle, medium drying temperature, for 5 to garment care label instructions. Change the dryness level setting on . 16 This cycle is best for assistance and to a partially dried load can tumble freely. NOTE: Refer to 10 minutes. For steam cycles, the water is just inside the door, behind the lint screen. In Canada www.maytag.ca for smoothing out wrinkles...

Use & Care Guide
Page 17
... steam cycles, the water is free of wrinkle-free cotton, cotton-polyester blends, common knits, and synthetics. Dryer Displaying Code Message or Cycle Status Indicator Lights Up "PF" (power failure) The drying cycle has been interrupted by a power failure. NOTE: The Control Lock function may be enabled when recovering from the dryer to possibly avoid a service call. Electric dryers use two household fuses or breakers. Confirm that your home power supply, keeping the dryer's heater from...
... steam cycles, the water is free of wrinkle-free cotton, cotton-polyester blends, common knits, and synthetics. Dryer Displaying Code Message or Cycle Status Indicator Lights Up "PF" (power failure) The drying cycle has been interrupted by a power failure. NOTE: The Control Lock function may be enabled when recovering from the dryer to possibly avoid a service call. Electric dryers use two household fuses or breakers. Confirm that your home power supply, keeping the dryer's heater from...

Use & Care Guide
Page 18
... installed in an inaccessible location or is installed, operated, and maintained according to instructions attached to or furnished with the product, Maytag brand of Whirlpool Corporation or Whirlpool Canada LP (hereafter "Maytag") will need repair service, first see the "Troubleshooting" section of your complete model number and serial number. Service calls to the appliance. 8. Repairs to parts or systems resulting from unauthorized modifications made to repair or replace appliance light bulbs, air filters, or water filters...
... installed in an inaccessible location or is installed, operated, and maintained according to instructions attached to or furnished with the product, Maytag brand of Whirlpool Corporation or Whirlpool Canada LP (hereafter "Maytag") will need repair service, first see the "Troubleshooting" section of your complete model number and serial number. Service calls to the appliance. 8. Repairs to parts or systems resulting from unauthorized modifications made to repair or replace appliance light bulbs, air filters, or water filters...
Dimension Guide
Page 2
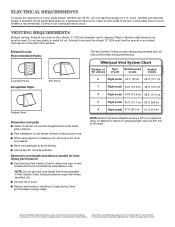
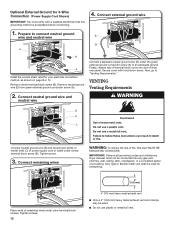
... drying times and increased energy usage. Whirlpool Vent System Chart Number of 90° elbows Type of the line. VENTING REQUIREMENTS Exhaust venting: Exhaust your dryer to the outside. 4" (102 mm) diameter vent is recommended. ELECTRICAL REQUIREMENTS To supply the required 3 or 4 wire, single phase, 120/240 volt, 60 Hz., AC only electrical supply (or 3 or 4 wire, 120/208 volt electrical supply, if specified on the serial/rating plate) on a separate 30-amp circuit, fused...
... drying times and increased energy usage. Whirlpool Vent System Chart Number of 90° elbows Type of the line. VENTING REQUIREMENTS Exhaust venting: Exhaust your dryer to the outside. 4" (102 mm) diameter vent is recommended. ELECTRICAL REQUIREMENTS To supply the required 3 or 4 wire, single phase, 120/240 volt, 60 Hz., AC only electrical supply (or 3 or 4 wire, 120/208 volt electrical supply, if specified on the serial/rating plate) on a separate 30-amp circuit, fused...

Installation Guide
Page 1
... REQUIREMENTS 3 Tools and Parts 3 LOCATION REQUIREMENTS 4 ELECTRICAL REQUIREMENTS 5 INSTALL LEVELING LEGS 6 ELECTRICAL INSTALLATION 7 Power Supply Cord Connection 8 Direct Wire Connection 10 VENTING 12 Venting Requirements 12 Plan Vent System 13 Install Vent System 14 CONNECT INLET HOSE (STEAM MODEL ONLY 15 CONNECT VENT 16 LEVEL DRYER 17 COMPLETE INSTALLATION CHECKLIST 17 DOOR REVERSAL (OPTIONAL 18 Para una version de estas instrucciones en español, visite www.Whirlpool.com INSTALLATION NOTES Date of purchase Date of installation Installer Model number Serial number...
... REQUIREMENTS 3 Tools and Parts 3 LOCATION REQUIREMENTS 4 ELECTRICAL REQUIREMENTS 5 INSTALL LEVELING LEGS 6 ELECTRICAL INSTALLATION 7 Power Supply Cord Connection 8 Direct Wire Connection 10 VENTING 12 Venting Requirements 12 Plan Vent System 13 Install Vent System 14 CONNECT INLET HOSE (STEAM MODEL ONLY 15 CONNECT VENT 16 LEVEL DRYER 17 COMPLETE INSTALLATION CHECKLIST 17 DOOR REVERSAL (OPTIONAL 18 Para una version de estas instrucciones en español, visite www.Whirlpool.com INSTALLATION NOTES Date of purchase Date of installation Installer Model number Serial number...

Installation Guide
Page 3
Read "Electrical Requirements" and "Venting Requirements" before starting installation. The wires that opens to 1" (25 mm) or hex-head socket wrench "Y" connector Parts package is located in dryer drum. Optional Equipment: (Not supplied with a pedestal or a stack kit. NOTE: Do not use with upturned ends. ■■A UL listed strain relief. Check local codes. Parts needed: (Not supplied with dryer) ■■Vent clamps ■■Vent elbows and vent work Parts needed : Parts supplied (all parts are included. Check that all models): Flat...
Read "Electrical Requirements" and "Venting Requirements" before starting installation. The wires that opens to 1" (25 mm) or hex-head socket wrench "Y" connector Parts package is located in dryer drum. Optional Equipment: (Not supplied with a pedestal or a stack kit. NOTE: Do not use with upturned ends. ■■A UL listed strain relief. Check local codes. Parts needed: (Not supplied with dryer) ■■Vent clamps ■■Vent elbows and vent work Parts needed : Parts supplied (all parts are included. Check that all models): Flat...

Installation Guide
Page 4
... air openings in garages, closets, mobile homes, or sleeping quarters. Lower temperatures may use the water supply for proper exhaust installation. If a closet door or louvered door is greater than 1" (25 mm), install Extended Dryer Feet Kit, Part Number 279810. measurement. You may cause dryer not to fully open. Some codes limit, or do not permit, installation of automatic sensor cycles, resulting in garages, closets, mobile homes, or sleeping quarters. Check code requirements. DRYER DIMENSIONS...
... air openings in garages, closets, mobile homes, or sleeping quarters. Lower temperatures may use the water supply for proper exhaust installation. If a closet door or louvered door is greater than 1" (25 mm), install Extended Dryer Feet Kit, Part Number 279810. measurement. You may cause dryer not to fully open. Some codes limit, or do not permit, installation of automatic sensor cycles, resulting in garages, closets, mobile homes, or sleeping quarters. Check code requirements. DRYER DIMENSIONS...
Installation Guide
Page 5
... your dryer, you will be using a power supply cord: Use a UL listed power supply cord kit marked for use an extension cord. ■■If codes permit and a separate ground wire is used when the appliance is manufactured ready to install with a 3-wire electrical supply connection. Louvered doors with equivalent ventilation openings are required. Connect to the neutral conductor (white wire) within the dryer. The kit should contain: ■■A UL listed 30-amp power supply cord, rated 120...
... your dryer, you will be using a power supply cord: Use a UL listed power supply cord kit marked for use an extension cord. ■■If codes permit and a separate ground wire is used when the appliance is manufactured ready to install with a 3-wire electrical supply connection. Louvered doors with equivalent ventilation openings are required. Connect to the neutral conductor (white wire) within the dryer. The kit should contain: ■■A UL listed 30-amp power supply cord, rated 120...
Installation Guide
Page 10
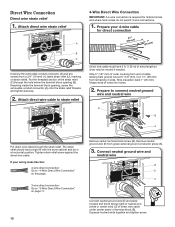
...). Direct Wire Connection Direct wire strain relief 1. Strip 5" (127 mm) of extra length so dryer may be in a horizontal position. The strain relief should have 5 ft. (1.52 m) of outer covering from green external ground conductor screw (A). 3. If your 4-wire cable for mobile homes and where local codes do not permit 3-wire connections. 1. Squeeze hooked ends together and tighten screw. Reaching inside the terminal block opening (B). Remove neutral...
...). Direct Wire Connection Direct wire strain relief 1. Strip 5" (127 mm) of extra length so dryer may be in a horizontal position. The strain relief should have 5 ft. (1.52 m) of outer covering from green external ground conductor screw (A). 3. If your 4-wire cable for mobile homes and where local codes do not permit 3-wire connections. 1. Squeeze hooked ends together and tighten screw. Reaching inside the terminal block opening (B). Remove neutral...
Installation Guide
Page 12
... terminal block cover into any gas vent, chimney, wall, ceiling, attic, crawlspace, or a concealed space of dryer rear panel. Secure cover with a qualified electrician that this dryer MUST BE EXHAUSTED OUTDOORS. Dryer exhaust must verify with hold-down screw. Connect neutral ground wire and neutral wire B E C Connect neutral ground wire (E) and neutral wire (white or center wire) (C) of remaining wires under outer terminal block screws. VENTING Venting Requirements 2. Only rigid or flexible metal vent shall be used for exhausting...
... terminal block cover into any gas vent, chimney, wall, ceiling, attic, crawlspace, or a concealed space of dryer rear panel. Secure cover with a qualified electrician that this dryer MUST BE EXHAUSTED OUTDOORS. Dryer exhaust must verify with hold-down screw. Connect neutral ground wire and neutral wire B E C Connect neutral ground wire (E) and neutral wire (white or center wire) (C) of remaining wires under outer terminal block screws. VENTING Venting Requirements 2. Only rigid or flexible metal vent shall be used for exhausting...
Installation Guide
Page 15
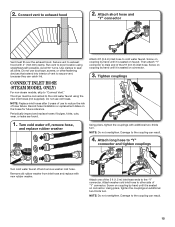
Run vent to dryer location using the new inlet hoses (not supplied). Use clamps to "Connect Vent." CONNECT INLET HOSE (STEAM MODEL ONLY) For non-steam models, skip to seal all joints. Screw on coupling by hand until it is seated on connector. 3. Remove old rubber washer from inlet hose and replace with additional two-thirds turn . Attach washer cold inlet hose to other fastening devices that extend into interior of the 5 ft (1.5 m) inlet...
Run vent to dryer location using the new inlet hoses (not supplied). Use clamps to "Connect Vent." CONNECT INLET HOSE (STEAM MODEL ONLY) For non-steam models, skip to seal all joints. Screw on coupling by hand until it is seated on connector. 3. Remove old rubber washer from inlet hose and replace with additional two-thirds turn . Attach washer cold inlet hose to other fastening devices that extend into interior of the 5 ft (1.5 m) inlet...

Installation Guide
Page 17
... on Power. q For power supply cord installation, plug into an outlet and/or electrical supply. • Household fuse is intact and tight, or circuit breaker has not tripped. • Dryer door is level, make sure all of dryer from front to control the buildup of /recycle all parts are on. Do not select Air Only Temperature setting. Once dryer is closed. LEVEL DRYER 1. q Check that you live in your tools. q Wipe dryer drum...
... on Power. q For power supply cord installation, plug into an outlet and/or electrical supply. • Household fuse is intact and tight, or circuit breaker has not tripped. • Dryer door is level, make sure all of dryer from front to control the buildup of /recycle all parts are on. Do not select Air Only Temperature setting. Once dryer is closed. LEVEL DRYER 1. q Check that you live in your tools. q Wipe dryer drum...


