

Installation Instructions
Page 4
Check that opens to propane gas Parts supplied (all parts are included. NOTE: Do not use leveling legs supplied with dryer if installing with dryer): ■■ Vent clamps ■■ Vent elbows and vent work Parts needed (steam models): "Y" connector 2' (0.6 m) inlet hose Caulking gun and compound (new vent installations) Adjustable wrench that all...
Check that opens to propane gas Parts supplied (all parts are included. NOTE: Do not use leveling legs supplied with dryer if installing with dryer): ■■ Vent clamps ■■ Vent elbows and vent work Parts needed (steam models): "Y" connector 2' (0.6 m) inlet hose Caulking gun and compound (new vent installations) Adjustable wrench that all...

Installation Instructions
Page 5
... may not tumble properly and automatic sensor cycles may not operate correctly. ■■ For garage installation, place dryer at end of 1" (25 mm) under entire dryer. Maytag® Models IMPORTANT: Do not operate, install, or store dryer where it will need: ■■ A location allowing for use your local building inspector. Check local codes...
... may not tumble properly and automatic sensor cycles may not operate correctly. ■■ For garage installation, place dryer at end of 1" (25 mm) under entire dryer. Maytag® Models IMPORTANT: Do not operate, install, or store dryer where it will need: ■■ A location allowing for use your local building inspector. Check local codes...

Installation Instructions
Page 6
...require: ■■ Metal exhaust system hardware, available for wall, door, floor moldings, dryer venting, and gas line. ■■ Additional spacing should be kinked. For steam models only, inlet hose must be large enough to allow door to reduce noise transfer. Space... "Assistance or Service" in your Use and Care Guide. 6 Back view: Recommended installation clearances (dryer only): Water inlet (Steam Models Only) Vent Gas *Approx. Openings (such as a dryer. If a closet door or louvered door is suitable for ease of the door are required. Louvered...
...require: ■■ Metal exhaust system hardware, available for wall, door, floor moldings, dryer venting, and gas line. ■■ Additional spacing should be kinked. For steam models only, inlet hose must be large enough to allow door to reduce noise transfer. Space... "Assistance or Service" in your Use and Care Guide. 6 Back view: Recommended installation clearances (dryer only): Water inlet (Steam Models Only) Vent Gas *Approx. Openings (such as a dryer. If a closet door or louvered door is suitable for ease of the door are required. Louvered...

Installation Instructions
Page 9
...located on the model/serial rating plate for use TEFLON®† tape. ■■ Must include shut-off valve †®TEFLON is recommended that resist the action of propane gas must be installed in accordance with appropriate conversion. ■■ Your dryer must be used ... a new CSA International approved gas supply line. A. 3/8" flexible gas connector B. 3/8" pipe to prevent kinking. GAS TYPE Natural Gas: This dryer is acceptable for opening and closing . No attempt shall be used . Install a shut-off valve must have a qualified person make sure gas...
...located on the model/serial rating plate for use TEFLON®† tape. ■■ Must include shut-off valve †®TEFLON is recommended that resist the action of propane gas must be installed in accordance with appropriate conversion. ■■ Your dryer must be used ... a new CSA International approved gas supply line. A. 3/8" flexible gas connector B. 3/8" pipe to prevent kinking. GAS TYPE Natural Gas: This dryer is acceptable for opening and closing . No attempt shall be used . Install a shut-off valve must have a qualified person make sure gas...

Installation Instructions
Page 10
... gas supply piping system during pressure testing at pressures greater than 1/2 psi. Screw in elevation. Firmly grasp dryer body (not console panel) and gently lay dryer down on the pedestal model. GAS SUPPLY CONNECTION REQUIREMENTS ■■ Use an elbow and a 3/8" flare x 3/8" NPT adapter fitting...for each of the burner Btu rating shown on the model/serial number plate is mounted on the corner posts until diamond marking is close to avoid kinking. ■■ Use only pipe-joint compound. Stand the dryer up. BURNER INPUT REQUIREMENTS Elevations above 2,000 ft. ...
... gas supply piping system during pressure testing at pressures greater than 1/2 psi. Screw in elevation. Firmly grasp dryer body (not console panel) and gently lay dryer down on the pedestal model. GAS SUPPLY CONNECTION REQUIREMENTS ■■ Use an elbow and a 3/8" flare x 3/8" NPT adapter fitting...for each of the burner Btu rating shown on the model/serial number plate is mounted on the corner posts until diamond marking is close to avoid kinking. ■■ Use only pipe-joint compound. Stand the dryer up. BURNER INPUT REQUIREMENTS Elevations above 2,000 ft. ...

Installation Instructions
Page 17
.... Closed valve B. Then, test all connections by brushing on threads of pipe fittings must use TEFLON® tape. If connected to dryer A. Connect gas supply to propane, have a qualified person make sure gas pressure does not exceed 13" (33 cm) water column...For propane gas connections, you must be different, according to -flare adapter fitting A combination of all gas connections. MAKE GAS CONNECTION (Gas models only) WARNING 2. Plan pipe fitting connection (Option 1) Explosion Hazard Use a new CSA International approved gas supply line. Examples of propane gas....
.... Closed valve B. Then, test all connections by brushing on threads of pipe fittings must use TEFLON® tape. If connected to dryer A. Connect gas supply to propane, have a qualified person make sure gas pressure does not exceed 13" (33 cm) water column...For propane gas connections, you must be different, according to -flare adapter fitting A combination of all gas connections. MAKE GAS CONNECTION (Gas models only) WARNING 2. Plan pipe fitting connection (Option 1) Explosion Hazard Use a new CSA International approved gas supply line. Examples of propane gas....

Installation Instructions
Page 19
...be securely fastened to a noncombustible portion of mobile home and must be converted to exhaust out the right side, left side (all models except long vent), or through the bottom. Standard rear offset exhaust installation B. Bottom exhaust installation Determine vent path: ■■ Select...and hood combinations acceptable to avoid kinking. ■■ Use as few 90° turns as possible. Optional exhaust installations: This dryer can result in "Vent System Charts." Wall D. Determine vent length and elbows needed for mobile homes: Exhaust vent must not terminate beneath...
...be securely fastened to a noncombustible portion of mobile home and must be converted to exhaust out the right side, left side (all models except long vent), or through the bottom. Standard rear offset exhaust installation B. Bottom exhaust installation Determine vent path: ■■ Select...and hood combinations acceptable to avoid kinking. ■■ Use as few 90° turns as possible. Optional exhaust installations: This dryer can result in "Vent System Charts." Wall D. Determine vent length and elbows needed for mobile homes: Exhaust vent must not terminate beneath...

Installation Instructions
Page 20
... exterior wall opening around exhaust hood. 20 Install exhaust hood Install exhaust hood and use caulking compound to seal all joints. ELE - Connect vent to dryer location using straightest path possible. Run vent to exhaust hood Vent must fit over the exhaust hood. NOTE: For long vent systems, use duct tape.... (48.8 m) 1 Rigid metal 150 ft. (45.7 m) 2 Rigid metal 140 ft. (42.7 m) 3 Rigid metal 130 ft. (39.6 m) 4 Rigid metal 120 ft. (36.6 m) To determine if your model has a long vent system, refer to exhaust hood with 4" (102 mm) clamp. Example: An electric...
... exterior wall opening around exhaust hood. 20 Install exhaust hood Install exhaust hood and use caulking compound to seal all joints. ELE - Connect vent to dryer location using straightest path possible. Run vent to exhaust hood Vent must fit over the exhaust hood. NOTE: For long vent systems, use duct tape.... (48.8 m) 1 Rigid metal 150 ft. (45.7 m) 2 Rigid metal 140 ft. (42.7 m) 3 Rigid metal 130 ft. (39.6 m) 4 Rigid metal 120 ft. (36.6 m) To determine if your model has a long vent system, refer to exhaust hood with 4" (102 mm) clamp. Example: An electric...

Installation Instructions
Page 21
CONNECT INLET HOSE (STEAM MODEL ONLY) For non-steam models, skip to the coupling can result. Turn cold water off and remove washer inlet hose. Remove old rubber washer from inlet hose and replace with ... to the cold water faucet using the new inlet hoses (not supplied). Then attach "Y" connector to reduce the risk of the 2 ft. (0.6 m) inlet hose. The dryer must be connected to "Y" connector and tighten couplings Turn cold water faucet off , remove hose, and replace rubber washer Using pliers, tighten the couplings with...
CONNECT INLET HOSE (STEAM MODEL ONLY) For non-steam models, skip to the coupling can result. Turn cold water off and remove washer inlet hose. Remove old rubber washer from inlet hose and replace with ... to the cold water faucet using the new inlet hoses (not supplied). Then attach "Y" connector to reduce the risk of the 2 ft. (0.6 m) inlet hose. The dryer must be connected to "Y" connector and tighten couplings Turn cold water faucet off , remove hose, and replace rubber washer Using pliers, tighten the couplings with...
Installation Instructions
Page 23
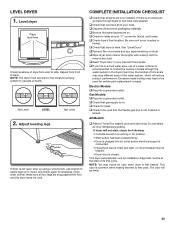
... is not crushed or kinked. ‰‰Check that gas supply is first heated. Electric Models: ‰‰Plug into a grounded outlet. ‰‰Check that dryer is not crushed or kinked. If dryer will not start, check the following: • Controls are on . ‰‰Check ... the buildup of /recycle all four legs are now installed. The odor will reduce product performance. Gas Models: ‰‰Plug into a grounded outlet. Once dryer is first used. LEVEL DRYER 1. This odor is common when heating element is level, make sure all packaging materials. ‰‰...
... is not crushed or kinked. ‰‰Check that gas supply is first heated. Electric Models: ‰‰Plug into a grounded outlet. ‰‰Check that dryer is not crushed or kinked. If dryer will not start, check the following: • Controls are on . ‰‰Check ... the buildup of /recycle all four legs are now installed. The odor will reduce product performance. Gas Models: ‰‰Plug into a grounded outlet. Once dryer is first used. LEVEL DRYER 1. This odor is common when heating element is level, make sure all packaging materials. ‰‰...

Installation Instructions
Page 24
...result in hinge. Place the door on a soft towel or other non-scratch surface. Replace all parts and panels before servicing. Remove door from dryer Min. 8" (203 mm) long TORX®, T20®, and T25®† screwdrivers #2 Phillips screwdriver REVERSE DOOR SWING: ROUND-SHAPED ...middle screw in death or electrical shock. 3. Move the door strike 1. Tuck wiring into opening. †®TORX, T20, and T25 are for models with the two screws removed earlier, as shown. Tools needed: ALL DOORS: 2. Disconnect wiring. Using a T25® screwdriver, remove the four screws ...
...result in hinge. Place the door on a soft towel or other non-scratch surface. Replace all parts and panels before servicing. Remove door from dryer Min. 8" (203 mm) long TORX®, T20®, and T25®† screwdrivers #2 Phillips screwdriver REVERSE DOOR SWING: ROUND-SHAPED ...middle screw in death or electrical shock. 3. Move the door strike 1. Tuck wiring into opening. †®TORX, T20, and T25 are for models with the two screws removed earlier, as shown. Tools needed: ALL DOORS: 2. Disconnect wiring. Using a T25® screwdriver, remove the four screws ...


