

Warranty Information
Page 1
... furnished with electrical or plumbing codes, or correction of purchase including dealer or retailer name and address IF YOU NEED SERVICE: 1. Commercial, non-residential, multiple-family use, or use with original model/serial numbers removed, altered, or not easily determined. light bulbs, batteries, air or water filters, preservation solutions, etc.). 5. Cosmetic damage including scratches, dents, chips, and other rights that interfere with published user, operator, or installation instructions. 2. EXCLUSION OF...
... furnished with electrical or plumbing codes, or correction of purchase including dealer or retailer name and address IF YOU NEED SERVICE: 1. Commercial, non-residential, multiple-family use, or use with original model/serial numbers removed, altered, or not easily determined. light bulbs, batteries, air or water filters, preservation solutions, etc.). 5. Cosmetic damage including scratches, dents, chips, and other rights that interfere with published user, operator, or installation instructions. 2. EXCLUSION OF...
Quick Reference Sheet
Page 1
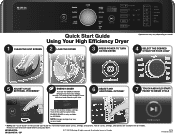
... Maytag. Used under license in Canada. 07/15 Printed in the Use and Care Guide for optimal energy savings. W10804670A W10804671A - Not all cycles, settings, and options are available with all models. All rights reserved. This setting uses a slightly lower heat level and extends cycle time. 6 SELECT ANY ADDITIONAL OPTIONS* 7 TOUCH AND HOLD START/ PAUSE TO BEGIN CYCLE Turn on model. 4 SELECT THE DESIRED CYCLE FOR YOUR LOAD* 5 ADJUST CYCLE SETTINGS, IF DESIRED* ENERGY...
... Maytag. Used under license in Canada. 07/15 Printed in the Use and Care Guide for optimal energy savings. W10804670A W10804671A - Not all cycles, settings, and options are available with all models. All rights reserved. This setting uses a slightly lower heat level and extends cycle time. 6 SELECT ANY ADDITIONAL OPTIONS* 7 TOUCH AND HOLD START/ PAUSE TO BEGIN CYCLE Turn on model. 4 SELECT THE DESIRED CYCLE FOR YOUR LOAD* 5 ADJUST CYCLE SETTINGS, IF DESIRED* ENERGY...
Use & Care Guide
Page 5
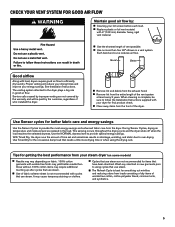
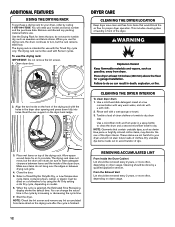
... prior to over-drying. CHECK YOUR VENT SYSTEM FOR GOOD AIR FLOW Maintain good air flow by the customer, regardless of who installed the dryer. n Use of the dryer. n Remove lint and debris from the front of fabric softener sheet is best for better fabric care and energy savings Use the Sensor Cycles to follow the Installation Instructions supplied with wrinkle-free finish may vary depending on clothes. n Remove lint from your lint screen before each load. Good Better...
... prior to over-drying. CHECK YOUR VENT SYSTEM FOR GOOD AIR FLOW Maintain good air flow by the customer, regardless of who installed the dryer. n Use of the dryer. n Remove lint and debris from the front of fabric softener sheet is best for better fabric care and energy savings Use the Sensor Cycles to follow the Installation Instructions supplied with wrinkle-free finish may vary depending on clothes. n Remove lint from your lint screen before each load. Good Better...
Use & Care Guide
Page 6
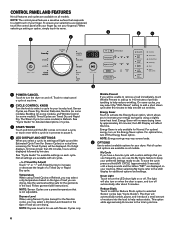
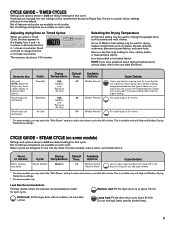
... a short steam cycle after about 5 minutes. Use the warmest setting safe for use with custom settings that is open, and turn the LED drum light on or off automatically after 60 minutes to help smooth out wrinkles. Dryness Level When using a slightly lower heat level. For optimal time, turn the dryer on and off the Energy Saver option. To save the cycle press and hold until a beep sounds and...
... a short steam cycle after about 5 minutes. Use the warmest setting safe for use with custom settings that is open, and turn the LED drum light on or off automatically after 60 minutes to help smooth out wrinkles. Dryness Level When using a slightly lower heat level. For optimal time, turn the dryer on and off the Energy Saver option. To save the cycle press and hold until a beep sounds and...
Use & Care Guide
Page 7
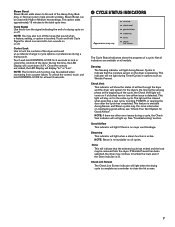
... cycle. This light will be removed from a power failure. The light will stay on all models. NOTE: Steam is detected. This option adds approximately 15 minutes to clean the lint screen. 7 The Cycle Status Indicators show the status of a drying cycle on all cycles. During the sensing phase at least 3 seconds. 6 CYCLE STATUS INDICATORS Appearance may also turn off . Once the controls are available on or off. Check Vent...
... cycle. This light will be removed from a power failure. The light will stay on all models. NOTE: Steam is detected. This option adds approximately 15 minutes to clean the lint screen. 7 The Cycle Status Indicators show the status of a drying cycle on all cycles. During the sensing phase at least 3 seconds. 6 CYCLE STATUS INDICATORS Appearance may also turn off . Once the controls are available on or off. Check Vent...

Use & Care Guide
Page 8
... fabric care and energy savings. If settings are default settings for better fabric care and energy savings The dryer senses moisture in bold are changed, the new settings will return to the default. Use Sensor Cycles for that cycle. Items to dry: Drying Dryness Default Available Cycle: Temperature: Level: Time: Options: Heavyweight items Power Dry High More 40 Wrinkle Prevent† such as towels or Normal Reduce Static* heavy work clothes Less Steam Boost* Work clothes...
... fabric care and energy savings. If settings are default settings for better fabric care and energy savings The dryer senses moisture in bold are changed, the new settings will return to the default. Use Sensor Cycles for that cycle. Items to dry: Drying Dryness Default Available Cycle: Temperature: Level: Time: Options: Heavyweight items Power Dry High More 40 Wrinkle Prevent† such as towels or Normal Reduce Static* heavy work clothes Less Steam Boost* Work clothes...
Use & Care Guide
Page 9
... Low heat-sensitive Air Only fabrics. Large load: Fill the dryer drum up to about drying temperatures for various loads, refer to select for use with High and Medium Drying Temperature settings. Do not add dryer sheets. † On steam models, you are changed, the new settings will return to add a short steam cycle after 60 minutes. CYCLE GUIDE - A Low to add a short steam cycle after 60 minutes. Use a no heat (air only) setting for each cycle. STEAM CYCLE (on all models. Load Size...
... Low heat-sensitive Air Only fabrics. Large load: Fill the dryer drum up to about drying temperatures for various loads, refer to select for use with High and Medium Drying Temperature settings. Do not add dryer sheets. † On steam models, you are changed, the new settings will return to add a short steam cycle after 60 minutes. CYCLE GUIDE - A Low to add a short steam cycle after 60 minutes. Use a no heat (air only) setting for each cycle. STEAM CYCLE (on all models. Load Size...
Use & Care Guide
Page 12
... the drum will need your model and serial number and the purchase date. NOTE: Check the lint screen and remove any packing material before use the drying rack: IMPORTANT: Do not remove the lint screen. 1. Tumble a load of the dryer interior. Align the two hooks on the drying rack after the cycle is selected, the Estimated Time Remaining display shows the default time. CLEANING THE DRYER INTERIOR To clean dryer drum 1. NOTE: Garments that would block the air flow for proper dryer operation. Dry...
... the drum will need your model and serial number and the purchase date. NOTE: Check the lint screen and remove any packing material before use the drying rack: IMPORTANT: Do not remove the lint screen. 1. Tumble a load of the dryer interior. Align the two hooks on the drying rack after the cycle is selected, the Estimated Time Remaining display shows the default time. CLEANING THE DRYER INTERIOR To clean dryer drum 1. NOTE: Garments that would block the air flow for proper dryer operation. Dry...
Use & Care Guide
Page 14
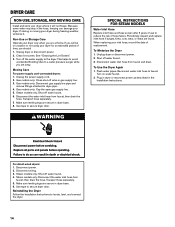
... Dryer 1. For direct-wired dryers: 1. Steam models only: Shut off the water supply to secure dryer door. Transport hose separately. 5. Use tape to the dryer. Because some water may stay in gas supply line. 3. See "Cleaning the Lint Screen." 3. Gas models only: Disconnect gas supply line pipe and remove fittings attached to reduce the risk of time, you are away. Moving Care For power supply cord-connected dryers: 1. DRYER CARE NON-USE, STORAGE, AND MOVING CARE Install and store your dryer where it . Plug in dryer or reconnect power...
... Dryer 1. For direct-wired dryers: 1. Steam models only: Shut off the water supply to secure dryer door. Transport hose separately. 5. Use tape to the dryer. Because some water may stay in gas supply line. 3. See "Cleaning the Lint Screen." 3. Gas models only: Disconnect gas supply line pipe and remove fittings attached to reduce the risk of time, you are away. Moving Care For power supply cord-connected dryers: 1. DRYER CARE NON-USE, STORAGE, AND MOVING CARE Install and store your dryer where it . Plug in dryer or reconnect power...

Use & Care Guide
Page 15
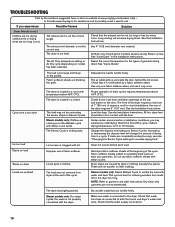
.... Check with Steam cycle selected (depending on model) on dryer (on . Household fuse is closed completely. Electric dryers require 240-volt power supply. This is on some models) is open . NOTE: The valve may not have not tripped. See the Installation Instructions. Hold your hand under the outside exhaust hood is minimal, clean exhaust system of the drum for 5-10 minutes. Energy Saver option is normal. For optimal energy, turn off Energy Saver. Clean lint screen...
.... Check with Steam cycle selected (depending on model) on dryer (on . Household fuse is closed completely. Electric dryers require 240-volt power supply. This is on some models) is open . NOTE: The valve may not have not tripped. See the Installation Instructions. Hold your hand under the outside exhaust hood is minimal, clean exhaust system of the drum for 5-10 minutes. Energy Saver option is normal. For optimal energy, turn off Energy Saver. Clean lint screen...
Use & Care Guide
Page 16
... the Installation Instructions. Check that the water supply is located in a cycle. Select the correct temperature for most installations, the rear of the dryer requires 5" (127 mm). The dryer is turned on model) has been selected. Steam models only: Clothes are too long (cont.) The exhaust vent is best for 5 to garment care label instructions. The air outlet grille is not the correct size. Increasing or decreasing the dryness level will change the amount of drying time in...
... the Installation Instructions. Check that the water supply is located in a cycle. Select the correct temperature for most installations, the rear of the dryer requires 5" (127 mm). The dryer is turned on model) has been selected. Steam models only: Clothes are too long (cont.) The exhaust vent is best for 5 to garment care label instructions. The air outlet grille is not the correct size. Increasing or decreasing the dryness level will change the amount of drying time in...

Use & Care Guide
Page 17
... or no line voltage home power supply, keeping the condition) dryer's heater from the display and return to both the faucet and dryer's water inlet valve. To unlock the control, touch and hold START/PAUSE to clear the code from turning on . Touch any setting or option name to restart the dryer. Electric dryers use two household fuses or breakers. Select a Timed Dry heated cycle, and restart the dryer. The lint screen or vent is enabled...
... or no line voltage home power supply, keeping the condition) dryer's heater from the display and return to both the faucet and dryer's water inlet valve. To unlock the control, touch and hold START/PAUSE to clear the code from turning on . Touch any setting or option name to restart the dryer. Electric dryers use two household fuses or breakers. Select a Timed Dry heated cycle, and restart the dryer. The lint screen or vent is enabled...

Use & Care Guide
Page 18
... is effective from natural gas or L.P. house wiring, fuses, or water inlet hoses). 4. light bulbs, batteries, air or water filters, preservation solutions, etc.). 5. Repairs to parts or systems to correct improper product maintenance or installation, installation not in accordance with the product, Maytag brand of repair or replacement under this Warranty. The cost of Whirlpool Corporation or Whirlpool Canada LP (hereafter "Maytag") will pay for factory specified parts for warranty service to province. 11...
... is effective from natural gas or L.P. house wiring, fuses, or water inlet hoses). 4. light bulbs, batteries, air or water filters, preservation solutions, etc.). 5. Repairs to parts or systems to correct improper product maintenance or installation, installation not in accordance with the product, Maytag brand of repair or replacement under this Warranty. The cost of Whirlpool Corporation or Whirlpool Canada LP (hereafter "Maytag") will pay for factory specified parts for warranty service to province. 11...
Dimension Guide
Page 2
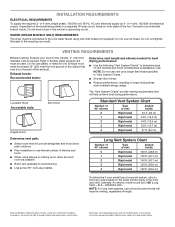
... serial number plate in the neutral or grounding circuit. WATER (STEAM MODELS ONLY) REQUIREMENTS The dryer must be at least 12" (305 mm) from the ground or any object that may be connected to the outside. 4" (102 mm) diameter vent is required. Do not use plastic or metal foil vet. VENTING REQUIREMENTS Exhaust venting: Exhaust your model has a long vent system, refer to the type code located on both sides of elbows and turns...
... serial number plate in the neutral or grounding circuit. WATER (STEAM MODELS ONLY) REQUIREMENTS The dryer must be at least 12" (305 mm) from the ground or any object that may be connected to the outside. 4" (102 mm) diameter vent is required. Do not use plastic or metal foil vet. VENTING REQUIREMENTS Exhaust venting: Exhaust your model has a long vent system, refer to the type code located on both sides of elbows and turns...
Installation Guide
Page 1
... REQUIREMENTS 3 Tools and Parts 3 LOCATION REQUIREMENTS 4 ELECTRICAL REQUIREMENTS 5 INSTALL LEVELING LEGS 6 ELECTRICAL INSTALLATION 7 Power Supply Cord Connection 8 Direct Wire Connection 10 VENTING 12 Venting Requirements 12 Plan Vent System 13 Install Vent System 15 CONNECT INLET HOSE (STEAM MODEL ONLY 15 CONNECT VENT 16 LEVEL DRYER 17 COMPLETE INSTALLATION CHECKLIST 17 DOOR REVERSAL (OPTIONAL 18 Para una version de estas instrucciones en español, visite www.Whirlpool.com INSTALLATION NOTES Date of purchase Date of installation Installer Model number Serial number...
... REQUIREMENTS 3 Tools and Parts 3 LOCATION REQUIREMENTS 4 ELECTRICAL REQUIREMENTS 5 INSTALL LEVELING LEGS 6 ELECTRICAL INSTALLATION 7 Power Supply Cord Connection 8 Direct Wire Connection 10 VENTING 12 Venting Requirements 12 Plan Vent System 13 Install Vent System 15 CONNECT INLET HOSE (STEAM MODEL ONLY 15 CONNECT VENT 16 LEVEL DRYER 17 COMPLETE INSTALLATION CHECKLIST 17 DOOR REVERSAL (OPTIONAL 18 Para una version de estas instrucciones en español, visite www.Whirlpool.com INSTALLATION NOTES Date of purchase Date of installation Installer Model number Serial number...
Installation Guide
Page 3
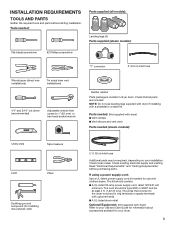
... (steam models): Flat-blade screwdriver #2 Phillips screwdriver "Y" connector 2' (0.6 m) inlet hose Wire stripper (direct wire installations) Tin snips (new vent installations) 1/4" and 5/16" nut driver (recommended) Adjustable wrench that connect to the dryer must end in dryer drum. Optional Equipment: (Not supplied with clothes dryers. The wires that opens to your Use and Care Guide for information about accessories available for your installation. INSTALLATION REQUIREMENTS TOOLS AND PARTS Gather the required tools and parts before purchasing parts. Parts needed: (Not...
... (steam models): Flat-blade screwdriver #2 Phillips screwdriver "Y" connector 2' (0.6 m) inlet hose Wire stripper (direct wire installations) Tin snips (new vent installations) 1/4" and 5/16" nut driver (recommended) Adjustable wrench that connect to the dryer must end in dryer drum. Optional Equipment: (Not supplied with clothes dryers. The wires that opens to your Use and Care Guide for information about accessories available for your installation. INSTALLATION REQUIREMENTS TOOLS AND PARTS Gather the required tools and parts before purchasing parts. Parts needed: (Not...
Installation Guide
Page 4
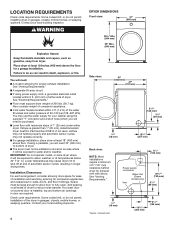
... your washer using power supply cord, a grounded electrical outlet located within 4 ft. (1.2 m) of the water fill valves and water pressure of the dryer in longer drying times. Some codes limit, or do not permit, installing dryer in garages, closets, mobile homes, or sleeping quarters. LOCATION REQUIREMENTS Check code requirements. See "Electrical Requirements." ■■Floor must be installed or stored in door are required. If slope is installed, top and bottom air openings in an area where it will need...
... your washer using power supply cord, a grounded electrical outlet located within 4 ft. (1.2 m) of the water fill valves and water pressure of the dryer in longer drying times. Some codes limit, or do not permit, installing dryer in garages, closets, mobile homes, or sleeping quarters. LOCATION REQUIREMENTS Check code requirements. See "Electrical Requirements." ■■Floor must be installed or stored in door are required. If slope is installed, top and bottom air openings in an area where it will need...

Installation Guide
Page 5
... ground connector (green screw), and secured under the neutral terminal (center or white wire) of the line. Additional installation requirements: This dryer is allowed for (1) new branch-circuit installations after 1996, and all mobile home installations. The National Electrical Code requires a 4-wire power supply connection for mobile home installations. Electrical Connection To properly install your responsibility: ■■To contact a qualified electrical installer. ■■To be obtained from your Use and Care Guide. ■...
... ground connector (green screw), and secured under the neutral terminal (center or white wire) of the line. Additional installation requirements: This dryer is allowed for (1) new branch-circuit installations after 1996, and all mobile home installations. The National Electrical Code requires a 4-wire power supply connection for mobile home installations. Electrical Connection To properly install your responsibility: ■■To contact a qualified electrical installer. ■■To be obtained from your Use and Care Guide. ■...
Installation Guide
Page 15
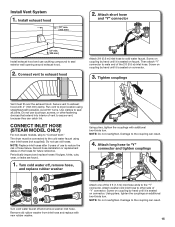
... reference. CONNECT INLET HOSE (STEAM MODEL ONLY) For non-steam models, skip to seal all joints. Use clamps to "Connect Vent." Tighten couplings Vent must be connected to dryer location using new inlet hoses (not supplied). Attach one of hose failure. Run vent to the cold water faucet using straightest path possible. The dryer must fit over the exhaust hood. Damage to the coupling can catch lint. Record hose installation or replacement dates on connector. Connect vent to exhaust hood...
... reference. CONNECT INLET HOSE (STEAM MODEL ONLY) For non-steam models, skip to seal all joints. Use clamps to "Connect Vent." Tighten couplings Vent must be connected to dryer location using new inlet hoses (not supplied). Attach one of hose failure. Run vent to the cold water faucet using straightest path possible. The dryer must fit over the exhaust hood. Damage to the coupling can catch lint. Record hose installation or replacement dates on connector. Connect vent to exhaust hood...
Installation Guide
Page 17
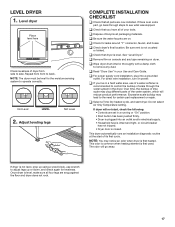
.... q Dispose of its first cycle. This odor is common when heating element is not crushed or kinked. If there is plugged into a grounded outlet. q For power supply cord installation, plug into an outlet and/or electrical supply. • Household fuse is intact and tight, or circuit breaker has not tripped. • Dryer door is level. q Check for certain part replacement or repair. q Read "Dryer Use" in a hard water area, use wrench to adjust legs...
.... q Dispose of its first cycle. This odor is common when heating element is not crushed or kinked. If there is plugged into a grounded outlet. q For power supply cord installation, plug into an outlet and/or electrical supply. • Household fuse is intact and tight, or circuit breaker has not tripped. • Dryer door is level. q Check for certain part replacement or repair. q Read "Dryer Use" in a hard water area, use wrench to adjust legs...


