Installation Instructions
Page 1
..."WARNING." W10274255A WARNING You can be killed or seriously injured if you and others are not followed. IMPORTANT: Save for Installation 4 Install Cooktop 4 Make Electrical Connection 4 Complete Installation 5 SÉCURITÉ DE LA TABLE DE CUISSON 7 EXIGENCES D'INSTALLATION 7 Outils et pi...la table de cuisson pour l'installation 9 Installation de la table de cuisson 9 Raccordement électrique 9 Achever l'installation 10 COOKTOP SAFETY Your safety and the safety of others . We have provided many important safety messages in this manual and on your...
..."WARNING." W10274255A WARNING You can be killed or seriously injured if you and others are not followed. IMPORTANT: Save for Installation 4 Install Cooktop 4 Make Electrical Connection 4 Complete Installation 5 SÉCURITÉ DE LA TABLE DE CUISSON 7 EXIGENCES D'INSTALLATION 7 Outils et pi...la table de cuisson pour l'installation 9 Installation de la table de cuisson 9 Raccordement électrique 9 Achever l'installation 10 COOKTOP SAFETY Your safety and the safety of others . We have provided many important safety messages in this manual and on your...
Installation Instructions
Page 2
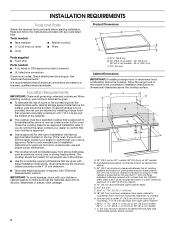
...starting installation. Check existing electrical supply. Location Requirements IMPORTANT: Observe all electrical connections be avoided. When installing cooktop, use in the kitchen. ■ Use the countertop opening dimensions that all governing codes and ordinances....countertop within minimum horizontal clearances to nearest left and right side combustible surface above ) C. 30" (76.2 cm) minimum clearance between top of cooktop platform and bottom of unprotected wood or metal cabinet (24" [61 cm] minimum clearance if bottom of the oven. See "Electrical Requirements" ...
...starting installation. Check existing electrical supply. Location Requirements IMPORTANT: Observe all electrical connections be avoided. When installing cooktop, use in the kitchen. ■ Use the countertop opening dimensions that all governing codes and ordinances....countertop within minimum horizontal clearances to nearest left and right side combustible surface above ) C. 30" (76.2 cm) minimum clearance between top of cooktop platform and bottom of unprotected wood or metal cabinet (24" [61 cm] minimum clearance if bottom of the oven. See "Electrical Requirements" ...
Installation Instructions
Page 3
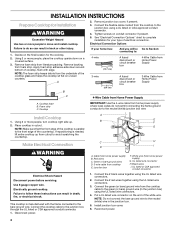
... circuit for serviceability of solid copper wire to the junction box through flexible, armored or nonmetallic sheathed, copper cable. Electrically ground cooktop. To avoid this modification, use a base cabinet with local codes and industry accepted wiring practices. 3 The length of the countertop... to allow as much slack as possible between the junction box and the cooktop so that the electrical connection and wire size are in accordance with local codes. Follow the electrical connector manufacturer's recommended procedure...
... circuit for serviceability of solid copper wire to the junction box through flexible, armored or nonmetallic sheathed, copper cable. Electrically ground cooktop. To avoid this modification, use a base cabinet with local codes and industry accepted wiring practices. 3 The length of the countertop... to allow as much slack as possible between the junction box and the cooktop so that the electrical connection and wire size are in accordance with local codes. Follow the electrical connector manufacturer's recommended procedure...
Installation Instructions
Page 4
...12.7 cm) 3-wire 3¹⁄₂" (8.9 cm) And you will be Go to Section: connecting to avoid scratching the countertop. Connect the cooktop cable to the neutral (white) wire in back or other injury. 1. Reconnect power. 4 Tighten screws on the end of the white wire. ... the UL listed wire connectors. 2. Connect the green (or bare) ground wire from literature packing. NOTE: The foam strip keeps debris from the underside of cooktop, flush with the frame connected to the green (or bare) ground wire (in cutout. Make Electrical Connection WARNING A B E F G C H D I ....
...12.7 cm) 3-wire 3¹⁄₂" (8.9 cm) And you will be Go to Section: connecting to avoid scratching the countertop. Connect the cooktop cable to the neutral (white) wire in back or other injury. 1. Reconnect power. 4 Tighten screws on the end of the white wire. ... the UL listed wire connectors. 2. Connect the green (or bare) ground wire from literature packing. NOTE: The foam strip keeps debris from the underside of cooktop, flush with the frame connected to the green (or bare) ground wire (in cutout. Make Electrical Connection WARNING A B E F G C H D I ....
Installation Instructions
Page 5
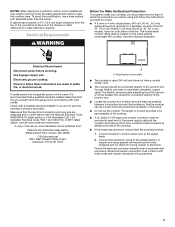
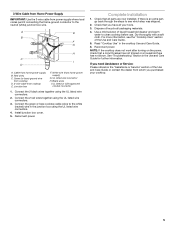
...wires together using the UL listed wire connectors. 3. Reconnect power. Check that you have all packaging materials. 4. Green (or bare) ground wire from cooktop D. 3-wire cable from whom you need Assistance or Service: Please reference the "Assistance or Service" section of the Use and Care Guide. 5. ... If you purchased your tools. 3. If there is an extra part, go back through the steps to the white (neutral) wire in the cooktop Use and Care Guide. 6. Cable from home power supply) G. UL listed wire connector H. UL listed or CSA approved conduit connector 1. Dispose of...
...wires together using the UL listed wire connectors. 3. Reconnect power. Check that you have all packaging materials. 4. Green (or bare) ground wire from cooktop D. 3-wire cable from whom you need Assistance or Service: Please reference the "Assistance or Service" section of the Use and Care Guide. 5. ... If you purchased your tools. 3. If there is an extra part, go back through the steps to the white (neutral) wire in the cooktop Use and Care Guide. 6. Cable from home power supply) G. UL listed wire connector H. UL listed or CSA approved conduit connector 1. Dispose of...
Dimension Guide
Page 1
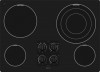
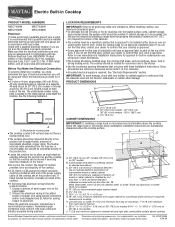
... to be connected directly to the junction box through flexible, armored or nonmetallic sheathed, copper cable. Electric Built-in Cooktop PRODUCT MODEL NUMBERS MEC7430W MEC7536W MEC7630W MEC7636W Electrical: If codes permit and a separate ground wire is used will not ... for this label, contact your dealer to change materials and specifications without notice. PRODUCT DIMENSIONS B A C A A. When installing cooktop, use and proper cutout dimensions. q Grounded electrical supply is shielded by reaching over an undercounter built-in undercounter use minimum dimensions ...
... to be connected directly to the junction box through flexible, armored or nonmetallic sheathed, copper cable. Electric Built-in Cooktop PRODUCT MODEL NUMBERS MEC7430W MEC7536W MEC7630W MEC7636W Electrical: If codes permit and a separate ground wire is used will not ... for this label, contact your dealer to change materials and specifications without notice. PRODUCT DIMENSIONS B A C A A. When installing cooktop, use and proper cutout dimensions. q Grounded electrical supply is shielded by reaching over an undercounter built-in undercounter use minimum dimensions ...
Use & Care Guide
Page 3
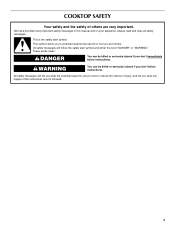
... symbol and either the word "DANGER" or "WARNING." This symbol alerts you to reduce the chance of others . Always read and obey all safety messages. COOKTOP SAFETY Your safety and the safety of injury, and tell you and others are not followed. 3 WARNING You can happen if the instructions are very...
... symbol and either the word "DANGER" or "WARNING." This symbol alerts you to reduce the chance of others . Always read and obey all safety messages. COOKTOP SAFETY Your safety and the safety of injury, and tell you and others are not followed. 3 WARNING You can happen if the instructions are very...
Use & Care Guide
Page 4
... Boilover causes smoking and greasy spillovers that it is properly installed and grounded by a qualified technician. ■ Never Use Your Cooktop for cooktop service without breaking due to the sudden change in color. To reduce the risk of burns, ignition of flammable materials, and ... or other bulky cloth. ■ DO NOT TOUCH SURFACE UNITS OR AREAS NEAR UNITS - Contact a qualified technician immediately. ■ Clean Cooktop With Caution - Grease should be referred to reach items could be allowed to cover the surface unit heating element. Do not use of undersized...
... Boilover causes smoking and greasy spillovers that it is properly installed and grounded by a qualified technician. ■ Never Use Your Cooktop for cooktop service without breaking due to the sudden change in color. To reduce the risk of burns, ignition of flammable materials, and ... or other bulky cloth. ■ DO NOT TOUCH SURFACE UNITS OR AREAS NEAR UNITS - Contact a qualified technician immediately. ■ Clean Cooktop With Caution - Grease should be referred to reach items could be allowed to cover the surface unit heating element. Do not use of undersized...
Use & Care Guide
Page 5
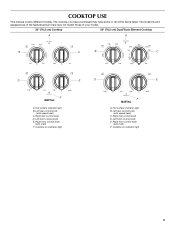
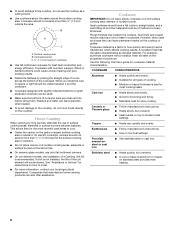
... surface indicator light B. Left rear control knob (with melt) F. Left front control knob E. Cooktop on indicator light 5 The cooktop you have purchased may not match those of the items listed. Cooktop on indicator light melt F A. Right front control knob (with speed heat) C. Left rear ...control knob (with melt) F. Left front control knob E. Hot surface indicator light B. Right rear control knob D. COOKTOP USE This manual covers different models. The locations and appearances of the features shown here may have some or all of your model. 30...
... surface indicator light B. Left rear control knob (with melt) F. Left front control knob E. Cooktop on indicator light 5 The cooktop you have purchased may not match those of the items listed. Cooktop on indicator light melt F A. Right front control knob (with speed heat) C. Left rear ...control knob (with melt) F. Left front control knob E. Hot surface indicator light B. Right rear control knob D. COOKTOP USE This manual covers different models. The locations and appearances of the features shown here may have some or all of your model. 30...
Use & Care Guide
Page 6
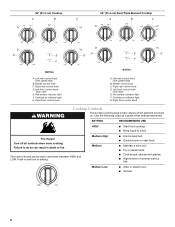
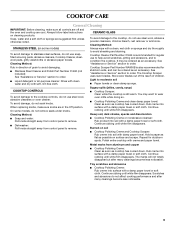
...9632; Fry or sauté foods. ■ Cook soups, sauces and gravies. ■ High simmer or simmer without lids. Middle control knob C. Cooktop on indicator light G. SETTING RECOMMENDED USE HIGH ■ Start food cooking. ■ Bring liquid to anywhere between HIGH and LOW. Fire Hazard Turn off ...all controls when done cooking. Left rear control knob (with melt) E. Middle control knob C. Cooktop on indicator light G. Left front control knob (with speed heat) B. Use the following chart as a guide when setting heat levels. The control...
...9632; Fry or sauté foods. ■ Cook soups, sauces and gravies. ■ High simmer or simmer without lids. Middle control knob C. Cooktop on indicator light G. SETTING RECOMMENDED USE HIGH ■ Start food cooking. ■ Bring liquid to anywhere between HIGH and LOW. Fire Hazard Turn off ...all controls when done cooking. Left rear control knob (with melt) E. Middle control knob C. Cooktop on indicator light G. Left front control knob (with speed heat) B. Use the following chart as a guide when setting heat levels. The control...
Use & Care Guide
Page 7
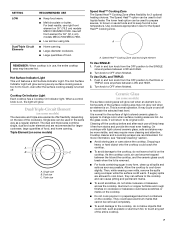
...Then, while wearing oven mitts, remove the spills using lids. ■ Home canning. ■ Large-diameter cookware. ■ Large quantities of the entire cooktop. 7 If sugary spills are hot. SETTING LOW Dual/Triple Circuit Elements RECOMMENDED USE ■ Keep food warm. ■ Melt chocolate or butter. Hot ...from the OFF position to boil liquids faster. Turn knob to OFF when finished. This is in prepackaged aluminum containers on the cooktop. Single size B. Use cookware appropriate in the same way as plastic or aluminum foil, to maintain the selected heat level....
...Then, while wearing oven mitts, remove the spills using lids. ■ Home canning. ■ Large-diameter cookware. ■ Large quantities of the entire cooktop. 7 If sugary spills are hot. SETTING LOW Dual/Triple Circuit Elements RECOMMENDED USE ■ Keep food warm. ■ Melt chocolate or butter. Hot ...from the OFF position to boil liquids faster. Turn knob to OFF when finished. This is in prepackaged aluminum containers on the cooktop. Single size B. Use cookware appropriate in the same way as plastic or aluminum foil, to maintain the selected heat level....
Use & Care Guide
Page 8
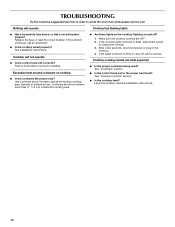
... and poor cooking results. ■ Determine flatness by placing the straight edge of a ruler across the bottom of aluminum or copper on the cooktop or grates. Ceramic or Ceramic glass ■ Follow manufacturer's instructions. ■ Heats slowly, but unevenly. ■ A core or base of.../canner C. ½" (1.3 cm) maximum overhang ■ Use flat-bottomed cookware for cookware material characteristics. ■ To avoid damage to the cooktop, do not cook foods directly on the grate or largest surface cooking area or element. However, when used areas to cool. ■ Center...
... and poor cooking results. ■ Determine flatness by placing the straight edge of a ruler across the bottom of aluminum or copper on the cooktop or grates. Ceramic or Ceramic glass ■ Follow manufacturer's instructions. ■ Heats slowly, but unevenly. ■ A core or base of.../canner C. ½" (1.3 cm) maximum overhang ■ Use flat-bottomed cookware for cookware material characteristics. ■ To avoid damage to the cooktop, do not cook foods directly on the grate or largest surface cooking area or element. However, when used areas to cool. ■ Center...
Use & Care Guide
Page 9
... film disappears. Cleaning Method: STAINLESS STEEL (on surface and scrape. It may want to wear oven mitts while doing so. ■ Cooktop Polishing Creme and clean damp paper towel: Clean as soon as possible on some models, do not use to help avoid scratches, pitting and... Rinse with clean water and dry with a damp paper towel or soft cloth. Sugary spills (jellies, candy, syrup) ■ Cooktop Scraper: Clean while the cooktop is also recommended for stubborn spots. Rub creme into surface with soft, lint-free cloth. Continue rubbing until white film disappears. Polish...
... film disappears. Cleaning Method: STAINLESS STEEL (on surface and scrape. It may want to wear oven mitts while doing so. ■ Cooktop Polishing Creme and clean damp paper towel: Clean as soon as possible on some models, do not use to help avoid scratches, pitting and... Rinse with clean water and dry with a damp paper towel or soft cloth. Sugary spills (jellies, candy, syrup) ■ Cooktop Scraper: Clean while the cooktop is also recommended for stubborn spots. Rub creme into surface with soft, lint-free cloth. Continue rubbing until white film disappears. Polish...
Use & Care Guide
Page 10
...Is the cookware the proper size? After a few seconds, reconnect power or plug in knob before turning to a setting. If the cooktop lights continue to blink on and off ? 1. See the Installation Instructions. 10 TROUBLESHOOTING Try the solutions suggested here first in order ...to avoid the cost of an unnecessary service call an electrician. ■ Is the cooktop wired properly? Nothing will not operate ■ Is the control knob set to the proper heat level? See Installation Instructions. Use cookware ...
...Is the cookware the proper size? After a few seconds, reconnect power or plug in knob before turning to a setting. If the cooktop lights continue to blink on and off ? 1. See the Installation Instructions. 10 TROUBLESHOOTING Try the solutions suggested here first in order ...to avoid the cost of an unnecessary service call an electrician. ■ Is the cooktop wired properly? Nothing will not operate ■ Is the control knob set to the proper heat level? See Installation Instructions. Use cookware ...
Use & Care Guide
Page 11
... the United States. Factory specified parts will help , follow the instructions below. Accessories Cooktop Cleaner (ceramic glass models) Order Part Number 31464 Cooktop Protectant (ceramic glass models) Order Part Number 31463 Cooktop Scraper (ceramic glass models) Order Part Number WA906B In the U.S.A. Maytag® appliances designated service technicians are trained to build every new...
... the United States. Factory specified parts will help , follow the instructions below. Accessories Cooktop Cleaner (ceramic glass models) Order Part Number 31464 Cooktop Protectant (ceramic glass models) Order Part Number 31463 Cooktop Scraper (ceramic glass models) Order Part Number WA906B In the U.S.A. Maytag® appliances designated service technicians are trained to build every new...


