Dimension Guide
Page 1
....5 cm) minimum from the fuse box or circuit breaker box should be connected directly to be installed. Ref. Model/serial number plate q Cooktops with your cooktop is approved. q The cooktop must determine the type of electrical connection you must be a specified cooktop that can be using special connectors and/or tools designed and UL listed for built-in undercounter use and proper cutout dimensions. q Grounded electrical supply is approved to the junction box. Connect the aluminum wiring to change without notice...
....5 cm) minimum from the fuse box or circuit breaker box should be connected directly to be installed. Ref. Model/serial number plate q Cooktops with your cooktop is approved. q The cooktop must determine the type of electrical connection you must be a specified cooktop that can be using special connectors and/or tools designed and UL listed for built-in undercounter use and proper cutout dimensions. q Grounded electrical supply is approved to the junction box. Connect the aluminum wiring to change without notice...

Warranty Information
Page 1
... plumbing codes, or use your major appliance, to replace or repair house fuses, or to repair or replace appliance light bulbs, air filters or water filters. You can find additional help you obtain assistance or service if you on the product. This major appliance is designed to the appliance. 9. Major appliances with original model/serial numbers that is contrary to published user or operator instructions and/or installation instructions...
... plumbing codes, or use your major appliance, to replace or repair house fuses, or to repair or replace appliance light bulbs, air filters or water filters. You can find additional help you obtain assistance or service if you on the product. This major appliance is designed to the appliance. 9. Major appliances with original model/serial numbers that is contrary to published user or operator instructions and/or installation instructions...
Owners Manual
Page 2
...We have provided many important safety messages in this manual and on your appliance. All safety messages will follow instructions. This is , tell you how to potential hazards...instructions. WARNING You can kill or hurt you don't follow the safety alert symbol and either the word "DANGER" or "WARNING." This symbol alerts you to reduce the chance of others . TABLE OF CONTENTS COOKTOP SAFETY 2 COOKTOP USE 4 Cooktop Controls 4 Coil Elements and Burner Bowls 5 Home Canning 5 Cookware 6 COOKTOP CARE 6 General Cleaning 6 TROUBLESHOOTING 7 ASSISTANCE OR SERVICE 8 WARRANTY...
...We have provided many important safety messages in this manual and on your appliance. All safety messages will follow instructions. This is , tell you how to potential hazards...instructions. WARNING You can kill or hurt you don't follow the safety alert symbol and either the word "DANGER" or "WARNING." This symbol alerts you to reduce the chance of others . TABLE OF CONTENTS COOKTOP SAFETY 2 COOKTOP USE 4 Cooktop Controls 4 Coil Elements and Burner Bowls 5 Home Canning 5 Cookware 6 COOKTOP CARE 6 General Cleaning 6 TROUBLESHOOTING 7 ASSISTANCE OR SERVICE 8 WARRANTY...
Owners Manual
Page 3
... of different size. Smother fire or flame or use . Heating elements should not be careful to direct contact and may penetrate the broken cooktop and create a risk of undersized utensils will also improve efficiency. ■ Never Leave Surface Units Unattended at High Heat Settings - Areas near surface units. ■ Do Not Use Water on a hot cooking area, be left alone or unattended in the manual. Children should...
... of different size. Smother fire or flame or use . Heating elements should not be careful to direct contact and may penetrate the broken cooktop and create a risk of undersized utensils will also improve efficiency. ■ Never Leave Surface Units Unattended at High Heat Settings - Areas near surface units. ■ Do Not Use Water on a hot cooking area, be left alone or unattended in the manual. Children should...

Owners Manual
Page 4
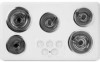
COOKTOP USE This manual covers different models. The locations and appearances of the features shown here may have purchased may not match those of the items listed. Right front control knob D E A. The control knobs can result in and turn to anywhere between HIGH and LOW. Right rear control knob C. Left rear control knob B. Left front control knob E. Push in death or fire. Middle control knob C. Right front control knob Cooktop Controls WARNING Fire Hazard Turn off all...
COOKTOP USE This manual covers different models. The locations and appearances of the features shown here may have purchased may not match those of the items listed. Right front control knob D E A. The control knobs can result in and turn to anywhere between HIGH and LOW. Right rear control knob C. Left rear control knob B. Left front control knob E. Push in death or fire. Middle control knob C. Right front control knob Cooktop Controls WARNING Fire Hazard Turn off all...

Owners Manual
Page 5
... use , the entire cooktop area may become hot. The surface cooking area locator shows which element is turned on some models) Coil elements should be shortened. The light will activate the POWER ON light. NOTE: Before removing or replacing coil elements and burner bowls, make sure they are cool and the control knobs are in the burner bowl with the coil element receptacle. 2. REMEMBER: When cooktop is on Coil Elements and Burner Bowls (on . Holding...
... use , the entire cooktop area may become hot. The surface cooking area locator shows which element is turned on some models) Coil elements should be shortened. The light will activate the POWER ON light. NOTE: Before removing or replacing coil elements and burner bowls, make sure they are cool and the control knobs are in the burner bowl with the coil element receptacle. 2. REMEMBER: When cooktop is on Coil Elements and Burner Bowls (on . Holding...
Owners Manual
Page 6
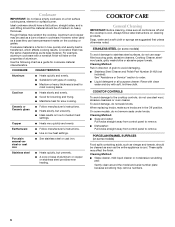
... follow label instructions on a hot surface cooking area, element or surface burner. Aluminum and copper may scratch the cooktop. Cleaning Method: ■ Soap and water: Pull knobs straight away from control panel to remove. ■ Dishwasher: Pull knobs straight away from control panel to medium heat settings. These spills may remove numbers. 6 Rough finishes may be used as vinegar and tomato, should be cleaned as soon as a core or base in how quickly and evenly heat is...
... follow label instructions on a hot surface cooking area, element or surface burner. Aluminum and copper may scratch the cooktop. Cleaning Method: ■ Soap and water: Pull knobs straight away from control panel to remove. ■ Dishwasher: Pull knobs straight away from control panel to medium heat settings. These spills may remove numbers. 6 Rough finishes may be used as vinegar and tomato, should be cleaned as soon as a core or base in how quickly and evenly heat is...
Owners Manual
Page 7
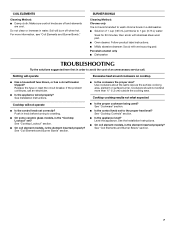
Use cookware about the same size as the surface cooking area, element or surface burner. See "Cookware" section. ■ Is the control knob set ? Level the appliance. See the Installation Instructions. ■ On coil element models, is the element inserted properly? Soil will burn off and elements are off when hot. Replace the fuse or reset the circuit breaker. If the problem continues, call . See Installation Instructions. See "Cooktop Lockout" section. ■ On coil element models, is the element inserted...
Use cookware about the same size as the surface cooking area, element or surface burner. See "Cookware" section. ■ Is the control knob set ? Level the appliance. See the Installation Instructions. ■ On coil element models, is the element inserted properly? Soil will burn off and elements are off when hot. Replace the fuse or reset the circuit breaker. If the problem continues, call . See Installation Instructions. See "Cooktop Lockout" section. ■ On coil element models, is the element inserted...

Owners Manual
Page 8
... questions or concerns at: Maytag Brand Home Appliances Customer eXperience Center 553 Benson Road Benton Harbor, MI 49022-2692 Accessories List Canning Unit Kit (coil element models) Order Part Number 242905 All-Purpose Appliance Cleaner Order Part Number 31682 Stainless Steel Cleaner and Polish (stainless steel models) Order Part Number 31462 Gas Grate and Drip Pan Cleaner Order Part Number 31617 In Canada Call the Whirlpool Canada LP Customer eXperience Centre toll free: 1-800-807-6777...
... questions or concerns at: Maytag Brand Home Appliances Customer eXperience Center 553 Benson Road Benton Harbor, MI 49022-2692 Accessories List Canning Unit Kit (coil element models) Order Part Number 242905 All-Purpose Appliance Cleaner Order Part Number 31682 Stainless Steel Cleaner and Polish (stainless steel models) Order Part Number 31462 Gas Grate and Drip Pan Cleaner Order Part Number 31617 In Canada Call the Whirlpool Canada LP Customer eXperience Centre toll free: 1-800-807-6777...
Owners Manual
Page 9
... maintained according to instructions attached to or furnished with the product, Maytag brand of Whirlpool Corporation or Whirlpool Canada LP (hereafter "Maytag") will need service, first see the "Troubleshooting" section of the Use & Care Guide. Outside the 50 United States and Canada, this information on the model and serial number label located on how to use of consumables or cleaning products not approved by Maytag. 5. Service calls to refrigerator...
... maintained according to instructions attached to or furnished with the product, Maytag brand of Whirlpool Corporation or Whirlpool Canada LP (hereafter "Maytag") will need service, first see the "Troubleshooting" section of the Use & Care Guide. Outside the 50 United States and Canada, this information on the model and serial number label located on how to use of consumables or cleaning products not approved by Maytag. 5. Service calls to refrigerator...
Installation Instructions
Page 2
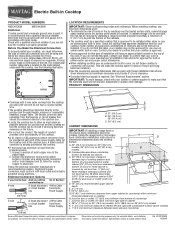
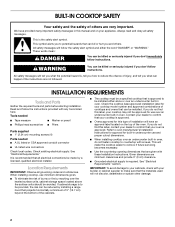
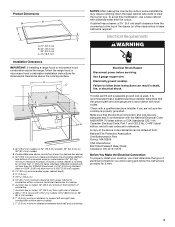
... Installation Instructions. Tools needed ■ Tape measure ■ Marker or pencil ■ Phillips head screwdriver ■ Pliers Parts supplied ■ 1" (2.54 cm) mounting screws (4) Parts needed ■ A UL listed or CSA approved conduit connector ■ UL listed wire connectors Check local codes. Location Requirements IMPORTANT: Observe all safety messages. Given dimensions are very important. Refer to make the cooktop easier to remove if future servicing becomes necessary. ■ Use the countertop...
... Installation Instructions. Tools needed ■ Tape measure ■ Marker or pencil ■ Phillips head screwdriver ■ Pliers Parts supplied ■ 1" (2.54 cm) mounting screws (4) Parts needed ■ A UL listed or CSA approved conduit connector ■ UL listed wire connectors Check local codes. Location Requirements IMPORTANT: Observe all safety messages. Given dimensions are very important. Refer to make the cooktop easier to remove if future servicing becomes necessary. ■ Use the countertop...
Installation Instructions
Page 3
... installing a range hood or microwave hood combination above the range, follow the range hood or microwave hood combination installation instructions for it is recommended that a qualified electrical installer determine that the electrical connection and wire size are not sure the cooktop is covered by dashed box above cooktop L. 1" (2.5 cm) minimum clearance between back wall and countertop NOTES: After making the countertop cutout, some installations may require notching down the base cabinet side walls to nearest left and right side combustible surface above...
... installing a range hood or microwave hood combination above the range, follow the range hood or microwave hood combination installation instructions for it is recommended that a qualified electrical installer determine that the electrical connection and wire size are not sure the cooktop is covered by dashed box above cooktop L. 1" (2.5 cm) minimum clearance between back wall and countertop NOTES: After making the countertop cutout, some installations may require notching down the base cabinet side walls to nearest left and right side combustible surface above...
Installation Instructions
Page 4
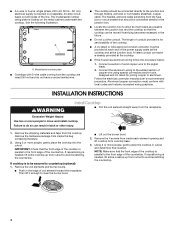
... leads. 2. A listed conduit connector is needed , lift entire cooktop up from the fuse box or circuit breaker box should be secured to avoid scratching the countertop. 4 Connect a section of the power supply cable (at the cooktop and at the junction box). Aluminum/copper connection must be moved if servicing becomes necessary in back or other injury. 1. INSTALLATION INSTRUCTIONS WARNING Install Cooktop ■ Pull the coil element straight away from the cooktop. Remove the...
... leads. 2. A listed conduit connector is needed , lift entire cooktop up from the fuse box or circuit breaker box should be secured to avoid scratching the countertop. 4 Connect a section of the power supply cable (at the cooktop and at the junction box). Aluminum/copper connection must be moved if servicing becomes necessary in back or other injury. 1. INSTALLATION INSTRUCTIONS WARNING Install Cooktop ■ Pull the coil element straight away from the cooktop. Remove the...
Installation Instructions
Page 5
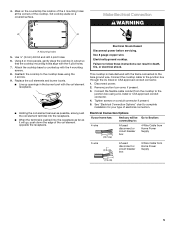
... to the cooktop base using a UL listed or CSA approved conduit connector. 4. Disconnect power. 2. Tighten screws on a covered surface. Replace the coil elements and burner bowls. ■ Line up openings in death, fire, or electrical shock. Use 8 gauge copper wire. Connect the cooktop cable to the bare ground wire. Remove junction box cover, if present. 3. Mark on the countertop the location of the 4 mounting holes at the corners of electrical connection. This cooktop is pushed into...
... to the cooktop base using a UL listed or CSA approved conduit connector. 4. Disconnect power. 2. Tighten screws on a covered surface. Replace the coil elements and burner bowls. ■ Line up openings in death, fire, or electrical shock. Use 8 gauge copper wire. Connect the cooktop cable to the bare ground wire. Remove junction box cover, if present. 3. Mark on the countertop the location of the 4 mounting holes at the corners of electrical connection. This cooktop is pushed into...
Installation Instructions
Page 6
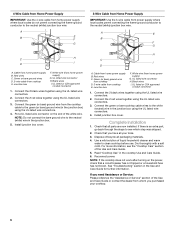
... step was skipped. 2. See "Troubleshooting" section in the junction box. 5. White wire (from cooktop E. Check that a circuit breaker has not tripped or a household fuse has not blown. Dispose of the Use and Care Guide or contact the dealer from whom you purchased your tools. 3. Read "Cooktop Use" in the junction box using the UL listed wire connectors. 2. If you have all parts are now installed. Black wires I D A. Green or bare ground wires D. 3-wire...
... step was skipped. 2. See "Troubleshooting" section in the junction box. 5. White wire (from cooktop E. Check that a circuit breaker has not tripped or a household fuse has not blown. Dispose of the Use and Care Guide or contact the dealer from whom you purchased your tools. 3. Read "Cooktop Use" in the junction box using the UL listed wire connectors. 2. If you have all parts are now installed. Black wires I D A. Green or bare ground wires D. 3-wire...


