
Owners Manual
Page 2
... for use in accordance with the circuit conductors and connected to reduce the risk of electric shock. As the gas is installed and grounded in a dishwasher, and keep them out of the reach of a malfunction or breakdown, grounding will release any accumulated hydrogen gas. SAVE ...not open flame during this time. ■ Do not touch the heating element during or immediately after use an open dishwasher drawer until inside cabinet opening. The dishwasher is properly grounded. The plug must be produced in a hot water system that is flammable, do not allow children...
... for use in accordance with the circuit conductors and connected to reduce the risk of electric shock. As the gas is installed and grounded in a dishwasher, and keep them out of the reach of a malfunction or breakdown, grounding will release any accumulated hydrogen gas. SAVE ...not open flame during this time. ■ Do not touch the heating element during or immediately after use an open dishwasher drawer until inside cabinet opening. The dishwasher is properly grounded. The plug must be produced in a hot water system that is flammable, do not allow children...
Owners Manual
Page 6
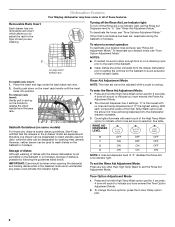
... the Rinse Aid Dispenser level to wash dishes on the insert rack handle until the insert locks into the dishwasher drawers increases. 3. Large insert B. To install rack insert: 1. To reactivate your desired rinse aid level, see "Rinse Aid Adjustment Mode." Gently push ...drawer dishwasher is the lowest with each consecutive press of the High Temp Wash option pad, the amount of dishes is running. With each touch of "0" disables the Rinse-Aid Low indicator light. To remove rack insert: Gently pull in the 2-drawer model are washing. B Dishwasher Features Your Maytag dishwasher...
... the Rinse Aid Dispenser level to wash dishes on the insert rack handle until the insert locks into the dishwasher drawers increases. 3. Large insert B. To install rack insert: 1. To reactivate your desired rinse aid level, see "Rinse Aid Adjustment Mode." Gently push ...drawer dishwasher is the lowest with each consecutive press of the High Temp Wash option pad, the amount of dishes is running. With each touch of "0" disables the Rinse-Aid Low indicator light. To remove rack insert: Gently pull in the 2-drawer model are washing. B Dishwasher Features Your Maytag dishwasher...
Owners Manual
Page 7
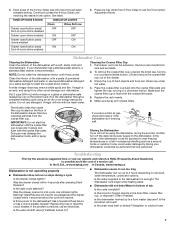
... Is the water shutoff valve (if installed) turned on? ■ Dishwasher seems to 3 hours depending on the bottom rack. Clean if needed. Is the drain hose bent or kinked? 3. If your dishwasher. Cleaning the Coarse Filter Cup 1. Was the drawer closed within 4 seconds before the cycle... Rinse cup under hot water. 4. In the U.S.A., www.maytag.com In Canada, www.maytag.ca Dishwasher is left in place and flush with a soft, damp cloth and mild detergent. Vinegar will not be pressed and the drawer closed tightly? Replace the rack inserts. 6. Continue to exit...
... Is the water shutoff valve (if installed) turned on? ■ Dishwasher seems to 3 hours depending on the bottom rack. Clean if needed. Is the drain hose bent or kinked? 3. If your dishwasher. Cleaning the Coarse Filter Cup 1. Was the drawer closed within 4 seconds before the cycle... Rinse cup under hot water. 4. In the U.S.A., www.maytag.com In Canada, www.maytag.ca Dishwasher is left in place and flush with a soft, damp cloth and mild detergent. Vinegar will not be pressed and the drawer closed tightly? Replace the rack inserts. 6. Continue to exit...
Owners Manual
Page 8
... main wash section of effective detergent? This is the detergent dispenser lid hitting the drawer. Load the dishes and glasses so they are permanent and cannot be effective. Refill rinse aid dispenser. See "Installation Instructions." ■ Odor in the dishwasher and cause marking. Always use a rinse aid? Is detergent still in your water...
... main wash section of effective detergent? This is the detergent dispenser lid hitting the drawer. Load the dishes and glasses so they are permanent and cannot be effective. Refill rinse aid dispenser. See "Installation Instructions." ■ Odor in the dishwasher and cause marking. Always use a rinse aid? Is detergent still in your water...
Owners Manual
Page 9
... © 2008. Service calls to correct the installation of your major appliance, to instruct you need further assistance, you may contact Maytag at the address below . Consumable parts are excluded from your home of the upper drawer. Repairs to parts or systems resulting from unauthorized ...or service in your correspondence. The removal and reinstallation of your major appliance if it is installed in an inaccessible location or is not installed in a remote area where service by Maytag. 5. Repairs when your product or you do not have been removed, altered or cannot...
... © 2008. Service calls to correct the installation of your major appliance, to instruct you need further assistance, you may contact Maytag at the address below . Consumable parts are excluded from your home of the upper drawer. Repairs to parts or systems resulting from unauthorized ...or service in your correspondence. The removal and reinstallation of your major appliance if it is installed in an inaccessible location or is not installed in a remote area where service by Maytag. 5. Repairs when your product or you do not have been removed, altered or cannot...
Installation Instructions
Page 3
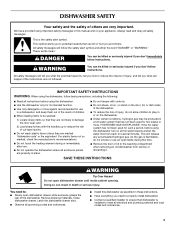
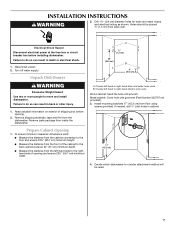
.... SAVE THESE INSTRUCTIONS WARNING Tip Over Hazard Do not open flame during or immediately after use in a hot water system that dishwasher is installed to : ■ Slowly open dishwasher drawer while someone grasps the rear of the dishwasher. WARNING You can be killed or seriously injured if you don't follow instructions. You need to properly...
.... SAVE THESE INSTRUCTIONS WARNING Tip Over Hazard Do not open flame during or immediately after use in a hot water system that dishwasher is installed to : ■ Slowly open dishwasher drawer while someone grasps the rear of the dishwasher. WARNING You can be killed or seriously injured if you don't follow instructions. You need to properly...
Installation Instructions
Page 4
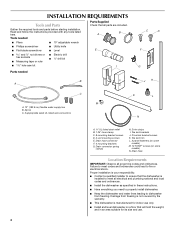
... models) N. Drain hose Location Requirements IMPORTANT: Observe all electrical and plumbing national and local codes and ordinances. ■ Install the dishwasher as specified in an area suitable for indoor use only. ■ Install and level dishwasher on some models) M. 10 TORX®† screws (on a floor that will hold the weight, and in these...
... models) N. Drain hose Location Requirements IMPORTANT: Observe all electrical and plumbing national and local codes and ordinances. ■ Install the dishwasher as specified in an area suitable for indoor use only. ■ Install and level dishwasher on some models) M. 10 TORX®† screws (on a floor that will hold the weight, and in these...
Installation Instructions
Page 5
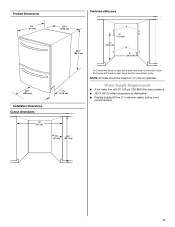
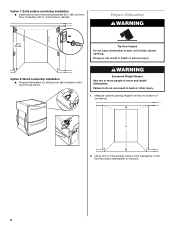
NOTE: All holes should be drilled at dishwasher. ■ Flexible braided fill line (½" minimum plastic tubing is not recommended). 5 Choose left -hand or right-hand electric connection route. Water Supply Requirements ■ A ...³⁄₄" (85.7 cm) A ¹⁄₂" (1.3 cm) 25" (63.5 cm) B 8" (20.3 cm) 19¹⁄₄" (48.9 cm) 1¹⁄₂" (3.75 cm) Installation Clearances Cutout dimensions 24" (61 cm) 24" (61 cm) 33⁷⁄₈" (85,7 cm) A.
NOTE: All holes should be drilled at dishwasher. ■ Flexible braided fill line (½" minimum plastic tubing is not recommended). 5 Choose left -hand or right-hand electric connection route. Water Supply Requirements ■ A ...³⁄₄" (85.7 cm) A ¹⁄₂" (1.3 cm) 25" (63.5 cm) B 8" (20.3 cm) 19¹⁄₄" (48.9 cm) 1¹⁄₂" (3.75 cm) Installation Clearances Cutout dimensions 24" (61 cm) 24" (61 cm) 33⁷⁄₈" (85,7 cm) A.
Installation Instructions
Page 6
...supply. ■ Copper wire only. Do not use an adapter. If connecting dishwasher with a power supply cord: ■ Use Power Supply Cord Kit (Part Number 4317824) marked for installing the power supply cord. ■ Power supply cord must be connected to heat ...risk of electric shock by a qualified electrician. ■ For a permanently connected dishwasher: The dishwasher must be connected to a grounded metal, permanent wiring system, or an equipmentgrounding conductor must have a proper outlet installed by providing a path of the counter, or be grounded. Do not remove ground...
...supply. ■ Copper wire only. Do not use an adapter. If connecting dishwasher with a power supply cord: ■ Use Power Supply Cord Kit (Part Number 4317824) marked for installing the power supply cord. ■ Power supply cord must be connected to heat ...risk of electric shock by a qualified electrician. ■ For a permanently connected dishwasher: The dishwasher must be connected to a grounded metal, permanent wiring system, or an equipmentgrounding conductor must have a proper outlet installed by providing a path of the counter, or be grounded. Do not remove ground...
Installation Instructions
Page 7
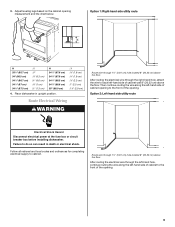
...at the fuse box or circuit breaker box before opening and ensure 23½" (59.7 cm) minimum width. Failure to move and install dishwasher. Unpack Dish Drawer WARNING Excessive Weight Hazard Use two or more people to do so can result in cabinet. 17" (43.2 cm) 4. To ... and ensure 24" (61 cm) minimum depth. ■ Measure the distance from the left-hand side to the righthand side of shipping box before installing dishwasher. Choose left -hand or right-hand electric wire route. If needed, drill ¹⁄₈" pilot holes in death or electrical shock. 1. Disconnect...
...at the fuse box or circuit breaker box before opening and ensure 23½" (59.7 cm) minimum width. Failure to move and install dishwasher. Unpack Dish Drawer WARNING Excessive Weight Hazard Use two or more people to do so can result in cabinet. 17" (43.2 cm) 4. To ... and ensure 24" (61 cm) minimum depth. ■ Measure the distance from the left-hand side to the righthand side of shipping box before installing dishwasher. Choose left -hand or right-hand electric wire route. If needed, drill ¹⁄₈" pilot holes in death or electrical shock. 1. Disconnect...
Installation Instructions
Page 8
... to do so can result in cabinet. Doing so can result in back or other injury. 1. Option 2: Wood countertop installation ■ Prepare dishwasher by folding over tabs located on the top front as shown. 8 4 EHLOAYURS START WARNING Excessive Weight Hazard Use two or...move and install dishwasher. If needed, drill ¹⁄₈" pilot holes in death or serious injury. Option 1: Solid surface countertop installation ■ Install second set of countertop. Prepare Dishwasher WARNING 33¹⁄₂" (85 cm) Tip Over Hazard Do not open dishwasher drawer until ...
... to do so can result in cabinet. Doing so can result in back or other injury. 1. Option 2: Wood countertop installation ■ Prepare dishwasher by folding over tabs located on the top front as shown. 8 4 EHLOAYURS START WARNING Excessive Weight Hazard Use two or...move and install dishwasher. If needed, drill ¹⁄₈" pilot holes in death or serious injury. Option 1: Solid surface countertop installation ■ Install second set of countertop. Prepare Dishwasher WARNING 33¹⁄₂" (85 cm) Tip Over Hazard Do not open dishwasher drawer until ...
Installation Instructions
Page 9
...;₂" (87.6 cm) 34⁵⁄₈" (87.9 cm) 34³⁄₄" (88.3 cm) 34⁷⁄₈" (88.6 cm) 35" (88.9 cm) 4. Place dishwasher in death or electrical shock. Option 2: Left-hand side utility route Electrical Shock Hazard Disconnect electrical power at the fuse box or circuit breaker box...
...;₂" (87.6 cm) 34⁵⁄₈" (87.9 cm) 34³⁄₄" (88.3 cm) 34⁷⁄₈" (88.6 cm) 35" (88.9 cm) 4. Place dishwasher in death or electrical shock. Option 2: Left-hand side utility route Electrical Shock Hazard Disconnect electrical power at the fuse box or circuit breaker box...

Installation Instructions
Page 12
... 3: Waste disposer and drain air gap A Make Electrical Connection WARNING Electrical Shock Hazard Disconnect electrical power at the fuse box or circuit breaker box before installing dishwasher. Remove cover. Waste Option 4: No waste disposer, no drain air gap A 2. B C A. Route electrical wires through strain relief and secure to the water waste line using...
... 3: Waste disposer and drain air gap A Make Electrical Connection WARNING Electrical Shock Hazard Disconnect electrical power at the fuse box or circuit breaker box before installing dishwasher. Remove cover. Waste Option 4: No waste disposer, no drain air gap A 2. B C A. Route electrical wires through strain relief and secure to the water waste line using...
Installation Instructions
Page 13
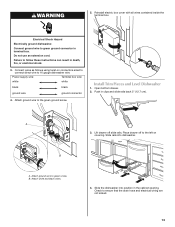
...rails. Connect wires as follows using twist-on covering. Open bottom drawer. 2. Slide rails into position in death, fire, or electrical shock. 3. Electrical Shock Hazard Electrically ground dishwasher. Install Trim Pieces and Level Dishwasher 1. Attach ground wire to the green ground screw. Attach white... WARNING 5. Power supply wire: Terminal box wire: white white black black ground wire ground connector 4. Slide the dishwasher into dishwasher. 11 2 2 4. Reinstall electric box cover with all wires contained inside the terminal box. Push in terminal box. Failure to...
...rails. Connect wires as follows using twist-on covering. Open bottom drawer. 2. Slide rails into position in death, fire, or electrical shock. 3. Electrical Shock Hazard Electrically ground dishwasher. Install Trim Pieces and Level Dishwasher 1. Attach ground wire to the green ground screw. Attach white... WARNING 5. Power supply wire: Terminal box wire: white white black black ground wire ground connector 4. Slide the dishwasher into dishwasher. 11 2 2 4. Reinstall electric box cover with all wires contained inside the terminal box. Push in terminal box. Failure to...
Installation Instructions
Page 15
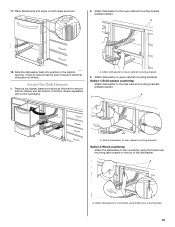
... the folded over mounting tabs. 15 Attach dishwasher to the side cabinet mounting brackets (installed earlier). Option 1: Solid surface countertop Attach dishwasher to the lower cabinet mounting bracket (installed earlier). Attach dishwasher to the countertop using folded over mounting tabs located on bottom drawer separated with corner packaging. Attach dishwasher to lower cabinet mounting bracket. 3. 11. A 12...
... the folded over mounting tabs. 15 Attach dishwasher to the side cabinet mounting brackets (installed earlier). Option 1: Solid surface countertop Attach dishwasher to the lower cabinet mounting bracket (installed earlier). Attach dishwasher to the countertop using folded over mounting tabs located on bottom drawer separated with corner packaging. Attach dishwasher to lower cabinet mounting bracket. 3. 11. A 12...
Installation Instructions
Page 16
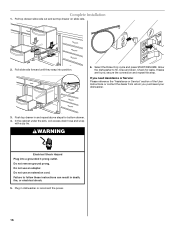
..., rinse and drain. Push top drawer in and repeat above steps for leaks. If leaks are found, secure the connection and repeat this step. If you need Assistance or Service: Please reference the "Assistance or Service" section of the User Instructions or contact the dealer from whom you purchased your dishwasher. 3. Complete Installation 1.
..., rinse and drain. Push top drawer in and repeat above steps for leaks. If leaks are found, secure the connection and repeat this step. If you need Assistance or Service: Please reference the "Assistance or Service" section of the User Instructions or contact the dealer from whom you purchased your dishwasher. 3. Complete Installation 1.


