Owners Manual
Page 1
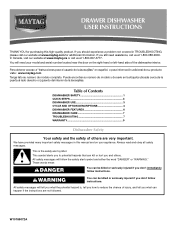
...9900. This symbol alerts you to reduce the chance of injury, and tell you what the potential hazard is the safety alert symbol. DRAWER DISHWASHER USER INSTRUCTIONS THANK YOU for additional information. WARNING You can kill or hurt you still need your appliance. If you and others are ...obtener acceso a "Instrucciones para el usuario de la lavavajillas" en español, o para información adicional de su producto visite : www.maytag.com Tenga listo su número de modelo completo. Puede encontrar su número de modelo y de serie en la etiqueta ubicada cerca de ...
...9900. This symbol alerts you to reduce the chance of injury, and tell you what the potential hazard is the safety alert symbol. DRAWER DISHWASHER USER INSTRUCTIONS THANK YOU for additional information. WARNING You can kill or hurt you still need your appliance. If you and others are ...obtener acceso a "Instrucciones para el usuario de la lavavajillas" en español, o para información adicional de su producto visite : www.maytag.com Tenga listo su número de modelo completo. Puede encontrar su número de modelo y de serie en la etiqueta ubicada cerca de ...
Owners Manual
Page 2
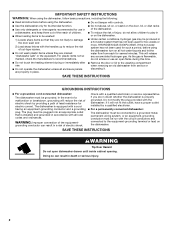
... it will not fit the outlet, have a proper outlet installed by providing a path of injury, do not smoke or use an open dishwasher drawer until inside cabinet opening. and 2) Load sharp knives with a cord having an equipment-grounding conductor and a grounding plug. If the hot ... for two weeks or more. This will reduce the risk of electric shock by a qualified electrician. ■ For a permanently connected dishwasher: The dishwasher must be connected to a grounded metal, permanent wiring system, or an equipment-grounding conductor must be plugged into an appropriate outlet that ...
... it will not fit the outlet, have a proper outlet installed by providing a path of injury, do not smoke or use an open dishwasher drawer until inside cabinet opening. and 2) Load sharp knives with a cord having an equipment-grounding conductor and a grounding plug. If the hot ... for two weeks or more. This will reduce the risk of electric shock by a qualified electrician. ■ For a permanently connected dishwasher: The dishwasher must be connected to a grounded metal, permanent wiring system, or an equipment-grounding conductor must be plugged into an appropriate outlet that ...
Owners Manual
Page 3
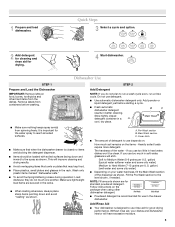
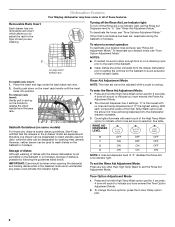
...too little in the rack. Pre-Wash section B. Remove labels from containers before starting a cycle. ■ Fresh automatic dishwasher detergent results in soft water, glassware will have excessive moisture. 3 This will improve cleaning and drying results. ■ Avoid... overlapping items like bowls or plates that when the dishwasher drawer is closed detergent container in the drawer dishwasher. Wash only plastic items marked "dishwasher safe." ■ To avoid thumping/clattering noises during operation: Load dishes so they do...
...too little in the rack. Pre-Wash section B. Remove labels from containers before starting a cycle. ■ Fresh automatic dishwasher detergent results in soft water, glassware will have excessive moisture. 3 This will improve cleaning and drying results. ■ Avoid... overlapping items like bowls or plates that when the dishwasher drawer is closed detergent container in the drawer dishwasher. Wash only plastic items marked "dishwasher safe." ■ To avoid thumping/clattering noises during operation: Load dishes so they do...
Owners Manual
Page 4
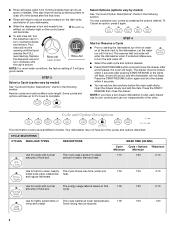
...of the dishes after pushing START/RESUME or the lights will flash, a tone will sound, and the dishwasher will not begin . Press the START/ RESUME then close the drawer. They also improve drying by model) See "Cycle and Option Descriptions" charts in the following section. Select...FULL level marking. Cycle and Option Descriptions This information covers several different models. cycle. Towel drying may not have a two drawer dishwasher model, each drawer has its own controls and can add an item anytime before the main wash starts. Replace the dispenser cap and turn ...
...of the dishes after pushing START/RESUME or the lights will flash, a tone will sound, and the dishwasher will not begin . Press the START/ RESUME then close the drawer. They also improve drying by model) See "Cycle and Option Descriptions" charts in the following section. Select...FULL level marking. Cycle and Option Descriptions This information covers several different models. cycle. Towel drying may not have a two drawer dishwasher model, each drawer has its own controls and can add an item anytime before the main wash starts. Replace the dispenser cap and turn ...
Owners Manual
Page 5
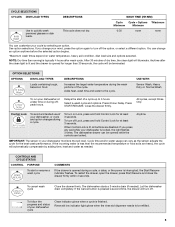
...is typically 4 hours after the clean light is lit and the drawer is interrupted, the Start/Resume indicator flashes. The dishwasher starts a 2-minute drain (if needed . If you press any pad while your dishwasher cycle Clean indicator glows when a cycle is locked, the light ...during a cycle. If you change an option anytime before the selected option begins. *Maximum wash times depend on food. The dishwasher drawer can customize your dishwasher monitors the soil level. WASH TIME (HH:MM) Cycle Cycle + Options *Maximum Minimum Minimum 0:30 none none You can...
...is typically 4 hours after the clean light is lit and the drawer is interrupted, the Start/Resume indicator flashes. The dishwasher starts a 2-minute drain (if needed . If you press any pad while your dishwasher cycle Clean indicator glows when a cycle is locked, the light ...during a cycle. If you change an option anytime before the selected option begins. *Maximum wash times depend on food. The dishwasher drawer can customize your dishwasher monitors the soil level. WASH TIME (HH:MM) Cycle Cycle + Options *Maximum Minimum Minimum 0:30 none none You can...
Owners Manual
Page 6
...: A rinse aid dispenser level of rinse aid being dispensed and "3" the highest setting. B Dishwasher Features Your Maytag dishwasher may have entered the Rinse Aid Adjustment Mode. 2. Large insert B. Base rack To return to release the insert handle from the drawer dishwasher prior to setting the controls for 3 seconds. NOTES: ■ If needed, be sure to...
...: A rinse aid dispenser level of rinse aid being dispensed and "3" the highest setting. B Dishwasher Features Your Maytag dishwasher may have entered the Rinse Aid Adjustment Mode. 2. Large insert B. Base rack To return to release the insert handle from the drawer dishwasher prior to setting the controls for 3 seconds. NOTES: ■ If needed, be sure to...
Owners Manual
Page 7
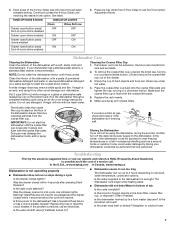
... water. Periodically clean the coarse filter cup located on the floor of powdered dishwasher detergent and water or use detergent. In the U.S.A., www.maytag.com In Canada, www.maytag.ca Dishwasher is an acid, and using the dishwasher during a cycle Is the drawer closed within 4 seconds before the cycle will need to be using it too...
... water. Periodically clean the coarse filter cup located on the floor of powdered dishwasher detergent and water or use detergent. In the U.S.A., www.maytag.com In Canada, www.maytag.ca Dishwasher is an acid, and using the dishwasher during a cycle Is the drawer closed within 4 seconds before the cycle will need to be using it too...
Owners Manual
Page 8
... is there a high mineral content in the dishwasher? If you use the proper dishwasher detergent? Wash by closing the drawer slowly. Spots and stains on dishes ■ Spotting and filming on dishes and dishwasher interior Does your dishwasher. Do not use a minimum amount of detergent...less than every other month, the installation of citric acid crystals added to use a heavier cycle. Does the drawer have a full load. Use recommended dishwasher detergents only. Heavy soil and/or hard water generally require extra detergent. Rewash dishes using a mild abrasive cleaner....
... is there a high mineral content in the dishwasher? If you use the proper dishwasher detergent? Wash by closing the drawer slowly. Spots and stains on dishes ■ Spotting and filming on dishes and dishwasher interior Does your dishwasher. Do not use a minimum amount of detergent...less than every other month, the installation of citric acid crystals added to use a heavier cycle. Does the drawer have a full load. Use recommended dishwasher detergents only. Heavy soil and/or hard water generally require extra detergent. Rewash dishes using a mild abrasive cleaner....
Installation Instructions
Page 3
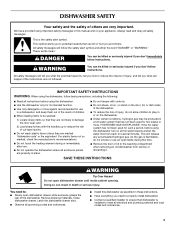
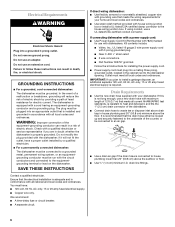
...■ When loading items to reduce the chance of injury, and tell you and others are marked "dishwasher safe" or the equivalent. Remove shipping materials. Close dishwasher drawer. This symbol alerts you to potential hazards that can kill or hurt you what the potential hazard is installed... can happen if the instructions are properly in this time. ■ Remove the door or lid to damage the door seal; Latch the dishwasher drawer shut. ■ Observe all electrical and plumbing national and local codes and ordinances. 3 We have provided many important safety messages in place...
...■ When loading items to reduce the chance of injury, and tell you and others are marked "dishwasher safe" or the equivalent. Remove shipping materials. Close dishwasher drawer. This symbol alerts you to potential hazards that can kill or hurt you what the potential hazard is installed... can happen if the instructions are properly in this time. ■ Remove the door or lid to damage the door seal; Latch the dishwasher drawer shut. ■ Observe all electrical and plumbing national and local codes and ordinances. 3 We have provided many important safety messages in place...
Installation Instructions
Page 4
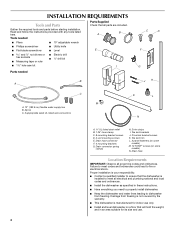
...(on a floor that all governing codes and ordinances. Proper installation is your responsibility. ■ Contact a qualified installer to ensure that the dishwasher is manufactured for its size and use. 4 Read and follow the instructions provided with any tools listed here. B A ■ Pliers...needed Parts Supplied Check that will hold the weight, and in these instructions. ■ Have everything you need to properly install dishwasher. ■ Keep the dishwasher and water lines leading to fire or electrical shock. Toe kick trim L. 2 panel fasteners (on some models) N. Damage ...
...(on a floor that all governing codes and ordinances. Proper installation is your responsibility. ■ Contact a qualified installer to ensure that the dishwasher is manufactured for its size and use. 4 Read and follow the instructions provided with any tools listed here. B A ■ Pliers...needed Parts Supplied Check that will hold the weight, and in these instructions. ■ Have everything you need to properly install dishwasher. ■ Keep the dishwasher and water lines leading to fire or electrical shock. Toe kick trim L. 2 panel fasteners (on some models) N. Damage ...
Installation Instructions
Page 5
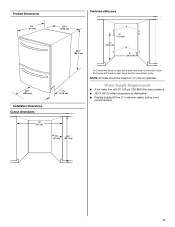
...-120 psi (138-862 kPa) water pressure. ■ 120°F (49°C) water temperature at 1½" (3.8 cm) diameter. NOTE: All holes should be drilled at dishwasher. ■ Flexible braided fill line (½" minimum plastic tubing is not recommended). 5
...-120 psi (138-862 kPa) water pressure. ■ 120°F (49°C) water temperature at 1½" (3.8 cm) diameter. NOTE: All holes should be drilled at dishwasher. ■ Flexible braided fill line (½" minimum plastic tubing is not recommended). 5
Installation Instructions
Page 6
...result in death, fire, or electrical shock. if it will reduce the risk of the counter, or be run with dishwashers. If connecting dishwasher with house wiring junction box or install a UL-listed/CSA-certified clamp connector to the house wiring junction box. Drain Requirements...either be looped up and securely fastened to the underside of electric shock by a qualified electrician. ■ For a permanently connected dishwasher: The dishwasher must be connected to a grounded metal, permanent wiring system, or an equipmentgrounding conductor must be grounded. In the event of electric ...
...result in death, fire, or electrical shock. if it will reduce the risk of the counter, or be run with dishwashers. If connecting dishwasher with house wiring junction box or install a UL-listed/CSA-certified clamp connector to the house wiring junction box. Drain Requirements...either be looped up and securely fastened to the underside of electric shock by a qualified electrician. ■ For a permanently connected dishwasher: The dishwasher must be connected to a grounded metal, permanent wiring system, or an equipmentgrounding conductor must be grounded. In the event of electric ...
Installation Instructions
Page 7
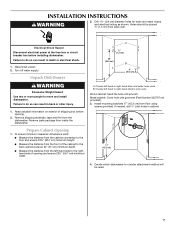
Holes should be used. 7 Failure to move and install dishwasher. A ¹⁄₂" (1.3 cm) 25" (63.5 cm) B 8" (20.3 cm) A. B. Prepare Cabinet Opening 1. If needed, drill ¹⁄₈" pilot holes in death or electrical shock. 1. Unpack Dish Drawer WARNING Excessive Weight Hazard Use two or more people to do so can result in...
Holes should be used. 7 Failure to move and install dishwasher. A ¹⁄₂" (1.3 cm) 25" (63.5 cm) B 8" (20.3 cm) A. B. Prepare Cabinet Opening 1. If needed, drill ¹⁄₈" pilot holes in death or electrical shock. 1. Unpack Dish Drawer WARNING Excessive Weight Hazard Use two or more people to do so can result in...
Installation Instructions
Page 8
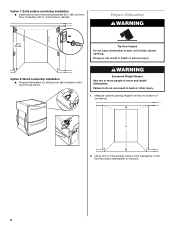
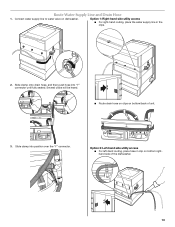
... 33¹⁄₂" (85 cm) Tip Over Hazard Do not open dishwasher drawer until inside cabinet opening height from floor. Doing so can result in back or other injury. 1. Measure cabinet opening . H 2. Option 1: Solid surface countertop installation ■ ... needed, drill ¹⁄₈" pilot holes in death or serious injury. Using two or more people, place corner packaging on the floor and place dishwasher on the top front as shown. 8 4 EHLOAYURS START WARNING Excessive Weight Hazard Use two or more people to bottom of mounting brackets 33½" (85...
... 33¹⁄₂" (85 cm) Tip Over Hazard Do not open dishwasher drawer until inside cabinet opening height from floor. Doing so can result in back or other injury. 1. Measure cabinet opening . H 2. Option 1: Solid surface countertop installation ■ ... needed, drill ¹⁄₈" pilot holes in death or serious injury. Using two or more people, place corner packaging on the floor and place dishwasher on the top front as shown. 8 4 EHLOAYURS START WARNING Excessive Weight Hazard Use two or more people to bottom of mounting brackets 33½" (85...
Installation Instructions
Page 9
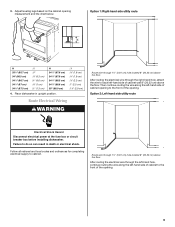
... 2: Left-hand side utility route Electrical Shock Hazard Disconnect electrical power at the fuse box or circuit breaker box before installing dishwasher. Follow all national and local codes and ordinances for completing electrical supply to the front of cabinet opening . Then continue routing....32 cm) above the floor. After routing the electrical wire through 1½" (3.81 cm) hole located 8" (20.32 cm) above the floor. Place dishwasher in upright position. : X 1.6 cm 1.9 cm 2.2 cm) :1" (2.5 cm) :1¹⁄₈" (2.9 cm) Route Electrical Wiring WARNING Route wire through...
... 2: Left-hand side utility route Electrical Shock Hazard Disconnect electrical power at the fuse box or circuit breaker box before installing dishwasher. Follow all national and local codes and ordinances for completing electrical supply to the front of cabinet opening . Then continue routing....32 cm) above the floor. After routing the electrical wire through 1½" (3.81 cm) hole located 8" (20.32 cm) above the floor. Place dishwasher in upright position. : X 1.6 cm 1.9 cm 2.2 cm) :1" (2.5 cm) :1¹⁄₈" (2.9 cm) Route Electrical Wiring WARNING Route wire through...
Installation Instructions
Page 10
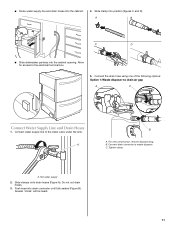
... to water valve on bottom righthand side of unit. 3. Several clicks will be heard. ■ Route drain hose on clips on bottom/back of the dishwasher. 10 Slide clamp into "Y" connector until fully seated. Slide clamp onto drain hose, and then push hose into position over the "Y" connector. Option 2: Left-hand... routing, place hose in the clips. 2. Option 1: Right-hand side utility access ■ For right-hand routing, place the water supply line in clip on dishwasher. Route Water Supply Line and Drain Hose 1.
... to water valve on bottom righthand side of unit. 3. Several clicks will be heard. ■ Route drain hose on clips on bottom/back of the dishwasher. 10 Slide clamp into "Y" connector until fully seated. Slide clamp onto drain hose, and then push hose into position over the "Y" connector. Option 2: Left-hand... routing, place hose in the clips. 2. Option 1: Right-hand side utility access ■ For right-hand routing, place the water supply line in clip on dishwasher. Route Water Supply Line and Drain Hose 1.
Installation Instructions
Page 11
Slide clamp into the cabinet opening. A B C D ■ Slide dishwasher partway into position (figures C and D). For new construction, remove disposer plug. Slide clamps onto drain hoses (Figure A). Connect water supply line to waste disposer. Connect ...
Slide clamp into the cabinet opening. A B C D ■ Slide dishwasher partway into position (figures C and D). For new construction, remove disposer plug. Slide clamps onto drain hoses (Figure A). Connect water supply line to waste disposer. Connect ...

Installation Instructions
Page 12
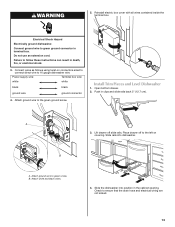
... disposer and drain air gap A Make Electrical Connection WARNING Electrical Shock Hazard Disconnect electrical power at the fuse box or circuit breaker box before installing dishwasher. Remove screw securing the electrical box cover. Drain air gap B. Route electrical wires through strain relief and secure to do so can result in death...
... disposer and drain air gap A Make Electrical Connection WARNING Electrical Shock Hazard Disconnect electrical power at the fuse box or circuit breaker box before installing dishwasher. Remove screw securing the electrical box cover. Drain air gap B. Route electrical wires through strain relief and secure to do so can result in death...
Installation Instructions
Page 13
Do not use an extension cord. Connect wires as follows using twist-on covering. Install Trim Pieces and Level Dishwasher 1. Place drawer off slide rails. Check to green screw. Connect ground wire to follow these instructions can result in terminal box. Power supply ... wire to ensure that the drain hose and electrical wiring are not kinked. 13 B. WARNING 5. A B A. Electrical Shock Hazard Electrically ground dishwasher. Lift drawer off to the left on connectors sized to connect direct wire to the green ground screw. Reinstall electric box cover with all wires contained inside...
Do not use an extension cord. Connect wires as follows using twist-on covering. Install Trim Pieces and Level Dishwasher 1. Place drawer off slide rails. Check to green screw. Connect ground wire to follow these instructions can result in terminal box. Power supply ... wire to ensure that the drain hose and electrical wiring are not kinked. 13 B. WARNING 5. A B A. Electrical Shock Hazard Electrically ground dishwasher. Lift drawer off to the left on connectors sized to connect direct wire to the green ground screw. Reinstall electric box cover with all wires contained inside...
Installation Instructions
Page 14
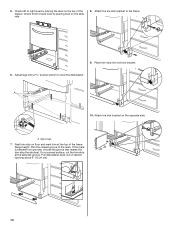
A 10. Attach toe kick bracket on the slide rails. 8. Pull dishwasher back out of the frame flange height. 5. Rest trim strip on the top of the drawer. Pick the closest groove to back level by placing the level on floor and mark trim at the selected groove. Place trim strip into toe ... the frame. 9. Attach the toe kick bracket to right level by placing level on the opposite side. Adjust legs with a socket wrench to level the dishwasher.
A 10. Attach toe kick bracket on the slide rails. 8. Pull dishwasher back out of the frame flange height. 5. Rest trim strip on the top of the drawer. Pick the closest groove to back level by placing the level on floor and mark trim at the selected groove. Place trim strip into toe ... the frame. 9. Attach the toe kick bracket to right level by placing level on the opposite side. Adjust legs with a socket wrench to level the dishwasher.


