
Owners Manual
Page 2
...to play in accordance with all enclosure panels are properly in the operation of the apparatus by a person responsible for use replacement parts that is properly grounded. The dishwasher is intended for use an open when not loading or unloading dishes. WARNING: Improper connection ... produced in a risk of electric shock. grounding conductor can result in a hot water system that they are supervised or trained in place. parts made at home using a 3D printer). Remove the door or lid to damage the door seal; I For a grounded, cord-connected dishwasher...
...to play in accordance with all enclosure panels are properly in the operation of the apparatus by a person responsible for use replacement parts that is properly grounded. The dishwasher is intended for use an open when not loading or unloading dishes. WARNING: Improper connection ... produced in a risk of electric shock. grounding conductor can result in a hot water system that they are supervised or trained in place. parts made at home using a 3D printer). Remove the door or lid to damage the door seal; I For a grounded, cord-connected dishwasher...

Owners Manual
Page 8
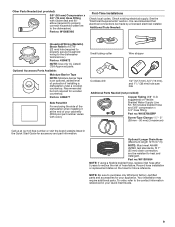
...literature package. All Installations Tools Needed: Other Useful Items You May Need: Flashlight Shallow pan Pliers Flat-blade screwdriver Bath towel Parts Supplied: Masking, or duct tape Phillips screwdriver Utility knife Drain hose clamps (2) Drain hose (1 large/red and 1 small/... or hex sockets Small level #8 x 1/2" (12.7 mm) Phillipshead screws (2) Undercounter mounting brackets (2) Make sure all parts are trademarks of Acument Intellectual Properties, LLC. 8 Read and follow the instructions provided with the tools listed here. INSTALLATION REQUIREMENTS TOOLS AND...
...literature package. All Installations Tools Needed: Other Useful Items You May Need: Flashlight Shallow pan Pliers Flat-blade screwdriver Bath towel Parts Supplied: Masking, or duct tape Phillips screwdriver Utility knife Drain hose clamps (2) Drain hose (1 large/red and 1 small/... or hex sockets Small level #8 x 1/2" (12.7 mm) Phillipshead screws (2) Undercounter mounting brackets (2) Make sure all parts are trademarks of Acument Intellectual Properties, LLC. 8 Read and follow the instructions provided with the tools listed here. INSTALLATION REQUIREMENTS TOOLS AND...
Owners Manual
Page 9
... : W11381654 NOTE: If using a flexible braided hose, replace inlet hose after 5 years to purchase only Whirlpool factory-certified parts and accessories for accessory and part information. Part no : W10278635RP Screw-Type Clamps 11/2"- 2" (38 mm - 50 mm) (3 maximum) Call us at the end of ... Check local codes. Kit includes braided hose and 3/8" compression x 3/4" hose fitting. To order, refer to the dishwasher terminal box.) Part no : 4396277 Side Panel Kit For enclosing the side of hose failure. Additional Tools Needed: Household Wiring (Metallic) Strain Relief to fit...
... : W11381654 NOTE: If using a flexible braided hose, replace inlet hose after 5 years to purchase only Whirlpool factory-certified parts and accessories for accessory and part information. Part no : W10278635RP Screw-Type Clamps 11/2"- 2" (38 mm - 50 mm) (3 maximum) Call us at the end of ... Check local codes. Kit includes braided hose and 3/8" compression x 3/4" hose fitting. To order, refer to the dishwasher terminal box.) Part no : 4396277 Side Panel Kit For enclosing the side of hose failure. Additional Tools Needed: Household Wiring (Metallic) Strain Relief to fit...
Owners Manual
Page 10
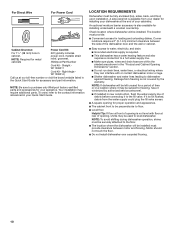
... Guide for installing underneath a wooden countertop. NOTE: Required for loading and unloading dishes. If it to purchase only Whirlpool factory-certified parts and accessories for your Quick Start Guide. Straight W11365011 Cord Kit - NOTE: Be sure to the fill valve. An optional moisture ...barrier accessory is also available for accessory and part information. NOTE: If dishwasher will be left unused for proper operation and appearance. ■ The cabinet front to be securely attached to...
... Guide for installing underneath a wooden countertop. NOTE: Required for loading and unloading dishes. If it to purchase only Whirlpool factory-certified parts and accessories for your Quick Start Guide. Straight W11365011 Cord Kit - NOTE: Be sure to the fill valve. An optional moisture ...barrier accessory is also available for accessory and part information. NOTE: If dishwasher will be left unused for proper operation and appearance. ■ The cabinet front to be securely attached to...
Owners Manual
Page 17
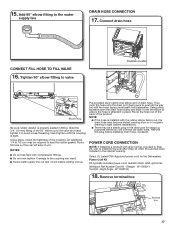
... and slide it to the water supply line DRAIN HOSE CONNECTION 17. Power Cord Kit Kit typically includes power cord, metallic strain relief, grommet. (Whirlpool Part Number Cord Kit - W11365014) 18. Put provided silver clamp over -tighten. NOTE: ■ If the hose is installed with direct wiring, proceed to Step 25...
... and slide it to the water supply line DRAIN HOSE CONNECTION 17. Power Cord Kit Kit typically includes power cord, metallic strain relief, grommet. (Whirlpool Part Number Cord Kit - W11365014) 18. Put provided silver clamp over -tighten. NOTE: ■ If the hose is installed with direct wiring, proceed to Step 25...
Owners Manual
Page 19
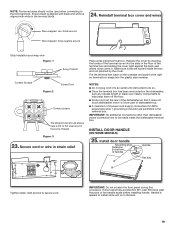
... help keep them off the floor. ■ Route cord out the rear of the dishwasher so that it does not touch dishwasher motor or lower part of dishwasher tub. ■ A maximum of the handle studs before installing handle. Handle is easiest to install while unit is aligned with white in strain...
... help keep them off the floor. ■ Route cord out the rear of the dishwasher so that it does not touch dishwasher motor or lower part of dishwasher tub. ■ A maximum of the handle studs before installing handle. Handle is easiest to install while unit is aligned with white in strain...

Owners Manual
Page 21
... time the dishwasher is tight (less than 1/4" [6.35 mm]), we suggest using a power cord, make sure to route the end through the holes in the parts bag to keep the blanket from cabinet in a tight fitting cabinet. Complete custom panel installation before pushing into the cabinet opening 30. For countertops that...
... time the dishwasher is tight (less than 1/4" [6.35 mm]), we suggest using a power cord, make sure to route the end through the holes in the parts bag to keep the blanket from cabinet in a tight fitting cabinet. Complete custom panel installation before pushing into the cabinet opening 30. For countertops that...
Owners Manual
Page 26
... into position. Connect rubber end of the dishwasher tub. Check that the power supply wire or cord does not touch dishwasher motor or the lower part of drain hose to disposer inlet. Use a rubber hose (not provided) with the connector housing and pushing in until the locking tab is visible over...
... into position. Connect rubber end of the dishwasher tub. Check that the power supply wire or cord does not touch dishwasher motor or the lower part of drain hose to disposer inlet. Use a rubber hose (not provided) with the connector housing and pushing in until the locking tab is visible over...

Owners Manual
Page 27
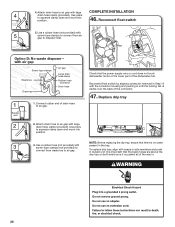
.... The product will pause when the door is included on this model, make sure insulation does not interfere with your dishwasher. ■ Check that all parts have all tools used. ■ Run the Installation Cycles as follows (Note that it hangs on the hooks on the plastic side members. ■ Reinstall...
.... The product will pause when the door is included on this model, make sure insulation does not interfere with your dishwasher. ■ Check that all parts have all tools used. ■ Run the Installation Cycles as follows (Note that it hangs on the hooks on the plastic side members. ■ Reinstall...


