
Quick Start Guide
Page 1
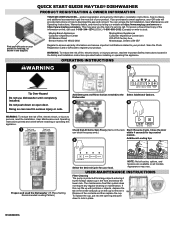
...the diagram. You can block the spray arms.) 4 Start / Resume Cycle. Additional Loading tips Prepare and Load the Dishwasher (15 Place Setting Recommended Loading Pattern) Auto Normal Quick PowerBlast Select the desired Cycle for top control models. W11680100A product registration and warranty information, installation instructions, how-to videos, and additional accessories to person, read the Installation, User Maintenance and Operating Instructions printed and online before installing or operating this appliance. 1 Third Level Dedicated Wash Third Level Utensil Rack START CANCEL...
...the diagram. You can block the spray arms.) 4 Start / Resume Cycle. Additional Loading tips Prepare and Load the Dishwasher (15 Place Setting Recommended Loading Pattern) Auto Normal Quick PowerBlast Select the desired Cycle for top control models. W11680100A product registration and warranty information, installation instructions, how-to videos, and additional accessories to person, read the Installation, User Maintenance and Operating Instructions printed and online before installing or operating this appliance. 1 Third Level Dedicated Wash Third Level Utensil Rack START CANCEL...
Cycle Guide
Page 1
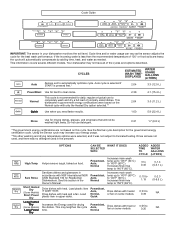
... by adding time, heat, and water as the sensor adjusts the cycle for Residential Dishwashers. Increases final rinse temp to 156°F (69°C). Increases final rinse temp to 140°F (60°C). Dries dishes with heater or fan on some models. Powerblast, Auto, Normal, Quick Dries dishes with heat. Do not use to Normal completely wash and dry a full load of normally soiled dishes. This dishwasher's government energy certifications were based on some models. Sanitizes dishes and glassware...
... by adding time, heat, and water as the sensor adjusts the cycle for Residential Dishwashers. Increases final rinse temp to 156°F (69°C). Increases final rinse temp to 140°F (60°C). Dries dishes with heater or fan on some models. Powerblast, Auto, Normal, Quick Dries dishes with heat. Do not use to Normal completely wash and dry a full load of normally soiled dishes. This dishwasher's government energy certifications were based on some models. Sanitizes dishes and glassware...
Cycle Guide
Page 2
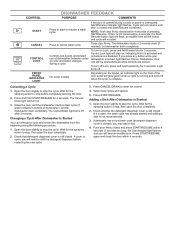
... door firmly closed . Light turns off after 3 minutes. If cover is interrupted, Start/Resume indicator light flashes. If it is closed . Wait for 3 seconds. Press and hold heated dry for the spraying action to cancel wash cycle. Check whether the detergent dispenser cover is still closed and press START/RESUME within 4 seconds of dishwasher between cycles or cycle and option changes during a cycle or power is open the door completely. 2. Control Lock avoids unintended use of pressing Start/Resume. Press CANCEL/DRAIN to stop...
... door firmly closed . Light turns off after 3 minutes. If cover is interrupted, Start/Resume indicator light flashes. If it is closed . Wait for 3 seconds. Press and hold heated dry for the spraying action to cancel wash cycle. Check whether the detergent dispenser cover is still closed and press START/RESUME within 4 seconds of dishwasher between cycles or cycle and option changes during a cycle or power is open the door completely. 2. Control Lock avoids unintended use of pressing Start/Resume. Press CANCEL/DRAIN to stop...
Owners Manual
Page 2
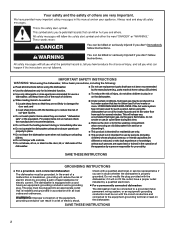
... codes and ordinances. and 2) Load sharp knives with the circuit conductors and connected to damage the door seal; HYDROGEN GAS IS EXPLOSIVE. IMPORTANT SAFETY INSTRUCTIONS WARNING: When using the dishwasher, follow basic precautions, including the following: Read all enclosure panels are properly in place. Use the dishwasher only for residential use replacement parts that is flammable, do not allow children to play in a hot water...
... codes and ordinances. and 2) Load sharp knives with the circuit conductors and connected to damage the door seal; HYDROGEN GAS IS EXPLOSIVE. IMPORTANT SAFETY INSTRUCTIONS WARNING: When using the dishwasher, follow basic precautions, including the following: Read all enclosure panels are properly in place. Use the dishwasher only for residential use replacement parts that is flammable, do not allow children to play in a hot water...
Owners Manual
Page 3
... soil removal and for customers who use dishwasher until completely installed. Store tightly closed detergent container in accordance with heated drying will start to save water and energy, just as driving a car slower saves on open door. Rinse aid needs to be connected to a 120 °F (49° C) hot water supply. Also, by using other dishwasher detergent types. ■ Use automatic dishwasher detergent only. This cycle senses the soil amount, and toughness of soil, to adjust the cycle for Residential Dishwashers...
... soil removal and for customers who use dishwasher until completely installed. Store tightly closed detergent container in accordance with heated drying will start to save water and energy, just as driving a car slower saves on open door. Rinse aid needs to be connected to a 120 °F (49° C) hot water supply. Also, by using other dishwasher detergent types. ■ Use automatic dishwasher detergent only. This cycle senses the soil amount, and toughness of soil, to adjust the cycle for Residential Dishwashers...
Owners Manual
Page 5
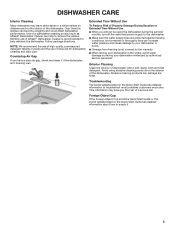
... dishwasher isn't draining well. Use of the dishwasher. Extended Time Without Use To Reduce Risk of Property Damage During Vacation or Extended Time Without Use ■ When you will not be using abrasive cleaning products on the Quick Start Guide has detailed information about how to troubleshoot most problems customers encounter. Avoid using the dishwasher during the summer months, turn off the water and power supply to your dishwasher winterized by authorized service personnel. Over time...
... dishwasher isn't draining well. Use of the dishwasher. Extended Time Without Use To Reduce Risk of Property Damage During Vacation or Extended Time Without Use ■ When you will not be using abrasive cleaning products on the Quick Start Guide has detailed information about how to troubleshoot most problems customers encounter. Avoid using the dishwasher during the summer months, turn off the water and power supply to your dishwasher winterized by authorized service personnel. Over time...
Owners Manual
Page 6
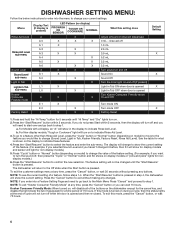
... Non-display models,"Tough or Cookware" light will need to go to a feature other than Rinse Aid Level, press the "Cycle" button or "Normal" button (depending on model) to move to the feature you haven't changed until "Hi Temp" and "Dry" lights turn the sound off when the door is opened Turn Kosher Consumer Friendly mode On and Off Turn mode ON Turn mode OFF Factory Reset Default Setting X X X X 1. To exit the customer settings menu...
... Non-display models,"Tough or Cookware" light will need to go to a feature other than Rinse Aid Level, press the "Cycle" button or "Normal" button (depending on model) to move to the feature you haven't changed until "Hi Temp" and "Dry" lights turn the sound off when the door is opened Turn Kosher Consumer Friendly mode On and Off Turn mode ON Turn mode OFF Factory Reset Default Setting X X X X 1. To exit the customer settings menu...
Owners Manual
Page 7
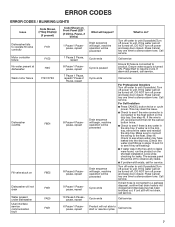
... power and keep door closed. If drain hose is connected to unit. For Self Installers ■ Press CANCEL button twice or cycle power. See step 46. Call service. 6 Pause 1 Pause pause, repeat Product will be turned off, DO NOT turn off power to the float switch on the drip tray. Ensure water supply is in the drip tray. Press Cancel key one time to start or resume cycles Call service. 7 This may have leaked...
... power and keep door closed. If drain hose is connected to unit. For Self Installers ■ Press CANCEL button twice or cycle power. See step 46. Call service. 6 Pause 1 Pause pause, repeat Product will be turned off, DO NOT turn off power to the float switch on the drip tray. Ensure water supply is in the drip tray. Press Cancel key one time to start or resume cycles Call service. 7 This may have leaked...
Owners Manual
Page 9
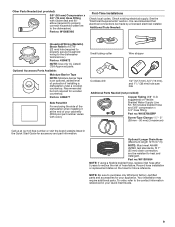
... the Quick Start Guide for future reference. See the "Electrical Requirements" section. suggested) or Flexible Braided Water Supply Line Kit. Part no: W10278635RP Screw-Type Clamps 11/2"- 2" (38 mm - 50 mm) (3 maximum) Call us at the end of your cabinetry (Whirlpool part number varies with rubber seal and 90° elbow (required to properly connect household water line to the dishwasher.) Part no : W11381654 NOTE: If using a flexible braided hose, replace inlet hose...
... the Quick Start Guide for future reference. See the "Electrical Requirements" section. suggested) or Flexible Braided Water Supply Line Kit. Part no: W10278635RP Screw-Type Clamps 11/2"- 2" (38 mm - 50 mm) (3 maximum) Call us at the end of your cabinetry (Whirlpool part number varies with rubber seal and 90° elbow (required to properly connect household water line to the dishwasher.) Part no : W11381654 NOTE: If using a flexible braided hose, replace inlet hose...
Owners Manual
Page 10
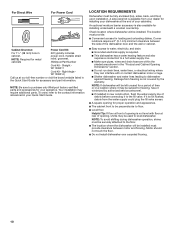
...; This dishwasher has a water heating feature and also requires a connection to a hot water supply line. ■ Make sure pipes, wires and drain hose are within the shaded area shown in the "Product and Cabinet Opening Dimensions" section. ■ Do not run drain lines, water lines, or electrical wiring where they can interfere with floor at the end of time or in cabinet. Corner locations require a 2" (5.1 cm) minimum clearance between motor and flooring. For Direct Wire For Power Cord Cabinet Grommet Power Cord Kit For 11...
...; This dishwasher has a water heating feature and also requires a connection to a hot water supply line. ■ Make sure pipes, wires and drain hose are within the shaded area shown in the "Product and Cabinet Opening Dimensions" section. ■ Do not run drain lines, water lines, or electrical wiring where they can interfere with floor at the end of time or in cabinet. Corner locations require a 2" (5.1 cm) minimum clearance between motor and flooring. For Direct Wire For Power Cord Cabinet Grommet Power Cord Kit For 11...
Owners Manual
Page 12
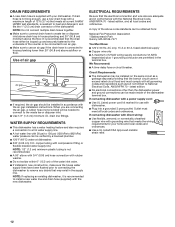
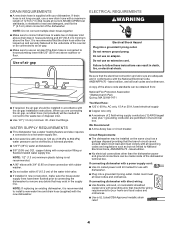
...) hose connection with a power supply cord: ■ Use UL Listed power cord kit marked for your dishwasher. We Recommend: ■ A time-delay fuse or circuit breaker. WATER SUPPLY REQUIREMENTS ■ This dishwasher has a water heating feature and also requires a connection to a hot water supply line. ■ A hot water line with a maximum length of 12 ft (3.7 m) that the electrical connection and wire size are connecting the air gap, a rubber hose (not provided) will be looped up and securely fastened to waste tee or disposer inlet above drain trap...
...) hose connection with a power supply cord: ■ Use UL Listed power cord kit marked for your dishwasher. We Recommend: ■ A time-delay fuse or circuit breaker. WATER SUPPLY REQUIREMENTS ■ This dishwasher has a water heating feature and also requires a connection to a hot water supply line. ■ A hot water line with a maximum length of 12 ft (3.7 m) that the electrical connection and wire size are connecting the air gap, a rubber hose (not provided) will be looped up and securely fastened to waste tee or disposer inlet above drain trap...
Owners Manual
Page 13
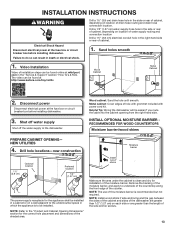
...: Wiring the dishwasher will be found at the fuse box or circuit breaker box before installing dishwasher. 3. Remove the backing of the side anchor screws. 13 NOTE: The use of this moisture barrier is clean and dry for the correct hole placement and dimensions of the counter. NEW UTILITIES 4. INSTALLATION INSTRUCTIONS WARNING Electrical Shock Hazard Disconnect electrical power at http://www.kaltura.com/tiny/ro00v Wood Cabinet...
...: Wiring the dishwasher will be found at the fuse box or circuit breaker box before installing dishwasher. 3. Remove the backing of the side anchor screws. 13 NOTE: The use of this moisture barrier is clean and dry for the correct hole placement and dimensions of the counter. NEW UTILITIES 4. INSTALLATION INSTRUCTIONS WARNING Electrical Shock Hazard Disconnect electrical power at http://www.kaltura.com/tiny/ro00v Wood Cabinet...
Owners Manual
Page 15
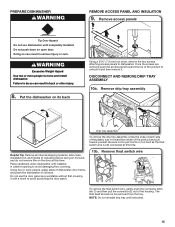
... internal shipping material, drain hose, installation kit, and handle (if included,) before laying on open door. The float itself should not be removed from the tray. DISCONNECT AND REMOVE DRIP TRAY ASSEMBLY 10a. Place cardboard under dishwasher until instructed. 15 PREPARE DISHWASHER WARNING REMOVE ACCESS PANEL AND INSULATION 9. Remove access panels Tip Over Hazard Do not use the door panel as the float switch wire is still connected at each side of...
... internal shipping material, drain hose, installation kit, and handle (if included,) before laying on open door. The float itself should not be removed from the tray. DISCONNECT AND REMOVE DRIP TRAY ASSEMBLY 10a. Place cardboard under dishwasher until instructed. 15 PREPARE DISHWASHER WARNING REMOVE ACCESS PANEL AND INSULATION 9. Remove access panels Tip Over Hazard Do not use the door panel as the float switch wire is still connected at each side of...
Owners Manual
Page 17
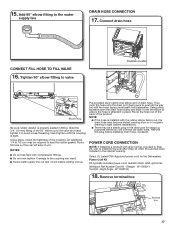
.... Power Cord Kit Kit typically includes power cord, metallic strain relief, grommet. (Whirlpool Part Number Cord Kit - Damage to valve Drain Hose Location Elbow fitting Be sure rubber washer is tight. Select UL Listed/CSA Approved power cord for shipping purposes where you will connect the drain hose. Then push the hose onto the drain port (being sure to the water supply line DRAIN HOSE CONNECTION 17. Straight - NOTES: ■ Do not use tape with the hose facing underneath the dishwasher. Add...
.... Power Cord Kit Kit typically includes power cord, metallic strain relief, grommet. (Whirlpool Part Number Cord Kit - Damage to valve Drain Hose Location Elbow fitting Be sure rubber washer is tight. Select UL Listed/CSA Approved power cord for shipping purposes where you will connect the drain hose. Then push the hose onto the drain port (being sure to the water supply line DRAIN HOSE CONNECTION 17. Straight - NOTES: ■ Do not use tape with the hose facing underneath the dishwasher. Add...
Owners Manual
Page 20
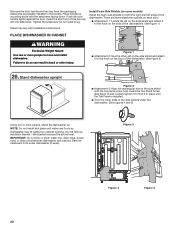
.... Push the door handle tightly against the door. Tighten the setscrews 1/4 turn past snug. IMPORTANT: Do not kink or pinch water line, drain hose, power cord, or direct wire between dishwasher and cabinet. Do not remove insulation blanket-the blanket reduces the sound level. Remove cardboard from the packaging. Dishwasher may fit tightly into the setscrews. Insert the short end of the side shields under dishwasher (if used). Stand dishwasher upright Figure...
.... Push the door handle tightly against the door. Tighten the setscrews 1/4 turn past snug. IMPORTANT: Do not kink or pinch water line, drain hose, power cord, or direct wire between dishwasher and cabinet. Do not remove insulation blanket-the blanket reduces the sound level. Remove cardboard from the packaging. Dishwasher may fit tightly into the setscrews. Insert the short end of the side shields under dishwasher (if used). Stand dishwasher upright Figure...

Owners Manual
Page 21
... product. 27. CHOOSE ANCHOR ATTACHMENT METHOD IMPORTANT: The dishwasher must be secured by attaching the 2 brackets found in order to avoid any kinks. NOTE: Route water supply, drain hose, and power cord out the rear of the dishwasher as shown in the cabinet, and pull the slack out at the same time the dishwasher is pushed into the cabinet opening 30. Complete custom panel installation before pushing into cabinet opening...
... product. 27. CHOOSE ANCHOR ATTACHMENT METHOD IMPORTANT: The dishwasher must be secured by attaching the 2 brackets found in order to avoid any kinks. NOTE: Route water supply, drain hose, and power cord out the rear of the dishwasher as shown in the cabinet, and pull the slack out at the same time the dishwasher is pushed into the cabinet opening 30. Complete custom panel installation before pushing into cabinet opening...
Owners Manual
Page 22
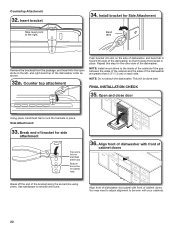
... the dishwasher. FINAL INSTALLATION CHECK 35. Open and close door Using pliers, bend/twist tab to the inside of the cabinets if the gap between the sides of the cabinet and the sides of the dishwasher. Use sandpaper to be done later. and right-hand top of cabinet doors. Repeat this step for plastic tubs 36. Break end of bracket for side attachment Top score line for stainless steel...
... the dishwasher. FINAL INSTALLATION CHECK 35. Open and close door Using pliers, bend/twist tab to the inside of the cabinets if the gap between the sides of the cabinet and the sides of the dishwasher. Use sandpaper to be done later. and right-hand top of cabinet doors. Repeat this step for plastic tubs 36. Break end of bracket for side attachment Top score line for stainless steel...
Owners Manual
Page 24
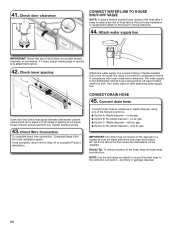
... Installation. Connect drain hose Connect drain hose to waste tee or waste disposer using one of hose failure. NOTE: Use the red clamp provided to connect the drain hose to the hot water line using a flexible braided hose, replace inlet hose after attaching water supply line. Check door clearance CONNECT WATER LINE TO HOUSE SHUT-OFF VALVE NOTE: If using a connection configuration that is in this installation guide. Tighten bracket screws. 43. no air gap ■ Option C: Waste disposer - Attach water supply line IMPORTANT: Check that space between dishwasher cabinet opening...
... Installation. Connect drain hose Connect drain hose to waste tee or waste disposer using one of hose failure. NOTE: Use the red clamp provided to connect the drain hose to the hot water line using a flexible braided hose, replace inlet hose after attaching water supply line. Check door clearance CONNECT WATER LINE TO HOUSE SHUT-OFF VALVE NOTE: If using a connection configuration that is in this installation guide. Tighten bracket screws. 43. no air gap ■ Option C: Waste disposer - Attach water supply line IMPORTANT: Check that space between dishwasher cabinet opening...

Owners Manual
Page 27
... instructions on the model. ■ The cycle will exit this mode after 10 minutes or if power is removed from the appliance. ■ If any 3 keys (except Delay or Cancel) in the sequence 1-2-3-1-2-3-1-2-3 with the access panel removed in order to look for service. CHECK OPERATION ■ Read the dishwasher Quick Start Guide that came with your dishwasher. ■ Check that all parts have all tools used. ■ Run...
... instructions on the model. ■ The cycle will exit this mode after 10 minutes or if power is removed from the appliance. ■ If any 3 keys (except Delay or Cancel) in the sequence 1-2-3-1-2-3-1-2-3 with the access panel removed in order to look for service. CHECK OPERATION ■ Read the dishwasher Quick Start Guide that came with your dishwasher. ■ Check that all parts have all tools used. ■ Run...
Dimension Guide
Page 4
... dishwasher, it is connected to the waste tee or disposer inlet. ■ Use 1/2" (1.3 cm) minimum I.D. Circuit Requirements: ■ The dishwasher may exist in conformance with a power supply cord: ■ Use UL Listed power cord kit marked for your dishwasher. Outlet must comply with 20 psi to 120 psi (138 kPa to install a new water line and drain hose (supplied) with compression fitting or flexible braided water supply line. Use of 2 field wiring supply conductors (12 AWG largest size) plus...
... dishwasher, it is connected to the waste tee or disposer inlet. ■ Use 1/2" (1.3 cm) minimum I.D. Circuit Requirements: ■ The dishwasher may exist in conformance with a power supply cord: ■ Use UL Listed power cord kit marked for your dishwasher. Outlet must comply with 20 psi to 120 psi (138 kPa to install a new water line and drain hose (supplied) with compression fitting or flexible braided water supply line. Use of 2 field wiring supply conductors (12 AWG largest size) plus...


