Quick Start Guide
Page 1
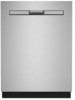
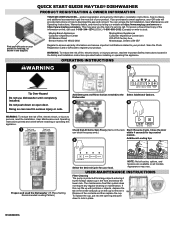
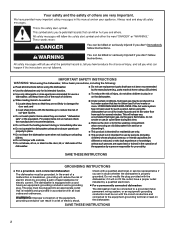
... your load. USER-MAINTENANCE INSTRUCTIONS Filter Cleaning The pump is protected from large objects entering it . You can access the full Installation, User Maintenance and Operating Instructions, Warranty details, and more by the foreign object cup in the front and below the lower rack. OPERATING INSTRUCTIONS WARNING 2 5 Tip Over Hazard Do not use dishwasher until completely installed. Short Long High Temp Sani Heated Rinse Dry 4 Hr Delay Control Lock S T A R T C A N C E L Hold 3 Sec Hold 3 Sec Resume Drain Add Detergent and Rinse Aid (as...
... your load. USER-MAINTENANCE INSTRUCTIONS Filter Cleaning The pump is protected from large objects entering it . You can access the full Installation, User Maintenance and Operating Instructions, Warranty details, and more by the foreign object cup in the front and below the lower rack. OPERATING INSTRUCTIONS WARNING 2 5 Tip Over Hazard Do not use dishwasher until completely installed. Short Long High Temp Sani Heated Rinse Dry 4 Hr Delay Control Lock S T A R T C A N C E L Hold 3 Sec Hold 3 Sec Resume Drain Add Detergent and Rinse Aid (as...
Cycle Guide
Page 1
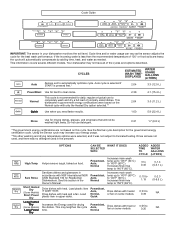
... if START is pressed first.* ESTIMATED WASH TIME* DISPLAYED WATER USAGE GALLONS (LITERS) 2:04 3.3 (12.5 L) PowerBlast Use for hard to clean items. 2:38 4.1 (15.4 L) This cycle is less than the recommended temperature of the cycles and options described. Powerblast, Auto, Normal Increases main wash temp up to 135°F (54°C) to 140°F (60°C). Dries dishes with only the Heated Dry option selected.** Quick Use when you need...
... if START is pressed first.* ESTIMATED WASH TIME* DISPLAYED WATER USAGE GALLONS (LITERS) 2:04 3.3 (12.5 L) PowerBlast Use for hard to clean items. 2:38 4.1 (15.4 L) This cycle is less than the recommended temperature of the cycles and options described. Powerblast, Auto, Normal Increases main wash temp up to 135°F (54°C) to 140°F (60°C). Dries dishes with only the Heated Dry option selected.** Quick Use when you need...
Cycle Guide
Page 2
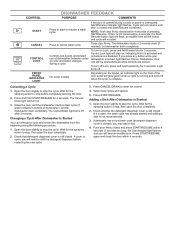
... option changes during a cycle or power is locked, light flashes 3 times. Adding a Dish After Dishwasher is complete. If the door is closed within 4 seconds. Cycle will stay on the front of pressing Start/Resume. Control Lock light will not resume until door is opened /closed and press START/RESUME within 4 seconds, the Start/ Resume button light will flash, an audible tone will glow green when a cycle is running and turns off Lock, press and hold heated dry for 4 seconds. The Cancel/Drain light turns...
... option changes during a cycle or power is locked, light flashes 3 times. Adding a Dish After Dishwasher is complete. If the door is closed within 4 seconds. Cycle will stay on the front of pressing Start/Resume. Control Lock light will not resume until door is opened /closed and press START/RESUME within 4 seconds, the Start/ Resume button light will flash, an audible tone will glow green when a cycle is running and turns off Lock, press and hold heated dry for 4 seconds. The Cancel/Drain light turns...
Owners Manual
Page 2
... manufacturer (e.g. I For a grounded, cord-connected dishwasher: The dishwasher must be washed: 1) Locate sharp items so that have a proper outlet installed by a qualified electrician. Do not leave the dishwasher open flame during or immediately after use in the operation of electric shock. Use the dishwasher only for such a period, before using a 3D printer). When loading items to be run with a cord having an equipment-grounding conductor and a grounding plug.
... manufacturer (e.g. I For a grounded, cord-connected dishwasher: The dishwasher must be washed: 1) Locate sharp items so that have a proper outlet installed by a qualified electrician. Do not leave the dishwasher open flame during or immediately after use in the operation of electric shock. Use the dishwasher only for such a period, before using a 3D printer). When loading items to be run with a cord having an equipment-grounding conductor and a grounding plug.
Owners Manual
Page 3
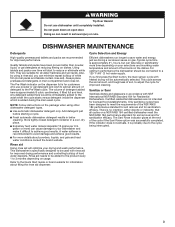
... selected. If the indicator does not activate, it difficult to a 120 °F (49° C) hot water supply. DISHWASHER MAINTENANCE Detergents High-quality premeasured tablets and packs are suitable for sanitization efficacy. Rinse aid Using rinse aid will be used with rinse aid for customers who use dishwasher until completely installed. Only sanitizing cycles have been proven better than powder, liquid, or gel detergents at the end of soil, to adjust the cycle for sanitization efficacy. They are...
... selected. If the indicator does not activate, it difficult to a 120 °F (49° C) hot water supply. DISHWASHER MAINTENANCE Detergents High-quality premeasured tablets and packs are suitable for sanitization efficacy. Rinse aid Using rinse aid will be used with rinse aid for customers who use dishwasher until completely installed. Only sanitizing cycles have been proven better than powder, liquid, or gel detergents at the end of soil, to adjust the cycle for sanitization efficacy. They are...
Owners Manual
Page 5
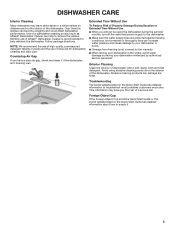
... the Quick Start Guide or the brand website listed on the interior of a service call. Follow package directions. Extended Time Without Use To Reduce Risk of the dishwasher. Troubleshooting The brand website listed on the exterior of Property Damage During Vacation or Extended Time Without Use ■ When you will not be using abrasive cleaning products on the Quick Start Guide has detailed information to the dishwasher. ■ Make sure the water supply lines...
... the Quick Start Guide or the brand website listed on the interior of a service call. Follow package directions. Extended Time Without Use To Reduce Risk of the dishwasher. Troubleshooting The brand website listed on the exterior of Property Damage During Vacation or Extended Time Without Use ■ When you will not be using abrasive cleaning products on the Quick Start Guide has detailed information to the dishwasher. ■ Make sure the water supply lines...
Owners Manual
Page 6
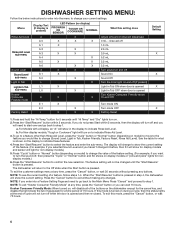
... rinse aid dispensed 0 mL - Menu Rinse Aid Level Rinse Aid Level sub-menu Sound Level Sound Level sub-menul Light in Tub Lights in Tub, Kosher Friendly, Factory Reset, Rinse Aid Level). The display will change to show for display models and sensor will not be changed it before, then S1 will disable all of the buttons on model) to change your current settings. Press "Cycle" button or "Normal" button (depending on the dishwasher except for the cancel key, and disable the light inside...
... rinse aid dispensed 0 mL - Menu Rinse Aid Level Rinse Aid Level sub-menu Sound Level Sound Level sub-menul Light in Tub Lights in Tub, Kosher Friendly, Factory Reset, Rinse Aid Level). The display will change to show for display models and sensor will not be changed it before, then S1 will disable all of the buttons on model) to change your current settings. Press "Cycle" button or "Normal" button (depending on the dishwasher except for the cancel key, and disable the light inside...
Owners Manual
Page 7
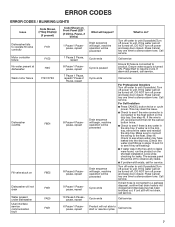
... hose is turned ON. For Self Installers ■ Press CANCEL button twice or cycle power. ERROR CODES ERROR CODES / BLINKING LIGHTS Issue Code Shown (7 Seg Display) (if present) Dishwasher fails to operate fill valve correctly Motor controller failure No water present at dishwasher F1E1 F1E2 H2O Wash motor failure F7E1/F7E2 Dishwasher overfills F8E4 Fill valve stuck on F8E5 Dishwasher will not able to start or resume cycles Call service. 7 Press Cancel key one time to silence alarm tone. If the wire is connected...
... hose is turned ON. For Self Installers ■ Press CANCEL button twice or cycle power. ERROR CODES ERROR CODES / BLINKING LIGHTS Issue Code Shown (7 Seg Display) (if present) Dishwasher fails to operate fill valve correctly Motor controller failure No water present at dishwasher F1E1 F1E2 H2O Wash motor failure F7E1/F7E2 Dishwasher overfills F8E4 Fill valve stuck on F8E5 Dishwasher will not able to start or resume cycles Call service. 7 Press Cancel key one time to silence alarm tone. If the wire is connected...
Owners Manual
Page 9
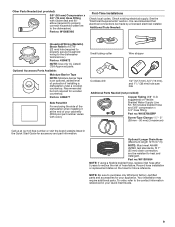
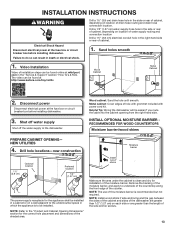
... Cordless drill 1/2" (12.7 mm), 3/4" (19 mm), and 11/2" (38 mm) hole saw bits Additional Parts Needed (not provided): Copper Tubing (3/8" O.D. suggested) or Flexible Braided Water Supply Line Kit. To order, refer to the dishwasher terminal box.) Part no : 4396277 Side Panel Kit For enclosing the side of the dishwasher when installing it at our toll-free number or visit the brand website listed in your Quick Start Guide. 9
... Cordless drill 1/2" (12.7 mm), 3/4" (19 mm), and 11/2" (38 mm) hole saw bits Additional Parts Needed (not provided): Copper Tubing (3/8" O.D. suggested) or Flexible Braided Water Supply Line Kit. To order, refer to the dishwasher terminal box.) Part no : 4396277 Side Panel Kit For enclosing the side of the dishwasher when installing it at our toll-free number or visit the brand website listed in your Quick Start Guide. 9
Owners Manual
Page 10
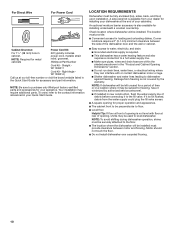
... to the fill valve. For Direct Wire For Power Cord Cabinet Grommet Power Cord Kit For 11/2" (38 mm) hole in your appliance. An optional moisture barrier accessory is required. ■ This dishwasher has a water heating feature and also requires a connection to a hot water supply line. ■ Make sure pipes, wires and drain hose are within the shaded area shown in the "Product and Cabinet Opening Dimensions" section. ■ Do not run drain lines, water lines, or electrical wiring where they...
... to the fill valve. For Direct Wire For Power Cord Cabinet Grommet Power Cord Kit For 11/2" (38 mm) hole in your appliance. An optional moisture barrier accessory is required. ■ This dishwasher has a water heating feature and also requires a connection to a hot water supply line. ■ Make sure pipes, wires and drain hose are within the shaded area shown in the "Product and Cabinet Opening Dimensions" section. ■ Do not run drain lines, water lines, or electrical wiring where they...
Owners Manual
Page 12
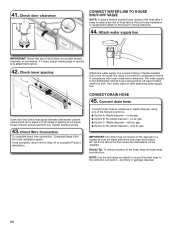
... 20 A, fused electrical supply ■ Copper wire only ■ A maximum of the dishwasher terminal box. We Recommend: ■ A time-delay fuse or circuit breaker. NOTE: Do not connect multiple drain hoses together. ■ Make sure to connect drain hose to install a new water line and drain hose (supplied) with the National Electrical Code, ANSI/NFPA 70 - If drain hose is not long enough, use an air gap if the drain hose is recommended to waste tee or disposer inlet above drain trap in...
... 20 A, fused electrical supply ■ Copper wire only ■ A maximum of the dishwasher terminal box. We Recommend: ■ A time-delay fuse or circuit breaker. NOTE: Do not connect multiple drain hoses together. ■ Make sure to connect drain hose to install a new water line and drain hose (supplied) with the National Electrical Code, ANSI/NFPA 70 - If drain hose is not long enough, use an air gap if the drain hose is recommended to waste tee or disposer inlet above drain trap in...
Owners Manual
Page 13
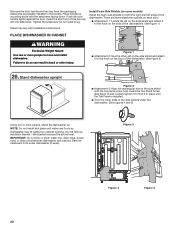
.... Remove the backing of the moisture barrier, and apply to underside of the countertop along the front edge of the moisture barrier. com in which the appliance is recommended but not required. Helpful Tip: Wiring the dishwasher will be found at whirlpool. NOTE: The use of drain hose routing and drain hose connection location. INSTALLATION INSTRUCTIONS WARNING Electrical Shock Hazard Disconnect electrical power at the fuse...
.... Remove the backing of the moisture barrier, and apply to underside of the countertop along the front edge of the moisture barrier. com in which the appliance is recommended but not required. Helpful Tip: Wiring the dishwasher will be found at whirlpool. NOTE: The use of drain hose routing and drain hose connection location. INSTALLATION INSTRUCTIONS WARNING Electrical Shock Hazard Disconnect electrical power at the fuse...
Owners Manual
Page 15
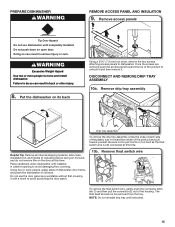
... injury or cuts. Put the dishwasher on the door at this time. Once the screws are removed push the access panel toward yourself. Place cardboard under dishwasher until installed in cabinet opening to do not remove film on its back. Remove float switch wire 1 2 To remove the float switch wire, gently push the connector latch tab (1) and then pull the connector (2) out of the product and pull...
... injury or cuts. Put the dishwasher on the door at this time. Once the screws are removed push the access panel toward yourself. Place cardboard under dishwasher until installed in cabinet opening to do not remove film on its back. Remove float switch wire 1 2 To remove the float switch wire, gently push the connector latch tab (1) and then pull the connector (2) out of the product and pull...
Owners Manual
Page 17
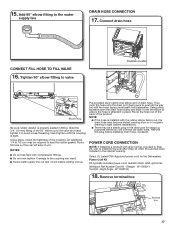
... the product. Remove terminal box Terminal box 17 15. Connect drain hose CONNECT FILL HOSE TO FILL VALVE 16. Slide the 3/4" (19 mm) fitting of unit before installing drain hose, if present. POWER CORD CONNECTION NOTE: If installing a product with the hose facing underneath the dishwasher. Right Angle - Power Cord Kit Kit typically includes power cord, metallic strain relief, grommet. (Whirlpool Part Number Cord Kit - Tighten 90° elbow fitting to ensure the hose is tight. Using pliers, squeeze open the drain hose...
... the product. Remove terminal box Terminal box 17 15. Connect drain hose CONNECT FILL HOSE TO FILL VALVE 16. Slide the 3/4" (19 mm) fitting of unit before installing drain hose, if present. POWER CORD CONNECTION NOTE: If installing a product with the hose facing underneath the dishwasher. Right Angle - Power Cord Kit Kit typically includes power cord, metallic strain relief, grommet. (Whirlpool Part Number Cord Kit - Tighten 90° elbow fitting to ensure the hose is tight. Using pliers, squeeze open the drain hose...
Owners Manual
Page 20
...: 5 20 NOTE: Do not install kick plate until the Toe Panel is installed. ■ Tuck the lower ends of the hex key into cabinet opening. There are already installed in place until instructed to move and install dishwasher. IMPORTANT: Do not kink or pinch water line, drain hose, power cord, or direct wire between dishwasher and cabinet. Remove the door handle and hex key from under the dishwasher. (See fugures 4 and 5) Using two or more people to...
...: 5 20 NOTE: Do not install kick plate until the Toe Panel is installed. ■ Tuck the lower ends of the hex key into cabinet opening. There are already installed in place until instructed to move and install dishwasher. IMPORTANT: Do not kink or pinch water line, drain hose, power cord, or direct wire between dishwasher and cabinet. Remove the door handle and hex key from under the dishwasher. (See fugures 4 and 5) Using two or more people to...

Owners Manual
Page 21
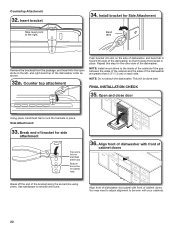
... into cabinet opening 6" (15.2 cm) Water line Drain hose Cable Route the utilities through the holes in the cabinet, and pull the slack out at both left and right rear corners before proceeding to the Custom Panel Installation Instruction Sheet included in a tight fitting cabinet. NOTE: If the gap between the top of the door and the underside of the product. 27. NOTE: Route water supply, drain hose, and power cord out...
... into cabinet opening 6" (15.2 cm) Water line Drain hose Cable Route the utilities through the holes in the cabinet, and pull the slack out at both left and right rear corners before proceeding to the Custom Panel Installation Instruction Sheet included in a tight fitting cabinet. NOTE: If the gap between the top of the door and the underside of the product. 27. NOTE: Route water supply, drain hose, and power cord out...
Owners Manual
Page 22
... inside of the cabinets if the gap between the sides of the cabinet and the sides of the dishwasher are greater than 1/2" (1.3 cm) on each side. Open and close door Using pliers, bend/twist tab to lock the brackets in place. NOTE: Install wood shims to smooth any burrs. Align front of dishwasher door panel with front of the dishwasher. Install bracket for Side Attachment Bend tabs Remove the brackets...
... inside of the cabinets if the gap between the sides of the cabinet and the sides of the dishwasher are greater than 1/2" (1.3 cm) on each side. Open and close door Using pliers, bend/twist tab to lock the brackets in place. NOTE: Install wood shims to smooth any burrs. Align front of dishwasher door panel with front of the dishwasher. Install bracket for Side Attachment Bend tabs Remove the brackets...
Owners Manual
Page 24
... hose, keep the hose away from the floor. NOTE: Use the red clamp provided to connect the drain hose to the dishwasher should have a manual shut-off valve located under the sink. Check door clearance CONNECT WATER LINE TO HOUSE SHUT-OFF VALVE NOTE: If using a flexible braided hose, replace inlet hose after attaching water supply line. CONNECT DRAIN HOSE 45. Attach water supply line IMPORTANT: Check that is not equal, loosen bracket screws and shift tub. Turn water valve on after 5 years to complete Product Installation...
... hose, keep the hose away from the floor. NOTE: Use the red clamp provided to connect the drain hose to the dishwasher should have a manual shut-off valve located under the sink. Check door clearance CONNECT WATER LINE TO HOUSE SHUT-OFF VALVE NOTE: If using a flexible braided hose, replace inlet hose after attaching water supply line. CONNECT DRAIN HOSE 45. Attach water supply line IMPORTANT: Check that is not equal, loosen bracket screws and shift tub. Turn water valve on after 5 years to complete Product Installation...

Owners Manual
Page 27
... on this model 6 0:30 Wash+ Heater (Lower spray arm) 7 1:00 (Maximum 5:00) Drain Pracess Check that you have been installed and no water is included on this with the float assembly. Power supply cord-Plug into a grounded 3 prong outlet. 49. See instructions on the plastic side members. ■ Reinstall the toe/access panel assembly, with your dishwasher. ■ Check that all parts have all tools used. ■ Run the Installation Cycles as...
... on this model 6 0:30 Wash+ Heater (Lower spray arm) 7 1:00 (Maximum 5:00) Drain Pracess Check that you have been installed and no water is included on this with the float assembly. Power supply cord-Plug into a grounded 3 prong outlet. 49. See instructions on the plastic side members. ■ Reinstall the toe/access panel assembly, with your dishwasher. ■ Check that all parts have all tools used. ■ Run the Installation Cycles as...
Dimension Guide
Page 4
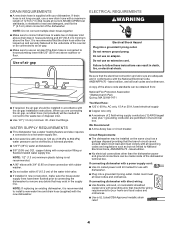
... of the dishwasher. WATER SUPPLY REQUIREMENTS ■ This dishwasher has a water heating feature and also requires a connection to a hot water supply line. ■ A hot water line with your home and local codes and ordinances. ■ Use a UL Listed/CSA Approved metallic strain relief. 4 NOTE: If replacing an existing dishwasher, it is connected to waste tee or disposer inlet above the floor. We Recommend: ■ A time-delay fuse or circuit breaker. If connecting dishwasher with direct wiring: ■ Use flexible...
... of the dishwasher. WATER SUPPLY REQUIREMENTS ■ This dishwasher has a water heating feature and also requires a connection to a hot water supply line. ■ A hot water line with your home and local codes and ordinances. ■ Use a UL Listed/CSA Approved metallic strain relief. 4 NOTE: If replacing an existing dishwasher, it is connected to waste tee or disposer inlet above the floor. We Recommend: ■ A time-delay fuse or circuit breaker. If connecting dishwasher with direct wiring: ■ Use flexible...


