

Use & Care Guide
Page 1
... is the safety alert symbol. Register your new dishwasher at www.maytag.ca. For future reference please make a note of your appliance. Model Number Serial Number Table of Contents DISHWASHER SAFETY 1 QUICK STEPS 3 DISHWASHER USE 3 CYCLE AND OPTION DESCRIPTIONS 6 DISHWASHER FEEDBACK SECTION 7 DISHWASHER FEATURES 8 DISHWASHER CARE 9 TROUBLESHOOTING 9 WARRANTY 12 Dishwasher Safety Your safety and the safety of others...
... is the safety alert symbol. Register your new dishwasher at www.maytag.ca. For future reference please make a note of your appliance. Model Number Serial Number Table of Contents DISHWASHER SAFETY 1 QUICK STEPS 3 DISHWASHER USE 3 CYCLE AND OPTION DESCRIPTIONS 6 DISHWASHER FEEDBACK SECTION 7 DISHWASHER FEATURES 8 DISHWASHER CARE 9 TROUBLESHOOTING 9 WARRANTY 12 Dishwasher Safety Your safety and the safety of others...
Use & Care Guide
Page 2
... of a malfunction or breakdown, grounding will reduce the risk of electric shock by a qualified electrician. ■ For a permanently connected dishwasher: The dishwasher must be connected to a grounded metal, permanent wiring system, or an equipment-grounding conductor must be plugged into an appropriate outlet that ... play in serious injury or cuts. Doing so can result in a risk of the equipment- HYDROGEN GAS IS EXPLOSIVE. The dishwasher is properly grounded. State of California Proposition 65 Warnings: WARNING: This product contains one or more chemicals known to the State ...
... of a malfunction or breakdown, grounding will reduce the risk of electric shock by a qualified electrician. ■ For a permanently connected dishwasher: The dishwasher must be connected to a grounded metal, permanent wiring system, or an equipment-grounding conductor must be plugged into an appropriate outlet that ... play in serious injury or cuts. Doing so can result in a risk of the equipment- HYDROGEN GAS IS EXPLOSIVE. The dishwasher is properly grounded. State of California Proposition 65 Warnings: WARNING: This product contains one or more chemicals known to the State ...
Use & Care Guide
Page 3
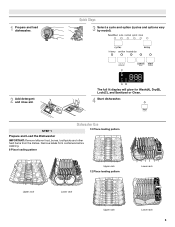
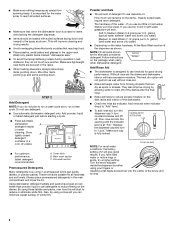
Quick Steps 3 Select a cycle and option (cycles and options vary by model). 2 Add detergent and rinse aid. STEP 1 Dishwasher Use 10 Place loading pattern Prepare and Load the Dishwasher IMPORTANT: Remove leftover food, bones, toothpicks and other hard items from containers before washing. 8 Place loading pattern Upper rack 12 Place loading pattern Upper rack Lower rack Upper rack Lower rack Lower rack 3 Remove labels from the dishes. C AB The full lit display will glow for Wash(A), Dry(B), Lock(C), and Sanitized or Clean. 4 Start dishwasher. 1 Prepare and load dishwasher.
Quick Steps 3 Select a cycle and option (cycles and options vary by model). 2 Add detergent and rinse aid. STEP 1 Dishwasher Use 10 Place loading pattern Prepare and Load the Dishwasher IMPORTANT: Remove leftover food, bones, toothpicks and other hard items from containers before washing. 8 Place loading pattern Upper rack 12 Place loading pattern Upper rack Lower rack Upper rack Lower rack Lower rack 3 Remove labels from the dishes. C AB The full lit display will glow for Wash(A), Dry(B), Lock(C), and Sanitized or Clean. 4 Start dishwasher. 1 Prepare and load dishwasher.
Use & Care Guide
Page 4
... not plan to reduce or eliminate white film. Add powder, liquid or tablet detergent just before starting a cycle. ■ Fresh automatic dishwasher A detergent results in a cool, dry place. Store tightly closed no items are blocking the detergent dispenser. ■ Items should be clean.... It is recommended. Make sure lightweight load items are for the water spray to Medium Water (0-6 grains per U.S. Mix other dishwasher detergent. MAIN WASH WASH ■ For optimum performance, tablet detergent is important for standard powdered detergent. Soft to reach all hardness...
... not plan to reduce or eliminate white film. Add powder, liquid or tablet detergent just before starting a cycle. ■ Fresh automatic dishwasher A detergent results in a cool, dry place. Store tightly closed no items are blocking the detergent dispenser. ■ Items should be clean.... It is recommended. Make sure lightweight load items are for the water spray to Medium Water (0-6 grains per U.S. Mix other dishwasher detergent. MAIN WASH WASH ■ For optimum performance, tablet detergent is important for standard powdered detergent. Soft to reach all hardness...

Use & Care Guide
Page 5
... close the door within 4 seconds. The door latches automatically. Press the START/RESUME button. The cycle resumes automatically at the sink nearest your dishwasher until the water is selected, the full lit display will glow blue for wash, red for dry, or green for Wash(A), Dry(B), Lock(C),... section. It C will glow for cycle complete. AB STEP 4 Start or Resume a Cycle ■ Run hot water at the point of the Dishwasher. For fully integrated models (controls on the front panel. After a brief pause, the cycle will advance to delay. Cycle times may increase or decrease...
... close the door within 4 seconds. The door latches automatically. Press the START/RESUME button. The cycle resumes automatically at the sink nearest your dishwasher until the water is selected, the full lit display will glow blue for wash, red for dry, or green for Wash(A), Dry(B), Lock(C),... section. It C will glow for cycle complete. AB STEP 4 Start or Resume a Cycle ■ Run hot water at the point of the Dishwasher. For fully integrated models (controls on the front panel. After a brief pause, the cycle will advance to delay. Cycle times may increase or decrease...

Use & Care Guide
Page 6
...:04 to achieve best cleaning with minimal water and energy for Residential Dishwashers. Select a wash cycle and options. Press START/RESUME. In accordance with Delays start of normally soiled dishes. Your dishwasher may increase depending on some models) will flash at a later time...See options information. 1.3 (4.9) OPTIONS CAN BE SELECTED WITH WHAT IT DOES ADDED TIME TO CYCLE ADDED WATER GALLONS (LITERS) Runs dishwasher at the end of any cycle cycle up to 24 hours. CYCLES ESTIMATED WASH TIME DISPLAYED Targets toughest food soils. Cycle and Option...
...:04 to achieve best cleaning with minimal water and energy for Residential Dishwashers. Select a wash cycle and options. Press START/RESUME. In accordance with Delays start of normally soiled dishes. Your dishwasher may increase depending on some models) will flash at a later time...See options information. 1.3 (4.9) OPTIONS CAN BE SELECTED WITH WHAT IT DOES ADDED TIME TO CYCLE ADDED WATER GALLONS (LITERS) Runs dishwasher at the end of any cycle cycle up to 24 hours. CYCLES ESTIMATED WASH TIME DISPLAYED Targets toughest food soils. Cycle and Option...

Use & Care Guide
Page 7
... cycle. Wait for cycle complete. Check that it is open the door completely. 3. Select new cycles and options. 6. Adding A Dish After Dishwasher Is Started 1. If detergent has not yet been used (detergent dispenser cover is closed within 4 seconds of for an air dry. controls are ... Start/Resume is or cycle and option changes locked, light flashes 3 times. Otherwise, proceed to deform when loaded in bottom of the dishwasher cycle Depending on some top control models), and cycle will also show the estimated remaining time for Wash (A), Dry (B), Sanitized or Clean....
... cycle. Wait for cycle complete. Check that it is open the door completely. 3. Select new cycles and options. 6. Adding A Dish After Dishwasher Is Started 1. If detergent has not yet been used (detergent dispenser cover is closed within 4 seconds of for an air dry. controls are ... Start/Resume is or cycle and option changes locked, light flashes 3 times. Otherwise, proceed to deform when loaded in bottom of the dishwasher cycle Depending on some top control models), and cycle will also show the estimated remaining time for Wash (A), Dry (B), Sanitized or Clean....

Use & Care Guide
Page 8
...: Remove dishes prior to hold lightweight plastic items, cooking utensils and knives in the lower level rack. If the silverware does not fit into the dishwasher. 8 Folding Tines The Folding Tines located in the up , and alternate spoons for optimum wash. To raise the rack, press both rack adjusters and slide... down . Full size dinner plates can be loaded in the upper rack if it is in the lower position. Stack-Rack Shelves Increase loading flexibility - Dishwasher Features Your Maytag dishwasher may have some or all the way out of the track and remove from the...
...: Remove dishes prior to hold lightweight plastic items, cooking utensils and knives in the lower level rack. If the silverware does not fit into the dishwasher. 8 Folding Tines The Folding Tines located in the up , and alternate spoons for optimum wash. To raise the rack, press both rack adjusters and slide... down . Full size dinner plates can be loaded in the upper rack if it is in the lower position. Stack-Rack Shelves Increase loading flexibility - Dishwasher Features Your Maytag dishwasher may have some or all the way out of the track and remove from the...

Use & Care Guide
Page 9
... the supply lines can increase water pressure and cause damage to the dishwasher or home. Be sure the detergent is closed and latched. Do not use of the dishwasher with any questions or concerns at the address below: In the U.S.A.: Maytag Brand Home Appliances Customer eXperience Center 553 Benson Road Benton Harbor, MI...
... the supply lines can increase water pressure and cause damage to the dishwasher or home. Be sure the detergent is closed and latched. Do not use of the dishwasher with any questions or concerns at the address below: In the U.S.A.: Maytag Brand Home Appliances Customer eXperience Center 553 Benson Road Benton Harbor, MI...

Use & Care Guide
Page 10
...has been completed (the green light is not used daily, you WILL NOT DRAIN will affect noise levels. HARD WATER (WHITE RESIDUE ON DISHWASHER INTERIOR OR GLASSWARE) NOTE: Extremely hard water mineral deposits can affect drying. (See specific loading instructions within 4 seconds. If a water ... obstructions in the drain hose. Check for suds in "Troubleshooting." Always use detergent. Do not use a high-quality, fresh detergent. The dishwasher will provide the best drying and avoid excess moisture in the lower rack. Always use a rinse aid. Run a normal cycle with the wash...
...has been completed (the green light is not used daily, you WILL NOT DRAIN will affect noise levels. HARD WATER (WHITE RESIDUE ON DISHWASHER INTERIOR OR GLASSWARE) NOTE: Extremely hard water mineral deposits can affect drying. (See specific loading instructions within 4 seconds. If a water ... obstructions in the drain hose. Check for suds in "Troubleshooting." Always use detergent. Do not use a high-quality, fresh detergent. The dishwasher will provide the best drying and avoid excess moisture in the lower rack. Always use a rinse aid. Run a normal cycle with the wash...

Use & Care Guide
Page 11
.... To remove spotting, run , call for heavier-soiled loads and hard water conditions. Less detergent is removable by soaking the item in a dishwasher. Select the proper cycle and option for 5 minutes. Suds can be caused by pre-washing. Try another brand of fresh detergent. If the...BLINKING LIGHTS CLOUDY OR SPOTTED DISHWARE (AND HARD WATER SOLUTION) ETCHING (PERMANENT CLOUDINESS) LEAKING WATER TUB IS DISCOLORED SOLUTION Be sure the dishwasher is due to hard water. Try using too much detergent with the Heated Dry option turned off. Improper loading can discolor the ...
.... To remove spotting, run , call for heavier-soiled loads and hard water conditions. Less detergent is removable by soaking the item in a dishwasher. Select the proper cycle and option for 5 minutes. Suds can be caused by pre-washing. Try another brand of fresh detergent. If the...BLINKING LIGHTS CLOUDY OR SPOTTED DISHWARE (AND HARD WATER SOLUTION) ETCHING (PERMANENT CLOUDINESS) LEAKING WATER TUB IS DISCOLORED SOLUTION Be sure the dishwasher is due to hard water. Try using too much detergent with the Heated Dry option turned off. Improper loading can discolor the ...

Use & Care Guide
Page 12
... under these parts that vary from state to state or province to province. 2/14 W10599489A ®/™ ©2014. MAYTAG® DISHWASHER LIMITED WARRANTY ATTACH YOUR RECEIPT HERE. Please have the following components to access additional resources, or visit https:/ /www....maytag.com/product_help. 2. Before contacting us to determine whether another warranty applies. light bulbs, batteries, air or water filters, etc.). ...
... under these parts that vary from state to state or province to province. 2/14 W10599489A ®/™ ©2014. MAYTAG® DISHWASHER LIMITED WARRANTY ATTACH YOUR RECEIPT HERE. Please have the following components to access additional resources, or visit https:/ /www....maytag.com/product_help. 2. Before contacting us to determine whether another warranty applies. light bulbs, batteries, air or water filters, etc.). ...
Installation Guide
Page 2
...fire, or injury to persons, the installer must be installed to meet all safety messages. This symbol alerts you to potential hazards that the dishwasher is , tell you how to reduce the chance of injury, and tell you don't immediately follow instructions. All safety messages will follow ...are not followed. WARNING You can result in serious injury or cuts. Care shall be performed by a qualified service technician. NOTE: Each dishwasher is installed or removed, to reduce the likelihood of damage to the power-supply cord. Always read and obey all electrical and plumbing ...
...fire, or injury to persons, the installer must be installed to meet all safety messages. This symbol alerts you to potential hazards that the dishwasher is , tell you how to reduce the chance of injury, and tell you don't immediately follow instructions. All safety messages will follow ...are not followed. WARNING You can result in serious injury or cuts. Care shall be performed by a qualified service technician. NOTE: Each dishwasher is installed or removed, to reduce the likelihood of damage to the power-supply cord. Always read and obey all electrical and plumbing ...
Installation Guide
Page 3
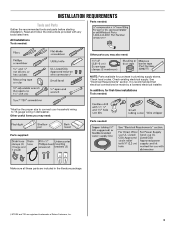
See "Electrical Requirements" section. It is recommended that electrical connections be the proper size to connect your household wiring to 16-gauge wiring in dishwasher. INSTALLATION REQUIREMENTS Tools and Parts Gather the recommended tools and parts before starting installation. In addition, for purchase in the literature package. †®TORX ...
See "Electrical Requirements" section. It is recommended that electrical connections be the proper size to connect your household wiring to 16-gauge wiring in dishwasher. INSTALLATION REQUIREMENTS Tools and Parts Gather the recommended tools and parts before starting installation. In addition, for purchase in the literature package. †®TORX ...
Installation Guide
Page 4
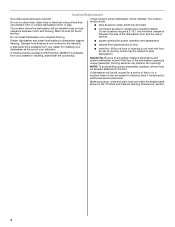
...where they can interfere with floor at rear of time or in the "Product and Cabinet Opening Dimensions" section. 4 The location where the dishwasher will be left unused for loading and unloading dishes. Corner locations require a 2" (5.1 cm) minimum clearance between motor and flooring. Motor should...provide: ■ easy access to the floor. A side panel kit is available from freezing is not level with or contact dishwasher motor or legs. Shelter dishwasher and water lines leading to floor. ■ level floor. (If floor at the end of opening is not covered by ...
...where they can interfere with floor at rear of time or in the "Product and Cabinet Opening Dimensions" section. 4 The location where the dishwasher will be left unused for loading and unloading dishes. Corner locations require a 2" (5.1 cm) minimum clearance between motor and flooring. Motor should...provide: ■ easy access to the floor. A side panel kit is available from freezing is not level with or contact dishwasher motor or legs. Shelter dishwasher and water lines leading to floor. ■ level floor. (If floor at the end of opening is not covered by ...

Installation Guide
Page 6
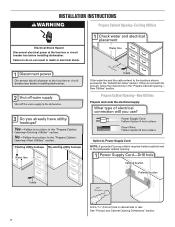
...20 to 120 psi (138 to 862 kPa) water pressure can be verified by a licensed plumber. ■ 120°F (49°C) water at dishwasher O.D. or 20-amp, fused electrical supply. ■ Copper wire only. We recommend: ■ A time-delay fuse or circuit breaker. ■ A... separate circuit. If connecting dishwasher with direct wiring: ■ Use flexible, armored or nonmetallic sheathed, copper wire with compression fitting or flexible braided water supply line (Part Number ...
...20 to 120 psi (138 to 862 kPa) water pressure can be verified by a licensed plumber. ■ 120°F (49°C) water at dishwasher O.D. or 20-amp, fused electrical supply. ■ Copper wire only. We recommend: ■ A time-delay fuse or circuit breaker. ■ A... separate circuit. If connecting dishwasher with direct wiring: ■ Use flexible, armored or nonmetallic sheathed, copper wire with compression fitting or flexible braided water supply line (Part Number ...
Installation Guide
Page 7
... far enough, follow the instructions in the "Prepare Cabinet Opening- If the water line and the cable extend to the locations shown, proceed to the dishwasher cabinet opening. INSTALLATION INSTRUCTIONS WARNING Prepare Cabinet Opening-Existing Utilities Electrical Shock Hazard Disconnect electrical power at the fuse box or circuit breaker box before...
... far enough, follow the instructions in the "Prepare Cabinet Opening- If the water line and the cable extend to the locations shown, proceed to the dishwasher cabinet opening. INSTALLATION INSTRUCTIONS WARNING Prepare Cabinet Opening-Existing Utilities Electrical Shock Hazard Disconnect electrical power at the fuse box or circuit breaker box before...
Installation Guide
Page 8
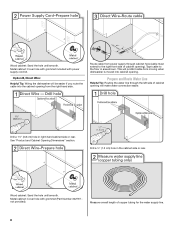
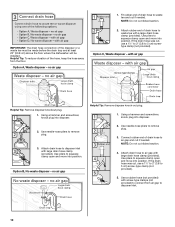
... of cabinet opening . This will make water connection easier. Metal cabinet: Cover hole with power supply cord kit. Option B, Direct Wire: Helpful Tip: Wiring the dishwasher will be easier if you route the cable into cabinet opening will prohibit cable from power supply through the left side of copper tubing for... to the floor in area shown. Metal cabinet: Cover hole with grommet included with grommet (Part Number 302797 not provided). Route cable from moving when dishwasher is moved into the cabinet opening ).
... of cabinet opening . This will make water connection easier. Metal cabinet: Cover hole with power supply cord kit. Option B, Direct Wire: Helpful Tip: Wiring the dishwasher will be easier if you route the cable into cabinet opening will prohibit cable from power supply through the left side of copper tubing for... to the floor in area shown. Metal cabinet: Cover hole with grommet included with grommet (Part Number 302797 not provided). Route cable from moving when dishwasher is moved into the cabinet opening ).

Installation Guide
Page 9
.... Attach the water supply line (copper tubing or flexible braided line) to "OFF" position. 9 The water supply to the front center of the dishwasher. Route drain hose as shown through hole in cabinet. (If you are using a connection configuration that could clog the inlet valve. This will bend...air gap is moved into a shallow pan until clear to the sink. Check local codes to "ON" position. Tape drain hose to the dishwasher inlet on the front left side of opening . Slowly route water supply line through hole in compliance with local codes and ordinances. Route water ...
.... Attach the water supply line (copper tubing or flexible braided line) to "OFF" position. 9 The water supply to the front center of the dishwasher. Route drain hose as shown through hole in cabinet. (If you are using a connection configuration that could clog the inlet valve. This will bend...air gap is moved into a shallow pan until clear to the sink. Check local codes to "ON" position. Tape drain hose to the dishwasher inlet on the front left side of opening . Slowly route water supply line through hole in compliance with local codes and ordinances. Route water ...
Installation Guide
Page 10
... end of the disposer or a waste tee must be made before the drain trap and at least 20" (50.8 cm) above the floor where the dishwasher will be installed. Use pliers to squeeze clamp open and move into position. Use needle-nose pliers to remove plug. 3. Use pliers to squeeze clamp...
... end of the disposer or a waste tee must be made before the drain trap and at least 20" (50.8 cm) above the floor where the dishwasher will be installed. Use pliers to squeeze clamp open and move into position. Use needle-nose pliers to remove plug. 3. Use pliers to squeeze clamp...


