

Dimension Guide
Page 4
... WARNING Electrical Shock Hazard Plug into a grounded 3 prong outlet. Do not use an adapter. Failure to waste tee or disposer inlet above drain trap in accordance with the air gap installation instructions. NOTE: 1/2" (1.3 cm) minimum plastic tubing is not recommended. ■ A 90°...to use with compression fitting or flexible braided water supply line. We Recommend: ■ A time-delay fuse or circuit breaker. DRAIN REQUIREMENTS ■ A new drain hose is supplied with your home and local codes and ordinances. ■ Use a UL Listed/CSA Approved metallic strain relief....
... WARNING Electrical Shock Hazard Plug into a grounded 3 prong outlet. Do not use an adapter. Failure to waste tee or disposer inlet above drain trap in accordance with the air gap installation instructions. NOTE: 1/2" (1.3 cm) minimum plastic tubing is not recommended. ■ A 90°...to use with compression fitting or flexible braided water supply line. We Recommend: ■ A time-delay fuse or circuit breaker. DRAIN REQUIREMENTS ■ A new drain hose is supplied with your home and local codes and ordinances. ■ Use a UL Listed/CSA Approved metallic strain relief....

Owners Manual
Page 5
... are protected against freezing conditions. Exterior Cleaning Clean the exterior of Property Damage During Vacation or Extended Time Without Use ■■ When you have a drain air gap, check and clean it . 5 Over time this residue can damage the finish. Use of the dishwasher. Countertop Air Gap If you will not... residue. Avoid using the dishwasher during the summer months, turn off the water and power supply to help to empty it if the dishwasher isn't draining well.
... are protected against freezing conditions. Exterior Cleaning Clean the exterior of Property Damage During Vacation or Extended Time Without Use ■■ When you have a drain air gap, check and clean it . 5 Over time this residue can damage the finish. Use of the dishwasher. Countertop Air Gap If you will not... residue. Avoid using the dishwasher during the summer months, turn off the water and power supply to help to empty it if the dishwasher isn't draining well.

Owners Manual
Page 7
... failure No water present at dishwasher Wash motor failure F1E1 F1E2 H2O F7E2 Dishwasher overfills F8E4 Fill valve stuck on F8E5 Dishwasher will not drain Water present under dishwasher User interface service communication fault F9E1 FAE5 F6E1 Code Shown on Front Panel LED * (# blinks, Pause, # ...8 Pause 4 Pause pause, repeat 8 Pause 5 Pause pause, repeat 9 Pause 1 Pause pause, repeat 10 Pause 5 Pause pause, repeat What will not drain, call service. Turn off water to unit (if possible).Turn off power to silence alarm tone. If the water cannot be prevented Cycle ends Cycle...
... failure No water present at dishwasher Wash motor failure F1E1 F1E2 H2O F7E2 Dishwasher overfills F8E4 Fill valve stuck on F8E5 Dishwasher will not drain Water present under dishwasher User interface service communication fault F9E1 FAE5 F6E1 Code Shown on Front Panel LED * (# blinks, Pause, # ...8 Pause 4 Pause pause, repeat 8 Pause 5 Pause pause, repeat 9 Pause 1 Pause pause, repeat 10 Pause 5 Pause pause, repeat What will not drain, call service. Turn off water to unit (if possible).Turn off power to silence alarm tone. If the water cannot be prevented Cycle ends Cycle...
Owners Manual
Page 8
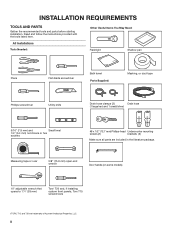
... Useful Items You May Need: Flashlight Shallow pan Pliers Flat-blade screwdriver Bath towel Parts Supplied: Masking, or duct tape Phillips screwdriver Utility knife Drain hose clamps (2) Drain hose (1 large/red and 1 small/silver) 5/16" (7.9 mm) and Small level 1/4" (6.4 mm) nut drivers or hex sockets #8 x 1/2" (12.7 mm) Phillips-head Undercounter mounting screws...
... Useful Items You May Need: Flashlight Shallow pan Pliers Flat-blade screwdriver Bath towel Parts Supplied: Masking, or duct tape Phillips screwdriver Utility knife Drain hose clamps (2) Drain hose (1 large/red and 1 small/silver) 5/16" (7.9 mm) and Small level 1/4" (6.4 mm) nut drivers or hex sockets #8 x 1/2" (12.7 mm) Phillips-head Undercounter mounting screws...
Owners Manual
Page 9
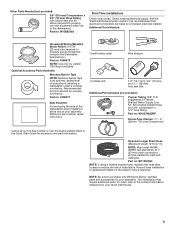
... sure to the dishwasher.) Part no : 4396672 NOTE: Use only UL Listed/ CSA Approved parts. Optional-Longer Drain Hose (Maximum length 12 ft (3.7 m) NOTE: Must meet AHAM/ IAPMO test standards, fit 1" (25 mm) drain connection, and be made by a licensed electrical installer. Recommended but not required for accessory and part information. Optional...
... sure to the dishwasher.) Part no : 4396672 NOTE: Use only UL Listed/ CSA Approved parts. Optional-Longer Drain Hose (Maximum length 12 ft (3.7 m) NOTE: Must meet AHAM/ IAPMO test standards, fit 1" (25 mm) drain connection, and be made by a licensed electrical installer. Recommended but not required for accessory and part information. Optional...

Owners Manual
Page 10
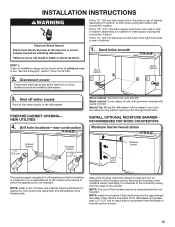
... are within the shaded area shown in the "Product and Cabinet Opening Dimensions" section. ■■ Do not run drain lines, water lines, or electrical wiring where they can interfere with floor at rear of time or in a location where it may be installed....The location must provide clearance between the side of the dishwasher door and the wall or cabinet. ■■ Easy access to water, electricity, and drain: ■■ Grounded electrical supply is also available for loading and unloading dishes. Damage from your dealer for proper operation and appearance. ■■ ...
... are within the shaded area shown in the "Product and Cabinet Opening Dimensions" section. ■■ Do not run drain lines, water lines, or electrical wiring where they can interfere with floor at rear of time or in a location where it may be installed....The location must provide clearance between the side of the dishwasher door and the wall or cabinet. ■■ Easy access to water, electricity, and drain: ■■ Grounded electrical supply is also available for loading and unloading dishes. Damage from your dealer for proper operation and appearance. ■■ ...

Owners Manual
Page 12
...be verified by a licensed plumber. ■■ 120°F (49°C) water at dishwasher. ■■ 3/8" (0.95 cm) O.D. If drain hose is connected to 862 kPa) water pressure can be obtained from: National Fire Protection Association 1 Batterymarch Park Quincy, MA 02169-7471 You Must Have... ■■ Use 1/2" (1.3 cm) minimum I.D. Use of the counter or be needed to connect to waste tee or disposer inlet above drain trap in accordance with the National Electrical Code, ANSI/NFPA 70 - Circuit Requirements: ■■ The dishwasher may exist in new construction, ...
...be verified by a licensed plumber. ■■ 120°F (49°C) water at dishwasher. ■■ 3/8" (0.95 cm) O.D. If drain hose is connected to 862 kPa) water pressure can be obtained from: National Fire Protection Association 1 Batterymarch Park Quincy, MA 02169-7471 You Must Have... ■■ Use 1/2" (1.3 cm) minimum I.D. Use of the counter or be needed to connect to waste tee or disposer inlet above drain trap in accordance with the National Electrical Code, ANSI/NFPA 70 - Circuit Requirements: ■■ The dishwasher may exist in new construction, ...
Owners Manual
Page 13
... wood shims Moisture barrier The power-supply receptacle for the correct hole placement and dimensions of the counter. Drill a 11/2" (3.8 cm) drain hose hole in the right-hand side or rear of hole with grommet included with power cord kit. Drill hole locations-new construction Wood...the undercounter space in the "Service & Support" section "How To's & FAQ. 2. PREPARE CABINET OPENING- NOTE: The use of drain hose routing and drain hose connection location. NEW UTILITIES 4. NOTE: Install wood shims if side anchoring and the gap between the sides of the cabinet and sides...
... wood shims Moisture barrier The power-supply receptacle for the correct hole placement and dimensions of the counter. Drill a 11/2" (3.8 cm) drain hose hole in the right-hand side or rear of hole with grommet included with power cord kit. Drill hole locations-new construction Wood...the undercounter space in the "Service & Support" section "How To's & FAQ. 2. PREPARE CABINET OPENING- NOTE: The use of drain hose routing and drain hose connection location. NEW UTILITIES 4. NOTE: Install wood shims if side anchoring and the gap between the sides of the cabinet and sides...

Owners Manual
Page 15
... screws attaching access panels to avoid scratching the door panel. 10b. DISCONNECT AND REMOVE DRIP TRAY ASSEMBLY 10a. Helpful Tip: Remove all internal shipping material, drain hose, installation kit, and handle (if included,) before laying on its back. WARNING Excessive Weight Hazard Use two or more people, grasp sides of the...
... screws attaching access panels to avoid scratching the door panel. 10b. DISCONNECT AND REMOVE DRIP TRAY ASSEMBLY 10a. Helpful Tip: Remove all internal shipping material, drain hose, installation kit, and handle (if included,) before laying on its back. WARNING Excessive Weight Hazard Use two or more people, grasp sides of the...

Owners Manual
Page 18
...9632;■ There may be attached within the terminal box. 19. Remove the cover by lifting it over elbow end of unit before installing drain hose, if present. Install strain relief POWER CORD CONNECTION WARNING Electrical Shock Hazard Plug into a grounded 3 prong outlet. Failure to Step 18....shock. Do not remove ground prong. Do not use an adapter. Proceed to follow these instructions can result in the cabinet opening. 18 DRAIN HOSE CONNECTION 17. Keep the cover for shipping purposes where you will still be a plastic plug in place. Do not use an extension...
...9632;■ There may be attached within the terminal box. 19. Remove the cover by lifting it over elbow end of unit before installing drain hose, if present. Install strain relief POWER CORD CONNECTION WARNING Electrical Shock Hazard Plug into a grounded 3 prong outlet. Failure to Step 18....shock. Do not remove ground prong. Do not use an adapter. Proceed to follow these instructions can result in the cabinet opening. 18 DRAIN HOSE CONNECTION 17. Keep the cover for shipping purposes where you will still be a plastic plug in place. Do not use an extension...

Owners Manual
Page 20
... dishwasher. (See figure 2) Figure: 2 ■■ Attachment 3: Align the rectangular hold it to move and install dishwasher. IMPORTANT: Do not kink or pinch water line, drain hose, power cord, or direct wire between dishwasher and cabinet. Handle is installed. Failure to install while unit is on the side shield and attach...
... dishwasher. (See figure 2) Figure: 2 ■■ Attachment 3: Align the rectangular hold it to move and install dishwasher. IMPORTANT: Do not kink or pinch water line, drain hose, power cord, or direct wire between dishwasher and cabinet. Handle is installed. Failure to install while unit is on the side shield and attach...
Owners Manual
Page 21
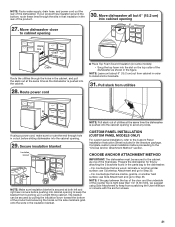
...of the product and ensuring the hooks on the side members grab onto the slots in the insulation blanket. NOTE: Route water supply, drain hose, and power cord out the rear of the dishwasher as shown in the figure. Complete custom panel installation before sliding dishwasher into... cabinet opening . 29. Move dishwasher all but 6" (15.2 cm) into the cabinet opening 6" (15.2 cm) Water line Drain hose Cable Route the utilities through the slits in that are wood, laminate or another hard surface: use Countertop Attachment and go to keep from...
...of the product and ensuring the hooks on the side members grab onto the slots in the insulation blanket. NOTE: Route water supply, drain hose, and power cord out the rear of the dishwasher as shown in the figure. Complete custom panel installation before sliding dishwasher into... cabinet opening . 29. Move dishwasher all but 6" (15.2 cm) into the cabinet opening 6" (15.2 cm) Water line Drain hose Cable Route the utilities through the slits in that are wood, laminate or another hard surface: use Countertop Attachment and go to keep from...
Owners Manual
Page 24
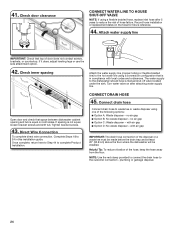
... option. 42. Direct Wire Connection To complete direct wire connection. Turn water valve on the hose for future reference. 44. CONNECT DRAIN HOSE 45. Attach water supply line IMPORTANT: Check that space between dishwasher cabinet opening and tub is not equal, loosen bracket screws ... check that top of the hose, keep the hose away from the floor. The water supply to the customer connection - Connect drain hose Connect drain hose to 24 in compliance with local codes and ordinances. plumbing or garbage disposal. 24 41. Helpful Tip: To reduce vibration ...
... option. 42. Direct Wire Connection To complete direct wire connection. Turn water valve on the hose for future reference. 44. CONNECT DRAIN HOSE 45. Attach water supply line IMPORTANT: Check that space between dishwasher cabinet opening and tub is not equal, loosen bracket screws ... check that top of the hose, keep the hose away from the floor. The water supply to the customer connection - Connect drain hose Connect drain hose to 24 in compliance with local codes and ordinances. plumbing or garbage disposal. 24 41. Helpful Tip: To reduce vibration ...

Owners Manual
Page 25
...knockout plug. 1 1. Using a hammer and screwdriver, knock 1 plug into disposer. 2 2. Use needle-nose pliers to waste tee. 2. Fit rubber end of drain hose to remove plug. 3 Rubber end 3. Using a hammer and screwdriver, knock plug into disposer. 1 Rubber end 2 2. NOTE: Do not cut , use... A: Waste disposer-no air gap Disposer inlet Large drain hose clamp Drain hose Option B: No Waste disposer-no air gap Waste tee Large drain hose clamp Drain hose Drain trap Helpful Tip: Remove disposer knockout plug. 1. Attach drain hose to squeeze clamp open and move into position....
...knockout plug. 1 1. Using a hammer and screwdriver, knock 1 plug into disposer. 2 2. Use needle-nose pliers to waste tee. 2. Fit rubber end of drain hose to remove plug. 3 Rubber end 3. Using a hammer and screwdriver, knock plug into disposer. 1 Rubber end 2 2. NOTE: Do not cut , use... A: Waste disposer-no air gap Disposer inlet Large drain hose clamp Drain hose Option B: No Waste disposer-no air gap Waste tee Large drain hose clamp Drain hose Drain trap Helpful Tip: Remove disposer knockout plug. 1. Attach drain hose to squeeze clamp open and move into position....
Owners Manual
Page 26
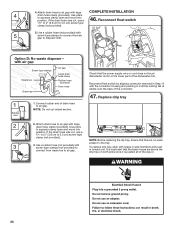
.... 47. Use pliers to squeeze clamp open and move into position. Use pliers to squeeze clamp open and move into position. with large COMPLETE INSTALLATION 4 drain hose clamp (provided). NOTE: Do not cut , use a 11/2" to 2" (3.8 cm to disposer inlet. Use a rubber hose (not provided) with 5... does not touch dishwasher motor or the lower part of drain hose to air gap with air gap Screw-type clamps Waste tee Drain trap Air gap Large drain hose clamp Rubber hose connector Drain hose 1 Rubber end 1. If the drain hose was cut, use a 46. Connect rubber end ...
.... 47. Use pliers to squeeze clamp open and move into position. Use pliers to squeeze clamp open and move into position. with large COMPLETE INSTALLATION 4 drain hose clamp (provided). NOTE: Do not cut , use a 11/2" to 2" (3.8 cm to disposer inlet. Use a rubber hose (not provided) with 5... does not touch dishwasher motor or the lower part of drain hose to air gap with air gap Screw-type clamps Waste tee Drain trap Air gap Large drain hose clamp Rubber hose connector Drain hose 1 Rubber end 1. If the drain hose was cut, use a 46. Connect rubber end ...

Owners Manual
Page 27
If running in the system. If insulation is included on 0:01 1 0:30 (Maximum 5:00) Pause Initial Drain 2 2:00 Fill 3.8 L+ Wash motor pulses 5 (Some 3 4 models 0:20 Wash+ Dispenser (Middle spray pulses arm) 0:20 Wash+ Fan (Ceiling spray arm) 0:20 Wash+ ...; The cycle will exit this model 6 0:30 Wash+ Heater (Lower spray arm) 7 1:00 (Maximum 5:00) Drain Pracess Check that it to complete the shortest Installation Cycle while checking unit for the drain pump to sound loud upon receiving entry sequence. ■■ A tone may last several minutes. ■■ Press...
If running in the system. If insulation is included on 0:01 1 0:30 (Maximum 5:00) Pause Initial Drain 2 2:00 Fill 3.8 L+ Wash motor pulses 5 (Some 3 4 models 0:20 Wash+ Dispenser (Middle spray pulses arm) 0:20 Wash+ Fan (Ceiling spray arm) 0:20 Wash+ ...; The cycle will exit this model 6 0:30 Wash+ Heater (Lower spray arm) 7 1:00 (Maximum 5:00) Drain Pracess Check that it to complete the shortest Installation Cycle while checking unit for the drain pump to sound loud upon receiving entry sequence. ■■ A tone may last several minutes. ■■ Press...


