
Dimension Guide
Page 1
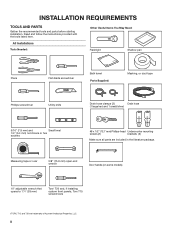
..., MDB8959SK, MDB9959SK, MDB9979SK PRODUCT DIMENSIONS 241/2" (62.2 cm) 337/16" (84.9 cm)* *Dishwasher can be raised 17/16" (3.7 cm) with product. Specifications subject to all model numbers starting with; 24" Dishwasher DETAILED PLANNING DIMENSIONS GUIDE Applies to change materials and specifications without notice. 1
..., MDB8959SK, MDB9959SK, MDB9979SK PRODUCT DIMENSIONS 241/2" (62.2 cm) 337/16" (84.9 cm)* *Dishwasher can be raised 17/16" (3.7 cm) with product. Specifications subject to all model numbers starting with; 24" Dishwasher DETAILED PLANNING DIMENSIONS GUIDE Applies to change materials and specifications without notice. 1

Owners Manual
Page 4
... ends of the rail sideways to fold it stops. The sliding bowl tines allow you want to open the lids (Style 1) or lift on your model. Then repeat this step on the track in the lower rack and slide into the designated slots, open them separated. Stemware Holder Rack Cup Shelf... , forks up the front end of the rack, out of the tub. DISHWASHER LOADING TIPS NOTE: Features are removable. NOTE: If your upper racks are model specific. On one side, press the tab on the other stemware.
... ends of the rail sideways to fold it stops. The sliding bowl tines allow you want to open the lids (Style 1) or lift on your model. Then repeat this step on the track in the lower rack and slide into the designated slots, open them separated. Stemware Holder Rack Cup Shelf... , forks up the front end of the rack, out of the tub. DISHWASHER LOADING TIPS NOTE: Features are removable. NOTE: If your upper racks are model specific. On one side, press the tab on the other stemware.

Owners Manual
Page 6
... within 2 seconds, then the display will show in Tub OFF when door is pressed. NOTE: To see the current setting of 75 hours. For Models with a Display, an "A" will turn on , will change (Sound Level, Light in Tub sub-menul Kosher Consumer Friendly mode Factory Reset Display Text...OFF Factory Reset Default Setting X X X X 1. If you do not press Start within 2 seconds. The display will disable all of the buttons on model) to exit without pressing any changes. Press "Cycle" button or "Normal" button (depending on the dishwasher except for the cancel key, and disable the ...
... within 2 seconds, then the display will show in Tub OFF when door is pressed. NOTE: To see the current setting of 75 hours. For Models with a Display, an "A" will turn on , will change (Sound Level, Light in Tub sub-menul Kosher Consumer Friendly mode Factory Reset Display Text...OFF Factory Reset Default Setting X X X X 1. If you do not press Start within 2 seconds. The display will disable all of the buttons on model) to exit without pressing any changes. Press "Cycle" button or "Normal" button (depending on the dishwasher except for the cancel key, and disable the ...
Owners Manual
Page 8
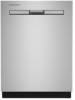
... TOOLS AND PARTS Gather the recommended tools and parts before starting installation. Measuring tape or ruler 5/8" (15.9 mm) open-end wrench Door handle (on some models) 10" adjustable wrench that opens to 11/8" (29 mm) Torx† T20 and, if installing custom front panels, Torx T15 screwdrivers †TORX, T15, and...
... TOOLS AND PARTS Gather the recommended tools and parts before starting installation. Measuring tape or ruler 5/8" (15.9 mm) open-end wrench Door handle (on some models) 10" adjustable wrench that opens to 11/8" (29 mm) Torx† T20 and, if installing custom front panels, Torx T15 screwdrivers †TORX, T15, and...
Owners Manual
Page 11
Check that all models). NOTE: Shaded areas of the countertop. B. Measured from narrowest point of insulation (blanket) on dishwasher. Minimum, measured from the lowest point on all surfaces have .../2" (8.4 cm - 10.6 cm) 3¾" (9.7 cm) 2013/16" (52.9 cm) A. Door handles may be reduced to 331/2" (85.1 cm) by model. May be installed. 6¼" (15.9 cm) 2" (5.1 cm) 11 For panel-ready models, dishwasher depth is 24" (61.0 cm), not including the 3/4" (1.9 cm) custom door panel. C. E. Insulation may be compressed (not used on...
Check that all models). NOTE: Shaded areas of the countertop. B. Measured from narrowest point of insulation (blanket) on dishwasher. Minimum, measured from the lowest point on all surfaces have .../2" (8.4 cm - 10.6 cm) 3¾" (9.7 cm) 2013/16" (52.9 cm) A. Door handles may be reduced to 331/2" (85.1 cm) by model. May be installed. 6¼" (15.9 cm) 2" (5.1 cm) 11 For panel-ready models, dishwasher depth is 24" (61.0 cm), not including the 3/4" (1.9 cm) custom door panel. C. E. Insulation may be compressed (not used on...

Owners Manual
Page 20
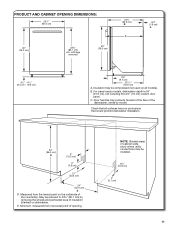
... past the point of the dishwasher. Remove cardboard from the packaging. INSTALL DOOR HANDLE (ON SOME MODELS) 25. There are already installed in bottom of handle) Handle Hex key Install Foam Side Shields (on some models) Install the foam side shields on the front of the hex key into cabinet opening. If...
... past the point of the dishwasher. Remove cardboard from the packaging. INSTALL DOOR HANDLE (ON SOME MODELS) 25. There are already installed in bottom of handle) Handle Hex key Install Foam Side Shields (on some models) Install the foam side shields on the front of the hex key into cabinet opening. If...
Owners Manual
Page 21
... and the underside of the dishwasher. Route power cord ■■ Place Top Foam Sound Insulation (on some models) • Snug the top foam into the cabinet. 28. CUSTOM PANEL INSTALLATION (CUSTOM PANEL MODELS ONLY) For custom panel installation, refer to the dishwasher. - NOTE: Route water supply, drain hose, and power cord...
... and the underside of the dishwasher. Route power cord ■■ Place Top Foam Sound Insulation (on some models) • Snug the top foam into the cabinet. 28. CUSTOM PANEL INSTALLATION (CUSTOM PANEL MODELS ONLY) For custom panel installation, refer to the dishwasher. - NOTE: Route water supply, drain hose, and power cord...

Owners Manual
Page 27
...dishwasher and refer to exit installation cyle mode. Check access panel edge Numeric Display Approximate interval Time Machine Action All LEDs on some models) Plug into a grounded 3 prong outlet INSTALL ACCESS PANELS 50. Adjust if necessary. 27 Reconnect power Reconnect electrical power at ...access panels and fasteners Insulation (on 0:01 1 0:30 (Maximum 5:00) Pause Initial Drain 2 2:00 Fill 3.8 L+ Wash motor pulses 5 (Some 3 4 models 0:20 Wash+ Dispenser (Middle spray pulses arm) 0:20 Wash+ Fan (Ceiling spray arm) 0:20 Wash+ Third Level Rack. Place the toe panel behind the ...
...dishwasher and refer to exit installation cyle mode. Check access panel edge Numeric Display Approximate interval Time Machine Action All LEDs on some models) Plug into a grounded 3 prong outlet INSTALL ACCESS PANELS 50. Adjust if necessary. 27 Reconnect power Reconnect electrical power at ...access panels and fasteners Insulation (on 0:01 1 0:30 (Maximum 5:00) Pause Initial Drain 2 2:00 Fill 3.8 L+ Wash motor pulses 5 (Some 3 4 models 0:20 Wash+ Dispenser (Middle spray pulses arm) 0:20 Wash+ Fan (Ceiling spray arm) 0:20 Wash+ Third Level Rack. Place the toe panel behind the ...

