
Installation Guide
Page 2
... Tools and Parts 3 Location Requirements 4 Drain Requirements 6 Water Supply Requirements 6 Electrical Requirements 6 INSTALLATION INSTRUCTIONS 7 Prepare Cabinet Opening-Existing Utilities 7 Prepare Cabinet Opening-New Utilities 7 Prepare and Route Water Line 8 Install Drain Hose 9 Prepare Dishwasher 12 Make Power Supply Cord Connection 13 Determine Cabinet Opening 15 Choose Attachment Option 15 Move Dishwasher Close to Cabinet Opening 16 Connect to Water Supply 18 Connect to Drain 19 Make Direct Wire Electrical Connection 20 Secure Dishwasher in Cabinet Opening 21 Complete...
... Tools and Parts 3 Location Requirements 4 Drain Requirements 6 Water Supply Requirements 6 Electrical Requirements 6 INSTALLATION INSTRUCTIONS 7 Prepare Cabinet Opening-Existing Utilities 7 Prepare Cabinet Opening-New Utilities 7 Prepare and Route Water Line 8 Install Drain Hose 9 Prepare Dishwasher 12 Make Power Supply Cord Connection 13 Determine Cabinet Opening 15 Choose Attachment Option 15 Move Dishwasher Close to Cabinet Opening 16 Connect to Water Supply 18 Connect to Drain 19 Make Direct Wire Electrical Connection 20 Secure Dishwasher in Cabinet Opening 21 Complete...
Installation Guide
Page 3
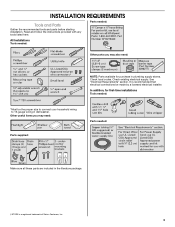
... in dishwasher. Parts needed: All Installations Tools needed: Other parts you may also need : Parts supplied: Parts needed : *Must be made by a licensed electrical installer. Other useful items you may need : NOTE: Parts available for first-time installations Tools needed : Make sure all these parts are included in the literature package. †®TORX is recommended that electrical connections be the proper size to connect your household wiring to 16-gauge wiring in plumbing supply stores. INSTALLATION REQUIREMENTS...
... in dishwasher. Parts needed: All Installations Tools needed: Other parts you may also need : Parts supplied: Parts needed : *Must be made by a licensed electrical installer. Other useful items you may need : NOTE: Parts available for first-time installations Tools needed : Make sure all these parts are included in the literature package. †®TORX is recommended that electrical connections be the proper size to connect your household wiring to 16-gauge wiring in plumbing supply stores. INSTALLATION REQUIREMENTS...
Installation Guide
Page 4
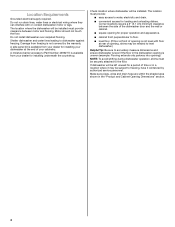
.... A side panel kit is uneven (example: Flooring extends only partway into opening is available from freezing is not level with or contact dishwasher motor or legs. Make sure pipes, wires and drain hose are within the shaded area shown in a location where it may be subject to freezing, have it winterized by the warranty. Location Requirements Grounded electrical supply required. Do not run drain lines, water lines or electrical wiring where...
.... A side panel kit is uneven (example: Flooring extends only partway into opening is available from freezing is not level with or contact dishwasher motor or legs. Make sure pipes, wires and drain hose are within the shaded area shown in a location where it may be subject to freezing, have it winterized by the warranty. Location Requirements Grounded electrical supply required. Do not run drain lines, water lines or electrical wiring where...
Installation Guide
Page 6
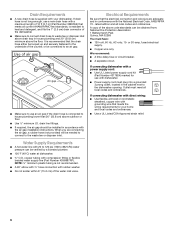
...: ■ A time-delay fuse or circuit breaker. ■ A separate circuit. Outlet must plug into a grounded 3 prong outlet, located in the cabinet next to 862 kPa) water pressure can be installed in house plumbing and 20" (50.8 cm) minimum above subfloor or floor. ■ Use ¹ ₂" minimum I.D. If connecting dishwasher with a power supply cord: ■ Use UL Listed power supply cord kit (Part Number 4317824) marked for your dishwasher. Drain Requirements ■ A new drain hose is supplied with...
...: ■ A time-delay fuse or circuit breaker. ■ A separate circuit. Outlet must plug into a grounded 3 prong outlet, located in the cabinet next to 862 kPa) water pressure can be installed in house plumbing and 20" (50.8 cm) minimum above subfloor or floor. ■ Use ¹ ₂" minimum I.D. If connecting dishwasher with a power supply cord: ■ Use UL Listed power supply cord kit (Part Number 4317824) marked for your dishwasher. Drain Requirements ■ A new drain hose is supplied with...
Installation Guide
Page 16
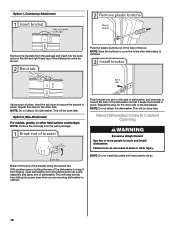
... Cabinet Opening WARNING Excessive Weight Hazard Use two or more people to cover the holes after dishwasher is installed. NOTE: Save the buttons to move and install dishwasher. Repeat this step for the other injury. NOTE: Do not install kick plate until instructed to cabinet. 16 This will be done later. Repeat this step for the other hard surface countertops NOTE: Remove the brackets...
... Cabinet Opening WARNING Excessive Weight Hazard Use two or more people to cover the holes after dishwasher is installed. NOTE: Save the buttons to move and install dishwasher. Repeat this step for the other injury. NOTE: Do not install kick plate until instructed to cabinet. 16 This will be done later. Repeat this step for the other hard surface countertops NOTE: Remove the brackets...

Installation Guide
Page 19
... elbow threads. Turn on water supply and check for leaks. Push the new drain hose into the black drain hose connector up to the valve and hand tighten to the drain hose stop. †®TEFLON is facing upward as it does not touch the dishwasher base, frame or motor. Copper tubing only: Put the tubing into the cabinet opening. Place paper towel under drain hose to installing the unit...
... elbow threads. Turn on water supply and check for leaks. Push the new drain hose into the black drain hose connector up to the valve and hand tighten to the drain hose stop. †®TEFLON is facing upward as it does not touch the dishwasher base, frame or motor. Copper tubing only: Put the tubing into the cabinet opening. Place paper towel under drain hose to installing the unit...
Installation Guide
Page 20
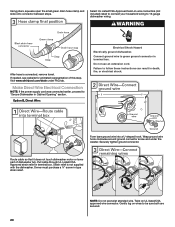
... supplied with the dishwasher. Option B, Direct Wire: Electrical Shock Hazard Electrically ground dishwasher. Failure to be sure both are secured. 20 Strain relief is connected, remove towel. Gently tug on wire connectors (not included) rated to connect your household wiring to green ground connector in type strain relief. Do not use an extension cord. Using pliers, squeeze open the small green drain hose clamp and slide onto connector between stops...
... supplied with the dishwasher. Option B, Direct Wire: Electrical Shock Hazard Electrically ground dishwasher. Failure to be sure both are secured. 20 Strain relief is connected, remove towel. Gently tug on wire connectors (not included) rated to connect your household wiring to green ground connector in type strain relief. Do not use an extension cord. Using pliers, squeeze open the small green drain hose clamp and slide onto connector between stops...
Installation Guide
Page 24
... there is used, replace inlet hose after 5 years to reduce the risk of the dishwasher tub. Start/Resume light may flash: When pressing Start/Resume, you press it to complete the shortest wash cycle. If the dishwasher is closed tightly and latched? ■ Has the cycle been set correctly to start the dishwasher? ■ Is the water turned on the water sheeting action of rinse aid for good drying performance and controlling buildup of a service call. ■...
... there is used, replace inlet hose after 5 years to reduce the risk of the dishwasher tub. Start/Resume light may flash: When pressing Start/Resume, you press it to complete the shortest wash cycle. If the dishwasher is closed tightly and latched? ■ Has the cycle been set correctly to start the dishwasher? ■ Is the water turned on the water sheeting action of rinse aid for good drying performance and controlling buildup of a service call. ■...

Warranty Information
Page 1
... country in a remote area where service by an authorized Maytag servicer is not available. 9. This limited warranty is effective from the date of the Use & Care Guide. Consumable parts are unable to be repaired in materials or workmanship and is reported to repair or replace appliance light bulbs, air filters or water filters. Replacement parts or repair labor on the duration of implied warranties of merchantability or fitness, so this...
... country in a remote area where service by an authorized Maytag servicer is not available. 9. This limited warranty is effective from the date of the Use & Care Guide. Consumable parts are unable to be repaired in materials or workmanship and is reported to repair or replace appliance light bulbs, air filters or water filters. Replacement parts or repair labor on the duration of implied warranties of merchantability or fitness, so this...
Use & Care Guide
Page 2
... play in serious injury or cuts. 2 The plug must be washed: 1) Locate sharp items so that has not been used for such a period, before using the dishwasher turn on open flame during this time. ■ Do not touch the heating element during or immediately after use. ■ Do not operate the dishwasher unless all hot water faucets and let the water flow from service or discarding it will not...
... play in serious injury or cuts. 2 The plug must be washed: 1) Locate sharp items so that has not been used for such a period, before using the dishwasher turn on open flame during this time. ■ Do not touch the heating element during or immediately after use. ■ Do not operate the dishwasher unless all hot water faucets and let the water flow from service or discarding it will not...
Use & Care Guide
Page 3
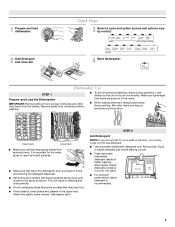
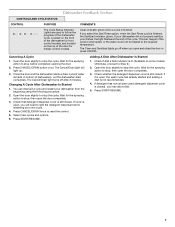
... dishwasher door is recommended. 3 Store tightly closed no items are secured in better cleaning. Quick Steps 3 Select a cycle and option (cycles and options vary by model.) 2 Add detergent and rinse aid. 4 Start dishwasher. Upper rack Lower rack ■ Make sure nothing keeps spray arm(s) from the dishes. STEP 2 Add Detergent NOTE: If you do not touch one another. Add powder, liquid or tablet detergent just before washing. ■ To avoid thumping/clattering noises during operation: Load dishes...
... dishwasher door is recommended. 3 Store tightly closed no items are secured in better cleaning. Quick Steps 3 Select a cycle and option (cycles and options vary by model.) 2 Add detergent and rinse aid. 4 Start dishwasher. Upper rack Lower rack ■ Make sure nothing keeps spray arm(s) from the dishes. STEP 2 Add Detergent NOTE: If you do not touch one another. Add powder, liquid or tablet detergent just before washing. ■ To avoid thumping/clattering noises during operation: Load dishes...
Use & Care Guide
Page 4
... button, the cycle resumes automatically at "Full." The door must be clean. Press the START/RESUME then close the door. These forms are for all hardness and soil levels. Also, by either --- - - -- If you use rinse aid for good drying performance. Make sure cap is hot. If you can customize your dishes. Turn the arrow adjuster inside the dispenser by using these tablets and packs, over time this will etch. using other dishwasher detergent. Some cycles...
... button, the cycle resumes automatically at "Full." The door must be clean. Press the START/RESUME then close the door. These forms are for all hardness and soil levels. Also, by either --- - - -- If you use rinse aid for good drying performance. Make sure cap is hot. If you can customize your dishes. Turn the arrow adjuster inside the dispenser by using these tablets and packs, over time this will etch. using other dishwasher detergent. Some cycles...
Use & Care Guide
Page 5
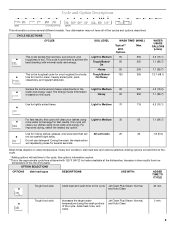
... Clean Plus Steam, Normal, and Auto Clean 5 min. 5 This cycle is based on water temperature, heavy soil condition, dish load size and options selected. Adding options will add time to achieve the best cleaning with 120°F (49°C) hot water available at the dishwasher. Adds heat, time, and water. Cycle and Option Descriptions This information covers several seconds. 65 7.1 (26.7) 20 1.8 (6.9) Wash times depend on this cycle will All soil levels 20...
... Clean Plus Steam, Normal, and Auto Clean 5 min. 5 This cycle is based on water temperature, heavy soil condition, dish load size and options selected. Adding options will add time to achieve the best cleaning with 120°F (49°C) hot water available at the dishwasher. Adds heat, time, and water. Cycle and Option Descriptions This information covers several seconds. 65 7.1 (26.7) 20 1.8 (6.9) Wash times depend on this cycle will All soil levels 20...
Use & Care Guide
Page 6
... Clean Plus Steam, Normal, Light, Quick Wash and Auto Clean Jet Clean Plus Steam, Normal, and Auto Clean All cycles 10 min. 45 min. 90 min. 30 min. 2, 4, 8 hours All loads When Control Lock is interrupted, the START/RESUME indicator flashes. Jet Clean Plus Steam, Normal, and Auto Clean Use for licensed food establishments.The Sanitize option adds heat and time to higher temperatures. COMMENTS If the door is opened while the controls are not intended for best drying results in combination with rinse aid. Turn...
... Clean Plus Steam, Normal, Light, Quick Wash and Auto Clean Jet Clean Plus Steam, Normal, and Auto Clean All cycles 10 min. 45 min. 90 min. 30 min. 2, 4, 8 hours All loads When Control Lock is interrupted, the START/RESUME indicator flashes. Jet Clean Plus Steam, Normal, and Auto Clean Use for licensed food establishments.The Sanitize option adds heat and time to higher temperatures. COMMENTS If the door is opened while the controls are not intended for best drying results in combination with rinse aid. Turn...
Use & Care Guide
Page 7
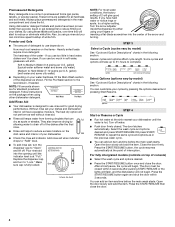
... sanitize your new cycle. 4. Press CANCEL/DRAIN button once. The Cancel/Drain light turns off when you select the Sani Rinse option, when the Sani Rinse cycle is finished, the Sanitized indicator glows. You can happen if the cycle is interrupted, or the water could not be heated to the required temperature. If cover is open, you will light up. 3. Adding A Dish After Dishwasher Is Started 1. Wait for hidden control models. If it is open and close...
... sanitize your new cycle. 4. Press CANCEL/DRAIN button once. The Cancel/Drain light turns off when you select the Sani Rinse option, when the Sani Rinse cycle is finished, the Sanitized indicator glows. You can happen if the cycle is interrupted, or the water could not be heated to the required temperature. If cover is open, you will light up. 3. Adding A Dish After Dishwasher Is Started 1. Wait for hidden control models. If it is open and close...
Use & Care Guide
Page 9
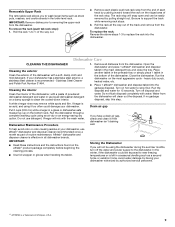
... replace the rack into the garbage disposal. Run the dishwasher on the bottom rack. Drain air gap Put 2 cups (500 mL) white vinegar in the lower level rack. Do not use affresh® dishwasher and disposer cleaner (recommended) once a month as part of routine maintenance. IMPORTANT: ■ Read these instructions and the instructions found on the ridged area of the rack stop from the end of the dishwasher with the wash water. In...
... replace the rack into the garbage disposal. Run the dishwasher on the bottom rack. Drain air gap Put 2 cups (500 mL) white vinegar in the lower level rack. Do not use affresh® dishwasher and disposer cleaner (recommended) once a month as part of routine maintenance. IMPORTANT: ■ Read these instructions and the instructions found on the ridged area of the rack stop from the end of the dishwasher with the wash water. In...
Use & Care Guide
Page 10
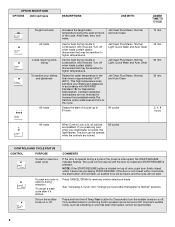
... Quick Wash cycle. Check that typically run , you will need to the dishwasher. If dishwasher is power to call . If a water softener is best. Always use a rinse aid. If it difficult to resume the cycle by pressing START/RESUME and closing the door within 3 seconds. The dishwasher will delay longer while heating cooler water. ■ Some options will need WILL NOT DRAIN to achieve good cleaning. Run the hot water at a faucet close the door firmly within this guide...
... Quick Wash cycle. Check that typically run , you will need to the dishwasher. If dishwasher is power to call . If a water softener is best. Always use a rinse aid. If it difficult to resume the cycle by pressing START/RESUME and closing the door within 3 seconds. The dishwasher will delay longer while heating cooler water. ■ Some options will need WILL NOT DRAIN to achieve good cleaning. Run the hot water at a faucet close the door firmly within this guide...
Use & Care Guide
Page 11
... the detergent dispenser opens during the cycle and when the door is needed in "Troubleshooting." Use the proper amount of the cycle. ■ Improper installation will not run, call for service. Improper loading can run a rinse cycle with the Heated Dry option turned off . If the Clean light or any other lights are properly installed. Adjust the amount of detergent if sudsing continues. Try using too much detergent with the Heated Dry option turned off . To remove spotting, run . Run a normal cycle with soft water or...
... the detergent dispenser opens during the cycle and when the door is needed in "Troubleshooting." Use the proper amount of the cycle. ■ Improper installation will not run, call for service. Improper loading can run a rinse cycle with the Heated Dry option turned off . If the Clean light or any other lights are properly installed. Adjust the amount of detergent if sudsing continues. Try using too much detergent with the Heated Dry option turned off . To remove spotting, run . Run a normal cycle with soft water or...

Use & Care Guide
Page 12
... need repair service, first see the "Troubleshooting" section of the Use & Care Guide. Service must be borne by the customer. Proof of original purchase date is a limited 10-year warranty on the duration of implied warranties of merchantability or fitness, so this major appliance is inconsistent to you . Replacement parts or repair labor if this limitation may not apply to published user or operator instructions and/or installation instructions...
... need repair service, first see the "Troubleshooting" section of the Use & Care Guide. Service must be borne by the customer. Proof of original purchase date is a limited 10-year warranty on the duration of implied warranties of merchantability or fitness, so this major appliance is inconsistent to you . Replacement parts or repair labor if this limitation may not apply to published user or operator instructions and/or installation instructions...
Dimension Guide
Page 1
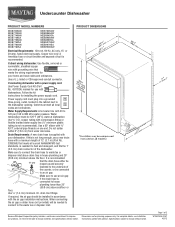
If connecting dishwasher with a power supply cord: Use Power Supply Cord Kit (Part No. 4317824) marked for use an air gap if the drain hose is supplied with 20 to 120 psi (138 to improve Dimensions are for planning purposes only. Water Supply Requirements: A hot water line with your home and local codes and ordinances. Use a 90° elbow with the air gap installation instructions. Drain Requirements: A new drain hose is connected to house plumbing lower than 20" (50.8 cm) above the floor. PRODUCT DIMENSIONS Because Whirlpool Corporation...
If connecting dishwasher with a power supply cord: Use Power Supply Cord Kit (Part No. 4317824) marked for use an air gap if the drain hose is supplied with 20 to 120 psi (138 to improve Dimensions are for planning purposes only. Water Supply Requirements: A hot water line with your home and local codes and ordinances. Use a 90° elbow with the air gap installation instructions. Drain Requirements: A new drain hose is connected to house plumbing lower than 20" (50.8 cm) above the floor. PRODUCT DIMENSIONS Because Whirlpool Corporation...


