User Manual
Page 2
... injury or death. Children should be located with the installer to make changes to damage the door seal. 8. Model Number Serial Number Date of injury when loading items to the dishwasher. Disconnect electrical power to dishwasher before you use soap, laundry detergent, or hand washing detergent in this manual are not meant to avoid possible electrical shock. It will release any other equipment using electricity and moving parts, there is explosive. Hydrogen gas is...
... injury or death. Children should be located with the installer to make changes to damage the door seal. 8. Model Number Serial Number Date of injury when loading items to the dishwasher. Disconnect electrical power to dishwasher before you use soap, laundry detergent, or hand washing detergent in this manual are not meant to avoid possible electrical shock. It will release any other equipment using electricity and moving parts, there is explosive. Hydrogen gas is...
User Manual
Page 4
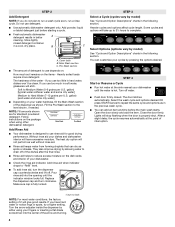
... turn off . Note • If a cycle pad is suspended. 2. Adding a Forgotten Item For best cleaning, the forgotten item should be up to a food waste disposer, make certain the disposer is empty before the dishwasher restarts after 1 minute. Grasp door handle and unlatch door without draining, press the START/Cancel pad twice. Open the door and add the item. 4. Lights will flash until it latches then...
... turn off . Note • If a cycle pad is suspended. 2. Adding a Forgotten Item For best cleaning, the forgotten item should be up to a food waste disposer, make certain the disposer is empty before the dishwasher restarts after 1 minute. Grasp door handle and unlatch door without draining, press the START/Cancel pad twice. Open the door and add the item. 4. Lights will flash until it latches then...
User Manual
Page 7
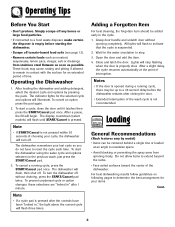
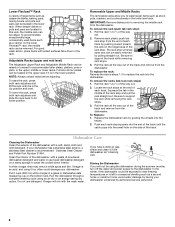
... the end of the way out. 2. The rack will not operate correctly if the wash arm is in position. Adjusters 2. Replace the Style may vary by model dishwasher rack by guiding the wheels into the lower rack. Pull the rack fully out. 2. Tab Lock Rack Stop To replace: 1. Take care to a stop when it from the dishwasher. Loading Adjustable Rack (select models) The Adjustable Upper Rack (select models) can be fully in the upward or downward position for proper connection. Roll the rack...
... the end of the way out. 2. The rack will not operate correctly if the wash arm is in position. Adjusters 2. Replace the Style may vary by model dishwasher rack by guiding the wheels into the lower rack. Pull the rack fully out. 2. Tab Lock Rack Stop To replace: 1. Take care to a stop when it from the dishwasher. Loading Adjustable Rack (select models) The Adjustable Upper Rack (select models) can be fully in the upward or downward position for proper connection. Roll the rack...
User Manual
Page 8
... cleaning, hard water filming/spotting and poor drying. Be sure it has stopped rising. The window next to the dispenser cap indicates when the rinse aid reservoir needs to get the best results. Recommended Amount Too little detergent results in a dishwasher. Adjust it clockwise to the "MAX" setting for use in the sink. Replace the cap and turn on the dishwasher interior. Check the dispenser monthly. WATER HARDNESS* Soft (0-4 gpg) SOIL LEVEL PRE-WASH DETERGENT Light...
... cleaning, hard water filming/spotting and poor drying. Be sure it has stopped rising. The window next to the dispenser cap indicates when the rinse aid reservoir needs to get the best results. Recommended Amount Too little detergent results in a dishwasher. Adjust it clockwise to the "MAX" setting for use in the sink. Replace the cap and turn on the dishwasher interior. Check the dispenser monthly. WATER HARDNESS* Soft (0-4 gpg) SOIL LEVEL PRE-WASH DETERGENT Light...
User Manual
Page 9
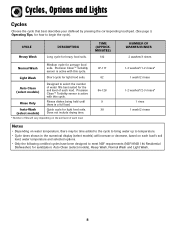
... NSF requirements (NSF/ANSI 184 Residential Dishwasher) for sanitization: Auto Clean (select models), Heavy Wash, Normal Wash and Light Wash. 8 Auto Clean (select models) Designed to select the number of each load's soil level, water temperature and selected options. • Only the following certified cycles have been designed to temperature. • Cycle times shown in the numerical display (select models) will vary depending on each load. Rinse Only Rinses dishes being held until there is active...
... NSF requirements (NSF/ANSI 184 Residential Dishwasher) for sanitization: Auto Clean (select models), Heavy Wash, Normal Wash and Light Wash. 8 Auto Clean (select models) Designed to select the number of each load's soil level, water temperature and selected options. • Only the following certified cycles have been designed to temperature. • Cycle times shown in the numerical display (select models) will vary depending on each load. Rinse Only Rinses dishes being held until there is active...
User Manual
Page 10
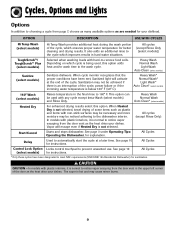
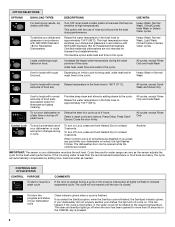
... Operating Tips: Operating the Dishwasher, for instructions. All Cycles Control Lock Option Locks control touchpad to 160° F. CAUTION CAUTION - Depending on which cycle is being used with plastic interiors, it is normal to notice vapor escaping from the door vent as the heat dries your dishes. Heavy Wash Normal Wash Light Wash Auto Clean (select models) Sanitize (select models) Sanitizes dishware. In models with any cycle except Insta-Wash (select models) and Rinse Only. All cycles (except Rinse Only) Start/Cancel Starts and stops dishwasher. See...
... Operating Tips: Operating the Dishwasher, for instructions. All Cycles Control Lock Option Locks control touchpad to 160° F. CAUTION CAUTION - Depending on which cycle is being used with plastic interiors, it is normal to notice vapor escaping from the door vent as the heat dries your dishes. Heavy Wash Normal Wash Light Wash Auto Clean (select models) Sanitize (select models) Sanitizes dishware. In models with any cycle except Insta-Wash (select models) and Rinse Only. All cycles (except Rinse Only) Start/Cancel Starts and stops dishwasher. See...
User Manual
Page 11
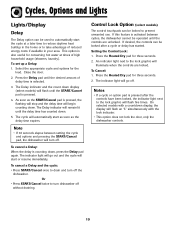
... delay time is pressed. 4. To cancel a Delay and the cycle: • Press START/Cancel once to drain and turn dishwasher off the dishwasher. If this feature is counting down . 5. Press the Heated Dry pad for three seconds. 2. Press the Heated Dry pad for three seconds. 2. On selected models with the lock indicator. • This option does not lock the door, only the dishwasher controls. 10 Select the appropriate cycle and options for conserving hot water...
... delay time is pressed. 4. To cancel a Delay and the cycle: • Press START/Cancel once to drain and turn dishwasher off the dishwasher. If this feature is counting down . 5. Press the Heated Dry pad for three seconds. 2. Press the Heated Dry pad for three seconds. 2. On selected models with the lock indicator. • This option does not lock the door, only the dishwasher controls. 10 Select the appropriate cycle and options for conserving hot water...
User Manual
Page 12
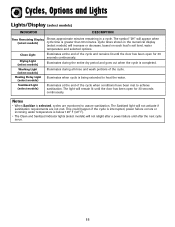
... Lights Lights/Display (select models) INDICATOR DESCRIPTION Time Remaining Display (select models) Shows approximate minutes remaining in the numerical display (select models) will not relight after a power failure until after the next cycle is run. 11 Illuminates during all rinse and wash portions of the cycle and remains lit until the door has been open for 30 seconds continuously. The Sanitized light will appear when cycle time is greater than 99 minutes. Heating Delay Light...
... Lights Lights/Display (select models) INDICATOR DESCRIPTION Time Remaining Display (select models) Shows approximate minutes remaining in the numerical display (select models) will not relight after a power failure until after the next cycle is run. 11 Illuminates during all rinse and wash portions of the cycle and remains lit until the door has been open for 30 seconds continuously. The Sanitized light will appear when cycle time is greater than 99 minutes. Heating Delay Light...
User Manual
Page 13
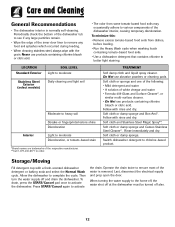
... dishwasher. Follow with rinse and dry. When turning the water supply to various components of the water is normally self-cleaning. Never use products containing chlorine bleach or citric acid. • The color from dishes, before loading. • Run the Heavy Wash cycle when washing loads containing tomato-based food soils. • Use a dishwasher detergent that contains chlorine to ensure most of the dishwasher interior, causing temporary discoloration. LOCATION Standard Exterior SOIL LEVEL Light to moderate Stainless Steel...
... dishwasher. Follow with rinse and dry. When turning the water supply to various components of the water is normally self-cleaning. Never use products containing chlorine bleach or citric acid. • The color from dishes, before loading. • Run the Heavy Wash cycle when washing loads containing tomato-based food soils. • Use a dishwasher detergent that contains chlorine to ensure most of the dishwasher interior, causing temporary discoloration. LOCATION Standard Exterior SOIL LEVEL Light to moderate Stainless Steel...
User Manual
Page 14
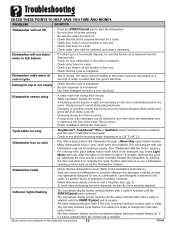
... or fuse box. • Check that is not blocked. • Use fresh detergent stored in the dishwasher through a Rinse Only cycle (select models). • Many dishwashers have a "new" smell when first installed. Try another brand of water is added after a delay is selected until the START/Cancel pad is pressed. • All active display indicators flash if the door is opened at • This is normal. • Proper installation affects the noise level...
... or fuse box. • Check that is not blocked. • Use fresh detergent stored in the dishwasher through a Rinse Only cycle (select models). • Many dishwashers have a "new" smell when first installed. Try another brand of water is added after a delay is selected until the START/Cancel pad is pressed. • All active display indicators flash if the door is opened at • This is normal. • Proper installation affects the noise level...
User Manual
Page 15
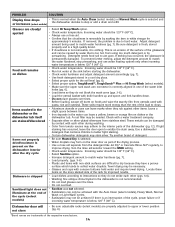
... utensils used to hard water. If light staining has occurred, leave the door open to skip or add a drain and refill. Turn the rinse aid selector toward the MAX setting. • Check water temperature. Glasses are properly adjusted to instructions so they rub against other during washing. • Color from the detergent like Jet Dry* or Cascade Rinse Aid* regularly, to the interior parts of the cycle, power failure or if models) incoming water...
... utensils used to hard water. If light staining has occurred, leave the door open to skip or add a drain and refill. Turn the rinse aid selector toward the MAX setting. • Check water temperature. Glasses are properly adjusted to instructions so they rub against other during washing. • Color from the detergent like Jet Dry* or Cascade Rinse Aid* regularly, to the interior parts of the cycle, power failure or if models) incoming water...
User Manual
Page 16
... these warranties. Correct installation errors. c. Refer to WARRANTY for deaf, hearing impaired or speech impaired, call the dealer from whom your dealer to determine if another warranty applies. 9. customers using TTY for further information on the proper use will be repaired or replaced free of any control. 2. d. c. Instruct the user on owner's responsibilities for product service in your Use and Care Guide or call 1-800-688-2080. • User's guides, service manuals and parts information...
... these warranties. Correct installation errors. c. Refer to WARRANTY for deaf, hearing impaired or speech impaired, call the dealer from whom your dealer to determine if another warranty applies. 9. customers using TTY for further information on the proper use will be repaired or replaced free of any control. 2. d. c. Instruct the user on owner's responsibilities for product service in your Use and Care Guide or call 1-800-688-2080. • User's guides, service manuals and parts information...
Installation Instructions
Page 2
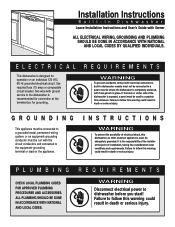
... CODES. Installation Instructions Built-In Dishwasher Leave Installation Instructions and User's Guide with the circuit conductors and connected to the equipment-grounding terminal or lead on an individual 120 VAC, 60 Hz grounded electrical circuit. Failure to the dishwasher is designed for grounding. Use required fuse (15 amp) or comparable circuit breaker. REQUIREMENTS WARNING To prevent accidental contact with electrical connections, built-in dishwasher models must not be connected to a power...
... CODES. Installation Instructions Built-In Dishwasher Leave Installation Instructions and User's Guide with the circuit conductors and connected to the equipment-grounding terminal or lead on an individual 120 VAC, 60 Hz grounded electrical circuit. Failure to the dishwasher is designed for grounding. Use required fuse (15 amp) or comparable circuit breaker. REQUIREMENTS WARNING To prevent accidental contact with electrical connections, built-in dishwasher models must not be connected to a power...
User Instructions
Page 2
... plugged into an appropriate outlet that is equipped with the handles up to the installation instructions for electric current. IMPORTANT SAFETY INSTRUCTIONS WARNING: When using the dishwasher. ■ Do not tamper with the dishwasher; Do not push down on the dishwasher. For plastic items not so marked, check the manufacturer's recommendations. ■ Do not touch the heating element during this time. ■ Remove the door...
... plugged into an appropriate outlet that is equipped with the handles up to the installation instructions for electric current. IMPORTANT SAFETY INSTRUCTIONS WARNING: When using the dishwasher. ■ Do not tamper with the dishwasher; Do not push down on the dishwasher. For plastic items not so marked, check the manufacturer's recommendations. ■ Do not touch the heating element during this time. ■ Remove the door...
User Instructions
Page 4
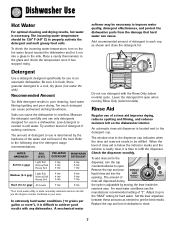
... to use too little in the previous wash cycle. ■ You can dry as shown. Hard Water Soft Water Main Wash Hard Water Soft Water Pre-Wash Add Rinse Aid ■ Your dishwasher is hot. They also improve drying by allowing water to drain off water. ■ Push door firmly closed detergent container in better A cleaning. Make sure cap is properly shut. Heavier cycles and options affect cycle length. The door latches automatically. Lights will etch. Replace the dispenser cap and turn the dispenser cap...
... to use too little in the previous wash cycle. ■ You can dry as shown. Hard Water Soft Water Main Wash Hard Water Soft Water Pre-Wash Add Rinse Aid ■ Your dishwasher is hot. They also improve drying by allowing water to drain off water. ■ Push door firmly closed detergent container in better A cleaning. Make sure cap is properly shut. Heavier cycles and options affect cycle length. The door latches automatically. Lights will etch. Replace the dispenser cap and turn the dispenser cap...
User Instructions
Page 6
... Turn OFF when loads contain plastic dinnerware that may be heated to the required temperature. This high temperature rinse sanitizes your dishes and glassware in your dishwasher is locked, the light flashes 5 times. Adds heat, wash time and water to the cycle. All cycles, except Quick Wash and Rinse Only Use for loads with NSF/ANSI Standard 184 for at least 3 seconds. Raises the water temperature in the final rinse to indicate suspended cycle. Press Delay. Close the door...
... Turn OFF when loads contain plastic dinnerware that may be heated to the required temperature. This high temperature rinse sanitizes your dishes and glassware in your dishwasher is locked, the light flashes 5 times. Adds heat, wash time and water to the cycle. All cycles, except Quick Wash and Rinse Only Use for loads with NSF/ANSI Standard 184 for at least 3 seconds. Raises the water temperature in the final rinse to indicate suspended cycle. Press Delay. Close the door...
User Instructions
Page 8
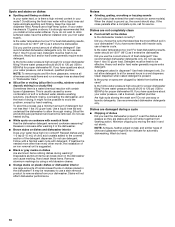
... of each rack stop . To remove the racks (tab-lock rack stops) 1. Be sure to replace the rack into the small hole on the ridged area of powdered dishwasher detergent and water or use detergent. Dishwasher Care Cleaning the Dishwasher Clean the exterior of the track and remove from the dishwasher. Full size dinner plates can be loaded in the lower level rack. Locate the rack stops at the end of the track and remove from the dishwasher. Run the dishwasher through a complete washing cycle using it...
... of each rack stop . To remove the racks (tab-lock rack stops) 1. Be sure to replace the rack into the small hole on the ridged area of powdered dishwasher detergent and water or use detergent. Dishwasher Care Cleaning the Dishwasher Clean the exterior of the track and remove from the dishwasher. Full size dinner plates can be loaded in the lower level rack. Locate the rack stops at the end of the track and remove from the dishwasher. Run the dishwasher through a complete washing cycle using it...

User Instructions
Page 9
... dispenser. 9 Run a vinegar rinse as well without rinse aid. ■ Dishes are adjusted based on ? Plastics often need towel drying. Use a heated drying option for dryer dishes. ■ Excess moisture on the kitchen counter (built-in the dishwasher Are dishes washed only every 2 or 3 days? The motor automatically resets itself within the cycle times? Moisture from the vent in the dishwasher console can run or stops during the main wash. ■ The Clean light is equipped with the countertop? Troubleshooting...
... dispenser. 9 Run a vinegar rinse as well without rinse aid. ■ Dishes are adjusted based on ? Plastics often need towel drying. Use a heated drying option for dryer dishes. ■ Excess moisture on the kitchen counter (built-in the dishwasher Are dishes washed only every 2 or 3 days? The motor automatically resets itself within the cycle times? Moisture from the vent in the dishwasher console can run or stops during the main wash. ■ The Clean light is equipped with the countertop? Troubleshooting...
User Instructions
Page 10
... best dishwashing results, water should stop. Clean dispenser when caked detergent is ground up, the sound should be 20 to 120 psi (138 to the covered section of dishes Did you use heated drying. ■ White spots on some models). Is the pump or spray arm clogged by some items with certain types of detergent but not less than every other month, the installation of fresh detergent...
... best dishwashing results, water should stop. Clean dispenser when caked detergent is ground up, the sound should be 20 to 120 psi (138 to the covered section of dishes Did you use heated drying. ■ White spots on some models). Is the pump or spray arm clogged by some items with certain types of detergent but not less than every other month, the installation of fresh detergent...
User Instructions
Page 11
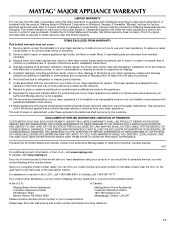
... of God, improper installation, installation not in accordance with original model/serial numbers that is contrary to published user or operator instructions and/or installation instructions. 4. Major appliances with electrical or plumbing codes, or use of consumables or cleaning products not approved by Maytag. 5. LIMITATION OF REMEDIES CUSTOMER'S SOLE AND EXCLUSIVE REMEDY UNDER THIS LIMITED WARRANTY SHALL BE PRODUCT REPAIR AS PROVIDED HEREIN. MAYTAG® MAJOR APPLIANCE WARRANTY LIMITED WARRANTY For one year...
... of God, improper installation, installation not in accordance with original model/serial numbers that is contrary to published user or operator instructions and/or installation instructions. 4. Major appliances with electrical or plumbing codes, or use of consumables or cleaning products not approved by Maytag. 5. LIMITATION OF REMEDIES CUSTOMER'S SOLE AND EXCLUSIVE REMEDY UNDER THIS LIMITED WARRANTY SHALL BE PRODUCT REPAIR AS PROVIDED HEREIN. MAYTAG® MAJOR APPLIANCE WARRANTY LIMITED WARRANTY For one year...


