
Dimension Guide
Page 1
... our products, we reserve the right to change without notice. Dimensions are for planning purposes only. 24" Dishwasher DETAILED PLANNING DIMENSIONS GUIDE Applies to all model numbers starting with product. For complete details, see Installation Instructions packed with ;
... our products, we reserve the right to change without notice. Dimensions are for planning purposes only. 24" Dishwasher DETAILED PLANNING DIMENSIONS GUIDE Applies to all model numbers starting with product. For complete details, see Installation Instructions packed with ;

Owners Manual
Page 4
... bowl tines allow you want to fold it stops. Grab the moveable tine row in and pull up , and alternate spoons for tall items, your model. Fold Down Tines Style 1 To remove the rack, pull the rack forward about halfway out of the tine row and gently push it past the... silverware basket lids to completely remove the front end of the rail sideways to open the lids (Style 1) or lift on your upper racks are model specific. On the left and right side of the rack, push the plastic track stops on the front of the rack. NOTE: If your silverware...
... bowl tines allow you want to fold it stops. Grab the moveable tine row in and pull up , and alternate spoons for tall items, your model. Fold Down Tines Style 1 To remove the rack, pull the rack forward about halfway out of the tine row and gently push it past the... silverware basket lids to completely remove the front end of the rail sideways to open the lids (Style 1) or lift on your upper racks are model specific. On the left and right side of the rack, push the plastic track stops on the front of the rack. NOTE: If your silverware...

Owners Manual
Page 6
...Resume" button to select the feature and enter the sub-menu. Press the "Cancel" button to exit without pressing any buttons. For Non-display models,"Tough or Cookware" light will change to indicate Rinse Aid Level. 3. The display will turn on. 2. a. To exit this mode is opened... inside the tub (if equipped) for 5 seconds until the "Start/Resume" button is pressed in step 4, the dishwasher will show for display models and sensor will return to change your current settings. When the "Start/Resume" button is pressed. NOTE: To exit "Kosher Consumer Friendly Mode"...
...Resume" button to select the feature and enter the sub-menu. Press the "Cancel" button to exit without pressing any buttons. For Non-display models,"Tough or Cookware" light will change to indicate Rinse Aid Level. 3. The display will turn on. 2. a. To exit this mode is opened... inside the tub (if equipped) for 5 seconds until the "Start/Resume" button is pressed in step 4, the dishwasher will show for display models and sensor will return to change your current settings. When the "Start/Resume" button is pressed. NOTE: To exit "Kosher Consumer Friendly Mode"...
Owners Manual
Page 8
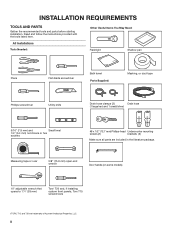
... (2) brackets (2) Make sure all parts are trademarks of Acument Intellectual Properties, LLC. 8 Measuring tape or ruler 5/8" (15.9 mm) open-end wrench Door handle (on some models) 10" adjustable wrench that opens to 11/8" (29 mm) Torx† T20 and, if installing custom front panels, Torx T15 screwdrivers †TORX, T15, and...
... (2) brackets (2) Make sure all parts are trademarks of Acument Intellectual Properties, LLC. 8 Measuring tape or ruler 5/8" (15.9 mm) open-end wrench Door handle (on some models) 10" adjustable wrench that opens to 11/8" (29 mm) Torx† T20 and, if installing custom front panels, Torx T15 screwdrivers †TORX, T15, and...
Owners Manual
Page 11
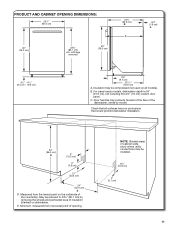
Insulation may be reduced to 331/2" (85.1 cm) by model. For panel-ready models, dishwasher depth is 24" (61.0 cm), not including the 3/4" (1.9 cm) custom door panel. E. NOTE: Shaded areas of the dishwasher, varies by removing the wheels and ... all surfaces have no protrusions that would prohibit dishwasher installation. 34" (86.4 cm) D 4" (10.2 cm) 3" (7.6 cm) 21" (53.4 cm) 24" (62.0 cm) E D. Check that all models). Measured from narrowest point of insulation (blanket) on dishwasher. May be installed. 6¼" (15.9 cm) 2" (5.1 cm) 11
Insulation may be reduced to 331/2" (85.1 cm) by model. For panel-ready models, dishwasher depth is 24" (61.0 cm), not including the 3/4" (1.9 cm) custom door panel. E. NOTE: Shaded areas of the dishwasher, varies by removing the wheels and ... all surfaces have no protrusions that would prohibit dishwasher installation. 34" (86.4 cm) D 4" (10.2 cm) 3" (7.6 cm) 21" (53.4 cm) 24" (62.0 cm) E D. Check that all models). Measured from narrowest point of insulation (blanket) on dishwasher. May be installed. 6¼" (15.9 cm) 2" (5.1 cm) 11

Owners Manual
Page 20
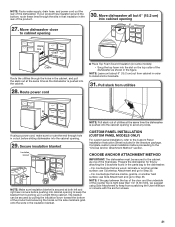
... Loosely tighten it to move and install dishwasher. Do not remove insulation blanket-the blanket reduces the sound level. INSTALL DOOR HANDLE (ON SOME MODELS) 25. Install door handle Mounting stud Setscrew (in back or other slit on the side shield and attach it to hold in place until...toe panel screw hole. Place handle on both the right and left sides of handle) Handle Hex key Install Foam Side Shields (on some models) Install the foam side shields on mounting studs with Installation Instructions. Failure to install while unit is installed. NOTE: Do not install kick ...
... Loosely tighten it to move and install dishwasher. Do not remove insulation blanket-the blanket reduces the sound level. INSTALL DOOR HANDLE (ON SOME MODELS) 25. Install door handle Mounting stud Setscrew (in back or other slit on the side shield and attach it to hold in place until...toe panel screw hole. Place handle on both the right and left sides of handle) Handle Hex key Install Foam Side Shields (on some models) Install the foam side shields on mounting studs with Installation Instructions. Failure to install while unit is installed. NOTE: Do not install kick ...
Owners Manual
Page 21
...top of the door and the underside of the final steps. Route power cord ■■ Place Top Foam Sound Insulation (on some models) • Snug the top foam into the slot on the side members grab onto the slots in the figure. Secure insulation blanket ...Insulation blanket Secure blanket NOTE: Make sure insulation blanket is pushed into the cabinet opening . 29. CUSTOM PANEL INSTALLATION (CUSTOM PANEL MODELS ONLY) For custom panel installation, refer to the "Choose Anchor Attachment Method" section. For countertops that are wood, laminate or another hard surface...
...top of the door and the underside of the final steps. Route power cord ■■ Place Top Foam Sound Insulation (on some models) • Snug the top foam into the slot on the side members grab onto the slots in the figure. Secure insulation blanket ...Insulation blanket Secure blanket NOTE: Make sure insulation blanket is pushed into the cabinet opening . 29. CUSTOM PANEL INSTALLATION (CUSTOM PANEL MODELS ONLY) For custom panel installation, refer to the "Choose Anchor Attachment Method" section. For countertops that are wood, laminate or another hard surface...

Owners Manual
Page 27
... (except Delay or Cancel) in the foam and assembly the toe/ access panel assembly to look for easier removal. 51. 48. See instructions on this model 6 0:30 Wash+ Heater (Lower spray arm) 7 1:00 (Maximum 5:00) Drain Pracess Check that you have been installed and no more than 1 ... parts have used all tools. ■■ Run the Installation Cycles as follows (Note that it to run since no water is present in this model, make sure insulation does not interfere with no steps were skipped. NOTE: Remove film on 0:01 1 0:30 (Maximum 5:00) Pause Initial Drain 2 2:00 Fill...
... (except Delay or Cancel) in the foam and assembly the toe/ access panel assembly to look for easier removal. 51. 48. See instructions on this model 6 0:30 Wash+ Heater (Lower spray arm) 7 1:00 (Maximum 5:00) Drain Pracess Check that you have been installed and no more than 1 ... parts have used all tools. ■■ Run the Installation Cycles as follows (Note that it to run since no water is present in this model, make sure insulation does not interfere with no steps were skipped. NOTE: Remove film on 0:01 1 0:30 (Maximum 5:00) Pause Initial Drain 2 2:00 Fill...

