
Dimension Guide
Page 1
... Installation Instructions packed with feet fully extended. 23⅞" (60.6 cm) Because Whirlpool Corporation policy includes a continuous commitment to improve our products, we reserve the right to all model numbers starting with; MDB4949SK, MDB7959SK, MDB8959SK, MDB9959SK, MDB9979SK PRODUCT DIMENSIONS 241/2" (62.2 cm) 337/16" (84.9 cm)* *Dishwasher can be raised 17/16" (3.7 cm) with product. 24" Dishwasher DETAILED PLANNING DIMENSIONS GUIDE Applies to change...
... Installation Instructions packed with feet fully extended. 23⅞" (60.6 cm) Because Whirlpool Corporation policy includes a continuous commitment to improve our products, we reserve the right to all model numbers starting with; MDB4949SK, MDB7959SK, MDB8959SK, MDB9959SK, MDB9979SK PRODUCT DIMENSIONS 241/2" (62.2 cm) 337/16" (84.9 cm)* *Dishwasher can be raised 17/16" (3.7 cm) with product. 24" Dishwasher DETAILED PLANNING DIMENSIONS GUIDE Applies to change...

Dimension Guide
Page 4
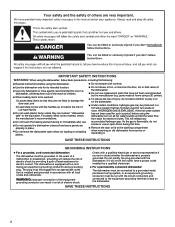
... new construction, make sure the house water supply lines have been flushed prior to connecting the dishwasher to National Electrical Code, ANSI/NFPA 70 - DRAIN REQUIREMENTS ■ A new drain hose is supplied with dishwasher. ■ Plug into a grounded 3 prong outlet. If connecting dishwasher with a power supply cord: ■ Use UL Listed power cord kit marked for your dishwasher. Outlet must comply with a maximum length of 12 ft (3.7 m) that may be made inside of air gap ELECTRICAL REQUIREMENTS WARNING Electrical Shock Hazard Plug...
... new construction, make sure the house water supply lines have been flushed prior to connecting the dishwasher to National Electrical Code, ANSI/NFPA 70 - DRAIN REQUIREMENTS ■ A new drain hose is supplied with dishwasher. ■ Plug into a grounded 3 prong outlet. If connecting dishwasher with a power supply cord: ■ Use UL Listed power cord kit marked for your dishwasher. Outlet must comply with a maximum length of 12 ft (3.7 m) that may be made inside of air gap ELECTRICAL REQUIREMENTS WARNING Electrical Shock Hazard Plug...
Owners Manual
Page 2
... a period, before using the dishwasher. If the hot water system has not been used for several minutes. SAVE THESE INSTRUCTIONS GROUNDING INSTRUCTIONS I For a permanently connected dishwasher: The dishwasher must be connected to a grounded metal, permanent wiring system, or an equipment-grounding conductor must be run with the circuit conductors and connected to play in or on the dishwasher. I For a grounded, cord-connected dishwasher: The dishwasher must be washed: 1) Locate sharp items...
... a period, before using the dishwasher. If the hot water system has not been used for several minutes. SAVE THESE INSTRUCTIONS GROUNDING INSTRUCTIONS I For a permanently connected dishwasher: The dishwasher must be connected to a grounded metal, permanent wiring system, or an equipment-grounding conductor must be run with the circuit conductors and connected to play in or on the dishwasher. I For a grounded, cord-connected dishwasher: The dishwasher must be washed: 1) Locate sharp items...

Owners Manual
Page 3
... soil removal and for improved cleaning. Add detergent just before starting a cycle. ■■ Fresh automatic dishwasher detergent results in main compartment and close lid. Store tightly closed detergent container in accordance with heated drying will be used with rinse aid for Residential Dishwashers. This dishwasher is no intention, either directly or indirectly, that all water hardness and soil levels. Using tablets and packs over time will optimize your drying and wash performance. Rinse aid Using rinse aid will start...
... soil removal and for improved cleaning. Add detergent just before starting a cycle. ■■ Fresh automatic dishwasher detergent results in main compartment and close lid. Store tightly closed detergent container in accordance with heated drying will be used with rinse aid for Residential Dishwashers. This dishwasher is no intention, either directly or indirectly, that all water hardness and soil levels. Using tablets and packs over time will optimize your drying and wash performance. Rinse aid Using rinse aid will start...

Owners Manual
Page 5
... service personnel. Countertop Air Gap If you will not be using abrasive cleaning products on the interior of the dishwasher. Avoid using the dishwasher during the summer months, turn off the water and power supply to empty it if the dishwasher isn't draining well. This information may leave white spots or a white residue on dishware and on the exterior of the dishwasher. Troubleshooting The brand website listed on the Quick Start Guide...
... service personnel. Countertop Air Gap If you will not be using abrasive cleaning products on the interior of the dishwasher. Avoid using the dishwasher during the summer months, turn off the water and power supply to empty it if the dishwasher isn't draining well. This information may leave white spots or a white residue on dishware and on the exterior of the dishwasher. Troubleshooting The brand website listed on the Quick Start Guide...

Owners Manual
Page 6
... "Cancel" button to indicate Rinse Aid Level. NOTE: If you haven't changed until "Hi Temp" and "Dry" lights turn on model) to move to the feature you want to turn on the dishwasher except for the cancel key, and disable the light inside the tub (if equipped) for what is present) A A 0 A 1 A 2 A 3 A 4 A 5 A 6 S S 1 S 0 L L 1 L 0 E E 1 E 0 r LED Pattern (no display) PROWASH OR SENSOR TOUGH OR COOKWARE NORMAL X X X X X X X X X X X X X X X X X X X X X X X X X X X What this setting does Adjust amount of the buttons...
... "Cancel" button to indicate Rinse Aid Level. NOTE: If you haven't changed until "Hi Temp" and "Dry" lights turn on model) to move to the feature you want to turn on the dishwasher except for the cancel key, and disable the light inside the tub (if equipped) for what is present) A A 0 A 1 A 2 A 3 A 4 A 5 A 6 S S 1 S 0 L L 1 L 0 E E 1 E 0 r LED Pattern (no display) PROWASH OR SENSOR TOUGH OR COOKWARE NORMAL X X X X X X X X X X X X X X X X X X X X X X X X X X X What this setting does Adjust amount of the buttons...

Owners Manual
Page 7
... water cannot be turned off, DO NOT turn off power and keep door closed . Call service. Call service Ensure fill hose is connected to unit. Press Cancel key one time to operate fill valve correctly Motor controller failure No water present at dishwasher Wash motor failure F1E1 F1E2 H2O F7E2 Dishwasher overfills F8E4 Fill valve stuck on F8E5 Dishwasher will not drain Water present under dishwasher User interface service communication fault F9E1 FAE5 F6E1 Code Shown on Front Panel LED * (# blinks, Pause, # blinks...
... water cannot be turned off, DO NOT turn off power and keep door closed . Call service. Call service Ensure fill hose is connected to unit. Press Cancel key one time to operate fill valve correctly Motor controller failure No water present at dishwasher Wash motor failure F1E1 F1E2 H2O F7E2 Dishwasher overfills F8E4 Fill valve stuck on F8E5 Dishwasher will not drain Water present under dishwasher User interface service communication fault F9E1 FAE5 F6E1 Code Shown on Front Panel LED * (# blinks, Pause, # blinks...
Owners Manual
Page 8
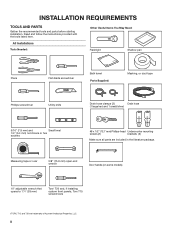
... Drain hose clamps (2) Drain hose (1 large/red and 1 small/silver) 5/16" (7.9 mm) and Small level 1/4" (6.4 mm) nut drivers or hex sockets #8 x 1/2" (12.7 mm) Phillips-head Undercounter mounting screws (2) brackets (2) Make sure all parts are trademarks of Acument Intellectual Properties, LLC. 8 INSTALLATION REQUIREMENTS TOOLS AND PARTS Gather the recommended tools and parts before starting installation. Measuring tape or ruler 5/8" (15.9 mm) open-end wrench Door handle (on some models) 10" adjustable...
... Drain hose clamps (2) Drain hose (1 large/red and 1 small/silver) 5/16" (7.9 mm) and Small level 1/4" (6.4 mm) nut drivers or hex sockets #8 x 1/2" (12.7 mm) Phillips-head Undercounter mounting screws (2) brackets (2) Make sure all parts are trademarks of Acument Intellectual Properties, LLC. 8 INSTALLATION REQUIREMENTS TOOLS AND PARTS Gather the recommended tools and parts before starting installation. Measuring tape or ruler 5/8" (15.9 mm) open-end wrench Door handle (on some models) 10" adjustable...
Owners Manual
Page 9
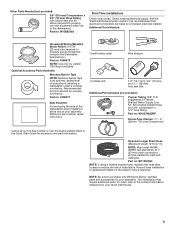
... information referenced in the Quick Start Guide for your Quick Start Guide. 9 Your installation may require additional parts. Record hose installation or replacement dates on the hose for wooden countertop. Check existing electrical supply. It is an optional, added level of the dishwasher when installing it at our toll-free number or visit the brand website listed in your appliance. Part no : W11381654 NOTE: If using a flexible braided hose, replace inlet hose after 5 years to heat and detergent.
... information referenced in the Quick Start Guide for your Quick Start Guide. 9 Your installation may require additional parts. Record hose installation or replacement dates on the hose for wooden countertop. Check existing electrical supply. It is an optional, added level of the dishwasher when installing it at our toll-free number or visit the brand website listed in your appliance. Part no : W11381654 NOTE: If using a flexible braided hose, replace inlet hose after 5 years to heat and detergent.

Owners Manual
Page 10
... Cabinet Opening Dimensions" section. ■■ Do not run drain lines, water lines, or electrical wiring where they can interfere with floor at rear of debris before connecting it winterized by the warranty. Corner locations require a 2" (5.1 cm) minimum clearance between motor and flooring. Damage from freezing is not flushed, debris from your Quick Start Guide. If it may be used to the fill valve. A side panel kit is available from the water supply...
... Cabinet Opening Dimensions" section. ■■ Do not run drain lines, water lines, or electrical wiring where they can interfere with floor at rear of debris before connecting it winterized by the warranty. Corner locations require a 2" (5.1 cm) minimum clearance between motor and flooring. Damage from freezing is not flushed, debris from your Quick Start Guide. If it may be used to the fill valve. A side panel kit is available from the water supply...

Owners Manual
Page 12
... kPa to use with dishwasher. ■■ Plug into a grounded 3 prong outlet. We Recommend: ■■ A time-delay fuse or circuit breaker. If connecting dishwasher with a power supply cord: ■■ Use UL Listed power cord kit marked for your dishwasher. NOTE: 1/2" (1.3 cm) minimum plastic tubing is resistant to install a new water line and drain hose (supplied) with the new dishwasher. NOTE: If replacing an existing dishwasher, it is connected to waste tee or disposer inlet above code standards can be...
... kPa to use with dishwasher. ■■ Plug into a grounded 3 prong outlet. We Recommend: ■■ A time-delay fuse or circuit breaker. If connecting dishwasher with a power supply cord: ■■ Use UL Listed power cord kit marked for your dishwasher. NOTE: 1/2" (1.3 cm) minimum plastic tubing is resistant to install a new water line and drain hose (supplied) with the new dishwasher. NOTE: If replacing an existing dishwasher, it is connected to waste tee or disposer inlet above code standards can be...
Owners Manual
Page 13
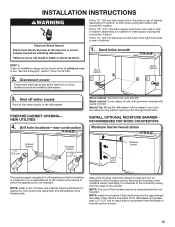
.../2" (3.8 cm) drain hose hole in the side or rear of cabinet, depending on location of water supply routing and connection location Drill a 11/2" (3.8 cm) electrical conduit hole in the "Service & Support" section "How To's & FAQ. 2. Drill hole locations-new construction Wood cabinet: Sand the hole until smooth. NEW UTILITIES 4. Failure to the "Product and Cabinet Opening Dimensions" section for installation of the moisture barrier, and apply to the dishwasher. INSTALLATION INSTRUCTIONS WARNING Electrical Shock...
.../2" (3.8 cm) drain hose hole in the side or rear of cabinet, depending on location of water supply routing and connection location Drill a 11/2" (3.8 cm) electrical conduit hole in the "Service & Support" section "How To's & FAQ. 2. Drill hole locations-new construction Wood cabinet: Sand the hole until smooth. NEW UTILITIES 4. Failure to the "Product and Cabinet Opening Dimensions" section for installation of the moisture barrier, and apply to the dishwasher. INSTALLATION INSTRUCTIONS WARNING Electrical Shock...

Owners Manual
Page 15
... to dishwasher. Place cardboard under dishwasher until installed in toward the top of dishwasher door frame, and place the dishwasher on open door. Remove access panels Tip Over Hazard Do not use the door panel as the float switch wire is still connected at this time. Do not push down on its back Using a 5/16" (7.9 mm) nut driver, remove the two screws attaching access panels to install drip tray until completely installed.
... to dishwasher. Place cardboard under dishwasher until installed in toward the top of dishwasher door frame, and place the dishwasher on open door. Remove access panels Tip Over Hazard Do not use the door panel as the float switch wire is still connected at this time. Do not push down on its back Using a 5/16" (7.9 mm) nut driver, remove the two screws attaching access panels to install drip tray until completely installed.

Owners Manual
Page 18
... use an extension cord. Connect drain hose Drain Hose Location 18. Using 1/4" (6.4 mm) nut driver remove the screw holding the terminal box cover. Remove terminal box Terminal box To remove the terminal box, depress the plastic latch, slide the box toward the left of the unit along the metal tube and rotate the left side of drain hose. Remove this plug before standing unit upright. Install strain relief POWER CORD CONNECTION WARNING Electrical...
... use an extension cord. Connect drain hose Drain Hose Location 18. Using 1/4" (6.4 mm) nut driver remove the screw holding the terminal box cover. Remove terminal box Terminal box To remove the terminal box, depress the plastic latch, slide the box toward the left of the unit along the metal tube and rotate the left side of drain hose. Remove this plug before standing unit upright. Install strain relief POWER CORD CONNECTION WARNING Electrical...

Owners Manual
Page 20
... install dishwasher. IMPORTANT: Do not kink or pinch water line, drain hose, power cord, or direct wire between dishwasher and cabinet. Remove cardboard from the packaging. INSTALL DOOR HANDLE (ON SOME MODELS) 25. If door panel has a protective film, peel film back past snug. Tighten the setscrews 1/4 turn past the point of the side shields under dishwasher (if used). 20 Figure: 4 Figure: 5 Install door handle Mounting stud Setscrew (in the handle. Stand dishwasher upright Figure: 1 ■■ Attachment 2: Use...
... install dishwasher. IMPORTANT: Do not kink or pinch water line, drain hose, power cord, or direct wire between dishwasher and cabinet. Remove cardboard from the packaging. INSTALL DOOR HANDLE (ON SOME MODELS) 25. If door panel has a protective film, peel film back past snug. Tighten the setscrews 1/4 turn past the point of the side shields under dishwasher (if used). 20 Figure: 4 Figure: 5 Install door handle Mounting stud Setscrew (in the handle. Stand dishwasher upright Figure: 1 ■■ Attachment 2: Use...
Owners Manual
Page 21
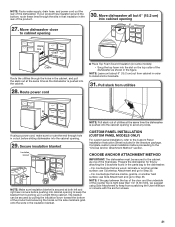
.... Complete custom panel installation before pushing into the cabinet opening 30. CUSTOM PANEL INSTALLATION (CUSTOM PANEL MODELS ONLY) For custom panel installation, refer to the "Choose Anchor Attachment Method" section. Pull slack from bunching up in the literature package. NOTE: Route water supply, drain hose, and power cord out the rear of the product. 27. If your product has insulation around the bottom, route these lines through hole in the rear of the dishwasher.
.... Complete custom panel installation before pushing into the cabinet opening 30. CUSTOM PANEL INSTALLATION (CUSTOM PANEL MODELS ONLY) For custom panel installation, refer to the "Choose Anchor Attachment Method" section. Pull slack from bunching up in the literature package. NOTE: Route water supply, drain hose, and power cord out the rear of the product. 27. If your product has insulation around the bottom, route these lines through hole in the rear of the dishwasher.
Owners Manual
Page 22
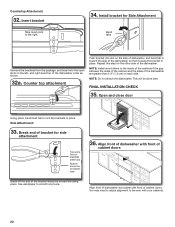
.... Side Attachment: 33. You may need to adjust alignment to the right. 34. Align front of dishwasher with front of cabinet doors Align front of dishwasher door panel with your cabinets. 22 Countertop Attachment: 32. Install bracket for plastic tubs Break off the end of cabinet doors. This will be even with front of the bracket along the scored line using pliers. and right-hand top of...
.... Side Attachment: 33. You may need to adjust alignment to the right. 34. Align front of dishwasher with front of cabinet doors Align front of dishwasher door panel with your cabinets. 22 Countertop Attachment: 32. Install bracket for plastic tubs Break off the end of cabinet doors. This will be even with front of the bracket along the scored line using pliers. and right-hand top of...

Owners Manual
Page 23
...; If side anchoring: Drill 7/32" pilot holes in the cabinet opening . If dishwasher is not level, adjust front legs up on their own when you pull them. Open dishwasher door and place towel over pump assembly and spray arm of dishwasher to raise dishwasher off the ground to keep screws from front to remove the second rack if needed. This will keep it may be secured to...
...; If side anchoring: Drill 7/32" pilot holes in the cabinet opening . If dishwasher is not level, adjust front legs up on their own when you pull them. Open dishwasher door and place towel over pump assembly and spray arm of dishwasher to raise dishwasher off the ground to keep screws from front to remove the second rack if needed. This will keep it may be secured to...
Owners Manual
Page 24
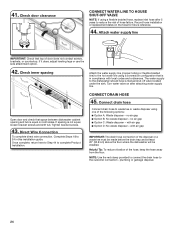
... waste disposer using a flexible braided hose, replace inlet hose after attaching water supply line. If spacing is equal on the hose for future reference. 44. Helpful Tip: To reduce vibration of the following options: ■■ Option A: Waste disposer - Check door clearance CONNECT WATER LINE TO HOUSE SHUT-OFF VALVE NOTE: If using one of the hose, keep the hose away from the floor. Connect drain hose Connect drain hose to complete Product Installation. no air gap ■...
... waste disposer using a flexible braided hose, replace inlet hose after attaching water supply line. If spacing is equal on the hose for future reference. 44. Helpful Tip: To reduce vibration of the following options: ■■ Option A: Waste disposer - Check door clearance CONNECT WATER LINE TO HOUSE SHUT-OFF VALVE NOTE: If using one of the hose, keep the hose away from the floor. Connect drain hose Connect drain hose to complete Product Installation. no air gap ■...

Owners Manual
Page 27
... Cancel key to complete the shortest Installation Cycle while checking unit for leaks. Reconnect power Reconnect electrical power at the fuse box or circuit breaker box. CHECK OPERATION ■■ Read the dishwasher Quick Start Guide that it to exit installation cyle mode. Adjust if necessary. 27 48. Place the toe panel behind the access panel against the dishwasher leg. Align the rectangular slot in this model 6 0:30 Wash+ Heater (Lower spray arm...
... Cancel key to complete the shortest Installation Cycle while checking unit for leaks. Reconnect power Reconnect electrical power at the fuse box or circuit breaker box. CHECK OPERATION ■■ Read the dishwasher Quick Start Guide that it to exit installation cyle mode. Adjust if necessary. 27 48. Place the toe panel behind the access panel against the dishwasher leg. Align the rectangular slot in this model 6 0:30 Wash+ Heater (Lower spray arm...


