

Dimension Guide
Page 1
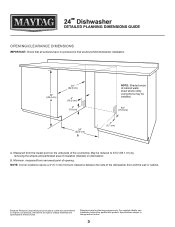
Dimensions are for planning purposes only. MDB4949SK, MDB7959SK, MDB8959SK, MDB9959SK, MDB9979SK PRODUCT DIMENSIONS 241/2" (62.2 cm) 337/16" (84.9 cm)* *Dishwasher can be raised 17/16" (3.7 cm) with feet fully extended. 23⅞" (60.6 cm) Because Whirlpool Corporation policy includes a continuous commitment ...change without notice. Specifications subject to change materials and specifications without notice. 1 For complete details, see Installation Instructions packed with ; 24" Dishwasher DETAILED PLANNING DIMENSIONS GUIDE Applies to all model numbers starting with product.
Dimensions are for planning purposes only. MDB4949SK, MDB7959SK, MDB8959SK, MDB9959SK, MDB9979SK PRODUCT DIMENSIONS 241/2" (62.2 cm) 337/16" (84.9 cm)* *Dishwasher can be raised 17/16" (3.7 cm) with feet fully extended. 23⅞" (60.6 cm) Because Whirlpool Corporation policy includes a continuous commitment ...change without notice. Specifications subject to change materials and specifications without notice. 1 For complete details, see Installation Instructions packed with ; 24" Dishwasher DETAILED PLANNING DIMENSIONS GUIDE Applies to all model numbers starting with product.

Dimension Guide
Page 2
.../2" (62.2 cm) 35/16" (8.4 cm) 337/16" (84.9 cm) I †* C FRONT VIEW TOP VIEW G* Floor DESCRIPTION A Width of recessed dishwasher 319/16" (80.1 cm) 31/2" (8.8 cm) - For complete details, see Installation Instructions packed with feet fully extended. K† SIDE VIEW Because Whirlpool Corporation... up to top of handle C Height of adjustable toe kick D Width of door DIMENSIONS 23⅞" (60.6 cm) B* Height to 1/8" (0.3 cm). *Dishwasher can be raised 17/16" (3.7 cm) with product. min. 41/4" (10.8 cm) - Dimensions are for planning purposes only. max. 23⅞" (...
.../2" (62.2 cm) 35/16" (8.4 cm) 337/16" (84.9 cm) I †* C FRONT VIEW TOP VIEW G* Floor DESCRIPTION A Width of recessed dishwasher 319/16" (80.1 cm) 31/2" (8.8 cm) - For complete details, see Installation Instructions packed with feet fully extended. K† SIDE VIEW Because Whirlpool Corporation... up to top of handle C Height of adjustable toe kick D Width of door DIMENSIONS 23⅞" (60.6 cm) B* Height to 1/8" (0.3 cm). *Dishwasher can be raised 17/16" (3.7 cm) with product. min. 41/4" (10.8 cm) - Dimensions are for planning purposes only. max. 23⅞" (...
Dimension Guide
Page 3
...Installation Instructions packed with product. NOTE: Corner locations require a 2" (5.1 cm) minimum clearance between the side of the dishwasher door and the wall or cabinet. B. Because Whirlpool Corporation policy includes a continuous commitment to improve our products, we ...reserve the right to change without notice. 24" Dishwasher DETAILED PLANNING DIMENSIONS GUIDE OPENING/CLEARANCE DIMENSIONS IMPORTANT: Check that all surfaces have no protrusions that would prohibit dishwasher installation. 34" (86.4 cm) A 24" (62.0 cm) 4" (10.2 cm...
...Installation Instructions packed with product. NOTE: Corner locations require a 2" (5.1 cm) minimum clearance between the side of the dishwasher door and the wall or cabinet. B. Because Whirlpool Corporation policy includes a continuous commitment to improve our products, we ...reserve the right to change without notice. 24" Dishwasher DETAILED PLANNING DIMENSIONS GUIDE OPENING/CLEARANCE DIMENSIONS IMPORTANT: Check that all surfaces have no protrusions that would prohibit dishwasher installation. 34" (86.4 cm) A 24" (62.0 cm) 4" (10.2 cm...

Dimension Guide
Page 4
...; A new drain hose is connected to the waste tee or disposer inlet. ■ Use 1/2" (1.3 cm) minimum I.D. WATER SUPPLY REQUIREMENTS ■ This dishwasher has a water heating feature and also requires a connection to a hot water supply line. ■ A hot water line with your home and local codes ...the branch circuit cannot exceed rated circuit load and must meet all local codes and ordinances. A copy of the dishwasher terminal box. NOTE: If replacing an existing dishwasher, it is recommended to waste tee or disposer inlet above drain trap in death, fire, or electrical shock. &#...
...; A new drain hose is connected to the waste tee or disposer inlet. ■ Use 1/2" (1.3 cm) minimum I.D. WATER SUPPLY REQUIREMENTS ■ This dishwasher has a water heating feature and also requires a connection to a hot water supply line. ■ A hot water line with your home and local codes ...the branch circuit cannot exceed rated circuit load and must meet all local codes and ordinances. A copy of the dishwasher terminal box. NOTE: If replacing an existing dishwasher, it is recommended to waste tee or disposer inlet above drain trap in death, fire, or electrical shock. &#...
Owners Manual
Page 2
...smoke or use . Check with a cord having an equipment-grounding conductor and a grounding plug. I For a grounded, cord-connected dishwasher: The dishwasher must be produced in or on the door, lid, or dish racks of electric shock by the manufacturer (e.g. IMPORTANT SAFETY INSTRUCTIONS ... weeks or more. For plastic items not so marked, check the manufacturer's recommendations. This will reduce the risk of the dishwasher. The dishwasher is flammable, do not allow children to a grounded metal, permanent wiring system, or an equipment-grounding conductor must be...
...smoke or use . Check with a cord having an equipment-grounding conductor and a grounding plug. I For a grounded, cord-connected dishwasher: The dishwasher must be produced in or on the door, lid, or dish racks of electric shock by the manufacturer (e.g. IMPORTANT SAFETY INSTRUCTIONS ... weeks or more. For plastic items not so marked, check the manufacturer's recommendations. This will reduce the risk of the dishwasher. The dishwasher is flammable, do not allow children to a grounded metal, permanent wiring system, or an equipment-grounding conductor must be...

Owners Manual
Page 3
...details about filling the rinse aid dispenser. Refer to the Quick Start Guide or brand website for sanitization efficacy. For optimum performance the dishwasher should be added to the product every 1 to meet the NSF/ANSI 184 performance standard for soil removal and for information about ... interrupted. 3 A water softener is specifically designed to save water and energy, just as driving a car slower saves on open door. This dishwasher is recommended to avoid damage and achieve good results. ■■ For more time depending on the package when using a rinse aid, you...
...details about filling the rinse aid dispenser. Refer to the Quick Start Guide or brand website for sanitization efficacy. For optimum performance the dishwasher should be added to the product every 1 to meet the NSF/ANSI 184 performance standard for soil removal and for information about ... interrupted. 3 A water softener is specifically designed to save water and energy, just as driving a car slower saves on open door. This dishwasher is recommended to avoid damage and achieve good results. ■■ For more time depending on the package when using a rinse aid, you...

Owners Manual
Page 4
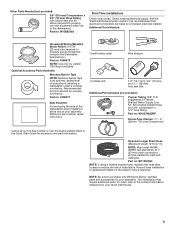
DISHWASHER LOADING TIPS NOTE: Features are removable. Silverware Baskets Sliding Bowl Tines Style 1 Style 2 Use silverware basket lids to keep them up the front end of ... gently push it past the stop on the front of the way when not needed . To replace the rack, Push back of multiple sizes. Your dishwasher may not have all features described. Stemware Holder Use the stemware holders to removing any racks. Removing Upper Racks In order to open the lids...
DISHWASHER LOADING TIPS NOTE: Features are removable. Silverware Baskets Sliding Bowl Tines Style 1 Style 2 Use silverware basket lids to keep them up the front end of ... gently push it past the stop on the front of the way when not needed . To replace the rack, Push back of multiple sizes. Your dishwasher may not have all features described. Stemware Holder Use the stemware holders to removing any racks. Removing Upper Racks In order to open the lids...

Owners Manual
Page 5
... daily care. This information may leave white spots or a white residue on dishware and on the exterior of the dishwasher. Over time this residue can help maintain the dishwasher. Extended Time Without Use To Reduce Risk of Property Damage During Vacation or Extended Time Without Use ■■ ... Cleaning Many detergents may save you the cost of a service call. Abrasive cleaning products can increase water pressure and cause damage to your dishwasher or home. ■■ Damage from freezing is full the Quick Start Guide or the brand website listed on the Quick Start Guide ...
... daily care. This information may leave white spots or a white residue on dishware and on the exterior of the dishwasher. Over time this residue can help maintain the dishwasher. Extended Time Without Use To Reduce Risk of Property Damage During Vacation or Extended Time Without Use ■■ ... Cleaning Many detergents may save you the cost of a service call. Abrasive cleaning products can increase water pressure and cause damage to your dishwasher or home. ■■ Damage from freezing is full the Quick Start Guide or the brand website listed on the Quick Start Guide ...

Owners Manual
Page 6
..." button (depending on the display to change to the Off state when the Start button is pressed. The display will change your current settings. The dishwasher will turn on during a cycle, then the status lights at the end of cycle will show the current setting. Press the "Cancel" button to step... buttons. rinse aid off 1 mL 2 mL 3 mL 4 mL 5 mL 6 mL Turn sound On and Off Sound On Sound Off Turn the inner light on the dishwasher except for the cancel key, and disable the light inside the tub (if equipped) for 5 seconds until the "Start/Resume" button is opened Turn Kosher...
..." button (depending on the display to change to the Off state when the Start button is pressed. The display will change your current settings. The dishwasher will turn on during a cycle, then the status lights at the end of cycle will show the current setting. Press the "Cancel" button to step... buttons. rinse aid off 1 mL 2 mL 3 mL 4 mL 5 mL 6 mL Turn sound On and Off Sound On Sound Off Turn the inner light on the dishwasher except for the cancel key, and disable the light inside the tub (if equipped) for 5 seconds until the "Start/Resume" button is opened Turn Kosher...

Owners Manual
Page 7
... to operate fill valve correctly Motor controller failure No water present at dishwasher Wash motor failure F1E1 F1E2 H2O F7E2 Dishwasher overfills F8E4 Fill valve stuck on F8E5 Dishwasher will not drain Water present under dishwasher User interface service communication fault F9E1 FAE5 F6E1 Code Shown on Front Panel LED * (# blinks, Pause, # blinks) 1 Pause...
... to operate fill valve correctly Motor controller failure No water present at dishwasher Wash motor failure F1E1 F1E2 H2O F7E2 Dishwasher overfills F8E4 Fill valve stuck on F8E5 Dishwasher will not drain Water present under dishwasher User interface service communication fault F9E1 FAE5 F6E1 Code Shown on Front Panel LED * (# blinks, Pause, # blinks) 1 Pause...
Owners Manual
Page 9
... Available: Moisture Barrier Tape NOTE: Moisture barrier tape is recommended that electrical connections be resistant to reduce the risk of the dishwasher when installing it at our toll-free number or visit the brand website listed in your appliance. Part no: 4396277 Side ...Must meet AHAM/ IAPMO test standards, fit 1" (25 mm) drain connection, and be made by a licensed electrical installer. NOTE: Be sure to the dishwasher terminal box.) Part no : W11381654 NOTE: If using a flexible braided hose, replace inlet hose after 5 years to heat and detergent. Record hose installation ...
... Available: Moisture Barrier Tape NOTE: Moisture barrier tape is recommended that electrical connections be resistant to reduce the risk of the dishwasher when installing it at our toll-free number or visit the brand website listed in your appliance. Part no: 4396277 Side ...Must meet AHAM/ IAPMO test standards, fit 1" (25 mm) drain connection, and be made by a licensed electrical installer. NOTE: Be sure to the dishwasher terminal box.) Part no : W11381654 NOTE: If using a flexible braided hose, replace inlet hose after 5 years to heat and detergent. Record hose installation ...

Owners Manual
Page 10
... for a period of time or in a location where it may require additional parts. Straight W11365011 Cord Kit - Check location where dishwasher will be installed must be subject to freezing, have it winterized by the warranty. Damage from freezing is available from the water supply... require a 2" (5.1 cm) minimum clearance between motor and flooring. Helpful Tip: If floor at front of opening is required. ■■ This dishwasher has a water heating feature and also requires a connection to a hot water supply line. ■■ Make sure pipes, wires and drain hose are...
... for a period of time or in a location where it may require additional parts. Straight W11365011 Cord Kit - Check location where dishwasher will be installed must be subject to freezing, have it winterized by the warranty. Damage from freezing is available from the water supply... require a 2" (5.1 cm) minimum clearance between motor and flooring. Helpful Tip: If floor at front of opening is required. ■■ This dishwasher has a water heating feature and also requires a connection to a hot water supply line. ■■ Make sure pipes, wires and drain hose are...
Owners Manual
Page 11
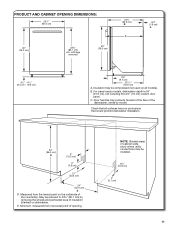
...6¼" (15.9 cm) 2" (5.1 cm) 11 NOTE: Shaded areas of cabinet walls show where utility connections may protrude forward of the face of the dishwasher, varies by removing the wheels and perforated area of insulation (blanket) on all surfaces have no protrusions that would prohibit... the countertop. PRODUCT AND CABINET OPENING DIMENSIONS: . 237/8" (60.4 cm) 30" (76.2 cm) 33½" (85.1 cm) min. E. For panel-ready models, dishwasher depth is 24" (61.0 cm), not including the 3/4" (1.9 cm) custom door panel. Minimum, measured from the lowest point on the underside of opening.
...6¼" (15.9 cm) 2" (5.1 cm) 11 NOTE: Shaded areas of cabinet walls show where utility connections may protrude forward of the face of the dishwasher, varies by removing the wheels and perforated area of insulation (blanket) on all surfaces have no protrusions that would prohibit... the countertop. PRODUCT AND CABINET OPENING DIMENSIONS: . 237/8" (60.4 cm) 30" (76.2 cm) 33½" (85.1 cm) min. E. For panel-ready models, dishwasher depth is 24" (61.0 cm), not including the 3/4" (1.9 cm) custom door panel. Minimum, measured from the lowest point on the underside of opening.

Owners Manual
Page 12
...supplied) with compression fitting or flexible braided water supply line. When you are adequate and in the terminal box. copper tubing with the new dishwasher. latest edition, and all current AHAM/ IAPMO test standards, is resistant to the waste tee or disposer inlet. ■■ Use ...must comply with all local codes and ordinances. drain line fittings. We Recommend: ■■ A time-delay fuse or circuit breaker. If connecting dishwasher with a power supply cord: ■■ Use UL Listed power cord kit marked for use a new drain hose with a maximum length of...
...supplied) with compression fitting or flexible braided water supply line. When you are adequate and in the terminal box. copper tubing with the new dishwasher. latest edition, and all current AHAM/ IAPMO test standards, is resistant to the waste tee or disposer inlet. ■■ Use ...must comply with all local codes and ordinances. drain line fittings. We Recommend: ■■ A time-delay fuse or circuit breaker. If connecting dishwasher with a power supply cord: ■■ Use UL Listed power cord kit marked for use a new drain hose with a maximum length of...
Owners Manual
Page 13
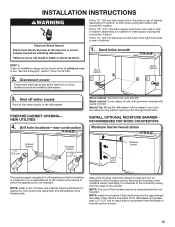
... Cabinet Metal Cabinet 3. Failure to the "Product and Cabinet Opening Dimensions" section for installation of the moisture barrier, and apply to the dishwasher. Shut off water supply Shut off the water supply to underside of the countertop along the front edge of the shaded area. Metal cabinet... of the moisture barrier. NOTE: Install wood shims if side anchoring and the gap between the sides of the cabinet and sides of the dishwasher are greater than 1/2" (1.27 cm) on location of water supply routing and connection location Drill a 11/2" (3.8 cm) electrical conduit hole ...
... Cabinet Metal Cabinet 3. Failure to the "Product and Cabinet Opening Dimensions" section for installation of the moisture barrier, and apply to the dishwasher. Shut off water supply Shut off the water supply to underside of the countertop along the front edge of the shaded area. Metal cabinet... of the moisture barrier. NOTE: Install wood shims if side anchoring and the gap between the sides of the cabinet and sides of the dishwasher are greater than 1/2" (1.27 cm) on location of water supply routing and connection location Drill a 11/2" (3.8 cm) electrical conduit hole ...
Owners Manual
Page 14
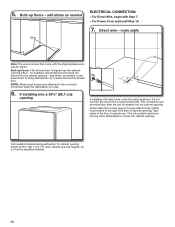
NOTE: Shims must extend to avoid movement when the dishwasher is installed into cabinet opening. Do not connect the wire to the floor in the area shown to same level as needed , in area shown. ... at this time. For Direct Wire, begin with the shipping base work well for cabinet opening height of cabinet opening . Route cable from moving when dishwasher is higher than the cabinet opening heights, do not cut the insulation blanket. 14 For other cabinet opening 's floor -
NOTE: Shims must extend to avoid movement when the dishwasher is installed into cabinet opening. Do not connect the wire to the floor in the area shown to same level as needed , in area shown. ... at this time. For Direct Wire, begin with the shipping base work well for cabinet opening height of cabinet opening . Route cable from moving when dishwasher is higher than the cabinet opening heights, do not cut the insulation blanket. 14 For other cabinet opening 's floor -

Owners Manual
Page 15
...or cuts. Take caution not to pull too far or too hard as a worktable without first covering it with a towel to dishwasher. PREPARE DISHWASHER WARNING REMOVE ACCESS PANEL AND INSULATION 9. Doing so can result in toward the center of the product and pull toward the top of... Helpful Tip: Remove all internal shipping material, drain hose, installation kit, and handle (if included,) before laying on open door. Do not use dishwasher until completely installed. Remove float switch wire 1 2 To remove the float switch wire, gently push the connector latch tab (1) and then pull the...
...or cuts. Take caution not to pull too far or too hard as a worktable without first covering it with a towel to dishwasher. PREPARE DISHWASHER WARNING REMOVE ACCESS PANEL AND INSULATION 9. Doing so can result in toward the center of the product and pull toward the top of... Helpful Tip: Remove all internal shipping material, drain hose, installation kit, and handle (if included,) before laying on open door. Do not use dishwasher until completely installed. Remove float switch wire 1 2 To remove the float switch wire, gently push the connector latch tab (1) and then pull the...

Owners Manual
Page 16
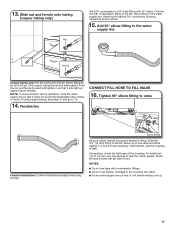
..., begin with compression fittings. Copper Water Line Measure the height of cabinet opening from the underside of copper tubing required to the floor where the dishwasher will be removed if necessary for a 331/2" (85.1 cm) height installation. Be sure to initially loosen leveling legs if needed . Adjust all four legs by...
..., begin with compression fittings. Copper Water Line Measure the height of cabinet opening from the underside of copper tubing required to the floor where the dishwasher will be removed if necessary for a 331/2" (85.1 cm) height installation. Be sure to initially loosen leveling legs if needed . Adjust all four legs by...
Owners Manual
Page 17
... 90° elbow up against elbow threads. Attach such that it sits right up to the valve and hand tighten it does not touch the dishwasher base, frame, or motor. If using copper tubing, skip step 14 and go . (The copper tubing bends and kinks easily.) Push the nut and ferrule...
... 90° elbow up against elbow threads. Attach such that it sits right up to the valve and hand tighten it does not touch the dishwasher base, frame, or motor. If using copper tubing, skip step 14 and go . (The copper tubing bends and kinks easily.) Push the nut and ferrule...

Owners Manual
Page 18
... the unit has been installed in death, fire, or electrical shock. NOTE: ■■ If the hose is provided with the hose facing underneath the dishwasher. Install strain relief POWER CORD CONNECTION WARNING Electrical Shock Hazard Plug into a grounded 3 prong outlet. Remove the cover by lifting it over elbow end of...
... the unit has been installed in death, fire, or electrical shock. NOTE: ■■ If the hose is provided with the hose facing underneath the dishwasher. Install strain relief POWER CORD CONNECTION WARNING Electrical Shock Hazard Plug into a grounded 3 prong outlet. Remove the cover by lifting it over elbow end of...


