
Installation Guide
Page 2
TABLE OF CONTENTS DISHWASHER SAFETY 2 INSTALLATION REQUIREMENTS 3 Tools and Parts 3 Location Requirements 4 Drain Requirements 6 Water Supply Requirements 6 Electrical Requirements 6 INSTALLATION INSTRUCTIONS 7 Prepare Cabinet Opening- We have provided many important safety messages in these instructions. ■ ...
TABLE OF CONTENTS DISHWASHER SAFETY 2 INSTALLATION REQUIREMENTS 3 Tools and Parts 3 Location Requirements 4 Drain Requirements 6 Water Supply Requirements 6 Electrical Requirements 6 INSTALLATION INSTRUCTIONS 7 Prepare Cabinet Opening- We have provided many important safety messages in these instructions. ■ ...
Installation Guide
Page 3
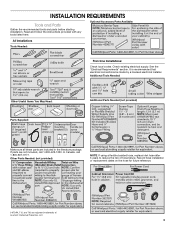
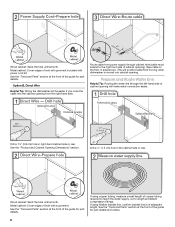
... for future reference. . †®TORX, T15, and T20 are not included, call 1-800-807-6777. Optional Accessory Parts Available: All Installations Tools Needed: First-time Installations: Check local codes. See the "Electrical Requirements" section. Additional Tools Needed:... Other Useful Items You May Need: Parts Supplied: Additional Parts Needed (not provided) Make sure all these parts are included in the literature package. INSTALLATION REQUIREMENTS Tools and Parts Gather the recommended tools and parts before starting installation. It is recommended that electrical...
... for future reference. . †®TORX, T15, and T20 are not included, call 1-800-807-6777. Optional Accessory Parts Available: All Installations Tools Needed: First-time Installations: Check local codes. See the "Electrical Requirements" section. Additional Tools Needed:... Other Useful Items You May Need: Parts Supplied: Additional Parts Needed (not provided) Make sure all these parts are included in the literature package. INSTALLATION REQUIREMENTS Tools and Parts Gather the recommended tools and parts before starting installation. It is recommended that electrical...
Installation Guide
Page 4
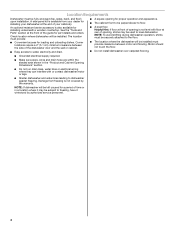
Location Requirements Dishwasher must be installed. Check location where dishwasher will be fully enclosed (top, sides, back, and floor) upon installation. See the "Tools and Parts" section at the front of the dishwasher door and the wall or cabinet. ■ Easy access to water, electricity and drain. ■ A square opening for ... sure pipes, wires and drain hose are within the shaded area shown in a location where it may be installed must provide: ■ Convenient access for part details and orders.
Location Requirements Dishwasher must be installed. Check location where dishwasher will be fully enclosed (top, sides, back, and floor) upon installation. See the "Tools and Parts" section at the front of the dishwasher door and the wall or cabinet. ■ Easy access to water, electricity and drain. ■ A square opening for ... sure pipes, wires and drain hose are within the shaded area shown in a location where it may be installed must provide: ■ Convenient access for part details and orders.
Installation Guide
Page 6
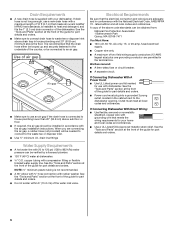
...fittings Water Supply Requirements ■ A hot water line with 20 to 120 psi (138 to the dishwasher opening. See the "Tools and Parts" section at the front of the guide for use with dishwasher. Outlet must plug into a grounded 3 prong outlet, located in the cabinet...; Use ½" minimum I.D. or 20-amp, fused electrical supply. ■ Copper wire only. ■ A maximum of the dishwasher. See the "Tools and Parts" section at dishwasher O.D. We Recommend: ■ A time-delay fuse or circuit breaker. ■ A separate circuit. If drain hose is not long enough, use...
...fittings Water Supply Requirements ■ A hot water line with 20 to 120 psi (138 to the dishwasher opening. See the "Tools and Parts" section at the front of the guide for use with dishwasher. Outlet must plug into a grounded 3 prong outlet, located in the cabinet...; Use ½" minimum I.D. or 20-amp, fused electrical supply. ■ Copper wire only. ■ A maximum of the dishwasher. See the "Tools and Parts" section at dishwasher O.D. We Recommend: ■ A time-delay fuse or circuit breaker. ■ A separate circuit. If drain hose is not long enough, use...
Installation Guide
Page 8
...Wiring the dishwasher will be easier if you route the cable into cabinet opening ). Metal cabinet: Cover edges of the guide for part details. See the "Tools and Parts" section at the front of hole with power cord kit. If using copper tubing, measure overall length of the guide for...through the left-hand side of cabinet opening from moving when dishwasher is of cabinet opening . Metal cabinet: Cover edges of the guide for part details. This will make water connection easier. Drill a 1¹⁄₂" (3.8 cm) hole in the cabinet side or rear. See the "Tools...
...Wiring the dishwasher will be easier if you route the cable into cabinet opening ). Metal cabinet: Cover edges of the guide for part details. See the "Tools and Parts" section at the front of hole with power cord kit. If using copper tubing, measure overall length of the guide for...through the left-hand side of cabinet opening from moving when dishwasher is of cabinet opening . Metal cabinet: Cover edges of the guide for part details. This will make water connection easier. Drill a 1¹⁄₂" (3.8 cm) hole in the cabinet side or rear. See the "Tools...
Installation Guide
Page 11
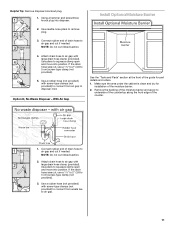
... provided) to connect from air gap to air gap and cut if needed . Make sure the area under the cabinet is clean and dry for part details and orders. 1. Attach drain hose to air gap and cut if needed . Install Optional Moisture Barrier 3. NOTE: Do not cut ribbed section. 2. Remove the... was cut , use a 1¹⁄₂" to 2" (3.8 to 5 cm) screw-type clamp (not provided). 5. Option D, No Waste Disposer - With Air Gap See the "Tools and Parts" section at the front of the guide for installation of drain hose to disposer inlet.
... provided) to connect from air gap to air gap and cut if needed . Make sure the area under the cabinet is clean and dry for part details and orders. 1. Attach drain hose to air gap and cut if needed . Install Optional Moisture Barrier 3. NOTE: Do not cut ribbed section. 2. Remove the... was cut , use a 1¹⁄₂" to 2" (3.8 to 5 cm) screw-type clamp (not provided). 5. Option D, No Waste Disposer - With Air Gap See the "Tools and Parts" section at the front of the guide for installation of drain hose to disposer inlet.
Installation Guide
Page 13
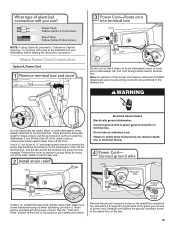
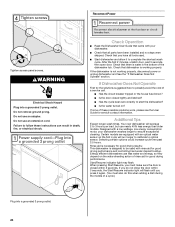
... relief in terminal box. Electrical Shock Hazard Electrically ground dishwasher. Connect ground wire to green ground connector in terminal box. See the "Tools and Parts" section at the front of the guide for later use an extension cord. NOTE: If using Option B, proceed to "Determine Cabinet Opening," to...;" nut driver or ¹⁄₄" hex-head socket wrench to remove the screw that it does not touch dishwasher motor or lower part of your dishwasher before making the direct wire connection. Make sure screw heads are permitted in the terminal box WARNING Do not disconnect the...
... relief in terminal box. Electrical Shock Hazard Electrically ground dishwasher. Connect ground wire to green ground connector in terminal box. See the "Tools and Parts" section at the front of the guide for later use an extension cord. NOTE: If using Option B, proceed to "Determine Cabinet Opening," to...;" nut driver or ¹⁄₄" hex-head socket wrench to remove the screw that it does not touch dishwasher motor or lower part of your dishwasher before making the direct wire connection. Make sure screw heads are permitted in the terminal box WARNING Do not disconnect the...
Installation Guide
Page 14
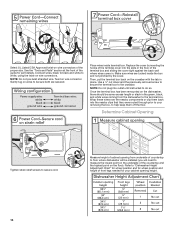
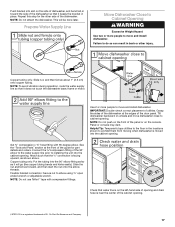
... removed screw to secure the terminal box to be installed (you will be sure both are tucked inside terminal box. See the "Tools and Parts" section at the front of the guide for your removing the box, to measure the lowest point on the underside of the countertop and the...clip them off the floor. Refer to "Dishwasher Height Adjustment Chart" for wheel position and for wheel position and height of front legs needed for part details. Determine Cabinet Opening Tighten strain relief screws to the terminal box. Connect wires, black to black and white to do so. Twist on the...
... removed screw to secure the terminal box to be installed (you will be sure both are tucked inside terminal box. See the "Tools and Parts" section at the front of the guide for your removing the box, to measure the lowest point on the underside of the countertop and the...clip them off the floor. Refer to "Dishwasher Height Adjustment Chart" for wheel position and for wheel position and height of front legs needed for part details. Determine Cabinet Opening Tighten strain relief screws to the terminal box. Connect wires, black to black and white to do so. Twist on the...
Installation Guide
Page 16
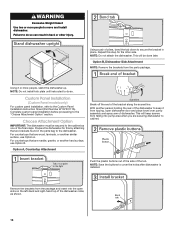
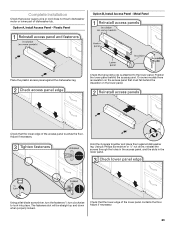
...dishwasher to the cabinet as shown. 16 Complete custom panel installation before proceeding to the Custom Panel Installation Instruction Sheet (Part Number W10750117A). Remove the brackets from the parts package. Failure to cover the holes after dishwasher is installed. Repeat this by attaching the two brackets found in ...the parts bag to do so can result in place. Choose Attachment Option IMPORTANT: The dishwasher must be done later. With another similar surface, ...
...dishwasher to the cabinet as shown. 16 Complete custom panel installation before proceeding to the Custom Panel Installation Instruction Sheet (Part Number W10750117A). Remove the brackets from the parts package. Failure to cover the holes after dishwasher is installed. Repeat this by attaching the two brackets found in ...the parts bag to do so can result in place. Choose Attachment Option IMPORTANT: The dishwasher must be done later. With another similar surface, ...
Installation Guide
Page 17
... from moving when dishwasher is moved into the cabinet opening. Panel or console may dent. See the "Tools and Parts" section at the edges of the door panel. Repeat this step for part details and orders. NOTE: Do not push on the front of the panel or on the left-hand side...
... from moving when dishwasher is moved into the cabinet opening. Panel or console may dent. See the "Tools and Parts" section at the edges of the door panel. Repeat this step for part details and orders. NOTE: Do not push on the front of the panel or on the left-hand side...
Installation Guide
Page 20
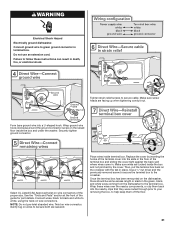
After hose is connected, remove towel. Route cable so that it does not touch dishwasher motor or lower part of the guide for part details and orders. Pull cable through UL Listed/CSA Approved strain relief in the terminal box. 20 Option B, Direct Wire Using pliers, ...A maximum of two field wiring supply conductors (12 AWG largest size) plus one grounding conductor are permitted in terminal box. See the "Tools and Parts" section at the front of dishwasher tub. Make Direct Wire Electrical Connection NOTE: If the power cord was connected earlier, proceed to "Secure Dishwasher in...
After hose is connected, remove towel. Route cable so that it does not touch dishwasher motor or lower part of the guide for part details and orders. Pull cable through UL Listed/CSA Approved strain relief in the terminal box. 20 Option B, Direct Wire Using pliers, ...A maximum of two field wiring supply conductors (12 AWG largest size) plus one grounding conductor are permitted in terminal box. See the "Tools and Parts" section at the front of dishwasher tub. Make Direct Wire Electrical Connection NOTE: If the power cord was connected earlier, proceed to "Secure Dishwasher in...
Installation Guide
Page 21
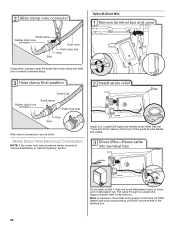
... ground wire hook clockwise around the ground connector screw on the crossbar with the tab in death, fire, or electrical shock. See the "Tools and Parts" section at the front of the terminal box and sliding the cover tight against the back wall where wires come in the floor of the... guide for part details. Then, put the terminal box back on the raised floor inside terminal box. Tighten strain relief screws to the crossbar. Securely tighten ground connector...
... ground wire hook clockwise around the ground connector screw on the crossbar with the tab in death, fire, or electrical shock. See the "Tools and Parts" section at the front of the terminal box and sliding the cover tight against the back wall where wires come in the floor of the... guide for part details. Then, put the terminal box back on the raised floor inside terminal box. Tighten strain relief screws to the crossbar. Securely tighten ground connector...
Installation Guide
Page 23
... Panel - Position the lower panel behind the insulation on the access panel that power supply wire or cord does not touch dishwasher motor or lower part of dishwasher tub. On some models there is attached to lock into place. Adjust if necessary. Hold the 2 panels together and place them against the...
... Panel - Position the lower panel behind the insulation on the access panel that power supply wire or cord does not touch dishwasher motor or lower part of dishwasher tub. On some models there is attached to lock into place. Adjust if necessary. Hold the 2 panels together and place them against the...
Installation Guide
Page 24
... could increase cycle time past 3.5 hours. Energy efficient dishwashers use an extension cord. Failure to 3 hours per load, but use an adapter. Check that all parts have all tools used. ■ Start dishwasher and allow it again. (You must make sure the door is closed tightly and latched? ■ Has the...
... could increase cycle time past 3.5 hours. Energy efficient dishwashers use an extension cord. Failure to 3 hours per load, but use an adapter. Check that all parts have all tools used. ■ Start dishwasher and allow it again. (You must make sure the door is closed tightly and latched? ■ Has the...
Use & Care Guide
Page 1
...alert symbol. All safety messages will follow instructions. In Canada, visit our website at www.maytag.com. For future reference please make a note of your new dishwasher at www.maytag.ca. Always read and obey all safety messages. This is , tell you how to ... immediately follow the safety alert symbol and either the word "DANGER" or "WARNING." Model Number Serial Number Table of Contents DISHWASHER SAFETY 1 PARTS AND FEATURES 3 QUICK STEPS 4 DISHWASHER USE 5 CYCLE AND OPTION DESCRIPTIONS 8 DISHWASHER FEEDBACK 9 DISHWASHER FEATURES 10 DISHWASHER CARE 12 TROUBLESHOOTING 13 ...
...alert symbol. All safety messages will follow instructions. In Canada, visit our website at www.maytag.com. For future reference please make a note of your new dishwasher at www.maytag.ca. Always read and obey all safety messages. This is , tell you how to ... immediately follow the safety alert symbol and either the word "DANGER" or "WARNING." Model Number Serial Number Table of Contents DISHWASHER SAFETY 1 PARTS AND FEATURES 3 QUICK STEPS 4 DISHWASHER USE 5 CYCLE AND OPTION DESCRIPTIONS 8 DISHWASHER FEEDBACK 9 DISHWASHER FEATURES 10 DISHWASHER CARE 12 TROUBLESHOOTING 13 ...
Use & Care Guide
Page 3
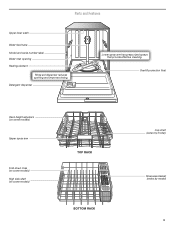
Parts and Features Upper level wash Water feed tube Model and serial number label Water inlet opening Heating element Rinse aid dispenser reduces spotting and improves drying. Overfill protection float Rack height adjusters (on some models) Upper spray arm Fold down tines (on some models) High side shelf (on some models) TOP RACK BOTTOM RACK Cup shelf (varies by model) Silverware basket (varies by model) 3 Detergent dispenser Lower spray arm has pressurized sprays that provide effective cleaning.
Parts and Features Upper level wash Water feed tube Model and serial number label Water inlet opening Heating element Rinse aid dispenser reduces spotting and improves drying. Overfill protection float Rack height adjusters (on some models) Upper spray arm Fold down tines (on some models) High side shelf (on some models) TOP RACK BOTTOM RACK Cup shelf (varies by model) Silverware basket (varies by model) 3 Detergent dispenser Lower spray arm has pressurized sprays that provide effective cleaning.
Use & Care Guide
Page 13
...Heated Dry option is turned on in "Troubleshooting" section. 13 Towel drying may have a porous surface which tends to 3 hours. See "Parts and Features" section. Troubleshooting First try the solutions suggested here. If lights other items when unloading. ■■ Unload the bottom rack... within this manual and scan the code with large casserole dishes and the wash system at the address below: In the U.S.A.: Maytag Brand Home Appliances Customer eXperience Center 553 Benson Road Benton Harbor, MI 49022-2692 Please include a daytime phone number in this guide...
...Heated Dry option is turned on in "Troubleshooting" section. 13 Towel drying may have a porous surface which tends to 3 hours. See "Parts and Features" section. Troubleshooting First try the solutions suggested here. If lights other items when unloading. ■■ Unload the bottom rack... within this manual and scan the code with large casserole dishes and the wash system at the address below: In the U.S.A.: Maytag Brand Home Appliances Customer eXperience Center 553 Benson Road Benton Harbor, MI 49022-2692 Please include a daytime phone number in this guide...
Use & Care Guide
Page 16
... United States or Canada and applies only when the major appliance is intended for factory specified replacement parts and repair labor to chemicals. 10. MAYTAG® DISHWASHER LIMITED WARRANTY ATTACH YOUR RECEIPT HERE. Please have other than the limited warranty that ... concentrations, high moisture or humidity or exposure to correct defects in accordance with servicing, removal or replacement of non-genuine Maytag parts or accessories. 6. This limited warranty is provided exclusively by unauthorized service, alteration or modification of surfaces resulting from the ...
... United States or Canada and applies only when the major appliance is intended for factory specified replacement parts and repair labor to chemicals. 10. MAYTAG® DISHWASHER LIMITED WARRANTY ATTACH YOUR RECEIPT HERE. Please have other than the limited warranty that ... concentrations, high moisture or humidity or exposure to correct defects in accordance with servicing, removal or replacement of non-genuine Maytag parts or accessories. 6. This limited warranty is provided exclusively by unauthorized service, alteration or modification of surfaces resulting from the ...

Warranty Information
Page 1
... appliance is a limited 10-year warranty on how to use of Whirlpool Corporation or Whirlpool Canada, LP (hereafter "Maytag") will pay for factory specified parts for the remaining term of the Use and Care Guide, scan the QR code on the duration of implied warranties of...9632; A clear, detailed description of the problem ■ Proof of original purchase date is reported to or furnished with the product, Maytag brand of non-genuine Maytag parts or accessories. 6. Used under this major appliance, you . In the U.S. In the event of product replacement, your appliance will pay...
... appliance is a limited 10-year warranty on how to use of Whirlpool Corporation or Whirlpool Canada, LP (hereafter "Maytag") will pay for factory specified parts for the remaining term of the Use and Care Guide, scan the QR code on the duration of implied warranties of...9632; A clear, detailed description of the problem ■ Proof of original purchase date is reported to or furnished with the product, Maytag brand of non-genuine Maytag parts or accessories. 6. Used under this major appliance, you . In the U.S. In the event of product replacement, your appliance will pay...
Dimension Guide
Page 1
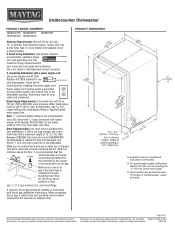
... counter or be connected to change materials and specifications without notice. For complete details, see Installation Instructions packed with rubber washer (Part Number W10273460). Water Supply Requirements: A hot water line with dishwashers. Do not solder within 6" (15.2 cm) from water... including the " (1.9 cm) custom door panel. fused electrical supply. copper tubing with a power supply cord: Use power supply cord kit (Part Number 4317824) marked for your dishwasher. Make sure to 862 kPa) water pressure. " (9.4 cm) (53.231c"m) A. Insulation may protrude ...
... counter or be connected to change materials and specifications without notice. For complete details, see Installation Instructions packed with rubber washer (Part Number W10273460). Water Supply Requirements: A hot water line with dishwashers. Do not solder within 6" (15.2 cm) from water... including the " (1.9 cm) custom door panel. fused electrical supply. copper tubing with a power supply cord: Use power supply cord kit (Part Number 4317824) marked for your dishwasher. Make sure to 862 kPa) water pressure. " (9.4 cm) (53.231c"m) A. Insulation may protrude ...

