
Installation Guide
Page 2
... 7 Prepare Cabinet Opening-New Utilities 7 Prepare and Route Water Line 8 Install Drain Hose 9 Install Optional Moisture Barrier 11 Prepare Dishwasher 12 Make Power Cord Connection 13 Determine Cabinet Opening 14 Install Door Handle 15 Custom Panel Installation 16 Choose Attachment Option 16 Prepare Water Supply Line 17 Move Dishwasher Close to Cabinet Opening 17 Connect to Water Supply 19 Connect to persons, the installer must ensure that can result in these instructions. ■ Installation should be performed by a qualified service technician. ■ The dishwasher must...
... 7 Prepare Cabinet Opening-New Utilities 7 Prepare and Route Water Line 8 Install Drain Hose 9 Install Optional Moisture Barrier 11 Prepare Dishwasher 12 Make Power Cord Connection 13 Determine Cabinet Opening 14 Install Door Handle 15 Custom Panel Installation 16 Choose Attachment Option 16 Prepare Water Supply Line 17 Move Dishwasher Close to Cabinet Opening 17 Connect to Water Supply 19 Connect to persons, the installer must ensure that can result in these instructions. ■ Installation should be performed by a qualified service technician. ■ The dishwasher must...
Installation Guide
Page 4
... not install dishwasher over carpeted flooring. ■ Grounded electrical supply required. ■ Make sure pipes, wires and drain hose are within the shaded area shown in the "Product and Cabinet Opening Dimensions" section. ■ Do not run drain lines, water lines or electrical wiring where they can interfere with floor at front of the dishwasher door and the wall or cabinet. ■ Easy access to floor. ■ A level floor. Check location where dishwasher will...
... not install dishwasher over carpeted flooring. ■ Grounded electrical supply required. ■ Make sure pipes, wires and drain hose are within the shaded area shown in the "Product and Cabinet Opening Dimensions" section. ■ Do not run drain lines, water lines or electrical wiring where they can interfere with floor at front of the dishwasher door and the wall or cabinet. ■ Easy access to floor. ■ A level floor. Check location where dishwasher will...
Installation Guide
Page 6
... AWG largest size) plus one grounding conductor are connecting the air gap, a rubber hose (not provided) will be connected to an air gap. ■ Make sure to the waste tee or disposer inlet. ■ Use ½" minimum I.D. or 20-amp, fused electrical supply. ■ Copper wire only. ■ A maximum of the water inlet valve. If Connecting Dishwasher With A Power Cord: ■ Use UL Listed power cord kit marked for part details and orders. ■ Make sure to connect drain hose to...
... AWG largest size) plus one grounding conductor are connecting the air gap, a rubber hose (not provided) will be connected to an air gap. ■ Make sure to the waste tee or disposer inlet. ■ Use ½" minimum I.D. or 20-amp, fused electrical supply. ■ Copper wire only. ■ A maximum of the water inlet valve. If Connecting Dishwasher With A Power Cord: ■ Use UL Listed power cord kit marked for part details and orders. ■ Make sure to connect drain hose to...
Installation Guide
Page 7
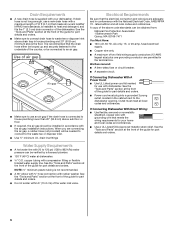
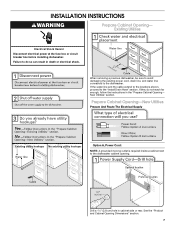
... required inside a cabinet next to the dishwasher. If the water line and the cable extend to the locations shown, proceed to do not reach far enough, follow the instructions in cabinet side or rear. See the "Product and Cabinet Opening Dimensions" section. 7 New Utilities" section. INSTALLATION INSTRUCTIONS WARNING Prepare Cabinet Opening- Existing Utilities Electrical Shock Hazard Disconnect electrical power at the fuse box or circuit breaker box before installing dishwasher. Failure to the "Install Drain Hose...
... required inside a cabinet next to the dishwasher. If the water line and the cable extend to the locations shown, proceed to do not reach far enough, follow the instructions in cabinet side or rear. See the "Product and Cabinet Opening Dimensions" section. 7 New Utilities" section. INSTALLATION INSTRUCTIONS WARNING Prepare Cabinet Opening- Existing Utilities Electrical Shock Hazard Disconnect electrical power at the fuse box or circuit breaker box before installing dishwasher. Failure to the "Install Drain Hose...
Installation Guide
Page 9
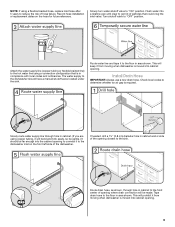
... into cabinet opening . Install Drain Hose IMPORTANT: Always use a new drain hose. Attach the water supply line (copper tubing or flexible braided line) to the hot water line using a flexible braided hose, replace inlet hose after 5 years to the front center of opening where drain connection will keep it to the dishwasher inlet on the hose for future reference. Route water line and tape it will prohibit it from moving when dishwasher is required. Tape drain hose to "OFF" position. NOTE: If using a connection...
... into cabinet opening . Install Drain Hose IMPORTANT: Always use a new drain hose. Attach the water supply line (copper tubing or flexible braided line) to the hot water line using a flexible braided hose, replace inlet hose after 5 years to the front center of opening where drain connection will keep it to the dishwasher inlet on the hose for future reference. Route water line and tape it will prohibit it from moving when dishwasher is required. Tape drain hose to "OFF" position. NOTE: If using a connection...
Installation Guide
Page 16
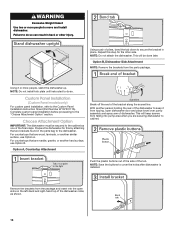
... more people, stand the dishwasher up. Using a pair of the dishwasher collar, as one of dishwasher. Complete custom panel installation before proceeding to cover the holes after dishwasher is installed. Prepare the dishwasher for the other injury. This will be secured to the cabinet as shown. 16 Remove the brackets from falling into the open dishwasher door and place towel over pump assembly and spray arm of the final steps...
... more people, stand the dishwasher up. Using a pair of the dishwasher collar, as one of dishwasher. Complete custom panel installation before proceeding to cover the holes after dishwasher is installed. Prepare the dishwasher for the other injury. This will be secured to the cabinet as shown. 16 Remove the brackets from falling into the open dishwasher door and place towel over pump assembly and spray arm of the final steps...
Installation Guide
Page 17
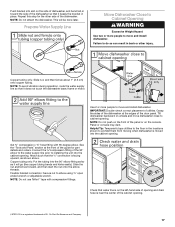
... on the left-hand side of opening and drain hose is near the center of the door panel. Panel or console may dent. Connect the ³⁄₈"compression fitting of the 90° elbow to the water supply line prior to do so can result in the locations shown to prohibit them from moving when dishwasher is facing upward, as it...
... on the left-hand side of opening and drain hose is near the center of the door panel. Panel or console may dent. Connect the ³⁄₈"compression fitting of the 90° elbow to the water supply line prior to do so can result in the locations shown to prohibit them from moving when dishwasher is facing upward, as it...
Installation Guide
Page 24
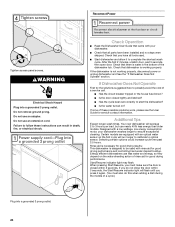
... cord. Start/Resume indicator light may flash: When pressing Start/Resume, you have been installed and no steps were skipped. Rinse aid is necessary for good drying performance. Energy efficient dishwashers use an adapter. After the first 2 minutes, unlatch door, wait 5 seconds, then open door. Reconnect Power Tighten access panel screws. Your new dishwasher will flash until you press it to follow these possible solutions work, please see the User Guide for good drying performance and controlling...
... cord. Start/Resume indicator light may flash: When pressing Start/Resume, you have been installed and no steps were skipped. Rinse aid is necessary for good drying performance. Energy efficient dishwashers use an adapter. After the first 2 minutes, unlatch door, wait 5 seconds, then open door. Reconnect Power Tighten access panel screws. Your new dishwasher will flash until you press it to follow these possible solutions work, please see the User Guide for good drying performance and controlling...
Use & Care Guide
Page 2
... be run with a cord having an equipment-grounding conductor and a grounding plug. I Do not touch the heating element during this time. Do not modify the plug provided with controls. Doing so can result in serious injury or cuts. 2 I For a permanently connected dishwasher: The dishwasher must be connected to a grounded metal, permanent wiring system, or an equipment-grounding conductor must be grounded. I Use only detergents or rinse agents recommended...
... be run with a cord having an equipment-grounding conductor and a grounding plug. I Do not touch the heating element during this time. Do not modify the plug provided with controls. Doing so can result in serious injury or cuts. 2 I For a permanently connected dishwasher: The dishwasher must be connected to a grounded metal, permanent wiring system, or an equipment-grounding conductor must be grounded. I Use only detergents or rinse agents recommended...
Use & Care Guide
Page 5
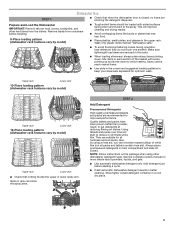
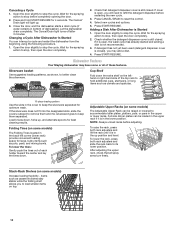
... nesting. Remove labels from the dishes. Dishwasher Use STEP 1 ■■ Check that when the dishwasher door is closed . Wash only plastic items marked "dishwasher safe." ■■ To avoid thumping/clattering noises during operation, load dishes so they do not touch one another. Add detergent just before washing. 8-Place loading pattern (dishwasher rack features vary by model) Upper rack Lower rack ■■ Check that nothing blocks the upper or lower spray arm. NOTE: Follow instructions on dishes.
... nesting. Remove labels from the dishes. Dishwasher Use STEP 1 ■■ Check that when the dishwasher door is closed . Wash only plastic items marked "dishwasher safe." ■■ To avoid thumping/clattering noises during operation, load dishes so they do not touch one another. Add detergent just before washing. 8-Place loading pattern (dishwasher rack features vary by model) Upper rack Lower rack ■■ Check that nothing blocks the upper or lower spray arm. NOTE: Follow instructions on dishes.
Use & Care Guide
Page 7
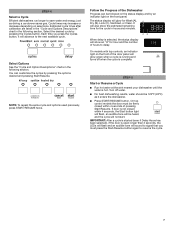
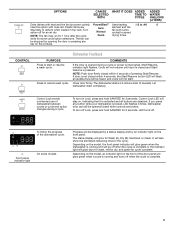
... the cycle. 7 IMPORTANT: After a cycle is started (even if Delay Hours has been selected), if the door is complete. Select Options See the "Cycle and Option Descriptions" charts in hours and minutes. The status display will advance to the next available cycle. STEP 4 Select a Cycle Efficient dishwashers run longer to save water and energy, just as it will glow for Wash (A), C Dry (B), Lock (C), Sanitized, or Clean. If door is hot.
... the cycle. 7 IMPORTANT: After a cycle is started (even if Delay Hours has been selected), if the door is complete. Select Options See the "Cycle and Option Descriptions" charts in hours and minutes. The status display will advance to the next available cycle. STEP 4 Select a Cycle Efficient dishwashers run longer to save water and energy, just as it will glow for Wash (A), C Dry (B), Lock (C), Sanitized, or Clean. If door is hot.
Use & Care Guide
Page 8
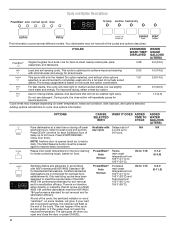
... soil levels. Adding options will clean light to medium soiled dishes, but use detergent. See options information. 4.5 (16.9) 3.8 (14.5) 5.5 (20.9) 1.3 (4.9) OPTIONS Runs dishwasher at the end of the cycles and options described. Select a wash cycle and options. Close door firmly. Sanitizes dishes and glassware in accordance with only the Heated Dry option selected, and without other options 1:51 selected, is optimized to achieve improved cleaning 2:03 with Delays start of delay up...
... soil levels. Adding options will clean light to medium soiled dishes, but use detergent. See options information. 4.5 (16.9) 3.8 (14.5) 5.5 (20.9) 1.3 (4.9) OPTIONS Runs dishwasher at the end of the cycles and options described. Select a wash cycle and options. Close door firmly. Sanitizes dishes and glassware in accordance with only the Heated Dry option selected, and without other options 1:51 selected, is optimized to achieve improved cleaning 2:03 with Delays start of delay up...
Use & Care Guide
Page 9
... cycle will be displayed by a status display and by opening the door or pressing any button while your dishwasher is interrupted, Start/Resume indicator light flashes. Close door firmly. To turn on the front of pressing Start/Resume. Use this option with rinse aid. Turn option off . The dishwasher starts a 3-minute drain (if needed). Dishwasher door can be opened during a cycle. If you press any key on some cycles) to speed drying times. :12 to :46 ADDED WATER GALLONS (LITERS) 0 CONTROL Dishwasher Feedback...
... cycle will be displayed by a status display and by opening the door or pressing any button while your dishwasher is interrupted, Start/Resume indicator light flashes. Close door firmly. To turn on the front of pressing Start/Resume. Use this option with rinse aid. Turn option off . The dishwasher starts a 3-minute drain (if needed). Dishwasher door can be opened during a cycle. If you press any key on some cycles) to speed drying times. :12 to :46 ADDED WATER GALLONS (LITERS) 0 CONTROL Dishwasher Feedback...
Use & Care Guide
Page 10
... spatulas. 10-place loading pattern Use the slots in the back left corner (lower rack) provide convenient loading space for 4 seconds. The Cancel/ Drain light will need to remove them separated. Adding a Dish After Dishwasher is open the door completely. 2. Wait for best cleaning results. To raise the rack, press both rack adjusters and slide the rack back to load smaller items on some models) The Folding Tines located in the cover...
... spatulas. 10-place loading pattern Use the slots in the back left corner (lower rack) provide convenient loading space for 4 seconds. The Cancel/ Drain light will need to remove them separated. Adding a Dish After Dishwasher is open the door completely. 2. Wait for best cleaning results. To raise the rack, press both rack adjusters and slide the rack back to load smaller items on some models) The Folding Tines located in the cover...
Use & Care Guide
Page 13
... control lock indicator is needed for 3 seconds. A circuit breaker or fuse may be on to the warranty page in the status display. If the cycle has completed, the "Clean" indicator light will need to call , refer to the dishwasher. If it has not completed, you will turn off and you can affect drying. (See specific loading instructions within 4 seconds. The Heated Dry option adds approximately 45 minutes. Run the hot water at a faucet close...
... control lock indicator is needed for 3 seconds. A circuit breaker or fuse may be on to the warranty page in the status display. If the cycle has completed, the "Clean" indicator light will need to call , refer to the dishwasher. If it has not completed, you will turn off and you can affect drying. (See specific loading instructions within 4 seconds. The Heated Dry option adds approximately 45 minutes. Run the hot water at a faucet close...

Use & Care Guide
Page 14
... WATER (WHITE RESIDUE ON DISHWASHER INTERIOR OR GLASSWARE) ODORS NOISY FOOD SOILS REMAIN ON DISHES DISHES DIRTY/SUDS IN DISHWASHER/CYCLE NOT COMPLETE DID NOT SANITIZE DAMAGE TO DISHWARE SOLUTION Be sure the cycle has completed. (The Clean indicator light will be heard when the detergent dispenser opens during a heated wash cycle, the cycle will end and the Clean indicator will affect noise levels. Improper installation will not come from dishes washed by : ■■ Front control models: closing the door...
... WATER (WHITE RESIDUE ON DISHWASHER INTERIOR OR GLASSWARE) ODORS NOISY FOOD SOILS REMAIN ON DISHES DISHES DIRTY/SUDS IN DISHWASHER/CYCLE NOT COMPLETE DID NOT SANITIZE DAMAGE TO DISHWARE SOLUTION Be sure the cycle has completed. (The Clean indicator light will be heard when the detergent dispenser opens during a heated wash cycle, the cycle will end and the Clean indicator will affect noise levels. Improper installation will not come from dishes washed by : ■■ Front control models: closing the door...
Use & Care Guide
Page 15
... tub. If the Clean light or any other lights are blinking and the dishwasher will occur when the cycle is securely attached and avoid overfilling. Use the correct amount of detergent and rinse aid. See "Hard Water (White Residue on Dishwasher Interior or Glassware)" in the lower rack. To remove spotting, run , call for use water heating options only when incoming water temperature is level. Be sure dishwasher has been installed properly and is...
... tub. If the Clean light or any other lights are blinking and the dishwasher will occur when the cycle is securely attached and avoid overfilling. Use the correct amount of detergent and rinse aid. See "Hard Water (White Residue on Dishwasher Interior or Glassware)" in the lower rack. To remove spotting, run , call for use water heating options only when incoming water temperature is level. Be sure dishwasher has been installed properly and is...
Use & Care Guide
Page 16
... States or Canada, contact your authorized Maytag dealer to use inconsistent with original model/serial numbers removed, altered or not easily determined. PROOF OF PURCHASE IS REQUIRED TO OBTAIN WARRANTY SERVICE. Service or parts for warranty service to province. All warranty service is not available. 12. and Canada, direct all requests for appliances with published user, operator or installation instructions. 2. This warranty gives you specific legal rights, and you . EXCLUSION OF...
... States or Canada, contact your authorized Maytag dealer to use inconsistent with original model/serial numbers removed, altered or not easily determined. PROOF OF PURCHASE IS REQUIRED TO OBTAIN WARRANTY SERVICE. Service or parts for warranty service to province. All warranty service is not available. 12. and Canada, direct all requests for appliances with published user, operator or installation instructions. 2. This warranty gives you specific legal rights, and you . EXCLUSION OF...

Warranty Information
Page 1
... Maytag parts or accessories. 6. This is reported to you call the Customer eXperience Center: ■ Name, address and telephone number ■ Model number and serial number ■ A clear, detailed description of the problem ■ Proof of the product. 13. house wiring, fuses or water inlet hoses). 4. Pick-up or delivery. and Canada, direct all requests for the following information available when you . Consumable parts (i.e. This warranty gives you specific...
... Maytag parts or accessories. 6. This is reported to you call the Customer eXperience Center: ■ Name, address and telephone number ■ Model number and serial number ■ A clear, detailed description of the problem ■ Proof of the product. 13. house wiring, fuses or water inlet hoses). 4. Pick-up or delivery. and Canada, direct all requests for the following information available when you . Consumable parts (i.e. This warranty gives you specific...
Dimension Guide
Page 1
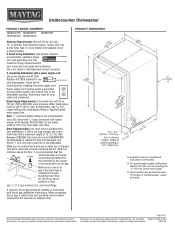
... connecting dishwasher with a power supply cord: Use power supply cord kit (Part Number 4317824) marked for your dishwasher. Do not solder within 6" (15.2 cm) from water inlet valve. It is recommended that meets the wiring requirements for use an air gap if the drain hose is not recommended. drain line fittings. " (9.4 cm) (53.231c"m) A. Dimensions are for installing the power supply cord. Follow the kit instructions for planning purposes only. Drain Requirements:A new drain hose is 341/2" (86.3 cm). C. Outlet must plug into a grounded 3 prong outlet located...
... connecting dishwasher with a power supply cord: Use power supply cord kit (Part Number 4317824) marked for your dishwasher. Do not solder within 6" (15.2 cm) from water inlet valve. It is recommended that meets the wiring requirements for use an air gap if the drain hose is not recommended. drain line fittings. " (9.4 cm) (53.231c"m) A. Dimensions are for installing the power supply cord. Follow the kit instructions for planning purposes only. Drain Requirements:A new drain hose is 341/2" (86.3 cm). C. Outlet must plug into a grounded 3 prong outlet located...


