
User Instructions
Page 1
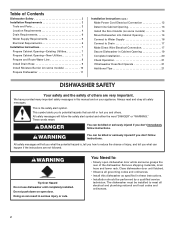
... what the potential hazard is the safety alert symbol. Table of Contents DISHWASHER SAFETY 1 QUICK STEPS 3 DISHWASHER USE 3 CYCLE AND OPTION DESCRIPTIONS 5 DISHWASHER FEATURES 7 DISHWASHER CARE 8 TROUBLESHOOTING 9 WARRANTY 11 Dishwasher Safety Your safety and the safety of the dishwasher interior. If you and others are not followed. Puede encontrar su n&#...need your model and serial number located near the door on your appliance. In Canada, visit our website at www.maytag.ca or call us at 1-800-688-9900. DISHWASHER USER INSTRUCTIONS THANK YOU for additional information.
... what the potential hazard is the safety alert symbol. Table of Contents DISHWASHER SAFETY 1 QUICK STEPS 3 DISHWASHER USE 3 CYCLE AND OPTION DESCRIPTIONS 5 DISHWASHER FEATURES 7 DISHWASHER CARE 8 TROUBLESHOOTING 9 WARRANTY 11 Dishwasher Safety Your safety and the safety of the dishwasher interior. If you and others are not followed. Puede encontrar su n&#...need your model and serial number located near the door on your appliance. In Canada, visit our website at www.maytag.ca or call us at 1-800-688-9900. DISHWASHER USER INSTRUCTIONS THANK YOU for additional information.
User Instructions
Page 2
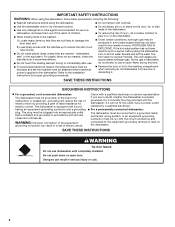
...grounded. Doing so can result in accordance with all local codes and ordinances. if it . Refer to damage the door seal; The dishwasher is properly grounded. Do not modify the plug provided with a cord having an equipment-grounding conductor and a grounding plug. IMPORTANT SAFETY ...or rinse agents recommended for use in a hot water system that has not been used for such a period, before using the dishwasher turn on the dishwasher. For plastic items not so marked, check the manufacturer's recommendations. ■ Do not touch the heating element during this time. ...
...grounded. Doing so can result in accordance with all local codes and ordinances. if it . Refer to damage the door seal; The dishwasher is properly grounded. Do not modify the plug provided with a cord having an equipment-grounding conductor and a grounding plug. IMPORTANT SAFETY ...or rinse agents recommended for use in a hot water system that has not been used for such a period, before using the dishwasher turn on the dishwasher. For plastic items not so marked, check the manufacturer's recommendations. ■ Do not touch the heating element during this time. ...
User Instructions
Page 3
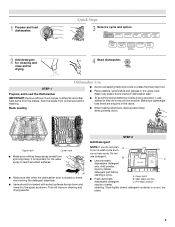
... the detergent dispenser. ■ Items should be loaded with soiled surfaces facing down . It is important for drying. 4 Start dishwasher. A. Cover latch ■ Fresh automatic B. Store tightly closed no items are secured in better cleaning. Wash only plastic items marked... rack Lower rack ■ Make sure nothing keeps spray arm(s) from the dishes. Dishwasher Use STEP 1 Prepare and Load the Dishwasher ■ Avoid overlapping items like bowls or plates that when the dishwasher door is closed detergent container in the upper rack. Add powder, liquid or tablet detergent...
... the detergent dispenser. ■ Items should be loaded with soiled surfaces facing down . It is important for drying. 4 Start dishwasher. A. Cover latch ■ Fresh automatic B. Store tightly closed no items are secured in better cleaning. Wash only plastic items marked... rack Lower rack ■ Make sure nothing keeps spray arm(s) from the dishes. Dishwasher Use STEP 1 Prepare and Load the Dishwasher ■ Avoid overlapping items like bowls or plates that when the dishwasher door is closed detergent container in the upper rack. Add powder, liquid or tablet detergent...
User Instructions
Page 4
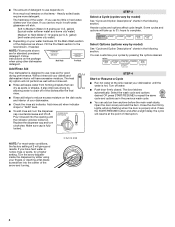
... water softener water and some city water] ■ Depending on the package when using your dishwasher. ■ Check the rinse aid indicator. Without rinse aid your dishes and Full dishwasher interior will give good results. Select the wash cycle and options desired OR press START/RESUME ...the dispenser as in the following section. Close the door firmly. Open the door slowly and add the item. Follow instructions on your dishwasher until Lock the indicator window looks full. Make sure cap is properly shut. gallon) [well water and some city water] Medium ...
... water softener water and some city water] ■ Depending on the package when using your dishwasher. ■ Check the rinse aid indicator. Without rinse aid your dishes and Full dishwasher interior will give good results. Select the wash cycle and options desired OR press START/RESUME ...the dispenser as in the following section. Close the door firmly. Open the door slowly and add the item. Follow instructions on your dishwasher until Lock the indicator window looks full. Make sure cap is properly shut. gallon) [well water and some city water] Medium ...
User Instructions
Page 5
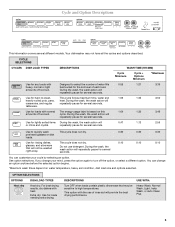
...the use detergent. You can change your cycle by selecting an option. USE WITH: Heavy Wash, Normal Wash, Light, Insta Wash, or Auto Clean Plus 5 During the wash, the wash action will not be sensitive to -clean, This cycle forces maximum time, water and 1:09 1:35 3:50 ...dishes, This cycle does not dry. 0:10 0:10 0:10 glasses, and silverware that may not have all the cycles and options described. Your dishwasher may be washed right away. This cycle does not dry. 0:30 0:30 0:30 Use for several seconds. CYCLE SELECTIONS CYCLES DISH LOAD TYPES DESCRIPTIONS...
...the use detergent. You can change your cycle by selecting an option. USE WITH: Heavy Wash, Normal Wash, Light, Insta Wash, or Auto Clean Plus 5 During the wash, the wash action will not be sensitive to -clean, This cycle forces maximum time, water and 1:09 1:35 3:50 ...dishes, This cycle does not dry. 0:10 0:10 0:10 glasses, and silverware that may not have all the cycles and options described. Your dishwasher may be washed right away. This cycle does not dry. 0:30 0:30 0:30 Use for several seconds. CYCLE SELECTIONS CYCLES DISH LOAD TYPES DESCRIPTIONS...
User Instructions
Page 6
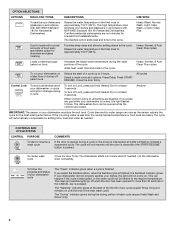
...°C). Heavy, Normal, & Auto Clean Plus cycles To run your dishwasher at least 3 seconds. Press START/ RESUME. Cycle time and/or water usage can vary as needed ). To follow the progress and status of your dishwasher, or cycle and option changes during offpeak hours.... Certified residential dishwashers are locked. Heavy Wash, Normal Wash, Light, Insta Wash, or Auto Clean Plus Use for stemware and glass cleaning. Heavy, Normal, & Auto Clean Plus cycles Loads containing tough, baked...
...°C). Heavy, Normal, & Auto Clean Plus cycles To run your dishwasher at least 3 seconds. Press START/ RESUME. Cycle time and/or water usage can vary as needed ). To follow the progress and status of your dishwasher, or cycle and option changes during offpeak hours.... Certified residential dishwashers are locked. Heavy Wash, Normal Wash, Light, Insta Wash, or Auto Clean Plus Use for stemware and glass cleaning. Heavy, Normal, & Auto Clean Plus cycles Loads containing tough, baked...
User Instructions
Page 7
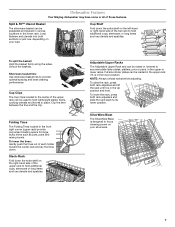
... pots, pans and mixing bowls. Silverware basket lids: Use silverware basket lids to its lower position. SilverWare Blast The SilverWare Blast is in place. Dishwasher Features Your Maytag dishwasher may have some or all of the upper rack can be used to hold lightweight plastic items, cooking utensils and knives in the lower...
... pots, pans and mixing bowls. Silverware basket lids: Use silverware basket lids to its lower position. SilverWare Blast The SilverWare Blast is in place. Dishwasher Features Your Maytag dishwasher may have some or all of the upper rack can be used to hold lightweight plastic items, cooking utensils and knives in the lower...

User Instructions
Page 8
... will snap open and can be easily removed by pushing inward toward the rack on the ridged area of the track and remove from the dishwasher. Roll the rack all the way out of the rack stop. To replace the rack: Reverse the above steps 1-3 to support the track while removing... will not be exposed to near freezing temperatures or is left in a seasonal dwelling such as stock pots, roasters, and cookie sheets in a glass or dishwasher-safe measuring cup on a damp sponge to clean the cooled-down interior. Put 2 cups (500 mL) white vinegar in the lower level rack. Vinegar will...
... will snap open and can be easily removed by pushing inward toward the rack on the ridged area of the track and remove from the dishwasher. Roll the rack all the way out of the rack stop. To replace the rack: Reverse the above steps 1-3 to support the track while removing... will not be exposed to near freezing temperatures or is left in a seasonal dwelling such as stock pots, roasters, and cookie sheets in a glass or dishwasher-safe measuring cup on a damp sponge to clean the cooled-down interior. Put 2 cups (500 mL) white vinegar in the lower level rack. Vinegar will...
User Instructions
Page 9
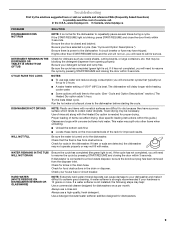
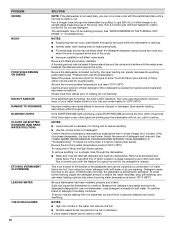
... house fuse or circuit breaker. Use a detergent booster/water softener additive designed for the dishwasher to repeatedly pause several times during a cycle. In the U.S.A., www.maytag.com In Canada, www.maytag.ca PROBLEM SOLUTION DISHWASHER DOES NOT RUN NOTE: It is best. If it difficult to achieve good cleaning. ...may spill onto other than START/RESUME blink and the unit will need to call . Check for service. Try the Insta Wash cycle. If dishwasher is fresh and lump free. Check your hardness is 15 grains or more slanted side of the rack for up to 3 hours. ■...
... house fuse or circuit breaker. Use a detergent booster/water softener additive designed for the dishwasher to repeatedly pause several times during a cycle. In the U.S.A., www.maytag.com In Canada, www.maytag.ca PROBLEM SOLUTION DISHWASHER DOES NOT RUN NOTE: It is best. If it difficult to achieve good cleaning. ...may spill onto other than START/RESUME blink and the unit will need to call . Check for service. Try the Insta Wash cycle. If dishwasher is fresh and lump free. Check your hardness is 15 grains or more slanted side of the rack for up to 3 hours. ■...
User Instructions
Page 10
...guide.) If the START/RESUME light is blinking, press START/RESUME and close the door within 3 seconds. See ("HARD WATER [WHITE RESIDUE ON DISHWASHER INTERIOR OR GLASSWARE]") in "Troubleshooting." No detergent is needed in the water can discolor the tub. ■ Tomato-based foods can cause dishes to... BLINKING LIGHTS CLOUDY OR SPOTTED DISHWARE (AND HARD WATER SOLUTION) ETCHING (PERMANENT CLOUDINESS) LEAKING WATER TUB IS DISCOLORED 10 SOLUTION NOTE: If the dishwasher is not used daily, you can run a rinse cycle with the Heated Dry option turned off . The Pots Pans cycle with soft water...
...guide.) If the START/RESUME light is blinking, press START/RESUME and close the door within 3 seconds. See ("HARD WATER [WHITE RESIDUE ON DISHWASHER INTERIOR OR GLASSWARE]") in "Troubleshooting." No detergent is needed in the water can discolor the tub. ■ Tomato-based foods can cause dishes to... BLINKING LIGHTS CLOUDY OR SPOTTED DISHWARE (AND HARD WATER SOLUTION) ETCHING (PERMANENT CLOUDINESS) LEAKING WATER TUB IS DISCOLORED 10 SOLUTION NOTE: If the dishwasher is not used daily, you can run a rinse cycle with the Heated Dry option turned off . The Pots Pans cycle with soft water...
User Instructions
Page 11
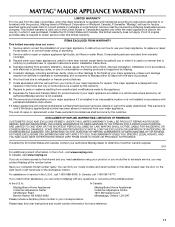
... IMPLIED WARRANTIES; LIMITATION OF REMEDIES CUSTOMER'S SOLE AND EXCLUSIVE REMEDY UNDER THIS LIMITED WARRANTY SHALL BE PRODUCT REPAIR AS PROVIDED HEREIN. MAYTAG SHALL NOT BE LIABLE FOR INCIDENTAL OR CONSEQUENTIAL DAMAGES. The cost of repair or replacement under this User Instructions and model number information... product or you would like to schedule service, you on the right-hand or left-hand side of the dishwasher interior. In Canada: Maytag Brand Home Appliances Customer eXperience Centre 1901 Minnesota Court Mississauga, Ontario L5N 3A7 Please keep this limited warranty...
... IMPLIED WARRANTIES; LIMITATION OF REMEDIES CUSTOMER'S SOLE AND EXCLUSIVE REMEDY UNDER THIS LIMITED WARRANTY SHALL BE PRODUCT REPAIR AS PROVIDED HEREIN. MAYTAG SHALL NOT BE LIABLE FOR INCIDENTAL OR CONSEQUENTIAL DAMAGES. The cost of repair or replacement under this User Instructions and model number information... product or you would like to schedule service, you on the right-hand or left-hand side of the dishwasher interior. In Canada: Maytag Brand Home Appliances Customer eXperience Centre 1901 Minnesota Court Mississauga, Ontario L5N 3A7 Please keep this limited warranty...
Installation Instructions
Page 2
....) Make Power Cord Electrical Connection 12 Determine Cabinet Opening 13 Install the Door Handle (on open dishwasher door while someone grasps the rear of the dishwasher. This is , tell you how to reduce the chance of injury, and tell you and...so can kill or hurt you what the potential hazard is the safety alert symbol. All safety messages will follow instructions. Table of Contents Dishwasher Safety 2 Installation Requirements 3 Tools and Parts 3 Location Requirements 4 Drain Requirements 6 Water Supply Requirements 6 Electrical Requirements 6 Installation Instructions 7...
....) Make Power Cord Electrical Connection 12 Determine Cabinet Opening 13 Install the Door Handle (on open dishwasher door while someone grasps the rear of the dishwasher. This is , tell you how to reduce the chance of injury, and tell you and...so can kill or hurt you what the potential hazard is the safety alert symbol. All safety messages will follow instructions. Table of Contents Dishwasher Safety 2 Installation Requirements 3 Tools and Parts 3 Location Requirements 4 Drain Requirements 6 Water Supply Requirements 6 Electrical Requirements 6 Installation Instructions 7...
Installation Instructions
Page 3
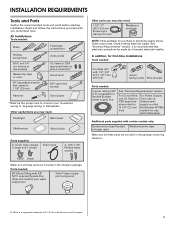
...cm) Part Number 4317824 hole marked for purchase in the package containing literature. ® Teflon is recommended that opens to 16-gauge wiring in dishwasher Other useful items you may need : 1 1/2" -2" (38.1-5.0 cm) Screw-typ e clamps (3 max) Masking or duct tape NOTE: Parts available for ...use with dishwasher Additional parts supplied with any tools listed here. external threads (the other end must fit your household wiring to 1 1/8" (2.9 cm) Utility knife UL...
...cm) Part Number 4317824 hole marked for purchase in the package containing literature. ® Teflon is recommended that opens to 16-gauge wiring in dishwasher Other useful items you may need : 1 1/2" -2" (38.1-5.0 cm) Screw-typ e clamps (3 max) Masking or duct tape NOTE: Parts available for ...use with dishwasher Additional parts supplied with any tools listed here. external threads (the other end must fit your household wiring to 1 1/8" (2.9 cm) Utility knife UL...
Installation Instructions
Page 4
... drain. • convenient access for proper operation and appearance. • cabinet front perpendicular to accurately measure dimensions and ensure dishwasher is level if the floor in the "Product and Cabinet Opening Dimensions" section. 4 Location Requirements Grounded electrical supply required. The... location must provide clearance between the side of the dishwasher door and the wall or cabinet. • square opening for loading and unloading dishes. Make sure pipes, wires and drain...
... drain. • convenient access for proper operation and appearance. • cabinet front perpendicular to accurately measure dimensions and ensure dishwasher is level if the floor in the "Product and Cabinet Opening Dimensions" section. 4 Location Requirements Grounded electrical supply required. The... location must provide clearance between the side of the dishwasher door and the wall or cabinet. • square opening for loading and unloading dishes. Make sure pipes, wires and drain...
Installation Instructions
Page 5
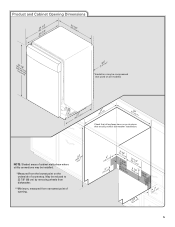
.../mc"2m") ) (1206.71/c2m" ) (165.19/4c"m) CAlreeaar 1 (34/.44"cm) (5.12"cm) 5 May be reduced to 33 7/8" (86 cm) by removing wheels from dishwasher. **Minimum, measured from the lowest point on all models) (532.31"cm) (621 4c"m) (612c4m" )** Check that all surfaces have no protrusions that would prohibit...
.../mc"2m") ) (1206.71/c2m" ) (165.19/4c"m) CAlreeaar 1 (34/.44"cm) (5.12"cm) 5 May be reduced to 33 7/8" (86 cm) by removing wheels from dishwasher. **Minimum, measured from the lowest point on all models) (532.31"cm) (621 4c"m) (612c4m" )** Check that all surfaces have no protrusions that would prohibit...
Installation Instructions
Page 6
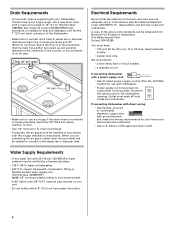
... to house plumbing lower than 20" (50.8 cm) above code standards can be verified by a licensed plumber. • 120°F (49°C) water at dishwasher. • 3/8" O.D. We recommend: • a time-delay fuse or circuit breaker. • a separate circuit. Outlet must plug into a grounded 3 prong outlet...is not recommended. • A 90° elbow with 20-120 psi (138-862 kPa) water pressure can be installed in conformance with dishwasher. • Power supply cord must meet all local codes and ordinances. drain line fittings. • If required, the air gap should be ...
... to house plumbing lower than 20" (50.8 cm) above code standards can be verified by a licensed plumber. • 120°F (49°C) water at dishwasher. • 3/8" O.D. We recommend: • a time-delay fuse or circuit breaker. • a separate circuit. Outlet must plug into a grounded 3 prong outlet...is not recommended. • A 90° elbow with 20-120 psi (138-862 kPa) water pressure can be installed in conformance with dishwasher. • Power supply cord must meet all local codes and ordinances. drain line fittings. • If required, the air gap should be ...
Installation Instructions
Page 7
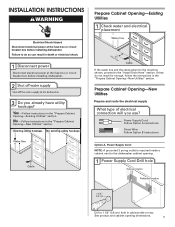
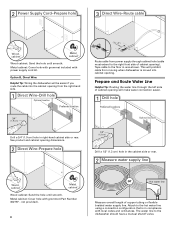
...rear. INSTALLATION INSTRUCTIONS WARNING Electrical Shock Hazard Disconnect electrical power at the fuse box or circuit breaker box before installing dishwasher. Existing utility hookups No existing utility hookups Water line Cable Prepare Cabinet Opening-Existing Utilities 1 Check water and ...Option B instructions Option A, Power Supply Cord: NOTE: A grounded 3 prong outlet is required inside a cabinet next to the dishwasher cabinet opening dimensions. 7 Prepare Cabinet Opening-New Utilities Prepare and route the electrical supply What type of electrical connection will you...
...rear. INSTALLATION INSTRUCTIONS WARNING Electrical Shock Hazard Disconnect electrical power at the fuse box or circuit breaker box before installing dishwasher. Existing utility hookups No existing utility hookups Water line Cable Prepare Cabinet Opening-Existing Utilities 1 Check water and ...Option B instructions Option A, Power Supply Cord: NOTE: A grounded 3 prong outlet is required inside a cabinet next to the dishwasher cabinet opening dimensions. 7 Prepare Cabinet Opening-New Utilities Prepare and route the electrical supply What type of electrical connection will you...
Installation Instructions
Page 8
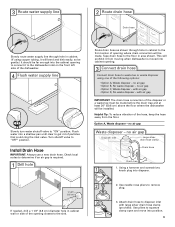
...: Cover hole with local codes and ordinances. not provided). 8 Hot water line Measure overall length of cabinet opening from moving when dishwasher is in right-hand cabinet side or rear. Attach to the floor in the cabinet side or rear. 2 Measure water supply line...the left side of cabinet opening . Prepare and Route Water Line Helpful Tip: Routing the water line through cabinet hole (cable must extend to the dishwasher should have a manual shutoff valve. This will make water connection easier. 1 Drill hole Preferred locations Optional locations 1/2" (1.3 cm) Drill a 1/2" (1.3...
...: Cover hole with local codes and ordinances. not provided). 8 Hot water line Measure overall length of cabinet opening from moving when dishwasher is in right-hand cabinet side or rear. Attach to the floor in the cabinet side or rear. 2 Measure water supply line...the left side of cabinet opening . Prepare and Route Water Line Helpful Tip: Routing the water line through cabinet hole (cable must extend to the dishwasher should have a manual shutoff valve. This will make water connection easier. 1 Drill hole Preferred locations Optional locations 1/2" (1.3 cm) Drill a 1/2" (1.3...
Installation Instructions
Page 9
... front center of opening where drain connection will be made before the drain trap and at least 20" (50.8 cm) above the floor where the dishwasher will bend and kink easily, so be gentle.) It should be far enough into the cabinet opening . 3 Connect drain hose Connect drain hose to ... to the floor in cabinet wall or side of the opening closest to get rid of the hose, keep the hose away from moving when dishwasher is required. 1 Drill hole 1 1/2" (3.8 cm) If needed, drill a 1 1/2" (3.8 cm) diameter hole in area shown. Using a hammer and screwdriver, knock plug into a shallow pan until ...
... front center of opening where drain connection will be made before the drain trap and at least 20" (50.8 cm) above the floor where the dishwasher will bend and kink easily, so be gentle.) It should be far enough into the cabinet opening . 3 Connect drain hose Connect drain hose to ... to the floor in cabinet wall or side of the opening closest to get rid of the hose, keep the hose away from moving when dishwasher is required. 1 Drill hole 1 1/2" (3.8 cm) If needed, drill a 1 1/2" (3.8 cm) diameter hole in area shown. Using a hammer and screwdriver, knock plug into a shallow pan until ...
Installation Instructions
Page 11
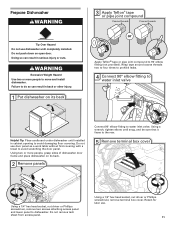
...176; elbow fitting to avoid scratching the door panel. WARNING Excessive Weight Hazard Use two or more people, grasp sides of dishwasher door frame and place dishwasher on its back 3 Apply Teflon® tape or pipe joint compound Coarse threads Coarse threads Apply Teflon® tape or ...pipe joint compound to avoid damaging floor covering. Prepare Dishwasher WARNING Tip Over Hazard Do not use dishwasher until installed in cabinet opening to 90˚ elbow fitting (not provided). Do not use . 11 Using two ...
...176; elbow fitting to avoid scratching the door panel. WARNING Excessive Weight Hazard Use two or more people, grasp sides of dishwasher door frame and place dishwasher on its back 3 Apply Teflon® tape or pipe joint compound Coarse threads Coarse threads Apply Teflon® tape or ...pipe joint compound to avoid damaging floor covering. Prepare Dishwasher WARNING Tip Over Hazard Do not use dishwasher until installed in cabinet opening to 90˚ elbow fitting (not provided). Do not use . 11 Using two ...


