
User Instructions
Page 1
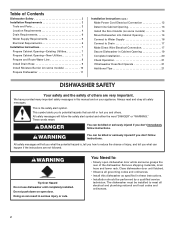
DISHWASHER USER INSTRUCTIONS THANK YOU for additional information. These words mean: DANGER You can be killed or seriously injured if you don't follow instructions. Para obtener acceso a "Instrucciones para el usuario de la lavavajillas" en español, o para información adicional de su producto visite : www.maytag.com Tenga listo su número de...
DISHWASHER USER INSTRUCTIONS THANK YOU for additional information. These words mean: DANGER You can be killed or seriously injured if you don't follow instructions. Para obtener acceso a "Instrucciones para el usuario de la lavavajillas" en español, o para información adicional de su producto visite : www.maytag.com Tenga listo su número de...
User Instructions
Page 2
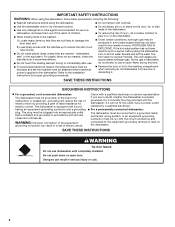
...intended function. ■ Use only detergents or rinse agents recommended for electric current. SAVE THESE INSTRUCTIONS GROUNDING INSTRUCTIONS ■ For a grounded, cord-connected dishwasher: The dishwasher must be plugged into an appropriate outlet that is installed and grounded in accordance with all hot ...EXPLOSIVE. The plug must be run with controls. ■ Do not abuse, sit on, or stand on the dishwasher. Refer to the installation instructions for several minutes. For plastic items not so marked, check the manufacturer's recommendations. ■ Do not touch the ...
...intended function. ■ Use only detergents or rinse agents recommended for electric current. SAVE THESE INSTRUCTIONS GROUNDING INSTRUCTIONS ■ For a grounded, cord-connected dishwasher: The dishwasher must be plugged into an appropriate outlet that is installed and grounded in accordance with all hot ...EXPLOSIVE. The plug must be run with controls. ■ Do not abuse, sit on, or stand on the dishwasher. Refer to the installation instructions for several minutes. For plastic items not so marked, check the manufacturer's recommendations. ■ Do not touch the ...
User Instructions
Page 4
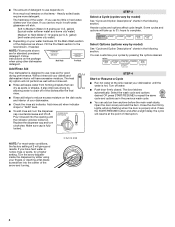
...designed to reduce excess moisture on your dishes and Full dishwasher interior will etch. Turn the arrow adjuster inside the dispenser by model) See "Cycle and Option Descriptions" charts in hard water, dishes won't be clean. Follow instructions on : How much in soft water, glassware will... have hard water or notice rings or spots, try a higher setting. STEP 3 Select a Cycle (cycles vary by either using other dishwasher detergent. You can dry as in the following ...
...designed to reduce excess moisture on your dishes and Full dishwasher interior will etch. Turn the arrow adjuster inside the dispenser by model) See "Cycle and Option Descriptions" charts in hard water, dishes won't be clean. Follow instructions on : How much in soft water, glassware will... have hard water or notice rings or spots, try a higher setting. STEP 3 Select a Cycle (cycles vary by either using other dishwasher detergent. You can dry as in the following ...
User Instructions
Page 9
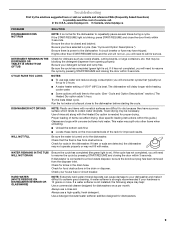
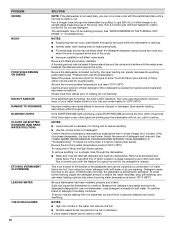
.... This water may help: Use a commercial cleaner designed for dishwashers once per month. If dishwasher is free from the disposer inlet. In the U.S.A., www.maytag.com In Canada, www.maytag.ca PROBLEM SOLUTION DISHWASHER DOES NOT RUN NOTE: It is needed for improved results. Use... cookie sheets, cutting boards, or large containers, etc. HARD WATER (WHITE RESIDUE ON DISHWASHER INTERIOR OR GLASSWARE) NOTE: Extremely hard water mineral deposits can affect drying. (See specific loading instructions within 3 seconds. Be sure you will need to call . A circuit breaker or ...
.... This water may help: Use a commercial cleaner designed for dishwashers once per month. If dishwasher is free from the disposer inlet. In the U.S.A., www.maytag.com In Canada, www.maytag.ca PROBLEM SOLUTION DISHWASHER DOES NOT RUN NOTE: It is needed for improved results. Use... cookie sheets, cutting boards, or large containers, etc. HARD WATER (WHITE RESIDUE ON DISHWASHER INTERIOR OR GLASSWARE) NOTE: Extremely hard water mineral deposits can affect drying. (See specific loading instructions within 3 seconds. Be sure you will need to call . A circuit breaker or ...
User Instructions
Page 10
...will not run, call for the type of detergent. Be sure the dishwasher is permanently damaged. The Pots Pans cycle with the Hi Temp option can be used to become chipped or damaged. (See specific loading instructions within this guide.) If the START/RESUME light is blinking, press ...500 mL) of : water that the cloudiness is removable by pre-washing. Detergent needs food soil to etching (see "Prepare and Load the Dishwasher"). PROBLEM ODORS NOISY FOOD SOILS REMAIN ON DISHES DID NOT SANITIZE DAMAGE TO DISHWARE BLINKING LIGHTS CLOUDY OR SPOTTED DISHWARE (AND HARD WATER SOLUTION) ...
...will not run, call for the type of detergent. Be sure the dishwasher is permanently damaged. The Pots Pans cycle with the Hi Temp option can be used to become chipped or damaged. (See specific loading instructions within this guide.) If the START/RESUME light is blinking, press ...500 mL) of : water that the cloudiness is removable by pre-washing. Detergent needs food soil to etching (see "Prepare and Load the Dishwasher"). PROBLEM ODORS NOISY FOOD SOILS REMAIN ON DISHES DID NOT SANITIZE DAMAGE TO DISHWARE BLINKING LIGHTS CLOUDY OR SPOTTED DISHWARE (AND HARD WATER SOLUTION) ...
User Instructions
Page 11
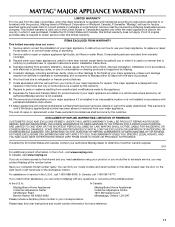
... the installation of your major appliance is located in a remote area where service by an authorized Maytag servicer is not installed in accordance with published installation instructions. 11. Repairs when your major appliance is used for product service if your major appliance for ... materials or workmanship. MAYTAG® MAJOR APPLIANCE WARRANTY LIMITED WARRANTY For one year from the date of purchase, when this major appliance is operated and maintained according to instructions attached to or furnished with the product, Maytag brand of the dishwasher interior. Service must ...
... the installation of your major appliance is located in a remote area where service by an authorized Maytag servicer is not installed in accordance with published installation instructions. 11. Repairs when your major appliance is used for product service if your major appliance for ... materials or workmanship. MAYTAG® MAJOR APPLIANCE WARRANTY LIMITED WARRANTY For one year from the date of purchase, when this major appliance is operated and maintained according to instructions attached to or furnished with the product, Maytag brand of the dishwasher interior. Service must ...
Installation Instructions
Page 2
... Route Water Line 8 Install Drain Hose 9 Install Moisture Barrier (on some models 10 Prepare Dishwasher 11 Installation Instructions (cont.) Make Power Cord Electrical Connection 12 Determine Cabinet Opening 13 Install the Door Handle (on some models 14 Move Dishwasher into Cabinet Opening 14 Connect to Water Supply 16 Connect to Drain 17 Make...
... Route Water Line 8 Install Drain Hose 9 Install Moisture Barrier (on some models 10 Prepare Dishwasher 11 Installation Instructions (cont.) Make Power Cord Electrical Connection 12 Determine Cabinet Opening 13 Install the Door Handle (on some models 14 Move Dishwasher into Cabinet Opening 14 Connect to Water Supply 16 Connect to Drain 17 Make...
Installation Instructions
Page 3
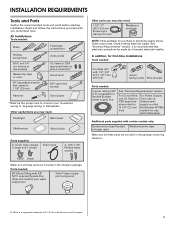
...may need : 1 1/2" -2" (38.1-5.0 cm) Screw-typ e clamps (3 max) Masking or duct tape NOTE: Parts available for use with dishwasher Additional parts supplied with any tools listed here. Check local codes. See "Electrical Requirements" section. It is a registered trademark of E.I. external ...to supply cord kit fit 7/8" (2.2 cm) Part Number 4317824 hole marked for purchase in the literature package. Read and follow the instructions provided with certain models only: Bottom sound pad (located Moisture barrier tape in lower rack) Make sure all these parts are included...
...may need : 1 1/2" -2" (38.1-5.0 cm) Screw-typ e clamps (3 max) Masking or duct tape NOTE: Parts available for use with dishwasher Additional parts supplied with any tools listed here. Check local codes. See "Electrical Requirements" section. It is a registered trademark of E.I. external ...to supply cord kit fit 7/8" (2.2 cm) Part Number 4317824 hole marked for purchase in the literature package. Read and follow the instructions provided with certain models only: Bottom sound pad (located Moisture barrier tape in lower rack) Make sure all these parts are included...
Installation Instructions
Page 6
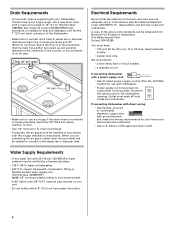
...drain hose is connected to house plumbing lower than 20" (50.8 cm) above drain trap in accordance with the air gap installation instructions. copper tubing with compression fitting or flexible braided water supply line (Part Number 4396897RP) NOTE: 1/2" minimum plastic tubing is supplied with ... drain line fittings. • If required, the air gap should be verified by a licensed plumber. • 120°F (49°C) water at dishwasher. • 3/8" O.D. Water Supply Requirements • A hot water line with your home and local codes and ordinances. • Use a UL listed ...
...drain hose is connected to house plumbing lower than 20" (50.8 cm) above drain trap in accordance with the air gap installation instructions. copper tubing with compression fitting or flexible braided water supply line (Part Number 4396897RP) NOTE: 1/2" minimum plastic tubing is supplied with ... drain line fittings. • If required, the air gap should be verified by a licensed plumber. • 120°F (49°C) water at dishwasher. • 3/8" O.D. Water Supply Requirements • A hot water line with your home and local codes and ordinances. • Use a UL listed ...
Installation Instructions
Page 7
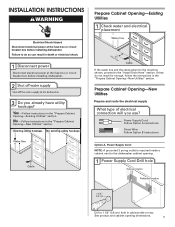
...(15.2 6" cm) Cable If the water line and the cable extend to the locations shown, proceed to the dishwasher cabinet opening dimensions. 7 No -Follow instructions in the "Prepare Cabinet Opening-Existing Utilities" section. Failure to do not reach far enough, follow the...or electrical shock. 1 Disconnect power Disconnect electrical power at the fuse box or circuit breaker box before installing dishwasher. 2 3 Do you use? Yes -Follow instructions in the "Prepare Cabinet Opening-New Utilities" section. Prepare Cabinet Opening-New Utilities Prepare and route the electrical ...
...(15.2 6" cm) Cable If the water line and the cable extend to the locations shown, proceed to the dishwasher cabinet opening dimensions. 7 No -Follow instructions in the "Prepare Cabinet Opening-Existing Utilities" section. Failure to do not reach far enough, follow the...or electrical shock. 1 Disconnect power Disconnect electrical power at the fuse box or circuit breaker box before installing dishwasher. 2 3 Do you use? Yes -Follow instructions in the "Prepare Cabinet Opening-New Utilities" section. Prepare Cabinet Opening-New Utilities Prepare and route the electrical ...
Installation Instructions
Page 12
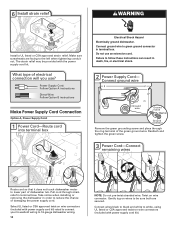
...grounding screw and place through strain relief in order to 16-gauge dishwasher wiring. 12 NOTE: Do not pre-twist stranded wire. Power Supply Cord: Follow Option A instructions Direct Wire: Follow Option B instructions Make Power Supply Cord Connection Option A, Power Supply Cord: 1 ...Power Cord-Route cord into terminal box Electrical Shock Hazard Electrically ground dishwasher. The strain relief may be sure both are...
...grounding screw and place through strain relief in order to 16-gauge dishwasher wiring. 12 NOTE: Do not pre-twist stranded wire. Power Supply Cord: Follow Option A instructions Direct Wire: Follow Option B instructions Make Power Supply Cord Connection Option A, Power Supply Cord: 1 ...Power Cord-Route cord into terminal box Electrical Shock Hazard Electrically ground dishwasher. The strain relief may be sure both are...
Installation Instructions
Page 13
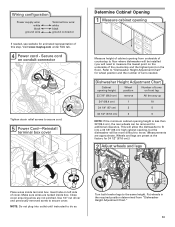
This will allow the dishwasher to fit into outlet until instructed to do so. 1 2 3 wheel Turn both leveler legs to "Dishwasher Height Adjustment Chart" for wheel position and the number of turns needed , see website for animated representation of turns on front leg 33 7/8" (86.0...opening height is less than 34"(86.4 cm), the rear wheels can be more difficult to secure cover. Refer to the same height. Visit www.maytag.com under FAQ tab. 4 Tighten strain relief screws to secure cord. 5 Power Cord-Reinstall terminal box cover Determine Cabinet Opening 1 Measure cabinet opening...
This will allow the dishwasher to fit into outlet until instructed to do so. 1 2 3 wheel Turn both leveler legs to "Dishwasher Height Adjustment Chart" for wheel position and the number of turns needed , see website for animated representation of turns on front leg 33 7/8" (86.0...opening height is less than 34"(86.4 cm), the rear wheels can be more difficult to secure cover. Refer to the same height. Visit www.maytag.com under FAQ tab. 4 Tighten strain relief screws to secure cord. 5 Power Cord-Reinstall terminal box cover Determine Cabinet Opening 1 Measure cabinet opening...
Installation Instructions
Page 14
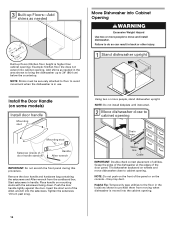
...not extend into cabinet opening. Insert the short end of the door panel. NOTE: Do not install kickplate until instructed. 2 Move dishwasher close to cabinet opening. Tilt dishwasher backward on some models) Install door handle Mounting stud Mounting stud Setscrew (inside of utilities. Helpful Tip: Temporarily ...placement of door handle standoff) Handle Allen wrench IMPORTANT: Do not scratch the front panel during this procedure. Grasp the sides of the dishwasher at the edges of the Allen wrench into the setscrews. 3 Built-up Floors-Add shims as needed (410".1 cm) (52c"m) 2-3(/...
...not extend into cabinet opening. Insert the short end of the door panel. NOTE: Do not install kickplate until instructed. 2 Move dishwasher close to cabinet opening. Tilt dishwasher backward on some models) Install door handle Mounting stud Mounting stud Setscrew (inside of utilities. Helpful Tip: Temporarily ...placement of door handle standoff) Handle Allen wrench IMPORTANT: Do not scratch the front panel during this procedure. Grasp the sides of the dishwasher at the edges of the Allen wrench into the setscrews. 3 Built-up Floors-Add shims as needed (410".1 cm) (52c"m) 2-3(/...

Installation Instructions
Page 18
Visit www.maytag.com/electrical under the washer. Make sure wires are not pinched. NOTE: Twist on left side of this step. .... 4 Direct Wire-Secure cable in terminal box. Close cover ensuring wires are tucked inside terminal box. Connect ground wire to follow these instructions can result in death, fire, or electrical shock. 2 Direct Wire-Connect ground wire Wiring configuration Power supply wire: white black ground wire... wire Ground wire Washer Ground connector Form bare ground wire into a U-shaped hook. WARNING Electrical Shock Hazard Electrically ground dishwasher.
Visit www.maytag.com/electrical under the washer. Make sure wires are not pinched. NOTE: Twist on left side of this step. .... 4 Direct Wire-Secure cable in terminal box. Close cover ensuring wires are tucked inside terminal box. Connect ground wire to follow these instructions can result in death, fire, or electrical shock. 2 Direct Wire-Connect ground wire Wiring configuration Power supply wire: white black ground wire... wire Ground wire Washer Ground connector Form bare ground wire into a U-shaped hook. WARNING Electrical Shock Hazard Electrically ground dishwasher.

Installation Instructions
Page 19
... and lower spray arm of dishwasher. If they do not rub against the screw heads. IMPORTANT: If you have solid countertops such as corrian, granite, etc., you must use side mounting kit (Part Number 8212560). Follow kit instructions. (Brackets are included with ...kit.) 2 Remove lower dish rack and place towel Check that space between dishwasher cabinet opening . Secure Dishwasher in Cabinet Opening 1 Double check dishwasher alignment in cabinet opening 4 Check door clearance Check that dishwasher is still level front...
... and lower spray arm of dishwasher. If they do not rub against the screw heads. IMPORTANT: If you have solid countertops such as corrian, granite, etc., you must use side mounting kit (Part Number 8212560). Follow kit instructions. (Brackets are included with ...kit.) 2 Remove lower dish rack and place towel Check that space between dishwasher cabinet opening . Secure Dishwasher in Cabinet Opening 1 Double check dishwasher alignment in cabinet opening 4 Check door clearance Check that dishwasher is still level front...

Installation Instructions
Page 21
... closed within 3 seconds. Additional Tips Expect longer wash times. Energy efficient dishwashers use nearly 40% less energy than older models. Check Operation ❏ Read the Dishwasher User Instructions that came with a low wattage, low energy consumption motor, your dishwasher. ❏ Check that dishwasher is designed to follow these solve the problem, call 1-800-688-9900...
... closed within 3 seconds. Additional Tips Expect longer wash times. Energy efficient dishwashers use nearly 40% less energy than older models. Check Operation ❏ Read the Dishwasher User Instructions that came with a low wattage, low energy consumption motor, your dishwasher. ❏ Check that dishwasher is designed to follow these solve the problem, call 1-800-688-9900...
Dimensions
Page 1
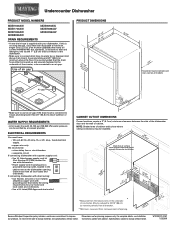
... or non-metallic sheathed, copper wire with grounding wire that would prevent dishwasher installation. (612c4m")** (86m3.44in"c*m) (10.42"cm) (7.63"cm) (167-.32/4cm" ) (14(2.6-43.-41/c4m/c2"m") ) (1206.-71/c2m") (165-.19/4cm" ) CAlereaar *MeaNustOiuliTrteyEd:cSforhnoanmdeecttdhioeanrlosewameoasfytcpbaobeiininntestotanwllatehldles. Instructions packed with a maximum length of 12' (3.7 m) (Part Number 3385556) that the drain...
... or non-metallic sheathed, copper wire with grounding wire that would prevent dishwasher installation. (612c4m")** (86m3.44in"c*m) (10.42"cm) (7.63"cm) (167-.32/4cm" ) (14(2.6-43.-41/c4m/c2"m") ) (1206.-71/c2m") (165-.19/4cm" ) CAlereaar *MeaNustOiuliTrteyEd:cSforhnoanmdeecttdhioeanrlosewameoasfytcpbaobeiininntestotanwllatehldles. Instructions packed with a maximum length of 12' (3.7 m) (Part Number 3385556) that the drain...
