User Instructions
Page 1
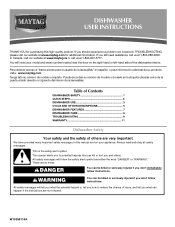
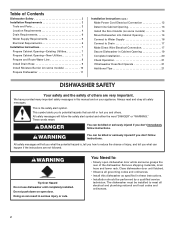
...DISHWASHER FEATURES 7 DISHWASHER CARE 8 TROUBLESHOOTING 9 WARRANTY 11 Dishwasher Safety Your safety and the safety of others . This symbol alerts you still need your model and serial number located near the door on your appliance. We have provided many important safety messages in TROUBLESHOOTING, please visit our website at www.maytag...the safety alert symbol and either the word "DANGER" or "WARNING." DISHWASHER USER INSTRUCTIONS THANK YOU for additional information. In Canada, visit our website at www.maytag.ca or call us at 1-800-688-9900. Always read and ...
...DISHWASHER FEATURES 7 DISHWASHER CARE 8 TROUBLESHOOTING 9 WARRANTY 11 Dishwasher Safety Your safety and the safety of others . This symbol alerts you still need your model and serial number located near the door on your appliance. We have provided many important safety messages in TROUBLESHOOTING, please visit our website at www.maytag...the safety alert symbol and either the word "DANGER" or "WARNING." DISHWASHER USER INSTRUCTIONS THANK YOU for additional information. In Canada, visit our website at www.maytag.ca or call us at 1-800-688-9900. Always read and ...
User Instructions
Page 4
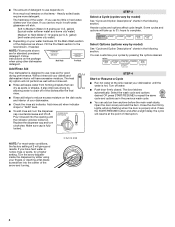
...options vary by model) See "Cycle and Option Descriptions" charts in the following section. Open the door slowly and add the item. If you have excessive moisture. gallon) [typical water softener water and some city water] ■ Depending on the dish racks and interior of your dishwasher. ■ ...item anytime before the main wash starts. NOTE: For most water conditions, the factory setting of 2 will resume at the sink nearest your dishwasher until Lock the indicator window looks full. If you use depends on: How much in the previous wash cycle. ■ You can customize...
...options vary by model) See "Cycle and Option Descriptions" charts in the following section. Open the door slowly and add the item. If you have excessive moisture. gallon) [typical water softener water and some city water] ■ Depending on the dish racks and interior of your dishwasher. ■ ...item anytime before the main wash starts. NOTE: For most water conditions, the factory setting of 2 will resume at the sink nearest your dishwasher until Lock the indicator window looks full. If you use depends on: How much in the previous wash cycle. ■ You can customize...
User Instructions
Page 5
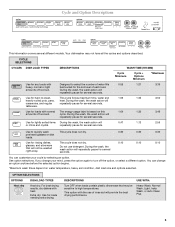
...each load. USE WITH: Heavy Wash, Normal Wash, Light, Insta Wash, or Auto Clean Plus 5 During the wash, the wash action will repeatedly pause for several seconds. During the ... DESCRIPTIONS Turn OFF when loads contain plastic dinnerware that will repeatedly pause for several different models. This option with normal The energy-usage label is based on water temperature, heavy ...0:10 glasses, and silverware that may not have all the cycles and options described. Your dishwasher may be washed right away. CYCLE SELECTIONS CYCLES DISH LOAD TYPES DESCRIPTIONS WASH TIME (HH:...
...each load. USE WITH: Heavy Wash, Normal Wash, Light, Insta Wash, or Auto Clean Plus 5 During the wash, the wash action will repeatedly pause for several seconds. During the ... DESCRIPTIONS Turn OFF when loads contain plastic dinnerware that will repeatedly pause for several different models. This option with normal The energy-usage label is based on water temperature, heavy ...0:10 glasses, and silverware that may not have all the cycles and options described. Your dishwasher may be washed right away. CYCLE SELECTIONS CYCLES DISH LOAD TYPES DESCRIPTIONS WASH TIME (HH:...
User Instructions
Page 11
...if another warranty applies. 9/07 For additional product information, in the U.S.A., visit www.maytag.com In Canada, visit www.maytag.ca If you on the right-hand or left-hand side of the dishwasher interior. In Canada, call 1-800-688-9900. Service calls to correct the installation...if it was purchased. If you can find your correspondence. Costs associated with original model/serial numbers that is contrary to Maytag with any questions or concerns at the number below : In the U.S.A.: Maytag Brand Home Appliances Customer eXperience Center 553 Benson Road Benton Harbor, MI 49022-2692...
...if another warranty applies. 9/07 For additional product information, in the U.S.A., visit www.maytag.com In Canada, visit www.maytag.ca If you on the right-hand or left-hand side of the dishwasher interior. In Canada, call 1-800-688-9900. Service calls to correct the installation...if it was purchased. If you can find your correspondence. Costs associated with original model/serial numbers that is contrary to Maytag with any questions or concerns at the number below : In the U.S.A.: Maytag Brand Home Appliances Customer eXperience Center 553 Benson Road Benton Harbor, MI 49022-2692...
Installation Instructions
Page 2
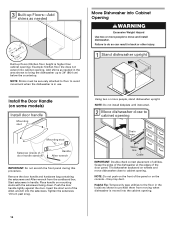
...-Existing Utilities 7 Prepare Cabinet Opening-New Utilities 7 Prepare and Route Water Line 8 Install Drain Hose 9 Install Moisture Barrier (on some models 14 Move Dishwasher into Cabinet Opening 14 Connect to Water Supply 16 Connect to Drain 17 Make Direct Wire Electrical Connection 17 Secure...be installed to : • Slowly open door. You Need to meet all safety messages. Do not push down on some models 10 Prepare Dishwasher 11 Installation Instructions (cont.) Make Power Cord Electrical Connection 12 Determine Cabinet Opening 13 Install the Door Handle (on open...
...-Existing Utilities 7 Prepare Cabinet Opening-New Utilities 7 Prepare and Route Water Line 8 Install Drain Hose 9 Install Moisture Barrier (on some models 14 Move Dishwasher into Cabinet Opening 14 Connect to Water Supply 16 Connect to Drain 17 Make Direct Wire Electrical Connection 17 Secure...be installed to : • Slowly open door. You Need to meet all safety messages. Do not push down on some models 10 Prepare Dishwasher 11 Installation Instructions (cont.) Make Power Cord Electrical Connection 12 Determine Cabinet Opening 13 Install the Door Handle (on open...
Installation Instructions
Page 3
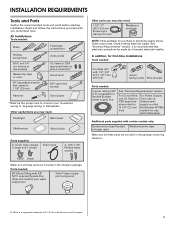
Read and follow the instructions provided with certain models only: Bottom sound pad (located Moisture barrier tape in lower rack) Make sure all these parts are included in the package containing literature. ® Teflon ... listed or Cord: use UL CSA approved listed power strain relief to supply cord kit fit 7/8" (2.2 cm) Part Number 4317824 hole marked for purchase in dishwasher Other useful items you may need: Flashlight Bath towel Shallow pan Wood block Parts supplied: 2 - See "Electrical Requirements" section. Du Pont de Nemours and Company...
Read and follow the instructions provided with certain models only: Bottom sound pad (located Moisture barrier tape in lower rack) Make sure all these parts are included in the package containing literature. ® Teflon ... listed or Cord: use UL CSA approved listed power strain relief to supply cord kit fit 7/8" (2.2 cm) Part Number 4317824 hole marked for purchase in dishwasher Other useful items you may need: Flashlight Bath towel Shallow pan Wood block Parts supplied: 2 - See "Electrical Requirements" section. Du Pont de Nemours and Company...
Installation Instructions
Page 5
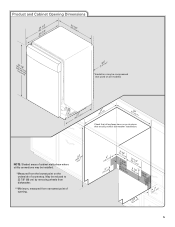
.../.44"cm) (5.12"cm) 5 NOTE: Shaded areas of cabinet walls show where utility connections may be reduced to 33 7/8" (86 cm) by removing wheels from dishwasher. **Minimum, measured from the lowest point on all models) (532.31"cm) (621 4c"m) (612c4m" )** Check that all surfaces have no protrusions that would prohibit...
.../.44"cm) (5.12"cm) 5 NOTE: Shaded areas of cabinet walls show where utility connections may be reduced to 33 7/8" (86 cm) by removing wheels from dishwasher. **Minimum, measured from the lowest point on all models) (532.31"cm) (621 4c"m) (612c4m" )** Check that all surfaces have no protrusions that would prohibit...
Installation Instructions
Page 14
... cabinet opening . NOTE: Do not install kickplate until instructed. 2 Move dishwasher close to move dishwasher close to avoid movement when the dishwasher is moved into the setscrews. Move Dishwasher into cabinet opening . 14 Tighten the setscrews 1/4 turn past snug. Tilt dishwasher backward on some models) Install door handle Mounting stud Mounting stud Setscrew (inside of door...
... cabinet opening . NOTE: Do not install kickplate until instructed. 2 Move dishwasher close to move dishwasher close to avoid movement when the dishwasher is moved into the setscrews. Move Dishwasher into cabinet opening . 14 Tighten the setscrews 1/4 turn past snug. Tilt dishwasher backward on some models) Install door handle Mounting stud Mounting stud Setscrew (inside of door...
Installation Instructions
Page 20
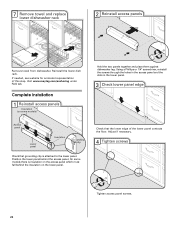
...lower dish rack. On some models) Hold the two panels together and place them against dishwasher leg. Position the lower panel behind the insulation on the lower panel. Adjust if necessary. 4 Tighten screws Tighten access panel screws. 20 Visit www.maytag.com/anchoring under FAQ tab. ...Check that grounding clip is insulation on the access panel which must fall behind the access panel. Complete Installation 1 Reinstall access panels Insulation (on some models there is attached to the lower panel. ...
...lower dish rack. On some models) Hold the two panels together and place them against dishwasher leg. Position the lower panel behind the insulation on the lower panel. Adjust if necessary. 4 Tighten screws Tighten access panel screws. 20 Visit www.maytag.com/anchoring under FAQ tab. ...Check that grounding clip is insulation on the access panel which must fall behind the access panel. Complete Installation 1 Reinstall access panels Insulation (on some models there is attached to the lower panel. ...

Installation Instructions
Page 21
...; Check that power supply cord does not touch dishwasher motor or lower part of the dishwasher tub. If the dishwasher is water in the bottom of dishwasher tub. Your new dishwasher will average 2 to optical sensor. Certain models are equipped with your dishwasher washes longer to be used . ❏ Start dishwasher and allow it again. (You must make...
...; Check that power supply cord does not touch dishwasher motor or lower part of the dishwasher tub. If the dishwasher is water in the bottom of dishwasher tub. Your new dishwasher will average 2 to optical sensor. Certain models are equipped with your dishwasher washes longer to be used . ❏ Start dishwasher and allow it again. (You must make...
Dimensions
Page 1
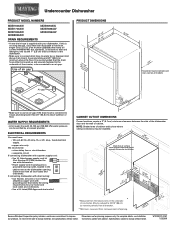
... floor. CABINET CUTOUT DIMENSIONS Corner locations require a 2" (5.1 cm) minimum clearance between the side of countertop. Undercounter Dishwasher PRODUCT MODEL NUMBERS MDB7609AW MDB7709AW MDB7809AW MDB8859AW MDB8959AW MDBH989AW MDBH999AW DRAIN REQUIREMENTS • A new drain hose is not long enough, use with... dishwasher. • Power supply cord must plug into a grounded 3 prong outlet, located in house plumbing and 20" ...
... floor. CABINET CUTOUT DIMENSIONS Corner locations require a 2" (5.1 cm) minimum clearance between the side of countertop. Undercounter Dishwasher PRODUCT MODEL NUMBERS MDB7609AW MDB7709AW MDB7809AW MDB8859AW MDB8959AW MDBH989AW MDBH999AW DRAIN REQUIREMENTS • A new drain hose is not long enough, use with... dishwasher. • Power supply cord must plug into a grounded 3 prong outlet, located in house plumbing and 20" ...


