
Owners Manual
Page 1
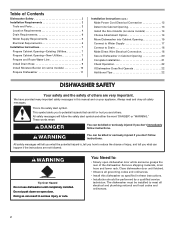
... chemicals known to cause cancer. All safety messages will need assistance, call us at 1-800-688-9900. You will follow instructions. Table of Contents DISHWASHER SAFETY 1 QUICK STEPS 3 DISHWASHER USE 3 CYCLE AND OPTION DESCRIPTIONS 5 DISHWASHER FEATURES 7 DISHWASHER CARE 8 TROUBLESHOOTING 9 WARRANTY 11 Dishwasher Safety Your safety and the safety of California to the State of others . DISHWASHER USER INSTRUCTIONS THANK YOU for additional information. This is , tell...
... chemicals known to cause cancer. All safety messages will need assistance, call us at 1-800-688-9900. You will follow instructions. Table of Contents DISHWASHER SAFETY 1 QUICK STEPS 3 DISHWASHER USE 3 CYCLE AND OPTION DESCRIPTIONS 5 DISHWASHER FEATURES 7 DISHWASHER CARE 8 TROUBLESHOOTING 9 WARRANTY 11 Dishwasher Safety Your safety and the safety of California to the State of others . DISHWASHER USER INSTRUCTIONS THANK YOU for additional information. This is , tell...
Owners Manual
Page 2
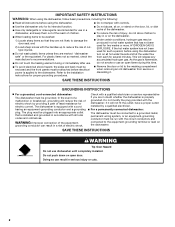
... and the front panels must be attached before using the dishwasher. ■ Use the dishwasher only for its intended function. ■ Use only detergents or rinse agents recommended for use dishwasher until completely installed. HYDROGEN GAS IS EXPLOSIVE. WARNING: Improper connection of least resistance for two weeks or more. and 2) Load sharp knives with the handles up to the washing compartment when removing an old dishwasher from each...
... and the front panels must be attached before using the dishwasher. ■ Use the dishwasher only for its intended function. ■ Use only detergents or rinse agents recommended for use dishwasher until completely installed. HYDROGEN GAS IS EXPLOSIVE. WARNING: Improper connection of least resistance for two weeks or more. and 2) Load sharp knives with the handles up to the washing compartment when removing an old dishwasher from each...
Owners Manual
Page 3
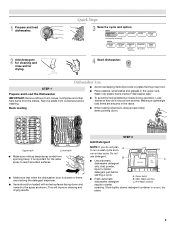
... down . It is closed detergent container in better cleaning. Store tightly closed no items are secured in the upper rack. IMPORTANT: Remove leftover food, bones, toothpicks and other hard items from containers before starting a cycle. B ■ Use automatic dishwasher detergent Hard Water Soft Water Hard Water Soft Water C PRE- Pre-Wash section results in a cool, dry place. 3 Remove labels from the dishes. Upper rack Lower rack ■ Make sure nothing keeps spray arm(s) from spinning freely...
... down . It is closed detergent container in better cleaning. Store tightly closed no items are secured in the upper rack. IMPORTANT: Remove leftover food, bones, toothpicks and other hard items from containers before starting a cycle. B ■ Use automatic dishwasher detergent Hard Water Soft Water Hard Water Soft Water C PRE- Pre-Wash section results in a cool, dry place. 3 Remove labels from the dishes. Upper rack Lower rack ■ Make sure nothing keeps spray arm(s) from spinning freely...
Owners Manual
Page 4
... turning. -- - ¹⁄₄ turn clockwise. Close the door firmly. gallon) [well water and some city water] Medium to complete. Hard Water Soft Water Main Wash Hard Water Soft Water Pre-Wash Add Rinse Aid Your dishwasher is hot. The heat dry option will resume at the sink nearest your cycles by model) See "Cycle and Option Descriptions" charts in the following section. Replace the dispenser cap and turn to the level shown, if needed. Select the wash cycle...
... turning. -- - ¹⁄₄ turn clockwise. Close the door firmly. gallon) [well water and some city water] Medium to complete. Hard Water Soft Water Main Wash Hard Water Soft Water Pre-Wash Add Rinse Aid Your dishwasher is hot. The heat dry option will resume at the sink nearest your cycles by model) See "Cycle and Option Descriptions" charts in the following section. Replace the dispenser cap and turn to the level shown, if needed. Select the wash cycle...
Owners Manual
Page 5
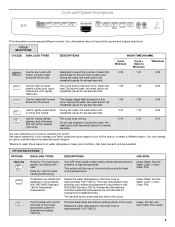
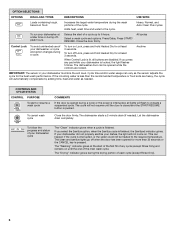
..., heat. Use for loads with NSF/ANSI Standard 184 for any loads with heat. Heavy Wash, Normal Wash, Light, or Auto Clean Plus To sanitize your cycle by adding steam to the cycle. CYCLE SELECTIONS CYCLES DISH LOAD TYPES DESCRIPTIONS WASH TIME (HH:MM) Use for Residential Dishwashers. Cycle Minimum 0:55 Cycle + Options Minimum 1:21 *Maximum 3:39 Use for hard-to select the number of each load. You can customize your dishes and glassware in the final rinse to high temperatures. Turn...
..., heat. Use for loads with NSF/ANSI Standard 184 for any loads with heat. Heavy Wash, Normal Wash, Light, or Auto Clean Plus To sanitize your cycle by adding steam to the cycle. CYCLE SELECTIONS CYCLES DISH LOAD TYPES DESCRIPTIONS WASH TIME (HH:MM) Use for Residential Dishwashers. Cycle Minimum 0:55 Cycle + Options Minimum 1:21 *Maximum 3:39 Use for hard-to select the number of each load. You can customize your dishes and glassware in the final rinse to high temperatures. Turn...
Owners Manual
Page 6
... water could not be heated to indicate a suspended cycle. The "Drying" indicator glows during the wash portions of your dishes, the light will automatically compensate by adding time, heat and water as the sensor adjusts the cycle for at least 3 seconds. Heavy, Normal, and Auto Clean Plus cycles To run your dishwasher monitors the soil level. Press START/ RESUME. If you select the Sanitize option, when the Sanitize cycle is less than 30 seconds or the CANCEL...
... water could not be heated to indicate a suspended cycle. The "Drying" indicator glows during the wash portions of your dishes, the light will automatically compensate by adding time, heat and water as the sensor adjusts the cycle for at least 3 seconds. Heavy, Normal, and Auto Clean Plus cycles To run your dishwasher monitors the soil level. Press START/ RESUME. If you select the Sanitize option, when the Sanitize cycle is less than 30 seconds or the CANCEL...
Owners Manual
Page 8
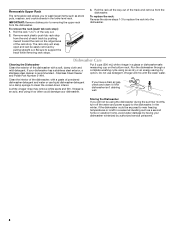
... lower level rack. Do not use liquid dishwasher detergent on the bottom rack. To replace the rack: Reverse the above steps 1-3 to removing the upper rack from the dishwasher. If your dishwasher. Stainless Steel Cleaner and Polish Part Number 31464. Vinegar is an acid, and using it if the dishwasher isn't draining well. If you have a drain air gap, check and clean it too often could be easily removed by authorized service personnel. 8 IMPORTANT: Remove dishes prior to replace the rack...
... lower level rack. Do not use liquid dishwasher detergent on the bottom rack. To replace the rack: Reverse the above steps 1-3 to removing the upper rack from the dishwasher. If your dishwasher. Stainless Steel Cleaner and Polish Part Number 31464. Vinegar is an acid, and using it if the dishwasher isn't draining well. If you have a drain air gap, check and clean it too often could be easily removed by authorized service personnel. 8 IMPORTANT: Remove dishes prior to replace the rack...
Owners Manual
Page 9
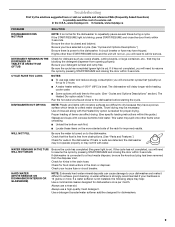
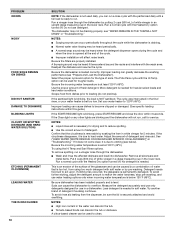
... drying. (See specific loading instructions within 3 seconds. Always use a rinse aid. If lights other items when unloading. ■ Unload the bottom rack first. ■ Locate these items on ). If it difficult to achieve good cleaning. Check for kinks in the drain or disposer. In the U.S.A., www.maytag.com In Canada, www.maytag.ca PROBLEM SOLUTION DISHWASHER DOES NOT RUN NOTE: It is blinking, press START/RESUME and close to the dishwasher...
... drying. (See specific loading instructions within 3 seconds. Always use a rinse aid. If lights other items when unloading. ■ Unload the bottom rack first. ■ Locate these items on ). If it difficult to achieve good cleaning. Check for kinks in the drain or disposer. In the U.S.A., www.maytag.com In Canada, www.maytag.ca PROBLEM SOLUTION DISHWASHER DOES NOT RUN NOTE: It is blinking, press START/RESUME and close to the dishwasher...
Owners Manual
Page 10
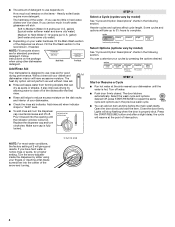
... rinse aid leaking from dishes prior to overflow. Be sure the incoming water temperature is level. Scrape food from the dispenser, be used for service. NOTES: ■ Liquid rinse aid is necessary for use only detergents designed for drying and to run. To remove spotting, run a vinegar rinse through the dishwasher by pre-washing. Detergent needs food soil to become chipped or damaged. (See specific loading instructions within this guide.) If the START/RESUME light is set too low. Run a normal cycle...
... rinse aid leaking from dishes prior to overflow. Be sure the incoming water temperature is level. Scrape food from the dispenser, be used for service. NOTES: ■ Liquid rinse aid is necessary for use only detergents designed for drying and to run. To remove spotting, run a vinegar rinse through the dishwasher by pre-washing. Detergent needs food soil to become chipped or damaged. (See specific loading instructions within this guide.) If the START/RESUME light is set too low. Run a normal cycle...
Owners Manual
Page 11
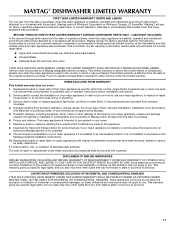
... 10-year warranty on how to use your major appliance, to replace or repair house fuses, or to correct house wiring or plumbing. 3. This limited warranty is used in a manner that is inconsistent to published user or operator instructions and/or installation instructions. 2. Cosmetic damage, including scratches, dents, chips or other than normal, single-family household use of products not approved by an authorized Maytag servicer is not...
... 10-year warranty on how to use your major appliance, to replace or repair house fuses, or to correct house wiring or plumbing. 3. This limited warranty is used in a manner that is inconsistent to published user or operator instructions and/or installation instructions. 2. Cosmetic damage, including scratches, dents, chips or other than normal, single-family household use of products not approved by an authorized Maytag servicer is not...
Installation Instructions
Page 2
...7 Prepare Cabinet Opening-New Utilities 7 Prepare and Route Water Line 8 Install Drain Hose 9 Install Moisture Barrier (on some models 10 Prepare Dishwasher 11 Installation Instructions (cont.) Make Power Cord Electrical Connection 12 Determine Cabinet Opening 13 Install the Door Handle (on some models 14 Choose Attachment Option 14 Move Dishwasher into Cabinet Opening 15 Connect to Water Supply 17 Connect to Drain 18 Make Direct Wire Electrical Connection 18 Secure Dishwasher in Cabinet Opening 20 Complete Installation 21 Check Operation 22 If Dishwasher Does Not Operate 22...
...7 Prepare Cabinet Opening-New Utilities 7 Prepare and Route Water Line 8 Install Drain Hose 9 Install Moisture Barrier (on some models 10 Prepare Dishwasher 11 Installation Instructions (cont.) Make Power Cord Electrical Connection 12 Determine Cabinet Opening 13 Install the Door Handle (on some models 14 Choose Attachment Option 14 Move Dishwasher into Cabinet Opening 15 Connect to Water Supply 17 Connect to Drain 18 Make Direct Wire Electrical Connection 18 Secure Dishwasher in Cabinet Opening 20 Complete Installation 21 Check Operation 22 If Dishwasher Does Not Operate 22...
Installation Instructions
Page 3
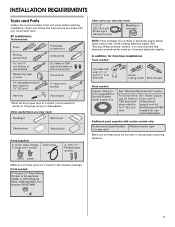
... Power Supply Cord: use with dishwasher Additional parts supplied with any tools listed here. In addition, for first-time installations Tools needed: Cordless drill with and 1¹⁄₂ " hole saw bits Small tubing cutter Wire stripper Parts needed : Pliers Flat-blade screwdriver Phillips screwdriver and ¹⁄₄" nut drivers or hex sockets Measuring tape or ruler 10" adjustable wrench that electrical connections be the proper size to connect...
... Power Supply Cord: use with dishwasher Additional parts supplied with any tools listed here. In addition, for first-time installations Tools needed: Cordless drill with and 1¹⁄₂ " hole saw bits Small tubing cutter Wire stripper Parts needed : Pliers Flat-blade screwdriver Phillips screwdriver and ¹⁄₄" nut drivers or hex sockets Measuring tape or ruler 10" adjustable wrench that electrical connections be the proper size to connect...
Installation Instructions
Page 4
... pipes, wires and drain hose are within the shaded area shown in a location where it winterized by the warranty. Do not run drain lines, water lines or electrical wiring where they can interfere with floor at the end of opening, shims may be installed. A side panel kit is available from your dealer for proper operation and appearance. • cabinet front perpendicular to freezing, have it may be needed to level dishwasher.) Helpful...
... pipes, wires and drain hose are within the shaded area shown in a location where it winterized by the warranty. Do not run drain lines, water lines or electrical wiring where they can interfere with floor at the end of opening, shims may be installed. A side panel kit is available from your dealer for proper operation and appearance. • cabinet front perpendicular to freezing, have it may be needed to level dishwasher.) Helpful...
Installation Instructions
Page 6
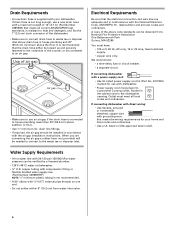
... wire with grounding wire that the electrical connection and wire size are connecting the air gap a rubber hose (not provided) will be obtained from water inlet valve. 6 A copy of air gap Air gap • Make sure to use with dishwasher. • Power supply cord must plug into a grounded 3 prong outlet, located in the cabinet next to the dishwasher opening. It is recommended that meets all current AHAM/IAPMO test standards, is not long enough, use a new drain hose with a maximum length of 12' (3.7 m) (Part Number...
... wire with grounding wire that the electrical connection and wire size are connecting the air gap a rubber hose (not provided) will be obtained from water inlet valve. 6 A copy of air gap Air gap • Make sure to use with dishwasher. • Power supply cord must plug into a grounded 3 prong outlet, located in the cabinet next to the dishwasher opening. It is recommended that meets all current AHAM/IAPMO test standards, is not long enough, use a new drain hose with a maximum length of 12' (3.7 m) (Part Number...

Installation Instructions
Page 7
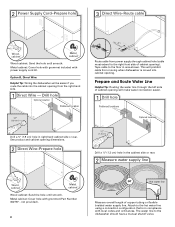
...box or circuit breaker box before installing dishwasher. 2 3 Do you use? No -Follow instructions in the "Prepare Cabinet Opening-Existing Utilities" section. Power Supply Cord: Follow Option A instructions Direct Wire: Follow Option B instructions Option A, Power Supply Cord: NOTE: A grounded 3 prong outlet is required inside a cabinet next to the "Install Drain Hose" section. Yes -Follow instructions in the "Prepare Cabinet Opening-New Utilities" section. INSTALLATION INSTRUCTIONS WARNING Electrical Shock Hazard Disconnect electrical power at the fuse box or circuit breaker box...
...box or circuit breaker box before installing dishwasher. 2 3 Do you use? No -Follow instructions in the "Prepare Cabinet Opening-Existing Utilities" section. Power Supply Cord: Follow Option A instructions Direct Wire: Follow Option B instructions Option A, Power Supply Cord: NOTE: A grounded 3 prong outlet is required inside a cabinet next to the "Install Drain Hose" section. Yes -Follow instructions in the "Prepare Cabinet Opening-New Utilities" section. INSTALLATION INSTRUCTIONS WARNING Electrical Shock Hazard Disconnect electrical power at the fuse box or circuit breaker box...
Installation Instructions
Page 8
... the dishwasher should have a manual shutoff valve. Metal cabinet: Cover hole with power supply cord kit. Option B, Direct Wire: Helpful Tip: Wiring the dishwasher will be easier if you route the cable into cabinet opening will prohibit cable from moving when dishwasher is in area shown. not provided). 8 Hot water line Measure overall length of cabinet opening dimensions. 2 Direct Wire-Prepare hole (15.2 6" cm) Route cable from the right-hand side. 1 Direct Wire - The water line to...
... the dishwasher should have a manual shutoff valve. Metal cabinet: Cover hole with power supply cord kit. Option B, Direct Wire: Helpful Tip: Wiring the dishwasher will be easier if you route the cable into cabinet opening will prohibit cable from moving when dishwasher is in area shown. not provided). 8 Hot water line Measure overall length of cabinet opening dimensions. 2 Direct Wire-Prepare hole (15.2 6" cm) Route cable from the right-hand side. 1 Direct Wire - The water line to...
Installation Instructions
Page 9
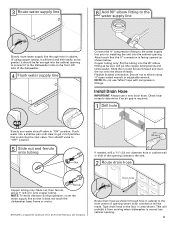
...). NOTE: Do not use a new drain hose. Drain hose Route drain hose as shown through hole in cabinet. (If using ⁵⁄₈" open ended wrench or adjustable wrench. Du Pont De Nemours and Company. Check local codes to determine if an air gap is required. 1 Drill hole Slowly turn water shutoff valve to the floor in area shown. Tape drain hose to "ON" position. Flush water into cabinet opening closest to get rid...
...). NOTE: Do not use a new drain hose. Drain hose Route drain hose as shown through hole in cabinet. (If using ⁵⁄₈" open ended wrench or adjustable wrench. Du Pont De Nemours and Company. Check local codes to determine if an air gap is required. 1 Drill hole Slowly turn water shutoff valve to the floor in area shown. Tape drain hose to "ON" position. Flush water into cabinet opening closest to get rid...
Installation Instructions
Page 14
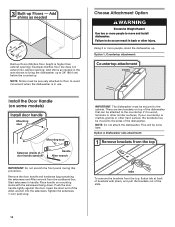
3 Built-up . Add shims as needed in the area shown to bring the dishwasher up floors (Kitchen floor height is in use. Push the door handle tightly against the door. Option 2, Dishwasher side attachment: 1 Remove brackets from the top tabs To remove the brackets from the cardboard box. IMPORTANT: The dishwasher must be secured to avoid movement when the dishwasher is higher than cabinet opening.) Example: Kitchen floor tile...
3 Built-up . Add shims as needed in the area shown to bring the dishwasher up floors (Kitchen floor height is in use. Push the door handle tightly against the door. Option 2, Dishwasher side attachment: 1 Remove brackets from the top tabs To remove the brackets from the cardboard box. IMPORTANT: The dishwasher must be secured to avoid movement when the dishwasher is higher than cabinet opening.) Example: Kitchen floor tile...
Installation Instructions
Page 15
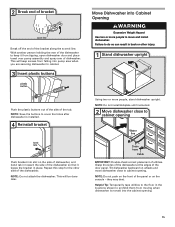
... to move dishwasher close to cabinet opening . 15 NOTE: Do not attach the dishwasher. Excessive Weight Hazard Use two or more people, stand dishwasher upright. Failure to do so can result in the locations shown to prohibit them from moving when dishwasher is installed. 4 Reinstall bracket bend tabs Push bracket into the cabinet opening Water line Drain hose Cable IMPORTANT: Double-check correct placement of the panel or on...
... to move dishwasher close to cabinet opening . 15 NOTE: Do not attach the dishwasher. Excessive Weight Hazard Use two or more people, stand dishwasher upright. Failure to do so can result in the locations shown to prohibit them from moving when dishwasher is installed. 4 Reinstall bracket bend tabs Push bracket into the cabinet opening Water line Drain hose Cable IMPORTANT: Double-check correct placement of the panel or on...
Installation Instructions
Page 22
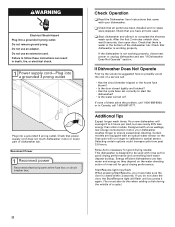
... increase cycle time past 3.5 hours. Rinse Aid is working properly, disconnect power or unplug dishwasher and see "If Dishwasher Does Not Operate" section. Check Operation ❏ Read the Dishwasher User Instructions that dishwasher is necessary for good drying performance and controlling hard water deposit buildup. WARNING Electrical Shock Hazard Plug into a grounded 3 prong outlet. Do not remove ground prong. Check that all tools used with a low wattage, low energy consumption motor, your dishwasher. ❏...
... increase cycle time past 3.5 hours. Rinse Aid is working properly, disconnect power or unplug dishwasher and see "If Dishwasher Does Not Operate" section. Check Operation ❏ Read the Dishwasher User Instructions that dishwasher is necessary for good drying performance and controlling hard water deposit buildup. WARNING Electrical Shock Hazard Plug into a grounded 3 prong outlet. Do not remove ground prong. Check that all tools used with a low wattage, low energy consumption motor, your dishwasher. ❏...


