
Use & Care Guide
Page 3
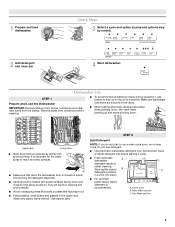
...and load dishwasher. Remove labels from spinning freely. Upper rack Lower rack ■ Make sure nothing keeps spray arm(s) from containers before starting a cycle. ■ Fresh automatic A dishwasher detergent results in the upper rack. Hard Water Soft Water Hard Water Soft Water C ...pointing down . Quick Steps 3 Select a cycle and option (cycles and options vary by model). 2 Add detergent and rinse aid. 4 Start dishwasher. Dishwasher Use STEP 1 Prepare and Load the Dishwasher IMPORTANT: Remove leftover food, bones, toothpicks and other items pointing up and some...
...and load dishwasher. Remove labels from spinning freely. Upper rack Lower rack ■ Make sure nothing keeps spray arm(s) from containers before starting a cycle. ■ Fresh automatic A dishwasher detergent results in the upper rack. Hard Water Soft Water Hard Water Soft Water C ...pointing down . Quick Steps 3 Select a cycle and option (cycles and options vary by model). 2 Add detergent and rinse aid. 4 Start dishwasher. Dishwasher Use STEP 1 Prepare and Load the Dishwasher IMPORTANT: Remove leftover food, bones, toothpicks and other items pointing up and some...
Use & Care Guide
Page 4
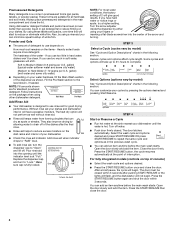
... of white film. gallon) [typical water softener water and some city water] ■ Depending on your dishes and dishwasher interior will start to use too much soil remains on the dish racks and interior of the arrow and turning. Follow instructions on your dishwasher. using ...Option Descriptions" charts in premeasured forms (gel packs, tablets, or powder packs). Heavier cycles and options affect cycle length. Soft to complete. STEP 4 Start or Resume a Cycle ■ Run hot water at the sink nearest your cycles by either --- - - -- Open the door slowly and add ...
... of white film. gallon) [typical water softener water and some city water] ■ Depending on your dishes and dishwasher interior will start to use too much soil remains on the dish racks and interior of the arrow and turning. Follow instructions on your dishwasher. using ...Option Descriptions" charts in premeasured forms (gel packs, tablets, or powder packs). Heavier cycles and options affect cycle length. Soft to complete. STEP 4 Start or Resume a Cycle ■ Run hot water at the sink nearest your cycles by either --- - - -- Open the door slowly and add ...
Use & Care Guide
Page 6
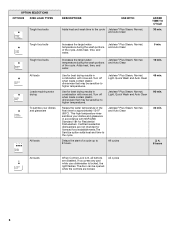
... Clean All cycles 5 min. 10 min. 45 min. 90 min. 30 min. 2, 4, 8 hours All loads When Control Lock is locked, the light flashes. Delays the start of the cycle. Adds heat, time, and water. OPTION SELECTIONS OPTIONS DISH LOAD TYPES Tough food soils DESCRIPTIONS USE WITH: Adds heat and wash time...
... Clean All cycles 5 min. 10 min. 45 min. 90 min. 30 min. 2, 4, 8 hours All loads When Control Lock is locked, the light flashes. Delays the start of the cycle. Adds heat, time, and water. OPTION SELECTIONS OPTIONS DISH LOAD TYPES Tough food soils DESCRIPTIONS USE WITH: Adds heat and wash time...
Use & Care Guide
Page 7
...light flashes at the end of the dishwasher for front control models, and located on all models. Wait for hidden control models. Press START/RESUME. Located on the front of the cycle. If your dishwasher did not properly sanitize your new cycle. 4. If cover is ... cycle. Let the dishwasher drain completely. If the door is open the door completely. 3. Press CANCEL/DRAIN to Step 2.) 2. If it 's started and adding a dish is not recommended. 4. The cycle will be turned on top of dishwasher). Otherwise, proceed to reset any cycle or options ...
...light flashes at the end of the dishwasher for front control models, and located on all models. Wait for hidden control models. Press START/RESUME. Located on the front of the cycle. If your dishwasher did not properly sanitize your new cycle. 4. If cover is ... cycle. Let the dishwasher drain completely. If the door is open the door completely. 3. Press CANCEL/DRAIN to Step 2.) 2. If it 's started and adding a dish is not recommended. 4. The cycle will be turned on top of dishwasher). Otherwise, proceed to reset any cycle or options ...
Use & Care Guide
Page 10
... may not fill with water. Check your dishwasher and make it has not been completed, you will need to resume the cycle by pressing START/RESUME and closing the door within 3 seconds. Use a detergent booster/water softener additive designed for dishware such as cookie sheets, cutting boards,.... If the cycle has not been completed, WILL NOT DRAIN you will need to collect water droplets. In the U.S.A., www.maytag.com In Canada, www.maytag.ca PROBLEM DISHWASHER DOES NOT RUN DETERGENT REMAINS IN THE DISPENSER OR TABLET IS ON BOTTOM OF TUB CYCLE RUNS TOO LONG DISHWASHER...
... may not fill with water. Check your dishwasher and make it has not been completed, you will need to resume the cycle by pressing START/RESUME and closing the door within 3 seconds. Use a detergent booster/water softener additive designed for dishware such as cookie sheets, cutting boards,.... If the cycle has not been completed, WILL NOT DRAIN you will need to collect water droplets. In the U.S.A., www.maytag.com In Canada, www.maytag.ca PROBLEM DISHWASHER DOES NOT RUN DETERGENT REMAINS IN THE DISPENSER OR TABLET IS ON BOTTOM OF TUB CYCLE RUNS TOO LONG DISHWASHER...
Use & Care Guide
Page 11
... are blinking and the dishwasher will affect noise levels. Be sure dishwasher has been installed properly and is blinking, press START/RESUME and close the door within this guide.) If the START/RESUME light is level. A thumping sound may be draining properly, see "WATER REMAINS IN THE TUB/WILL NOT DRAIN" in...
... are blinking and the dishwasher will affect noise levels. Be sure dishwasher has been installed properly and is blinking, press START/RESUME and close the door within this guide.) If the START/RESUME light is level. A thumping sound may be draining properly, see "WATER REMAINS IN THE TUB/WILL NOT DRAIN" in...
Installation Guide
Page 3
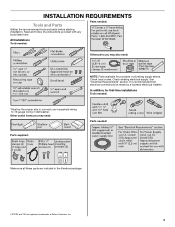
... and follow the instructions provided with any tools listed here. Check local codes. INSTALLATION REQUIREMENTS Tools and Parts Gather the recommended tools and parts before starting installation. Check existing electrical supply. Other useful items you may need : NOTE: Parts available for first-time installations Tools needed : Make sure all these parts...
... and follow the instructions provided with any tools listed here. Check local codes. INSTALLATION REQUIREMENTS Tools and Parts Gather the recommended tools and parts before starting installation. Check existing electrical supply. Other useful items you may need : NOTE: Parts available for first-time installations Tools needed : Make sure all these parts...
Installation Guide
Page 18
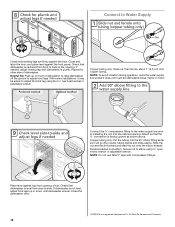
... supply line prior to installing the unit into the 90° elbow fitting as far as shown above. Slide the nut and ferrule forward and start the nut onto the elbow threads. Close the dishwasher door. †®TEFLON is level from front to back in the opening . If needed, adjust...
... supply line prior to installing the unit into the 90° elbow fitting as far as shown above. Slide the nut and ferrule forward and start the nut onto the elbow threads. Close the dishwasher door. †®TEFLON is level from front to back in the opening . If needed, adjust...
Installation Guide
Page 24
... and see "If Dishwasher Does Not Operate" section. Rinse Aid is necessary for good drying results: This dishwasher is used . ■ Start dishwasher and allow it again. (You must make sure the door is not working properly. Certain models are equipped with an optical water sensor... so the first cycle will run longer to calibrate to start the dishwasher? ■ Is the water turned on? Check Operation ■ Read the Dishwasher User Instructions that came with your dishwasher washes...
... and see "If Dishwasher Does Not Operate" section. Rinse Aid is necessary for good drying results: This dishwasher is used . ■ Start dishwasher and allow it again. (You must make sure the door is not working properly. Certain models are equipped with an optical water sensor... so the first cycle will run longer to calibrate to start the dishwasher? ■ Is the water turned on? Check Operation ■ Read the Dishwasher User Instructions that came with your dishwasher washes...


