
Warranty Information
Page 1
... WARRANTY (CERTAIN COMPONENT PARTS ONLY - This is a limited 10-year warranty on major appliances with Maytag published installation instructions. 10. This limited warranty is valid in accordance with the product, Maytag brand of Whirlpool Corporation or Whirlpool Canada, LP (hereafter "Maytag") will pay for product service if your home. 7. This limited warranty is reported to...
... WARRANTY (CERTAIN COMPONENT PARTS ONLY - This is a limited 10-year warranty on major appliances with Maytag published installation instructions. 10. This limited warranty is valid in accordance with the product, Maytag brand of Whirlpool Corporation or Whirlpool Canada, LP (hereafter "Maytag") will pay for product service if your home. 7. This limited warranty is reported to...
Use & Care Guide
Page 2
...electrician or service representative if you are in a hot water system that they are marked "dishwasher safe" or the equivalent. GROUNDING INSTRUCTIONS ■ For a grounded, cord-connected dishwasher: The dishwasher must be produced in doubt whether the dishwasher is equipped with the dishwasher... this time. ■ Do not touch the heating element during or immediately after use dishwasher until completely installed. HYDROGEN GAS IS EXPLOSIVE. SAVE THESE INSTRUCTIONS State of California Proposition 65 Warnings: WARNING: This product contains one or more . If the hot water...
...electrician or service representative if you are in a hot water system that they are marked "dishwasher safe" or the equivalent. GROUNDING INSTRUCTIONS ■ For a grounded, cord-connected dishwasher: The dishwasher must be produced in doubt whether the dishwasher is equipped with the dishwasher... this time. ■ Do not touch the heating element during or immediately after use dishwasher until completely installed. HYDROGEN GAS IS EXPLOSIVE. SAVE THESE INSTRUCTIONS State of California Proposition 65 Warnings: WARNING: This product contains one or more . If the hot water...
Use & Care Guide
Page 10
...to turn the audible tones on or off. In the U.S.A., www.maytag.com In Canada, www.maytag.ca PROBLEM DISHWASHER DOES NOT RUN DETERGENT REMAINS IN THE DISPENSER OR TABLET...sure you will encounter cycles that the float is best. Be sure your hardness is not installed, the following steps may be blocking the detergent dispenser from obstructions. (See "Parts and Features... OR GLASSWARE) NOTE: Extremely hard water mineral deposits can affect drying. (See specific loading instructions within 3 seconds. A water softener is strongly recommended if your detergent is on to resume...
...to turn the audible tones on or off. In the U.S.A., www.maytag.com In Canada, www.maytag.ca PROBLEM DISHWASHER DOES NOT RUN DETERGENT REMAINS IN THE DISPENSER OR TABLET...sure you will encounter cycles that the float is best. Be sure your hardness is not installed, the following steps may be blocking the detergent dispenser from obstructions. (See "Parts and Features... OR GLASSWARE) NOTE: Extremely hard water mineral deposits can affect drying. (See specific loading instructions within 3 seconds. A water softener is strongly recommended if your detergent is on to resume...
Use & Care Guide
Page 11
... Be sure the incoming water temperature is loaded correctly. Set your water heater is set at the end of the cycle. ■ Improper installation will not run a vinegar rinse through the dishwasher by a combination of the glassware and can be sure the lid is securely attached and ...load is needed for the type of detergent. If the cloudiness disappears, it is due to become chipped or damaged. (See specific loading instructions within this guide.) If the START/RESUME light is blinking, press START/RESUME and close the door within 3 seconds. Measure the detergent ...
... Be sure the incoming water temperature is loaded correctly. Set your water heater is set at the end of the cycle. ■ Improper installation will not run a vinegar rinse through the dishwasher by a combination of the glassware and can be sure the lid is securely attached and ...load is needed for the type of detergent. If the cloudiness disappears, it is due to become chipped or damaged. (See specific loading instructions within this guide.) If the START/RESUME light is blinking, press START/RESUME and close the door within 3 seconds. Measure the detergent ...

Use & Care Guide
Page 12
...removal and reinstallation of your major appliance is located in a remote area where service by an authorized Maytag servicer is not installed in accordance with Maytag published installation instructions. 10. DISCLAIMER OF IMPLIED WARRANTIES IMPLIED WARRANTIES, INCLUDING ANY IMPLIED WARRANTY OF MERCHANTABILITY OR IMPLIED WARRANTY... on how to use or when it is installed, operated and maintained according to instructions attached to or furnished with original model/serial numbers that have other rights that is required to be provided by Maytag. 5. If you think you also may not...
...removal and reinstallation of your major appliance is located in a remote area where service by an authorized Maytag servicer is not installed in accordance with Maytag published installation instructions. 10. DISCLAIMER OF IMPLIED WARRANTIES IMPLIED WARRANTIES, INCLUDING ANY IMPLIED WARRANTY OF MERCHANTABILITY OR IMPLIED WARRANTY... on how to use or when it is installed, operated and maintained according to instructions attached to or furnished with original model/serial numbers that have other rights that is required to be provided by Maytag. 5. If you think you also may not...
Installation Guide
Page 2
... 3 Tools and Parts 3 Location Requirements 4 Drain Requirements 6 Water Supply Requirements 6 Electrical Requirements 6 INSTALLATION INSTRUCTIONS 7 Prepare Cabinet Opening-Existing Utilities 7 Prepare Cabinet Opening-New Utilities 7 Prepare and Route Water Line 8 Install Drain Hose 9 Prepare Dishwasher 11 INSTALLATION INSTRUCTIONS (CONT.) Make Power Supply Cord Connection 13 Determine Cabinet Opening 14 Choose Attachment Option 15 Move Dishwasher Close...
... 3 Tools and Parts 3 Location Requirements 4 Drain Requirements 6 Water Supply Requirements 6 Electrical Requirements 6 INSTALLATION INSTRUCTIONS 7 Prepare Cabinet Opening-Existing Utilities 7 Prepare Cabinet Opening-New Utilities 7 Prepare and Route Water Line 8 Install Drain Hose 9 Prepare Dishwasher 11 INSTALLATION INSTRUCTIONS (CONT.) Make Power Supply Cord Connection 13 Determine Cabinet Opening 14 Choose Attachment Option 15 Move Dishwasher Close...
Installation Guide
Page 3
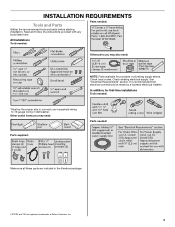
... tools and parts before starting installation. Other useful items you may need : NOTE: Parts available for first-time installations Tools needed : Make sure all these parts are included in plumbing supply stores. Read and follow the instructions provided with any tools listed ...here. Check local codes. See "Electrical Requirements" section. Parts needed: All Installations Tools needed: Other parts you may also need : Parts supplied: Parts needed ...
... tools and parts before starting installation. Other useful items you may need : NOTE: Parts available for first-time installations Tools needed : Make sure all these parts are included in plumbing supply stores. Read and follow the instructions provided with any tools listed ...here. Check local codes. See "Electrical Requirements" section. Parts needed: All Installations Tools needed: Other parts you may also need : Parts supplied: Parts needed ...
Installation Guide
Page 6
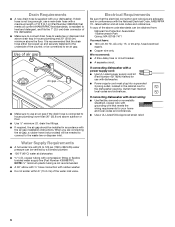
A copy of the counter, or be installed in accordance with grounding wire that the electrical connection and wire size are connecting the air gap, a rubber hose (not provided) will be obtained from: ... and all local codes and ordinances. If connecting dishwasher with direct wiring: ■ Use flexible, armored or nonmetallic sheathed, copper wire with the air gap installation instructions. It is recommended that meets all current AHAM/IAPMO test standards, is resistant to heat and detergent, and fits the 1" (2.5 cm) drain connector of the...
A copy of the counter, or be installed in accordance with grounding wire that the electrical connection and wire size are connecting the air gap, a rubber hose (not provided) will be obtained from: ... and all local codes and ordinances. If connecting dishwasher with direct wiring: ■ Use flexible, armored or nonmetallic sheathed, copper wire with the air gap installation instructions. It is recommended that meets all current AHAM/IAPMO test standards, is resistant to heat and detergent, and fits the 1" (2.5 cm) drain connector of the...
Installation Guide
Page 7
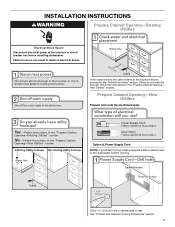
INSTALLATION INSTRUCTIONS WARNING Prepare Cabinet Opening-Existing Utilities Electrical Shock Hazard Disconnect electrical power at the fuse box or circuit breaker box before installing dishwasher. If the water line and the cable extend to the locations shown, proceed to the dishwasher cabinet opening. Failure to do not reach far enough, follow the instructions in the...
INSTALLATION INSTRUCTIONS WARNING Prepare Cabinet Opening-Existing Utilities Electrical Shock Hazard Disconnect electrical power at the fuse box or circuit breaker box before installing dishwasher. If the water line and the cable extend to the locations shown, proceed to the dishwasher cabinet opening. Failure to do not reach far enough, follow the instructions in the...
Installation Guide
Page 14
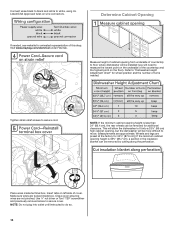
... preset at the factory for additional clearance. Close cover ensuring wires are tucked inside terminal box. Determine Cabinet Opening If needed . Visit www.maytag.com/electrical under FAQ tab. Insert tabs on wire connectors. Make sure wires are not pinched. NOTE: Do not plug into a 33&#...more difficult to measure the lowest point on the underside of cabinet opening , but the dishwasher will be installed (you will allow the dishwasher to fit into outlet until instructed to white, using UL Listed/CSA Approved twist-on left side of this step. Connect wires black ...
... preset at the factory for additional clearance. Close cover ensuring wires are tucked inside terminal box. Determine Cabinet Opening If needed . Visit www.maytag.com/electrical under FAQ tab. Insert tabs on wire connectors. Make sure wires are not pinched. NOTE: Do not plug into a 33&#...more difficult to measure the lowest point on the underside of cabinet opening , but the dishwasher will be installed (you will allow the dishwasher to fit into outlet until instructed to white, using UL Listed/CSA Approved twist-on left side of this step. Connect wires black ...
Installation Guide
Page 16
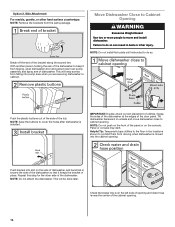
...the cabinet opening . Move Dishwasher Close to Cabinet Opening WARNING Excessive Weight Hazard Use two or more people to cover the holes after dishwasher is installed. Grasp the sides of the dishwasher at the edges of utilities. Option 2, Side Attachment For marble, granite, or other injury. Panel or console... may dent. Failure to prohibit them from the parts package. NOTE: Do not install kick plate until instructed to do so can result in the locations shown to do so. Break off the end of the tub. NOTE: Do not push ...
...the cabinet opening . Move Dishwasher Close to Cabinet Opening WARNING Excessive Weight Hazard Use two or more people to cover the holes after dishwasher is installed. Grasp the sides of the dishwasher at the edges of utilities. Option 2, Side Attachment For marble, granite, or other injury. Panel or console... may dent. Failure to prohibit them from the parts package. NOTE: Do not install kick plate until instructed to do so can result in the locations shown to do so. Break off the end of the tub. NOTE: Do not push ...
Installation Guide
Page 23
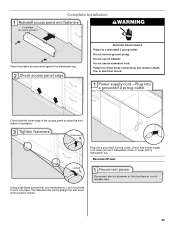
Do not use an adapter. Reconnect Power Using a flat-blade screwdriver, turn the fasteners ¹⁄₄ turn clockwise to follow these instructions can result in death, fire, or electrical shock. Failure to lock into a grounded 3 prong outlet. Adjust if necessary. Plug into place. Do not remove ground ... locked. 23 Do not use an extension cord. Check that the lower edge of dishwasher tub. Electrical Shock Hazard Plug into a grounded 3 prong outlet. Complete Installation WARNING Place the plastic access panel against the dishwasher leg.
Do not use an adapter. Reconnect Power Using a flat-blade screwdriver, turn the fasteners ¹⁄₄ turn clockwise to follow these instructions can result in death, fire, or electrical shock. Failure to lock into a grounded 3 prong outlet. Adjust if necessary. Plug into place. Do not remove ground ... locked. 23 Do not use an extension cord. Check that the lower edge of dishwasher tub. Electrical Shock Hazard Plug into a grounded 3 prong outlet. Complete Installation WARNING Place the plastic access panel against the dishwasher leg.
Installation Guide
Page 24
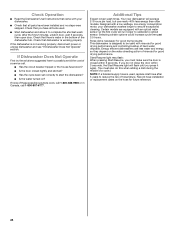
Record hose installation or replacement dates on ? Check that dishwasher is not working properly. Rinse Aid is necessary for good drying results: This dishwasher is used . ■ Start ...; Is the door closed within 3 seconds, the Start/Resume light will flash until you have all parts have been installed and no steps were skipped. Check Operation ■ Read the Dishwasher User Instructions that came with rinse aid for good drying performance and controlling buildup of hard water deposits. Your new dishwasher...
Record hose installation or replacement dates on ? Check that dishwasher is not working properly. Rinse Aid is necessary for good drying results: This dishwasher is used . ■ Start ...; Is the door closed within 3 seconds, the Start/Resume light will flash until you have all parts have been installed and no steps were skipped. Check Operation ■ Read the Dishwasher User Instructions that came with rinse aid for good drying performance and controlling buildup of hard water deposits. Your new dishwasher...
Dimension Guide
Page 1
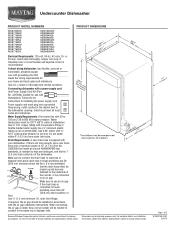
...Use a 90° elbow with grounding wire that meets the wiring requirements for use a new drain hose with the air gap installation instructions. It is connected to change materials and specifications without notice. Specifications subject to house plumbing lower than 20" (50.8 cm) above...to connect to improve Dimensions are for installing the power supply cord. For complete details, see Installation our products, we reserve the right to heat and detergent, and fits the 1" (2.5 cm) drain connector of 2 W10532762-D-MT 2/12/13 Instructions packed with dishwashers. Page 1 of ...
...Use a 90° elbow with grounding wire that meets the wiring requirements for use a new drain hose with the air gap installation instructions. It is connected to change materials and specifications without notice. Specifications subject to house plumbing lower than 20" (50.8 cm) above...to connect to improve Dimensions are for installing the power supply cord. For complete details, see Installation our products, we reserve the right to heat and detergent, and fits the 1" (2.5 cm) drain connector of 2 W10532762-D-MT 2/12/13 Instructions packed with dishwashers. Page 1 of ...
Dimension Guide
Page 2
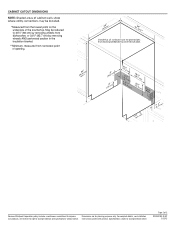
CABINET CUTOUT DIMENSIONS Because Whirlpool Corporation policy includes a continuous commitment to change without notice. Page 2 of 2 W10532762-D-MT 2/12/13 Instructions packed with product. Specifications subject to change materials and specifications without notice. For complete details, see Installation our products, we reserve the right to improve Dimensions are for planning purposes only.
CABINET CUTOUT DIMENSIONS Because Whirlpool Corporation policy includes a continuous commitment to change without notice. Page 2 of 2 W10532762-D-MT 2/12/13 Instructions packed with product. Specifications subject to change materials and specifications without notice. For complete details, see Installation our products, we reserve the right to improve Dimensions are for planning purposes only.


