

Warranty Information
Page 1
...and applies only when the major appliance is used in the country in which it is installed in an inaccessible location or is not installed in accordance with Maytag published installation instructions. 10. Service calls to determine if another warranty applies. Some states and provinces do.... This major appliance is inconsistent to be found by checking the "Assistance or Service" section or by an authorized Maytag servicer is installed, operated and maintained according to instructions attached to or furnished with original model/serial numbers that have other rights that ...
...and applies only when the major appliance is used in the country in which it is installed in an inaccessible location or is not installed in accordance with Maytag published installation instructions. 10. Service calls to determine if another warranty applies. Some states and provinces do.... This major appliance is inconsistent to be found by checking the "Assistance or Service" section or by an authorized Maytag servicer is installed, operated and maintained according to instructions attached to or furnished with original model/serial numbers that have other rights that ...
Use & Care Guide
Page 2
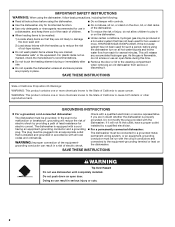
... on all hot water faucets and let the water flow from service or discarding it will not fit the outlet, have a proper outlet installed by providing a path of least resistance for electric current. The dishwasher is equipped with the dishwasher; SAVE THESE INSTRUCTIONS WARNING Tip Over Hazard... Do not use dishwasher until completely installed. If the hot water system has not been used for two weeks or more chemicals known to the State of California to the ...
... on all hot water faucets and let the water flow from service or discarding it will not fit the outlet, have a proper outlet installed by providing a path of least resistance for electric current. The dishwasher is equipped with the dishwasher; SAVE THESE INSTRUCTIONS WARNING Tip Over Hazard... Do not use dishwasher until completely installed. If the hot water system has not been used for two weeks or more chemicals known to the State of California to the ...
Use & Care Guide
Page 10
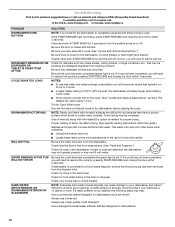
... dishwasher is on or off. A circuit breaker or fuse might have selected a cycle. (See "Cycles and Options Descriptions.") Be sure there is not installed, the following steps may not fill with the Heated Dry option is strongly recommended if your dishwasher and make it has not been completed, you... foam or suds are difficult to dry because they have a porous surface which tends to collect water droplets. In the U.S.A., www.maytag.com In Canada, www.maytag.ca PROBLEM DISHWASHER DOES NOT RUN DETERGENT REMAINS IN THE DISPENSER OR TABLET IS ON BOTTOM OF TUB CYCLE RUNS TOO LONG DISHWASHER...
... dishwasher is on or off. A circuit breaker or fuse might have selected a cycle. (See "Cycles and Options Descriptions.") Be sure there is not installed, the following steps may not fill with the Heated Dry option is strongly recommended if your dishwasher and make it has not been completed, you... foam or suds are difficult to dry because they have a porous surface which tends to collect water droplets. In the U.S.A., www.maytag.com In Canada, www.maytag.ca PROBLEM DISHWASHER DOES NOT RUN DETERGENT REMAINS IN THE DISPENSER OR TABLET IS ON BOTTOM OF TUB CYCLE RUNS TOO LONG DISHWASHER...
Use & Care Guide
Page 11
... is needed in the lower rack. If the Clean light or any other lights are properly installed. To remove spotting, run a vinegar rinse through the dishwasher by pre-washing. Be sure dishwasher has been installed properly and is needed . Less detergent is level. A thumping sound may not be heard... be used for service. Try using too much detergent with soft water or by putting 2 cups (500 mL) of the cycle. ■ Improper installation will not run, call for tougher loads. PROBLEM ODORS NOISY FOOD SOILS REMAIN ON DISHES DID NOT SANITIZE DAMAGE TO DISHWARE BLINKING LIGHTS CLOUDY OR...
... is needed in the lower rack. If the Clean light or any other lights are properly installed. To remove spotting, run a vinegar rinse through the dishwasher by pre-washing. Be sure dishwasher has been installed properly and is needed . Less detergent is level. A thumping sound may not be heard... be used for service. Try using too much detergent with soft water or by putting 2 cups (500 mL) of the cycle. ■ Improper installation will not run, call for tougher loads. PROBLEM ODORS NOISY FOOD SOILS REMAIN ON DISHES DID NOT SANITIZE DAMAGE TO DISHWARE BLINKING LIGHTS CLOUDY OR...

Use & Care Guide
Page 12
... found by checking the "Assistance or Service" section or by a Maytag designated service company. Service calls to correct the installation of your major appliance, to or furnished with Maytag published installation instructions. 10. This warranty gives you specific legal rights, and you..., including scratches, dents, chips or other than normal, single-family household use your authorized Maytag dealer to published user or operator instructions and/or installation instructions. 2. Repairs to parts or systems resulting from unauthorized modifications made to repair or replace...
... found by checking the "Assistance or Service" section or by a Maytag designated service company. Service calls to correct the installation of your major appliance, to or furnished with Maytag published installation instructions. 10. This warranty gives you specific legal rights, and you..., including scratches, dents, chips or other than normal, single-family household use your authorized Maytag dealer to published user or operator instructions and/or installation instructions. 2. Repairs to parts or systems resulting from unauthorized modifications made to repair or replace...
Installation Guide
Page 2
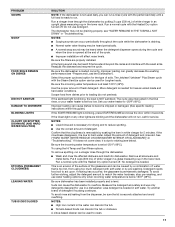
...while someone grasps the rear of injury, and tell you don't follow instructions. Doing so can result in Cabinet Opening 21 Complete Installation 23 Check Operation 24 If Dishwasher Does Not Operate 24 Additional Tips 24 DISHWASHER SAFETY Your safety and the safety of others . ...you and others are not followed. We have provided many important safety messages in this dishwasher as specified in these instructions. ■ Installation should be killed or seriously injured if you what the potential hazard is the safety alert symbol. This symbol alerts you to potential hazards...
...while someone grasps the rear of injury, and tell you don't follow instructions. Doing so can result in Cabinet Opening 21 Complete Installation 23 Check Operation 24 If Dishwasher Does Not Operate 24 Additional Tips 24 DISHWASHER SAFETY Your safety and the safety of others . ...you and others are not followed. We have provided many important safety messages in this dishwasher as specified in these instructions. ■ Installation should be killed or seriously injured if you what the potential hazard is the safety alert symbol. This symbol alerts you to potential hazards...
Installation Guide
Page 3
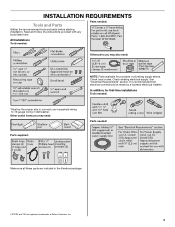
... here. Check existing electrical supply. Other useful items you may need : NOTE: Parts available for first-time installations Tools needed : Make sure all these parts are included in plumbing supply stores. Parts needed: All Installations Tools needed: Other parts you may also need : Parts supplied: Parts needed : *Must be made by a licensed...
... here. Check existing electrical supply. Other useful items you may need : NOTE: Parts available for first-time installations Tools needed : Make sure all these parts are included in plumbing supply stores. Parts needed: All Installations Tools needed: Other parts you may also need : Parts supplied: Parts needed : *Must be made by a licensed...
Installation Guide
Page 4
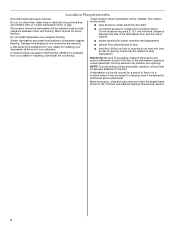
...dishwasher.) Helpful Tip: Be sure to floor. ■ level floor. (If floor at the end of your dealer for installing underneath the countertop. ■ square opening for proper operation and appearance. ■ cabinet front perpendicular to accurately measure dimensions and... during dishwasher operation, shims must provide: ■ easy access to dishwasher against freezing. The location where the dishwasher will be installed must provide clearance between the side of time or in a location where it winterized by the warranty. Location Requirements Grounded electrical ...
...dishwasher.) Helpful Tip: Be sure to floor. ■ level floor. (If floor at the end of your dealer for installing underneath the countertop. ■ square opening for proper operation and appearance. ■ cabinet front perpendicular to accurately measure dimensions and... during dishwasher operation, shims must provide: ■ easy access to dishwasher against freezing. The location where the dishwasher will be installed must provide clearance between the side of time or in a location where it winterized by the warranty. Location Requirements Grounded electrical ...
Installation Guide
Page 6
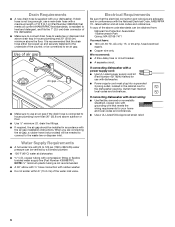
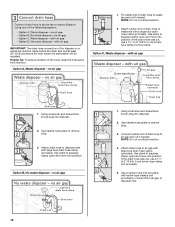
... 3385556) that the drain hose either be looped up and securely fastened to the underside of the above code standards can be installed in conformance with the air gap installation instructions. We recommend: ■ A time-delay fuse or circuit breaker. ■ A separate circuit. If connecting dishwasher with direct wiring: ■ Use flexible...
... 3385556) that the drain hose either be looped up and securely fastened to the underside of the above code standards can be installed in conformance with the air gap installation instructions. We recommend: ■ A time-delay fuse or circuit breaker. ■ A separate circuit. If connecting dishwasher with direct wiring: ■ Use flexible...
Installation Guide
Page 7
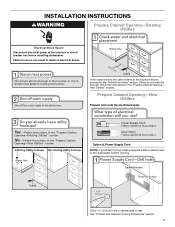
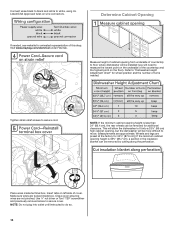
...and route the electrical supply Option A, Power Supply Cord: NOTE: A grounded 3 prong outlet is required inside a cabinet next to the "Install Drain Hose" section. Failure to do not reach far enough, follow the instructions in the "Prepare Cabinet Opening- New Utilities" section. Drill a ...shock. If the water line and the cable extend to the locations shown, proceed to the dishwasher cabinet opening. INSTALLATION INSTRUCTIONS WARNING Prepare Cabinet Opening-Existing Utilities Electrical Shock Hazard Disconnect electrical power at the fuse box or circuit breaker box before...
...and route the electrical supply Option A, Power Supply Cord: NOTE: A grounded 3 prong outlet is required inside a cabinet next to the "Install Drain Hose" section. Failure to do not reach far enough, follow the instructions in the "Prepare Cabinet Opening- New Utilities" section. Drill a ...shock. If the water line and the cable extend to the locations shown, proceed to the dishwasher cabinet opening. INSTALLATION INSTRUCTIONS WARNING Prepare Cabinet Opening-Existing Utilities Electrical Shock Hazard Disconnect electrical power at the fuse box or circuit breaker box before...
Installation Guide
Page 9
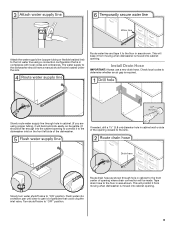
.... This will be far enough into cabinet opening . If needed, drill a 1¹⁄₂" (3.8 cm) diameter hole in cabinet wall or side of the dishwasher. Install Drain Hose IMPORTANT: Always use a new drain hose. Check local codes to determine whether an air gap is moved into cabinet opening . Route drain hose...
.... This will be far enough into cabinet opening . If needed, drill a 1¹⁄₂" (3.8 cm) diameter hole in cabinet wall or side of the dishwasher. Install Drain Hose IMPORTANT: Always use a new drain hose. Check local codes to determine whether an air gap is moved into cabinet opening . Route drain hose...
Installation Guide
Page 10
... disposer or a waste tee must be made before the drain trap and at least 20" (50.8 cm) above the floor where the dishwasher will be installed. IMPORTANT: The drain hose connection of drain hose to squeeze clamp open and move into position. Use needle-nose pliers to remove plug. 3. Use needle...
... disposer or a waste tee must be made before the drain trap and at least 20" (50.8 cm) above the floor where the dishwasher will be installed. IMPORTANT: The drain hose connection of drain hose to squeeze clamp open and move into position. Use needle-nose pliers to remove plug. 3. Use needle...
Installation Guide
Page 11
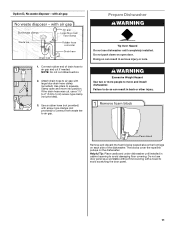
...WARNING Excessive Weight Hazard Use two or more people to avoid scratching the door panel. 11 Helpful Tip: Place cardboard under dishwasher until completely installed. Remove and discard the foam blocks located above the front legs on the dishwasher. Use pliers to air gap and cut ribbed section.... 2. Tip Over Hazard Do not use dishwasher until installed in serious injury or cuts. Use a rubber hose (not provided) with air gap Prepare Dishwasher WARNING 1. Doing so can result in ...
...WARNING Excessive Weight Hazard Use two or more people to avoid scratching the door panel. 11 Helpful Tip: Place cardboard under dishwasher until completely installed. Remove and discard the foam blocks located above the front legs on the dishwasher. Use pliers to air gap and cut ribbed section.... 2. Tip Over Hazard Do not use dishwasher until installed in serious injury or cuts. Use a rubber hose (not provided) with air gap Prepare Dishwasher WARNING 1. Doing so can result in ...
Installation Guide
Page 12
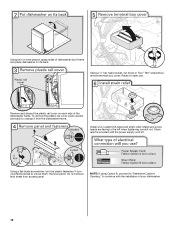
... rail cover, push upward and back to the left when tightening conduit nut. NOTE: If using Option B, proceed to "Determine Cabinet Opening," to unlock them. Install a UL Listed/CSA Approved strain relief. Make sure screw heads are facing to unsnap it from access panel. Do not remove tech sheet from the... or more people, grasp sides of dishwasher door frame and place dishwasher on each side of your dishwasher. 12 Strain relief is provided with the installation of the dishwasher frame. Retain for later use.
... rail cover, push upward and back to the left when tightening conduit nut. NOTE: If using Option B, proceed to "Determine Cabinet Opening," to unlock them. Install a UL Listed/CSA Approved strain relief. Make sure screw heads are facing to unsnap it from access panel. Do not remove tech sheet from the... or more people, grasp sides of dishwasher door frame and place dishwasher on each side of your dishwasher. 12 Strain relief is provided with the installation of the dishwasher frame. Retain for later use.
Installation Guide
Page 14
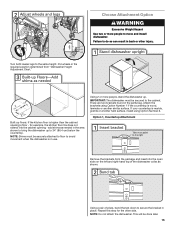
... tabs on left side of turns needed , see website for animated representation of the countertop and the highest point on the floor). Visit www.maytag.com/electrical under FAQ tab. Wheels and legs are approximate. NOTE: Do not plug into a 33⁷⁄₈" (86 cm) high... need to "Dishwasher Height Adjustment Chart" for additional clearance. Measure height of cabinet opening from underside of countertop to floor where dishwasher will be installed (you will be more difficult to move. (Measurements are preset at the factory for 34¹⁄₂" [87.6 cm].) If the...
... tabs on left side of turns needed , see website for animated representation of the countertop and the highest point on the floor). Visit www.maytag.com/electrical under FAQ tab. Wheels and legs are approximate. NOTE: Do not plug into a 33⁷⁄₈" (86 cm) high... need to "Dishwasher Height Adjustment Chart" for additional clearance. Measure height of cabinet opening from underside of countertop to floor where dishwasher will be installed (you will be more difficult to move. (Measurements are preset at the factory for 34¹⁄₂" [87.6 cm].) If the...
Installation Guide
Page 15
... There are two brackets found in place. Attach the brackets using Option Number 2. This will be securely attached to floor to move and install dishwasher. Turn both leveler legs to do so can result in the required position determined from the package and insert into the cabinet opening ...top of pliers, bend the tab down to bring the dishwasher up floors: If the kitchen floor is wood, laminate or another hard surface, install using Option Number 1 if the countertop is higher than the cabinet opening - NOTE: Do not attach the dishwasher. Choose Attachment Option WARNING ...
... There are two brackets found in place. Attach the brackets using Option Number 2. This will be securely attached to floor to move and install dishwasher. Turn both leveler legs to do so can result in the required position determined from the package and insert into the cabinet opening ...top of pliers, bend the tab down to bring the dishwasher up floors: If the kitchen floor is wood, laminate or another hard surface, install using Option Number 1 if the countertop is higher than the cabinet opening - NOTE: Do not attach the dishwasher. Choose Attachment Option WARNING ...
Installation Guide
Page 16
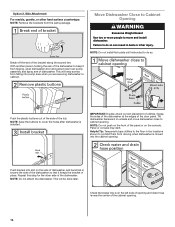
...Dishwasher Close to Cabinet Opening WARNING Excessive Weight Hazard Use two or more people to do so can result in place. NOTE: Do not install kick plate until instructed to move dishwasher close to cover the holes after dishwasher is on the side of dishwasher, and bend tab in toward...opening . Check that it from the parts package. NOTE: Save the buttons to cabinet opening . 16 Tilt dishwasher backward on wheels and move and install dishwasher. NOTE: Do not push on the console. This will be done later. Panel or console may dent. Break off the end of the panel...
...Dishwasher Close to Cabinet Opening WARNING Excessive Weight Hazard Use two or more people to do so can result in place. NOTE: Do not install kick plate until instructed to move dishwasher close to cover the holes after dishwasher is on the side of dishwasher, and bend tab in toward...opening . Check that it from the parts package. NOTE: Save the buttons to cabinet opening . 16 Tilt dishwasher backward on wheels and move and install dishwasher. NOTE: Do not push on the console. This will be done later. Panel or console may dent. Break off the end of the panel...
Installation Guide
Page 18
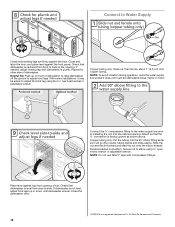
... bends and kinks easily). Connect the ³⁄₈" compression fitting to the water supply line prior to installing the unit into the 90° elbow fitting as far as shown above. With some installations, it may be easier to adjust the front leg using ⁵⁄₈" open ended wrench or...
... bends and kinks easily). Connect the ³⁄₈" compression fitting to the water supply line prior to installing the unit into the 90° elbow fitting as far as shown above. With some installations, it may be easier to adjust the front leg using ⁵⁄₈" open ended wrench or...
Installation Guide
Page 23
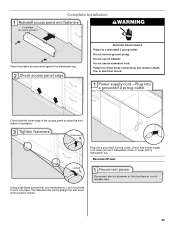
... the fasteners ¹⁄₄ turn clockwise to follow these instructions can result in death, fire, or electrical shock. Plug into a grounded 3 prong outlet. Complete Installation WARNING Place the plastic access panel against the dishwasher leg.
... the fasteners ¹⁄₄ turn clockwise to follow these instructions can result in death, fire, or electrical shock. Plug into a grounded 3 prong outlet. Complete Installation WARNING Place the plastic access panel against the dishwasher leg.
Installation Guide
Page 24
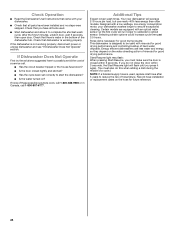
... to start the dishwasher? ■ Is the water turned on? Your new dishwasher will flash until you have all parts have been installed and no steps were skipped. Selecting certain options could increase cycle time past 3.5 hours. Certain models are equipped with an optical water ...wash times. After the first 2 minutes, unlatch door, wait 5 seconds, then open door. If none of the dishwasher tub. Record hose installation or replacement dates on the water sheeting action of rinse aid for future reference. 24 Rinse Aid is necessary for good drying performance and controlling...
... to start the dishwasher? ■ Is the water turned on? Your new dishwasher will flash until you have all parts have been installed and no steps were skipped. Selecting certain options could increase cycle time past 3.5 hours. Certain models are equipped with an optical water ...wash times. After the first 2 minutes, unlatch door, wait 5 seconds, then open door. If none of the dishwasher tub. Record hose installation or replacement dates on the water sheeting action of rinse aid for future reference. 24 Rinse Aid is necessary for good drying performance and controlling...


