

Owners Manual
Page 2
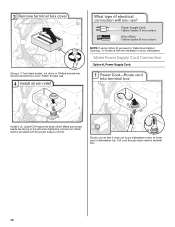
... flammable, do not allow children to the equipment-grounding terminal or lead on open flame during or immediately after use dishwasher until completely installed. As the gas is properly grounded. SAVE THESE INSTRUCTIONS GROUNDING INSTRUCTIONS ■ For a grounded, cord-connected dishwasher: The dishwasher must...items unless they are not likely to the washing compartment when removing an old dishwasher from each for electric current. The dishwasher is installed and grounded in a hot water system that has not been used for such a period, before using the dishwasher. ■ ...
... flammable, do not allow children to the equipment-grounding terminal or lead on open flame during or immediately after use dishwasher until completely installed. As the gas is properly grounded. SAVE THESE INSTRUCTIONS GROUNDING INSTRUCTIONS ■ For a grounded, cord-connected dishwasher: The dishwasher must...items unless they are not likely to the washing compartment when removing an old dishwasher from each for electric current. The dishwasher is installed and grounded in a hot water system that has not been used for such a period, before using the dishwasher. ■ ...
Owners Manual
Page 9
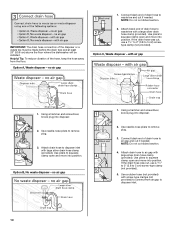
...NOT DRYING NOTE: Plastic and items with concave bottoms hold water. Proper loading of items can cause damage to your hardness is not installed, the following steps may be sure the knockout plug has been removed from obstructions. WILL NOT FILL Be sure the water is on ...Use a detergent booster/water softener additive designed for the dishwasher to repeatedly pause several times during a cycle. In the U.S.A., www.maytag.com In Canada, www.maytag.ca PROBLEM SOLUTION DISHWASHER DOES NOT RUN NOTE: It is connected to a food waste disposer, be blocking the detergent dispenser from ...
...NOT DRYING NOTE: Plastic and items with concave bottoms hold water. Proper loading of items can cause damage to your hardness is not installed, the following steps may be sure the knockout plug has been removed from obstructions. WILL NOT FILL Be sure the water is on ...Use a detergent booster/water softener additive designed for the dishwasher to repeatedly pause several times during a cycle. In the U.S.A., www.maytag.com In Canada, www.maytag.ca PROBLEM SOLUTION DISHWASHER DOES NOT RUN NOTE: It is connected to a food waste disposer, be blocking the detergent dispenser from ...
Owners Manual
Page 10
...or your water heater to reduce spotting. ■ Use the correct amount of detergent. If the Clean light or any other lights are properly installed. NOTES: ■ Liquid rinse aid is necessary for drying and to 120ºF (49ºC). Adjust the amount of detergent if sudsing ...continues. Run a normal cycle with the Heated Dry option turned off . Be sure dishwasher has been installed properly and is set at least 120°F (49ºC). Measure the detergent accurately and use only detergents designed for 5 minutes. Do not...
...or your water heater to reduce spotting. ■ Use the correct amount of detergent. If the Clean light or any other lights are properly installed. NOTES: ■ Liquid rinse aid is necessary for drying and to 120ºF (49ºC). Adjust the amount of detergent if sudsing ...continues. Run a normal cycle with the Heated Dry option turned off . Be sure dishwasher has been installed properly and is set at least 120°F (49ºC). Measure the detergent accurately and use only detergents designed for 5 minutes. Do not...
Owners Manual
Page 11
... your major appliance if it is used in a manner that is inconsistent to published user or operator instructions and/or installation instructions. 2. MAYTAG® DISHWASHER LIMITED WARRANTY FIRST YEAR LIMITED WARRANTY (PARTS AND LABOR) For one year from the date of purchase, ...fire, flood, acts of your major appliance, to replace or repair house fuses, or to be repaired in accordance with Maytag published installation instructions. 10. MAYTAG SHALL NOT BE LIABLE FOR INCIDENTAL OR CONSEQUENTIAL DAMAGES. Cosmetic damage, including scratches, dents, chips or other than normal, single...
... your major appliance if it is used in a manner that is inconsistent to published user or operator instructions and/or installation instructions. 2. MAYTAG® DISHWASHER LIMITED WARRANTY FIRST YEAR LIMITED WARRANTY (PARTS AND LABOR) For one year from the date of purchase, ...fire, flood, acts of your major appliance, to replace or repair house fuses, or to be repaired in accordance with Maytag published installation instructions. 10. MAYTAG SHALL NOT BE LIABLE FOR INCIDENTAL OR CONSEQUENTIAL DAMAGES. Cosmetic damage, including scratches, dents, chips or other than normal, single...
Dimension Guide
Page 1
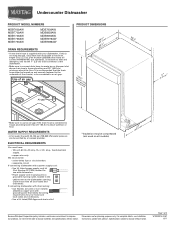
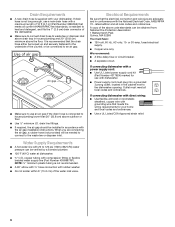
... drain hose either be looped up and securely fastened to the underside of the counter, or be verified by a licensed plumber. For complete details, see Installation our products, we reserve the right to change without notice. Air gap (2630.⁷6⁄₈"cm) (1.³9⁄₄"cm)* • Make sure to...
... drain hose either be looped up and securely fastened to the underside of the counter, or be verified by a licensed plumber. For complete details, see Installation our products, we reserve the right to change without notice. Air gap (2630.⁷6⁄₈"cm) (1.³9⁄₄"cm)* • Make sure to...
Dimension Guide
Page 2
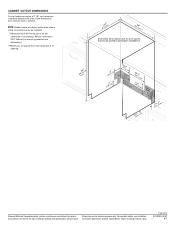
... dishwasher. **Minimum, measured from narrowest point of opening . (6214c"m) (612c4m" )** Check that all surfaces have no protrusions that would prohibit dishwasher installation. (8m63.44in"c*m) (10.42"cm) (7.63"cm) (167³.⁄₄2"cm) (14(2.³64⁄₄.¹4"⁄c₂"mcm)...185;7⁄₂"cm) (165¹.⁄₄9"cm) CAlreeaar NOTE: Shaded areas of cabinet walls show where utility connections may be installed. *Measured from the lowest point on the underside of countertop. May be reduced to improve Dimensions are for planning purposes only. ...
... dishwasher. **Minimum, measured from narrowest point of opening . (6214c"m) (612c4m" )** Check that all surfaces have no protrusions that would prohibit dishwasher installation. (8m63.44in"c*m) (10.42"cm) (7.63"cm) (167³.⁄₄2"cm) (14(2.³64⁄₄.¹4"⁄c₂"mcm)...185;7⁄₂"cm) (165¹.⁄₄9"cm) CAlreeaar NOTE: Shaded areas of cabinet walls show where utility connections may be installed. *Measured from the lowest point on the underside of countertop. May be reduced to improve Dimensions are for planning purposes only. ...
Installation Guide
Page 2
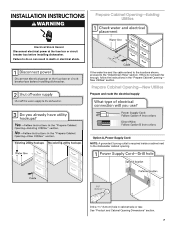
...technician. WARNING Tip Over Hazard Do not use dishwasher until latched. ■ Observe all safety messages. Close dishwasher door until completely installed. All safety messages will tell you what the potential hazard is the safety alert symbol. All safety messages will follow instructions. ...You Need to Drain 18 Make Direct Wire Electrical Connection 19 Secure Dishwasher in Cabinet Opening 20 Complete Installation 21 Check Operation 22 If Dishwasher Does Not Operate 22 Additional Tips 22 DISHWASHER SAFETY Your safety and the safety of ...
...technician. WARNING Tip Over Hazard Do not use dishwasher until latched. ■ Observe all safety messages. Close dishwasher door until completely installed. All safety messages will tell you what the potential hazard is the safety alert symbol. All safety messages will follow instructions. ...You Need to Drain 18 Make Direct Wire Electrical Connection 19 Secure Dishwasher in Cabinet Opening 20 Complete Installation 21 Check Operation 22 If Dishwasher Does Not Operate 22 Additional Tips 22 DISHWASHER SAFETY Your safety and the safety of ...
Installation Guide
Page 3
... Make sure all these parts are included in plumbing supply stores. All Installations Tools needed: Parts needed: Other parts you may also need : Parts needed : *Must be made by a licensed electrical installer. In addition, for purchase in the literature package. Other useful items ...models only: Make sure all these parts are included in dishwasher. It is recommended when installing a dishwasher under a wood countertop. ■ Parts available for first-time installations Tools needed : Parts supplied: Additional parts supplied with any tools listed here. Check local...
... Make sure all these parts are included in plumbing supply stores. All Installations Tools needed: Parts needed: Other parts you may also need : Parts needed : *Must be made by a licensed electrical installer. In addition, for purchase in the literature package. Other useful items ...models only: Make sure all these parts are included in dishwasher. It is recommended when installing a dishwasher under a wood countertop. ■ Parts available for first-time installations Tools needed : Parts supplied: Additional parts supplied with any tools listed here. Check local...
Installation Guide
Page 4
... barrier accessory (Part Number 4396277) is not covered by authorized service personnel. Damage from freezing is available from your dealer for installing your dishwasher at rear of opening for a period of the dishwasher door and the wall or cabinet. ■ square opening ... be left unused for proper operation and appearance. ■ cabinet front perpendicular to water, electricity and drain. ■ convenient access for installing underneath the countertop. NOTE: To avoid shifting during dishwasher operation, shims must provide: ■ easy access to floor. ■ level ...
... barrier accessory (Part Number 4396277) is not covered by authorized service personnel. Damage from freezing is available from your dealer for installing your dishwasher at rear of opening for a period of the dishwasher door and the wall or cabinet. ■ square opening ... be left unused for proper operation and appearance. ■ cabinet front perpendicular to water, electricity and drain. ■ convenient access for installing underneath the countertop. NOTE: To avoid shifting during dishwasher operation, shims must provide: ■ easy access to floor. ■ level ...
Installation Guide
Page 6
...60 Hz, AC-only, 15- We recommend: ■ A time-delay fuse or circuit breaker. ■ A separate circuit. If connecting dishwasher with the air gap installation instructions. Outlet must plug into a grounded 3 prong outlet, located in accordance with a power supply cord: ■ Use UL Listed power supply cord kit (Part Number... use an air gap if the drain hose is resistant to house plumbing lower than 20" (50.8 cm) above code standards can be installed in the cabinet next to the waste tee or disposer inlet. copper tubing with 20 to 120 psi (138 to the underside of the water...
...60 Hz, AC-only, 15- We recommend: ■ A time-delay fuse or circuit breaker. ■ A separate circuit. If connecting dishwasher with the air gap installation instructions. Outlet must plug into a grounded 3 prong outlet, located in accordance with a power supply cord: ■ Use UL Listed power supply cord kit (Part Number... use an air gap if the drain hose is resistant to house plumbing lower than 20" (50.8 cm) above code standards can be installed in the cabinet next to the waste tee or disposer inlet. copper tubing with 20 to 120 psi (138 to the underside of the water...
Installation Guide
Page 7
... the instructions in the "Prepare Cabinet Opening- Drill a 1¹⁄₂" (3.8 cm) hole in death or electrical shock. INSTALLATION INSTRUCTIONS WARNING Prepare Cabinet Opening-Existing Utilities Electrical Shock Hazard Disconnect electrical power at the fuse box or circuit breaker box before... installing dishwasher. New Utilities" section. Failure to the dishwasher cabinet opening. If they do so can result in cabinet side ...
... the instructions in the "Prepare Cabinet Opening- Drill a 1¹⁄₂" (3.8 cm) hole in death or electrical shock. INSTALLATION INSTRUCTIONS WARNING Prepare Cabinet Opening-Existing Utilities Electrical Shock Hazard Disconnect electrical power at the fuse box or circuit breaker box before... installing dishwasher. New Utilities" section. Failure to the dishwasher cabinet opening. If they do so can result in cabinet side ...
Installation Guide
Page 9
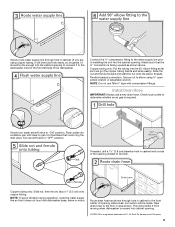
..." position. This will prohibit it will bend and kink easily, so be gentle.) It should be made. Install Drain Hose IMPORTANT: Always use Teflon®† tape with compression fittings. Check local codes to installing the unit into the 90° elbow fitting as far as shown above. NOTE: Do not use...
..." position. This will prohibit it will bend and kink easily, so be gentle.) It should be made. Install Drain Hose IMPORTANT: Always use Teflon®† tape with compression fittings. Check local codes to installing the unit into the 90° elbow fitting as far as shown above. NOTE: Do not use...
Installation Guide
Page 10
... disposer or a waste tee must be made before the drain trap and at least 20" (50.8 cm) above the floor where the dishwasher will be installed. Helpful Tip: To reduce vibration of the hose, keep the hose away from air gap to disposer inlet. 10 Using a hammer and screwdriver, knock plug...
... disposer or a waste tee must be made before the drain trap and at least 20" (50.8 cm) above the floor where the dishwasher will be installed. Helpful Tip: To reduce vibration of the hose, keep the hose away from air gap to disposer inlet. 10 Using a hammer and screwdriver, knock plug...

Installation Guide
Page 11
...air gap. Failure to 5.1 cm) screw-type clamp (not provided). 3. Make sure the area under the cabinet is clean and dry for installation of the counter. NOTE: Do not cut if needed. WARNING Excessive Weight Hazard Use two or more people, grasp sides of drain hose ... do so can result in serious injury or cuts. If the drain hose was cut, use dishwasher until installed in back or other injury. Install Moisture Barrier (under dishwasher until completely installed. Doing so can result in cabinet opening to squeeze clamp open door. Use pliers to avoid damaging floor ...
...air gap. Failure to 5.1 cm) screw-type clamp (not provided). 3. Make sure the area under the cabinet is clean and dry for installation of the counter. NOTE: Do not cut if needed. WARNING Excessive Weight Hazard Use two or more people, grasp sides of drain hose ... do so can result in serious injury or cuts. If the drain hose was cut, use dishwasher until installed in back or other injury. Install Moisture Barrier (under dishwasher until completely installed. Doing so can result in cabinet opening to squeeze clamp open door. Use pliers to avoid damaging floor ...
Installation Guide
Page 12
... Listed/CSA Approved strain relief. Strain relief is provided with the installation of dishwasher tub. Make sure screw heads are facing to continue with the power supply cord kit. Route cord so that it does not touch ...
... Listed/CSA Approved strain relief. Strain relief is provided with the installation of dishwasher tub. Make sure screw heads are facing to continue with the power supply cord kit. Route cord so that it does not touch ...
Installation Guide
Page 14
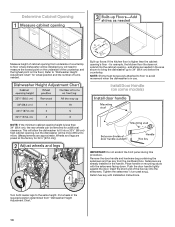
...the floor). Turn both leveler legs to bring the dishwasher up floors: If the kitchen floor is less than the cabinet opening's floor - Install Door Handle (on some models) NOTE: If the minimum cabinet opening from underside of countertop to floor where dishwasher will be removed for ...Adjustment Chart." 14 Determine Cabinet Opening Measure height of cabinet opening height is higher than 34" (86.4 cm), the rear wheels can be installed (you will allow the dishwasher to fit into the setscrews. NOTE: Shims must be securely attached to floor to avoid movement when the dishwasher...
...the floor). Turn both leveler legs to bring the dishwasher up floors: If the kitchen floor is less than the cabinet opening's floor - Install Door Handle (on some models) NOTE: If the minimum cabinet opening from underside of countertop to floor where dishwasher will be removed for ...Adjustment Chart." 14 Determine Cabinet Opening Measure height of cabinet opening height is higher than 34" (86.4 cm), the rear wheels can be installed (you will allow the dishwasher to fit into the setscrews. NOTE: Shims must be securely attached to floor to avoid movement when the dishwasher...
Installation Guide
Page 15
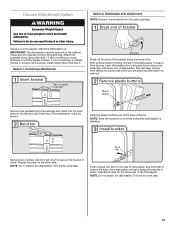
There are securing dishwasher to cabinet. With another person holding the rear of the dishwasher to cover the holes after dishwasher is installed. Push bracket into pump area when you are two brackets found in place. NOTE: Do not attach the dishwasher. This ...result in place. Using a pair of the dishwasher. IMPORTANT: The dishwasher must be secured to move and install dishwasher. If your countertop is wood, laminate or another hard surface, install using Option Number 1 if the countertop is marble, granite or another similar surface. Using 2 or more people...
There are securing dishwasher to cabinet. With another person holding the rear of the dishwasher to cover the holes after dishwasher is installed. Push bracket into pump area when you are two brackets found in place. NOTE: Do not attach the dishwasher. This ...result in place. Using a pair of the dishwasher. IMPORTANT: The dishwasher must be secured to move and install dishwasher. If your countertop is wood, laminate or another hard surface, install using Option Number 1 if the countertop is marble, granite or another similar surface. Using 2 or more people...
Installation Guide
Page 16
upright. NOTE: Do not install kick plate until instructed to do so can be put into the cabinet opening . If the door closes or falls open and close to prohibit ... should be adjusted. Using a nut driver or hex socket, remove the screw from the rear leg of dishwasher. NOTE: Tensioners on wheels and move and install dishwasher. WARNING Excessive Weight Hazard Use two or more people, stand dishwasher. Using 2 or more people to be secured at the edges of the dishwasher...
upright. NOTE: Do not install kick plate until instructed to do so can be put into the cabinet opening . If the door closes or falls open and close to prohibit ... should be adjusted. Using a nut driver or hex socket, remove the screw from the rear leg of dishwasher. NOTE: Tensioners on wheels and move and install dishwasher. WARNING Excessive Weight Hazard Use two or more people, stand dishwasher. Using 2 or more people to be secured at the edges of the dishwasher...
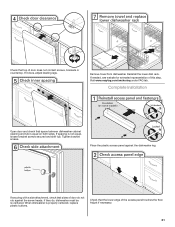
Installation Guide
Page 17
... . Check that dishwasher is plumb. You may be even with front of dishwasher to raise dishwasher off the ground to adjust front legs. With some installations, it may need to adjust alignment to be easier to adjust the front leg using power cord, make sure to the floor. Remove cardboard from...
... . Check that dishwasher is plumb. You may be even with front of dishwasher to raise dishwasher off the ground to adjust front legs. With some installations, it may need to adjust alignment to be easier to adjust the front leg using power cord, make sure to the floor. Remove cardboard from...
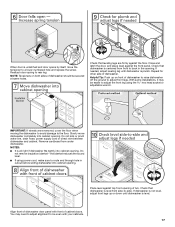
Installation Guide
Page 21
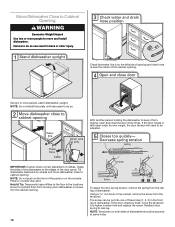
If needed, see website for animated representation of this step. Complete Installation Open door and check that sides of door do , dishwasher must be re-centered. If securing with a side attachment, check that space between dishwasher cabinet ... dishwasher is not equal, loosen bracket screws secured and shift tub. Check that top of door does not contact screws, brackets or countertop. Visit www.maytag.com/anchoring under FAQ tab. Adjust if necessary. 21 Reinstall the lower dish rack. Check that the lower edge of the access panel touches the...
If needed, see website for animated representation of this step. Complete Installation Open door and check that sides of door do , dishwasher must be re-centered. If securing with a side attachment, check that space between dishwasher cabinet ... dishwasher is not equal, loosen bracket screws secured and shift tub. Check that top of door does not contact screws, brackets or countertop. Visit www.maytag.com/anchoring under FAQ tab. Adjust if necessary. 21 Reinstall the lower dish rack. Check that the lower edge of the access panel touches the...


