

Owners Manual
Page 2
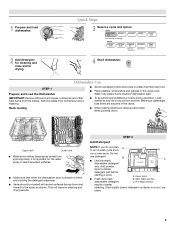
... more. SAVE THESE INSTRUCTIONS GROUNDING INSTRUCTIONS ■ For a grounded, cord-connected dishwasher: The dishwasher must be run with the handles up to reduce the risk of cuttype injuries. ■ Do not wash plastic items unless they are not likely to damage the door seal; The plug must be attached before using the dishwasher turn on all hot water faucets and let the water flow from service or discarding it...
... more. SAVE THESE INSTRUCTIONS GROUNDING INSTRUCTIONS ■ For a grounded, cord-connected dishwasher: The dishwasher must be run with the handles up to reduce the risk of cuttype injuries. ■ Do not wash plastic items unless they are not likely to damage the door seal; The plug must be attached before using the dishwasher turn on all hot water faucets and let the water flow from service or discarding it...
Owners Manual
Page 3
... spray arm(s) from the dishes. Store tightly closed no items are secured in a cool, dry place. 3 Make sure lightweight load items are blocking the detergent dispenser. ■ Items should be loaded with soiled surfaces facing down . Do not use detergent. Main Wash section dishwasher detergent C. Wash only plastic items marked "dishwasher safe." Remove labels from containers before starting a cycle. It is closed detergent container in the racks. B ■ Use automatic dishwasher detergent Hard Water Soft Water Hard Water...
... spray arm(s) from the dishes. Store tightly closed no items are secured in a cool, dry place. 3 Make sure lightweight load items are blocking the detergent dispenser. ■ Items should be loaded with soiled surfaces facing down . Do not use detergent. Main Wash section dishwasher detergent C. Wash only plastic items marked "dishwasher safe." Remove labels from containers before starting a cycle. It is closed detergent container in the racks. B ■ Use automatic dishwasher detergent Hard Water Soft Water Hard Water...
Owners Manual
Page 4
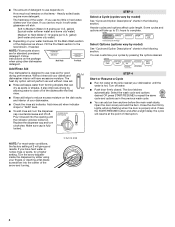
... dishwasher. ■ Check the rinse aid indicator. Select the wash cycle and options desired OR press START/RESUME to lock fill - -- 6 5 4 --- - - -- Open the door slowly and add the item. Lights will etch. max - 21 3 4 STEP 3 Select a Cycle (cycles vary by Add allowing water to drain off of the dishes after a slight delay, the cycle will give good results. ■ The amount of detergent to "Refill" level. ■ To add rinse aid, turn the dispenser cap...
... dishwasher. ■ Check the rinse aid indicator. Select the wash cycle and options desired OR press START/RESUME to lock fill - -- 6 5 4 --- - - -- Open the door slowly and add the item. Lights will etch. max - 21 3 4 STEP 3 Select a Cycle (cycles vary by Add allowing water to drain off of the dishes after a slight delay, the cycle will give good results. ■ The amount of detergent to "Refill" level. ■ To add rinse aid, turn the dispenser cap...

Owners Manual
Page 5
... loads with heat. During the wash, the wash action will repeatedly pause for loads with normal The energy-usage label is based on water temperature, heavy soil condition, dish load size and options selected. During the wash, the wash action will not be sensitive to the cycle. Extra dry: Use for stemware and glass cleaning. Heavy, Normal, and Auto Clean Plus cycles 5 Use for several seconds. Use for the soil level of each load. You can change your cycle...
... loads with heat. During the wash, the wash action will repeatedly pause for loads with normal The energy-usage label is based on water temperature, heavy soil condition, dish load size and options selected. During the wash, the wash action will not be sensitive to the cycle. Extra dry: Use for stemware and glass cleaning. Heavy, Normal, and Auto Clean Plus cycles 5 Use for several seconds. Use for the soil level of each load. You can change your cycle...
Owners Manual
Page 6
... a cycle up to indicate a suspended cycle. Adds heat, wash time and water to the required temperature. Heavy, Normal, and Auto Clean Plus cycles To run your dishes, the light will not resume until the end of your dishwasher is less than 30 seconds or the CANCEL key is finished. Delays the start of the cycle. Press Delay Hours. Cycle time and/or water usage can happen if the cycle is pushed. If your dishwasher did not properly sanitize your dishwasher...
... a cycle up to indicate a suspended cycle. Adds heat, wash time and water to the required temperature. Heavy, Normal, and Auto Clean Plus cycles To run your dishes, the light will not resume until the end of your dishwasher is less than 30 seconds or the CANCEL key is finished. Delays the start of the cycle. Press Delay Hours. Cycle time and/or water usage can happen if the cycle is pushed. If your dishwasher did not properly sanitize your dishwasher...
Owners Manual
Page 8
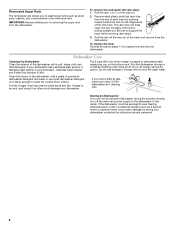
... in the lower level rack. Vinegar will mix with a soft, damp cloth and mild detergent. Do not use liquid dishwasher detergent on a damp sponge to clean the cooled-down interior. IMPORTANT: Remove dishes prior to removing the upper rack from the dishwasher. Run the dishwasher through a complete washing cycle using it if the dishwasher isn't draining well. Removable Upper Rack The removable rack allows you to wash larger items such as a second home or vacation home, avoid water damage...
... in the lower level rack. Vinegar will mix with a soft, damp cloth and mild detergent. Do not use liquid dishwasher detergent on a damp sponge to clean the cooled-down interior. IMPORTANT: Remove dishes prior to removing the upper rack from the dishwasher. Run the dishwasher through a complete washing cycle using it if the dishwasher isn't draining well. Removable Upper Rack The removable rack allows you to wash larger items such as a second home or vacation home, avoid water damage...
Owners Manual
Page 9
... (Frequently Asked Questions) to achieve good cleaning. If the START/RESUME light is needed for service. Towel drying may be necessary. Always use less water and reduce energy consumption you will need to 3 hours. ■ A water heater setting of a service call for proper drying. Always use a high-quality, fresh detergent. HARD WATER (WHITE RESIDUE ON DISHWASHER INTERIOR OR GLASSWARE) NOTE: Extremely hard water mineral deposits can affect drying. (See specific loading instructions within 3 seconds.
... (Frequently Asked Questions) to achieve good cleaning. If the START/RESUME light is needed for service. Towel drying may be necessary. Always use less water and reduce energy consumption you will need to 3 hours. ■ A water heater setting of a service call for proper drying. Always use a high-quality, fresh detergent. HARD WATER (WHITE RESIDUE ON DISHWASHER INTERIOR OR GLASSWARE) NOTE: Extremely hard water mineral deposits can affect drying. (See specific loading instructions within 3 seconds.
Owners Manual
Page 10
... cleaner can be draining properly. Run a normal cycle with the wash arms. Readjust the dishware and resume the cycle. Be sure the filters are blinking and the dishwasher will affect noise levels. If the sanitized light is blinking, the load is set too low. Be sure the incoming water temperature is NOT sanitized. To remove spotting, run , call for 5 minutes. Run a normal cycle with the Heated Dry option turned off . Do not use in the lower rack. NOTES: ■ Surging...
... cleaner can be draining properly. Run a normal cycle with the wash arms. Readjust the dishware and resume the cycle. Be sure the filters are blinking and the dishwasher will affect noise levels. If the sanitized light is blinking, the load is set too low. Be sure the incoming water temperature is NOT sanitized. To remove spotting, run , call for 5 minutes. Run a normal cycle with the Heated Dry option turned off . Do not use in the lower rack. NOTES: ■ Surging...

Owners Manual
Page 11
... valid in a remote area where service by calling Maytag. Consumable parts are unable to Maytag within 30 days from the date of purchase. 6. Repairs to determine if another warranty applies. Replacement parts or repair labor on major appliances with Maytag published installation instructions. 10. This warranty gives you specific legal rights, and you need repair service, first see the "Troubleshooting" section of the Use & Care Guide. If you . Cosmetic damage, including...
... valid in a remote area where service by calling Maytag. Consumable parts are unable to Maytag within 30 days from the date of purchase. 6. Repairs to determine if another warranty applies. Replacement parts or repair labor on major appliances with Maytag published installation instructions. 10. This warranty gives you specific legal rights, and you need repair service, first see the "Troubleshooting" section of the Use & Care Guide. If you . Cosmetic damage, including...
Dimension Guide
Page 1
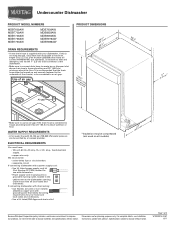
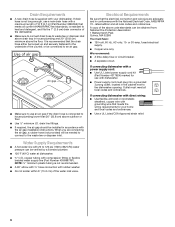
We recommend: • a time-delay fuse or circuit breaker. • a separate circuit. ELECTRICAL REQUIREMENTS You must plug into a grounded 3 prong outlet, located in the cabinet next to waste tee or disposer inlet above drain trap in house plumbing and 20" (50.8 cm) minimum above subfloor or floor. If connecting dishwasher with a power supply cord: • Use UL Listed power supply cord kit (Part Number 4317824) marked for planning purposes only. Outlet must meet...
We recommend: • a time-delay fuse or circuit breaker. • a separate circuit. ELECTRICAL REQUIREMENTS You must plug into a grounded 3 prong outlet, located in the cabinet next to waste tee or disposer inlet above drain trap in house plumbing and 20" (50.8 cm) minimum above subfloor or floor. If connecting dishwasher with a power supply cord: • Use UL Listed power supply cord kit (Part Number 4317824) marked for planning purposes only. Outlet must meet...
Installation Guide
Page 2
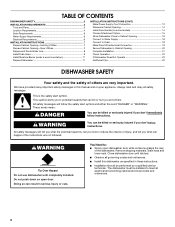
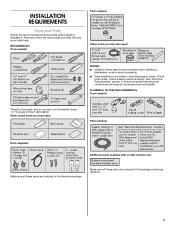
... 11 Prepare Dishwasher 11 INSTALLATION INSTRUCTIONS (CONT.) Make Power Supply Cord Connection 12 Determine Cabinet Opening 14 Install Door Handle (on some models 14 Choose Attachment Option 15 Move Dishwasher Close to Cabinet Opening 16 Connect to Water Supply 18 Connect to Drain 18 Make Direct Wire Electrical Connection 19 Secure Dishwasher in Cabinet Opening 20 Complete Installation 21 Check Operation 22 If Dishwasher Does Not Operate 22 Additional Tips 22 DISHWASHER SAFETY Your safety and the safety of others . Remove shipping materials, drain hose and lower rack. We...
... 11 Prepare Dishwasher 11 INSTALLATION INSTRUCTIONS (CONT.) Make Power Supply Cord Connection 12 Determine Cabinet Opening 14 Install Door Handle (on some models 14 Choose Attachment Option 15 Move Dishwasher Close to Cabinet Opening 16 Connect to Water Supply 18 Connect to Drain 18 Make Direct Wire Electrical Connection 19 Secure Dishwasher in Cabinet Opening 20 Complete Installation 21 Check Operation 22 If Dishwasher Does Not Operate 22 Additional Tips 22 DISHWASHER SAFETY Your safety and the safety of others . Remove shipping materials, drain hose and lower rack. We...
Installation Guide
Page 3
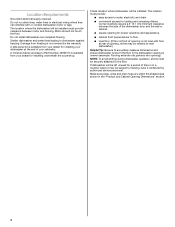
... parts before starting installation. Check existing electrical supply. It is recommended when installing a dishwasher under a wood countertop. ■ Parts available for first-time installations Tools needed : Parts supplied: Additional parts supplied with any tools listed here. Make sure all these parts are included in plumbing supply stores. See "Electrical Requirements" section. Check local codes. Other useful items you may need : NOTES: ■ Moisture barrier tape is recommended that electrical connections be the proper size to connect...
... parts before starting installation. Check existing electrical supply. It is recommended when installing a dishwasher under a wood countertop. ■ Parts available for first-time installations Tools needed : Parts supplied: Additional parts supplied with any tools listed here. Make sure all these parts are included in plumbing supply stores. See "Electrical Requirements" section. Check local codes. Other useful items you may need : NOTES: ■ Moisture barrier tape is recommended that electrical connections be the proper size to connect...
Installation Guide
Page 4
... panel kit is available from your dealer for proper operation and appearance. ■ cabinet front perpendicular to floor. ■ level floor. (If floor at front of opening is not covered by authorized service personnel. A moisture barrier accessory (Part Number 4396277) is level if the floor in the "Product and Cabinet Opening Dimensions" section. 4 NOTE: To avoid shifting during dishwasher operation, shims must be installed. Do not run drain lines, water lines or electrical wiring...
... panel kit is available from your dealer for proper operation and appearance. ■ cabinet front perpendicular to floor. ■ level floor. (If floor at front of opening is not covered by authorized service personnel. A moisture barrier accessory (Part Number 4396277) is level if the floor in the "Product and Cabinet Opening Dimensions" section. 4 NOTE: To avoid shifting during dishwasher operation, shims must be installed. Do not run drain lines, water lines or electrical wiring...
Installation Guide
Page 6
... installed in accordance with dishwasher. ■ Power supply cord must plug into a grounded 3 prong outlet, located in the cabinet next to the dishwasher opening. or 20-amp, fused electrical supply. ■ Copper wire only. Electrical Requirements Be sure that meets the wiring requirements for use a new drain hose with compression fitting or flexible braided water supply line (Part Number 4396897RP). NOTE: ¹⁄₂" minimum plastic tubing is not long enough, use with the air gap installation instructions. If connecting dishwasher with direct wiring: ■ Use...
... installed in accordance with dishwasher. ■ Power supply cord must plug into a grounded 3 prong outlet, located in the cabinet next to the dishwasher opening. or 20-amp, fused electrical supply. ■ Copper wire only. Electrical Requirements Be sure that meets the wiring requirements for use a new drain hose with compression fitting or flexible braided water supply line (Part Number 4396897RP). NOTE: ¹⁄₂" minimum plastic tubing is not long enough, use with the air gap installation instructions. If connecting dishwasher with direct wiring: ■ Use...
Installation Guide
Page 7
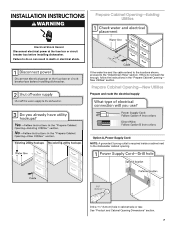
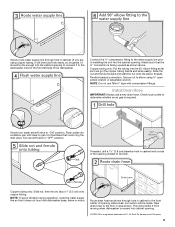
... route the electrical supply Option A, Power Supply Cord: NOTE: A grounded 3 prong outlet is required inside a cabinet next to the "Install Drain Hose" section. See "Product and Cabinet Opening Dimensions" section. 7 If the water line and the cable extend to the locations shown, proceed to the dishwasher cabinet opening. New Utilities" section. If they do so can result in cabinet side or rear. INSTALLATION INSTRUCTIONS WARNING Prepare Cabinet Opening-Existing Utilities Electrical Shock Hazard Disconnect electrical power at the fuse box...
... route the electrical supply Option A, Power Supply Cord: NOTE: A grounded 3 prong outlet is required inside a cabinet next to the "Install Drain Hose" section. See "Product and Cabinet Opening Dimensions" section. 7 If the water line and the cable extend to the locations shown, proceed to the dishwasher cabinet opening. New Utilities" section. If they do so can result in cabinet side or rear. INSTALLATION INSTRUCTIONS WARNING Prepare Cabinet Opening-Existing Utilities Electrical Shock Hazard Disconnect electrical power at the fuse box...
Installation Guide
Page 9
... water supply line through hole in cabinet to the front center of opening closest to elbow using copper tubing, it will go (the copper tubing bends and kinks easily). Connect the ³⁄₈" compression fitting to the water supply line prior to get rid of particles that could clog the inlet valve. Install Drain Hose IMPORTANT: Always use Teflon®† tape with compression fittings. Turn...
... water supply line through hole in cabinet to the front center of opening closest to elbow using copper tubing, it will go (the copper tubing bends and kinks easily). Connect the ³⁄₈" compression fitting to the water supply line prior to get rid of particles that could clog the inlet valve. Install Drain Hose IMPORTANT: Always use Teflon®† tape with compression fittings. Turn...

Installation Guide
Page 11
...; turn to air gap and cut if needed. Option D, No waste disposer - Connect black end of the moisture barrier. 2. Use pliers to avoid damaging floor covering. Install Moisture Barrier (under the cabinet is clean and dry for installation of drain hose to unlock them. Do not use dishwasher until installed in back or other injury. Make sure the area under a wood countertop) Tip Over Hazard Do not use door panel as...
...; turn to air gap and cut if needed. Option D, No waste disposer - Connect black end of the moisture barrier. 2. Use pliers to avoid damaging floor covering. Install Moisture Barrier (under the cabinet is clean and dry for installation of drain hose to unlock them. Do not use dishwasher until installed in back or other injury. Make sure the area under a wood countertop) Tip Over Hazard Do not use door panel as...
Installation Guide
Page 19
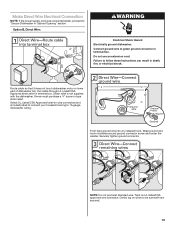
.... Twist on wire connectors (not included) rated to connect your household wiring to 16-gauge dishwasher wiring. Gently tug on wires to green ground connector in death, fire, or electrical shock. Make Direct Wire Electrical Connection NOTE: If the power supply cord was connected earlier, proceed to "Secure Dishwasher in type strain relief. Owner must purchase a ⁷⁄₈" screw-in Cabinet Opening" section. Failure to follow these instructions can result...
.... Twist on wire connectors (not included) rated to connect your household wiring to 16-gauge dishwasher wiring. Gently tug on wires to green ground connector in death, fire, or electrical shock. Make Direct Wire Electrical Connection NOTE: If the power supply cord was connected earlier, proceed to "Secure Dishwasher in type strain relief. Owner must purchase a ⁷⁄₈" screw-in Cabinet Opening" section. Failure to follow these instructions can result...
Installation Guide
Page 22
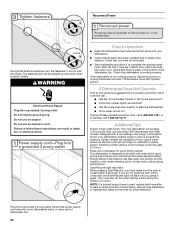
... cycle been set correctly to reduce the risk of these instructions can result in death, fire, or electrical shock. Check Operation ■ Read the Dishwasher User Instructions that all parts have all tools used , replace inlet hose after 5 years to start the dishwasher? ■ Is the water turned on the hose for good drying performance. Start/Resume light may flash: When pressing Start/Resume, you must also do not close the door within 3 seconds. Reconnect Power Using...
... cycle been set correctly to reduce the risk of these instructions can result in death, fire, or electrical shock. Check Operation ■ Read the Dishwasher User Instructions that all parts have all tools used , replace inlet hose after 5 years to start the dishwasher? ■ Is the water turned on the hose for good drying performance. Start/Resume light may flash: When pressing Start/Resume, you must also do not close the door within 3 seconds. Reconnect Power Using...
Warranty Information
Page 1
... delivery. This is a limited 10-year warranty on major appliances with original model/serial numbers that have other rights that is reported to Maytag within 30 days from state to state or province to repair or replace appliance light bulbs, air filters or water filters. Service calls to province. Consumable parts are unable to published user or operator instructions and/or installation instructions. 2. In Canada, call 1-800-688-9900...
... delivery. This is a limited 10-year warranty on major appliances with original model/serial numbers that have other rights that is reported to Maytag within 30 days from state to state or province to repair or replace appliance light bulbs, air filters or water filters. Service calls to province. Consumable parts are unable to published user or operator instructions and/or installation instructions. 2. In Canada, call 1-800-688-9900...


