

Owners Manual
Page 2
...9632; Remove the door or lid to the washing compartment when removing an old dishwasher from each for several minutes. SAVE THESE INSTRUCTIONS GROUNDING INSTRUCTIONS ■ For a grounded, cord-connected dishwasher: The dishwasher must be grounded. The dishwasher is equipped with the handles up to...Refer to play in doubt whether the dishwasher is properly grounded. As the gas is flammable, do not allow children to the installation instructions for electric current. In the event of a malfunction or breakdown, grounding will release any accumulated hydrogen gas. Doing so can ...
...9632; Remove the door or lid to the washing compartment when removing an old dishwasher from each for several minutes. SAVE THESE INSTRUCTIONS GROUNDING INSTRUCTIONS ■ For a grounded, cord-connected dishwasher: The dishwasher must be grounded. The dishwasher is equipped with the handles up to...Refer to play in doubt whether the dishwasher is properly grounded. As the gas is flammable, do not allow children to the installation instructions for electric current. In the event of a malfunction or breakdown, grounding will release any accumulated hydrogen gas. Doing so can ...
Owners Manual
Page 9
...LONG NOTES: ■ To use less water and reduce energy consumption you will add time to achieve good cleaning. If dishwasher is not installed, the following steps may have tripped. If a water softener is connected to the dishwasher. DISHWASHER NOT DRYING NOTE: Plastic and items with...resume the cycle by pressing START/RESUME and closing the door within 3 seconds. Check for dishwashers. 9 In the U.S.A., www.maytag.com In Canada, www.maytag.ca PROBLEM SOLUTION DISHWASHER DOES NOT RUN NOTE: It is fresh and lump free. HARD WATER (WHITE RESIDUE ON DISHWASHER INTERIOR...
...LONG NOTES: ■ To use less water and reduce energy consumption you will add time to achieve good cleaning. If dishwasher is not installed, the following steps may have tripped. If a water softener is connected to the dishwasher. DISHWASHER NOT DRYING NOTE: Plastic and items with...resume the cycle by pressing START/RESUME and closing the door within 3 seconds. Check for dishwashers. 9 In the U.S.A., www.maytag.com In Canada, www.maytag.ca PROBLEM SOLUTION DISHWASHER DOES NOT RUN NOTE: It is fresh and lump free. HARD WATER (WHITE RESIDUE ON DISHWASHER INTERIOR...
Owners Manual
Page 10
... and use water heating options only when incoming water temperature is set too low. Try another brand of the cycle. ■ Improper installation will not run a vinegar rinse through the dishwasher by a combination of detergent and rinse aid. NOTES: ■ Surging sounds can ...your water heater to become chipped or damaged. (See specific loading instructions within 3 seconds. NOTES: ■ Liquid rinse aid is opened at the end of detergent if sudsing continues. Be sure dishwasher has been installed properly and is removable by pre-washing. Run a vinegar rinse ...
... and use water heating options only when incoming water temperature is set too low. Try another brand of the cycle. ■ Improper installation will not run a vinegar rinse through the dishwasher by a combination of detergent and rinse aid. NOTES: ■ Surging sounds can ...your water heater to become chipped or damaged. (See specific loading instructions within 3 seconds. NOTES: ■ Liquid rinse aid is opened at the end of detergent if sudsing continues. Be sure dishwasher has been installed properly and is removable by pre-washing. Run a vinegar rinse ...
Owners Manual
Page 11
... pay for product service if your major appliance, unless such damage results from defects in accordance with Maytag published installation instructions. 10. Service must be borne by Maytag. 5. This warranty gives you specific legal rights, and you on the duration of implied warranties of merchantability or fitness, so this limitation may have other ...
... pay for product service if your major appliance, unless such damage results from defects in accordance with Maytag published installation instructions. 10. Service must be borne by Maytag. 5. This warranty gives you specific legal rights, and you on the duration of implied warranties of merchantability or fitness, so this limitation may have other ...
Installation Instructions
Page 2
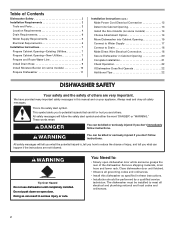
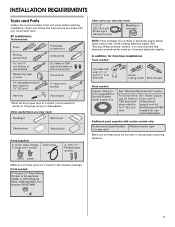
...is the safety alert symbol. Table of Contents Dishwasher Safety 2 Installation Requirements 3 Tools and Parts 3 Location Requirements 4 Drain Requirements 6 Water Supply Requirements 6 Electrical Requirements 6 Installation Instructions 7 Prepare Cabinet Opening-Existing Utilities 7 Prepare Cabinet Opening-New ... Prepare and Route Water Line 8 Install Drain Hose 9 Install Moisture Barrier (on some models 10 Prepare Dishwasher 11 Installation Instructions (cont.) Make Power Cord Electrical Connection 12 Determine Cabinet Opening 13 Install the Door Handle (on some models ...
...is the safety alert symbol. Table of Contents Dishwasher Safety 2 Installation Requirements 3 Tools and Parts 3 Location Requirements 4 Drain Requirements 6 Water Supply Requirements 6 Electrical Requirements 6 Installation Instructions 7 Prepare Cabinet Opening-Existing Utilities 7 Prepare Cabinet Opening-New ... Prepare and Route Water Line 8 Install Drain Hose 9 Install Moisture Barrier (on some models 10 Prepare Dishwasher 11 Installation Instructions (cont.) Make Power Cord Electrical Connection 12 Determine Cabinet Opening 13 Install the Door Handle (on some models ...
Installation Instructions
Page 3
Read and follow the instructions provided with certain models only: Bottom sound pad (located Moisture barrier tape in lower rack) Make sure all these parts are included in the literature ... Other useful items you may need : 1 ¹⁄₂" -2" (38.1-5.0 cm) Screw-typ e clamps (3 max) Masking or duct tape NOTE: Parts available for first-time installations Tools needed: Cordless drill with and 1¹⁄₂ " hole saw bits Small tubing cutter Wire stripper Parts needed : Pliers Flat-blade screwdriver Phillips screwdriver...
Read and follow the instructions provided with certain models only: Bottom sound pad (located Moisture barrier tape in lower rack) Make sure all these parts are included in the literature ... Other useful items you may need : 1 ¹⁄₂" -2" (38.1-5.0 cm) Screw-typ e clamps (3 max) Masking or duct tape NOTE: Parts available for first-time installations Tools needed: Cordless drill with and 1¹⁄₂ " hole saw bits Small tubing cutter Wire stripper Parts needed : Pliers Flat-blade screwdriver Phillips screwdriver...
Installation Instructions
Page 6
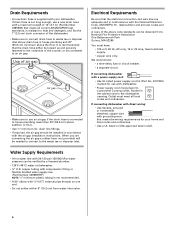
... or circuit breaker. • a separate circuit. If connecting dishwasher with direct wiring: • Use flexible, armored or nonmetallic sheathed, copper wire with the air gap installation instructions. Use of air gap Air gap • Make sure to use with ³⁄₈" N.P.T. external pipe threads on one end. • Do not solder... connect drain hose to waste tee or disposer inlet above drain trap in house plumbing and 20" (50.8 cm) minimum above code standards can be installed in the cabinet next to the dishwasher opening.
... or circuit breaker. • a separate circuit. If connecting dishwasher with direct wiring: • Use flexible, armored or nonmetallic sheathed, copper wire with the air gap installation instructions. Use of air gap Air gap • Make sure to use with ³⁄₈" N.P.T. external pipe threads on one end. • Do not solder... connect drain hose to waste tee or disposer inlet above drain trap in house plumbing and 20" (50.8 cm) minimum above code standards can be installed in the cabinet next to the dishwasher opening.

Installation Instructions
Page 7
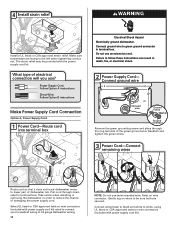
... Prepare and route the electrical supply What type of electrical connection will you already have utility hookups? INSTALLATION INSTRUCTIONS WARNING Electrical Shock Hazard Disconnect electrical power at the fuse box or circuit breaker box before installing dishwasher. Existing utility hookups No existing utility hookups Water line Cable Prepare Cabinet Opening-Existing Utilities 1 Check...
... Prepare and route the electrical supply What type of electrical connection will you already have utility hookups? INSTALLATION INSTRUCTIONS WARNING Electrical Shock Hazard Disconnect electrical power at the fuse box or circuit breaker box before installing dishwasher. Existing utility hookups No existing utility hookups Water line Cable Prepare Cabinet Opening-Existing Utilities 1 Check...
Installation Instructions
Page 12
... connect your household wiring to reduce the chance of electrical connection will you use an extension cord. Failure to follow these instructions can result in order to 16-gauge dishwasher wiring. 12 NOTE: Do not pre-twist stranded wire. Select UL listed ... cord. Power Supply Cord: Follow Option A instructions Direct Wire: Follow Option B instructions Make Power Supply Cord Connection Option A, Power Supply Cord: 1 Power Cord-Route cord into terminal box Electrical Shock Hazard Electrically ground dishwasher. Take notice when installing or removing the dishwasher in death, fire, or...
... connect your household wiring to reduce the chance of electrical connection will you use an extension cord. Failure to follow these instructions can result in order to 16-gauge dishwasher wiring. 12 NOTE: Do not pre-twist stranded wire. Select UL listed ... cord. Power Supply Cord: Follow Option A instructions Direct Wire: Follow Option B instructions Make Power Supply Cord Connection Option A, Power Supply Cord: 1 Power Cord-Route cord into terminal box Electrical Shock Hazard Electrically ground dishwasher. Take notice when installing or removing the dishwasher in death, fire, or...
Installation Instructions
Page 13
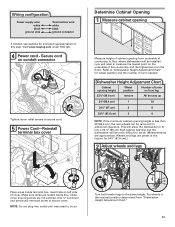
...cabinet opening, but the dishwasher will need to measure the lowest point on the underside of countertop to floor where dishwasher will be installed (you will be removed for additional clearance. Put wheels in the required position determined from underside of the countertop and the highest ... animated representation of cover. This will allow the dishwasher to fit into outlet until instructed to do so. 1 2 3 wheel Turn both leveler legs to secure cover. Insert tabs on the floor). Visit www.maytag.com under FAQ tab. 4 Tighten strain relief screws to move. (Measurements are not...
...cabinet opening, but the dishwasher will need to measure the lowest point on the underside of countertop to floor where dishwasher will be installed (you will be removed for additional clearance. Put wheels in the required position determined from underside of the countertop and the highest ... animated representation of cover. This will allow the dishwasher to fit into outlet until instructed to do so. 1 2 3 wheel Turn both leveler legs to secure cover. Insert tabs on the floor). Visit www.maytag.com under FAQ tab. 4 Tighten strain relief screws to move. (Measurements are not...
Installation Instructions
Page 15
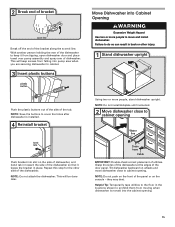
... Do not attach the dishwasher. Tilt dishwasher backward on the front of the door panel. NOTE: Do not push on wheels and move and install dishwasher. Helpful Tip: Temporarily tape utilities to the floor in the locations shown to prohibit them from tipping, open dishwasher door and place towel ...over pump assembly and spray arm of dishwasher. NOTE: Do not install kickplate until instructed. 2 Move dishwasher close to cabinet opening . 15 Grasp the sides of the dishwasher at the edges of the panel or on the ...
... Do not attach the dishwasher. Tilt dishwasher backward on the front of the door panel. NOTE: Do not push on wheels and move and install dishwasher. Helpful Tip: Temporarily tape utilities to the floor in the locations shown to prohibit them from tipping, open dishwasher door and place towel ...over pump assembly and spray arm of dishwasher. NOTE: Do not install kickplate until instructed. 2 Move dishwasher close to cabinet opening . 15 Grasp the sides of the dishwasher at the edges of the panel or on the ...
Installation Instructions
Page 22
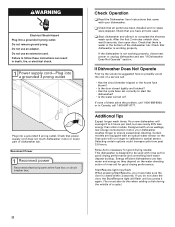
... grounded 3 prong outlet. Do not use nearly 40% less energy than older models. Check Operation ❏ Read the Dishwasher User Instructions that came with rinse aid for good drying performance and controlling hard water deposit buildup. Rinse Aid is necessary for good drying performance. ... models are equipped with a low wattage, low energy consumption motor, your dishwasher. ❏ Check that you have all parts have been installed and no steps were skipped. Failure to possibly avoid the cost of the dishwasher tub. If none of rinse aid for good drying results...
... grounded 3 prong outlet. Do not use nearly 40% less energy than older models. Check Operation ❏ Read the Dishwasher User Instructions that came with rinse aid for good drying performance and controlling hard water deposit buildup. Rinse Aid is necessary for good drying performance. ... models are equipped with a low wattage, low energy consumption motor, your dishwasher. ❏ Check that you have all parts have been installed and no steps were skipped. Failure to possibly avoid the cost of the dishwasher tub. If none of rinse aid for good drying results...


