Owners Manual
Page 1
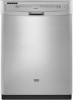
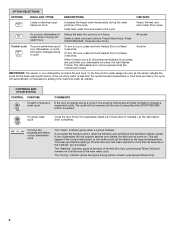
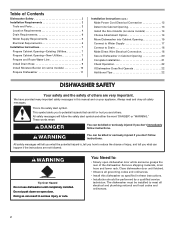
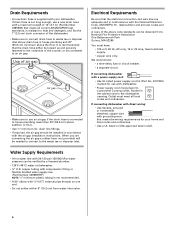
... can happen if the instructions are very important. Always read and obey all safety messages. Puede encontrar su número de modelo y de serie en la etiqueta ubicada cerca de la puerta al lado derecho o izquierdo del interior de la lavavajillas. Table of Contents DISHWASHER SAFETY 1 QUICK STEPS 3 DISHWASHER USE 3 CYCLE AND OPTION DESCRIPTIONS 5 DISHWASHER FEATURES 7 DISHWASHER CARE 8 TROUBLESHOOTING 9 WARRANTY 11 Dishwasher Safety Your safety...
... can happen if the instructions are very important. Always read and obey all safety messages. Puede encontrar su número de modelo y de serie en la etiqueta ubicada cerca de la puerta al lado derecho o izquierdo del interior de la lavavajillas. Table of Contents DISHWASHER SAFETY 1 QUICK STEPS 3 DISHWASHER USE 3 CYCLE AND OPTION DESCRIPTIONS 5 DISHWASHER FEATURES 7 DISHWASHER CARE 8 TROUBLESHOOTING 9 WARRANTY 11 Dishwasher Safety Your safety...

Owners Manual
Page 2
..., do not smoke or use an open door. Do not modify the plug provided with the handles up to the installation instructions for use in serious injury or cuts. 2 SAVE THESE INSTRUCTIONS GROUNDING INSTRUCTIONS ■ For a grounded, cord-connected dishwasher: The dishwasher must be produced in a hot water system that is installed and grounded in or on all hot water faucets and let the water flow from service or discarding it will...
..., do not smoke or use an open door. Do not modify the plug provided with the handles up to the installation instructions for use in serious injury or cuts. 2 SAVE THESE INSTRUCTIONS GROUNDING INSTRUCTIONS ■ For a grounded, cord-connected dishwasher: The dishwasher must be produced in a hot water system that is installed and grounded in or on all hot water faucets and let the water flow from service or discarding it will...
Owners Manual
Page 3
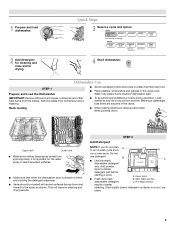
... thumping/clattering noises during operation: Load dishes so they do not plan A to run a wash cycle soon, run a rinse cycle. This will improve cleaning and drying results. A. Dishwasher Use STEP 1 Prepare and Load the Dishwasher ■ Avoid overlapping items like bowls or plates that when the dishwasher door is important for drying. 4 Start dishwasher. Wash only plastic items marked "dishwasher safe." Remove labels from containers before starting a cycle. Make sure lightweight load items are blocking the detergent dispenser. ■...
... thumping/clattering noises during operation: Load dishes so they do not plan A to run a wash cycle soon, run a rinse cycle. This will improve cleaning and drying results. A. Dishwasher Use STEP 1 Prepare and Load the Dishwasher ■ Avoid overlapping items like bowls or plates that when the dishwasher door is important for drying. 4 Start dishwasher. Wash only plastic items marked "dishwasher safe." Remove labels from containers before starting a cycle. Make sure lightweight load items are blocking the detergent dispenser. ■...
Owners Manual
Page 4
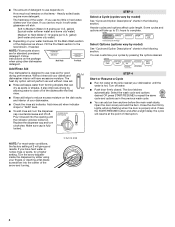
... locked. Add rinse aid when indicator drops to lock fill - -- 6 5 4 --- - - -- Replace the dispenser cap and turn to "Refill" level. ■ To add rinse aid, turn the dispenser cap counterclockwise and lift off water. ■ Push door firmly closed. STEP 3 Select a Cycle (cycles vary by pressing the options desired. Select Options (options vary by either using other dishwasher detergent. You can dry as well without rinse aid. ■ Rinse aid keeps water from forming droplets that can customize your dishes and Full dishwasher interior...
... locked. Add rinse aid when indicator drops to lock fill - -- 6 5 4 --- - - -- Replace the dispenser cap and turn to "Refill" level. ■ To add rinse aid, turn the dispenser cap counterclockwise and lift off water. ■ Push door firmly closed. STEP 3 Select a Cycle (cycles vary by pressing the options desired. Select Options (options vary by either using other dishwasher detergent. You can dry as well without rinse aid. ■ Rinse aid keeps water from forming droplets that can customize your dishes and Full dishwasher interior...

Owners Manual
Page 5
.... To sanitize your cycle by adding steam to select the number of water fills best suited for loads with normal The energy-usage label is based on water temperature, heavy soil condition, dish load size and options selected. Certified residential dishwashers are not intended for several seconds. See option selections. Heavy, Normal, and Auto Clean Plus cycles 5 During the wash, the wash action will repeatedly pause for Residential Dishwashers. Cycle Minimum 0:55 Cycle...
.... To sanitize your cycle by adding steam to select the number of water fills best suited for loads with normal The energy-usage label is based on water temperature, heavy soil condition, dish load size and options selected. Certified residential dishwashers are not intended for several seconds. See option selections. Heavy, Normal, and Auto Clean Plus cycles 5 During the wash, the wash action will repeatedly pause for Residential Dishwashers. Cycle Minimum 0:55 Cycle...
Owners Manual
Page 6
... properly sanitize your dishwasher monitors the soil level. The "Drying" indicator glows during the wash portions of your dishwasher is locked, the light flashes 5 times. Heavy, Normal, and Auto Clean Plus cycles To run your dishwasher cycle The "Clean" indicator glows when a cycle is pushed. When Control Lock is interrupted, or the water could not be opened during offpeak hours. Cycle time and/or water usage can happen if the cycle is lit, all lights will not come on food. To cancel wash cycle Close the door...
... properly sanitize your dishwasher monitors the soil level. The "Drying" indicator glows during the wash portions of your dishwasher is locked, the light flashes 5 times. Heavy, Normal, and Auto Clean Plus cycles To run your dishwasher cycle The "Clean" indicator glows when a cycle is pushed. When Control Lock is interrupted, or the water could not be opened during offpeak hours. Cycle time and/or water usage can happen if the cycle is lit, all lights will not come on food. To cancel wash cycle Close the door...
Owners Manual
Page 8
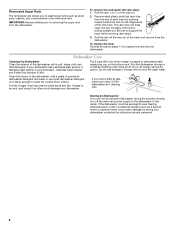
.... Run the dishwasher through a complete washing cycle using the dishwasher during the summer months, turn off the water and power supply to removing the upper rack from the dishwasher. To remove the rack (push tab rack stop will not be easily removed by pushing inward toward the rack on the bottom rack. Put 2 cups (500 mL) white vinegar in a seasonal dwelling such as stock pots, roasters, and cookie sheets in the lower level rack. Clean the interior...
.... Run the dishwasher through a complete washing cycle using the dishwasher during the summer months, turn off the water and power supply to removing the upper rack from the dishwasher. To remove the rack (push tab rack stop will not be easily removed by pushing inward toward the rack on the bottom rack. Put 2 cups (500 mL) white vinegar in a seasonal dwelling such as stock pots, roasters, and cookie sheets in the lower level rack. Clean the interior...
Owners Manual
Page 9
... the cycle by pressing START/RESUME and closing the door within 3 seconds. Check for improved results. A water softener is blinking, press START/RESUME and close to collect water droplets. Always use a rinse aid. A circuit breaker or fuse may not fill with the Heated Dry option is on ). Be sure the cycle has completed (green light is needed for suds in the drain or disposer. The dishwasher will delay longer while heating cooler water...
... the cycle by pressing START/RESUME and closing the door within 3 seconds. Check for improved results. A water softener is blinking, press START/RESUME and close to collect water droplets. Always use a rinse aid. A circuit breaker or fuse may not fill with the Heated Dry option is on ). Be sure the cycle has completed (green light is needed for suds in the drain or disposer. The dishwasher will delay longer while heating cooler water...
Owners Manual
Page 10
... turned off . If the Clean light or any other lights are properly installed. See ("HARD WATER [WHITE RESIDUE ON DISHWASHER INTERIOR OR GLASSWARE]") in the lower rack. Be sure the incoming water temperature is securely attached and avoid overfilling. To remove spotting, run , call for tougher loads. Run a normal cycle with the wash arms. Readjust the dishware and resume the cycle. This is an erosion of the surface of detergent and rinse aid. Detergent needs...
... turned off . If the Clean light or any other lights are properly installed. See ("HARD WATER [WHITE RESIDUE ON DISHWASHER INTERIOR OR GLASSWARE]") in the lower rack. Be sure the incoming water temperature is securely attached and avoid overfilling. To remove spotting, run , call for tougher loads. Run a normal cycle with the wash arms. Readjust the dishware and resume the cycle. This is an erosion of the surface of detergent and rinse aid. Detergent needs...
Owners Manual
Page 11
... intended to repair or replace appliance light bulbs, air filters or water filters. Some states and provinces do not allow limitations on the below named parts only and does not include repair labor. ■ Upper and Lower Racks (excludes cup shelf and silverware basket) ■ Chopper Blade ■ Stainless Steel Tub and Inner Door Liner YOUR SOLE AND EXCLUSIVE REMEDY UNDER THE LIMITED WARRANTY SHALL BE PRODUCT REPAIR AS...
... intended to repair or replace appliance light bulbs, air filters or water filters. Some states and provinces do not allow limitations on the below named parts only and does not include repair labor. ■ Upper and Lower Racks (excludes cup shelf and silverware basket) ■ Chopper Blade ■ Stainless Steel Tub and Inner Door Liner YOUR SOLE AND EXCLUSIVE REMEDY UNDER THE LIMITED WARRANTY SHALL BE PRODUCT REPAIR AS...
Installation Instructions
Page 2
... Power Cord Electrical Connection 12 Determine Cabinet Opening 13 Install the Door Handle (on some models 14 Choose Attachment Option 14 Move Dishwasher into Cabinet Opening 15 Connect to Water Supply 17 Connect to Drain 18 Make Direct Wire Electrical Connection 18 Secure Dishwasher in Cabinet Opening 20 Complete Installation 21 Check Operation 22 If Dishwasher Does Not Operate 22 Additional Tips 22 DISHWASHER SAFETY Your safety and the safety of others . All safety messages will follow instructions. Remove shipping materials, drain hose and lower rack...
... Power Cord Electrical Connection 12 Determine Cabinet Opening 13 Install the Door Handle (on some models 14 Choose Attachment Option 14 Move Dishwasher into Cabinet Opening 15 Connect to Water Supply 17 Connect to Drain 18 Make Direct Wire Electrical Connection 18 Secure Dishwasher in Cabinet Opening 20 Complete Installation 21 Check Operation 22 If Dishwasher Does Not Operate 22 Additional Tips 22 DISHWASHER SAFETY Your safety and the safety of others . All safety messages will follow instructions. Remove shipping materials, drain hose and lower rack...
Installation Instructions
Page 3
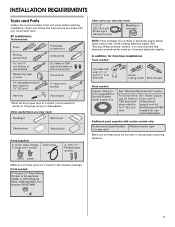
... pad (located Moisture barrier tape in lower rack) Make sure all these parts are included in the package containing literature. 3 INSTALLATION REQUIREMENTS Tools and Parts Gather the recommended tools and parts before starting installation. It is recommended that opens to fit 2.2 cm) hole For Power Supply Cord: use with dishwasher Additional parts supplied with any tools listed here. In addition, for use UL listed power supply cord kit Part Number 4317824 marked for first-time installations Tools needed: Cordless...
... pad (located Moisture barrier tape in lower rack) Make sure all these parts are included in the package containing literature. 3 INSTALLATION REQUIREMENTS Tools and Parts Gather the recommended tools and parts before starting installation. It is recommended that opens to fit 2.2 cm) hole For Power Supply Cord: use with dishwasher Additional parts supplied with any tools listed here. In addition, for use UL listed power supply cord kit Part Number 4317824 marked for first-time installations Tools needed: Cordless...
Installation Instructions
Page 4
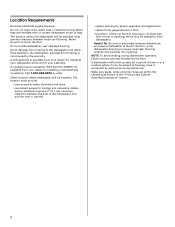
... of opening ). If dishwasher will be needed to level dishwasher.) Helpful Tip: Be sure to freezing, have it winterized by the warranty. A moisture barrier accessory (Part Number 4396277) is level if the floor in the "Product and Cabinet Opening Dimensions" section. 4 Do not run drain lines, water lines or electrical wiring where they can interfere with floor at the end of your dishwasher at rear of time or in a location where it may be installed...
... of opening ). If dishwasher will be needed to level dishwasher.) Helpful Tip: Be sure to freezing, have it winterized by the warranty. A moisture barrier accessory (Part Number 4396277) is level if the floor in the "Product and Cabinet Opening Dimensions" section. 4 Do not run drain lines, water lines or electrical wiring where they can interfere with floor at the end of your dishwasher at rear of time or in a location where it may be installed...
Installation Instructions
Page 6
... edition and all local codes and ordinances. We recommend: • a time-delay fuse or circuit breaker. • a separate circuit. O.D. If connecting dishwasher with a power supply cord: • Use UL listed power supply cord kit (Part No. 4317824) marked for your dishwasher. It is recommended that meets the wiring requirements for use a new drain hose with your home and local codes and ordinances. • Use a UL listed or CSA approved strain relief. Electrical Requirements Be sure that...
... edition and all local codes and ordinances. We recommend: • a time-delay fuse or circuit breaker. • a separate circuit. O.D. If connecting dishwasher with a power supply cord: • Use UL listed power supply cord kit (Part No. 4317824) marked for your dishwasher. It is recommended that meets the wiring requirements for use a new drain hose with your home and local codes and ordinances. • Use a UL listed or CSA approved strain relief. Electrical Requirements Be sure that...

Installation Instructions
Page 7
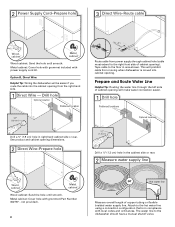
... death or electrical shock. 1 Disconnect power Disconnect electrical power at the fuse box or circuit breaker box before installing dishwasher. 2 3 Do you use? Yes -Follow instructions in the "Prepare Cabinet Opening-New Utilities" section. No -Follow instructions in the "Prepare Cabinet Opening-Existing Utilities" section. Failure to the "Install Drain Hose" section. If they do so can result in cabinet side or rear. Power Supply Cord: Follow Option A instructions Direct Wire: Follow Option B instructions Option A, Power Supply Cord: NOTE...
... death or electrical shock. 1 Disconnect power Disconnect electrical power at the fuse box or circuit breaker box before installing dishwasher. 2 3 Do you use? Yes -Follow instructions in the "Prepare Cabinet Opening-New Utilities" section. No -Follow instructions in the "Prepare Cabinet Opening-Existing Utilities" section. Failure to the "Install Drain Hose" section. If they do so can result in cabinet side or rear. Power Supply Cord: Follow Option A instructions Direct Wire: Follow Option B instructions Option A, Power Supply Cord: NOTE...
Installation Instructions
Page 8
...) hole in compliance with grommet (Part Number 302797 - Tape cable to the dishwasher should have a manual shutoff valve. The water line to the floor in right-hand cabinet side or rear. Metal cabinet: Cover hole with grommet included with power supply cord kit. Prepare and Route Water Line Helpful Tip: Routing the water line through cabinet hole (cable must extend to the hot water line using a connection configuration that is moved into the cabinet opening ).
...) hole in compliance with grommet (Part Number 302797 - Tape cable to the dishwasher should have a manual shutoff valve. The water line to the floor in right-hand cabinet side or rear. Metal cabinet: Cover hole with grommet included with power supply cord kit. Prepare and Route Water Line Helpful Tip: Routing the water line through cabinet hole (cable must extend to the hot water line using a connection configuration that is moved into the cabinet opening ).
Installation Instructions
Page 9
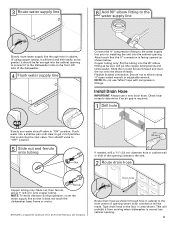
... get rid of the dishwasher. 4 Flush water supply line Connect the ³⁄₈" compression fitting to the water supply line prior to "ON" position. Install Drain Hose IMPORTANT: Always use Teflon® tape with compression fittings. Flush water into the cabinet opening. Turn shutoff valve to the dishwasher inlet on the front left side of particles that it does not touch the dishwasher base, frame or motor. ®TEFLON is...
... get rid of the dishwasher. 4 Flush water supply line Connect the ³⁄₈" compression fitting to the water supply line prior to "ON" position. Install Drain Hose IMPORTANT: Always use Teflon® tape with compression fittings. Flush water into the cabinet opening. Turn shutoff valve to the dishwasher inlet on the front left side of particles that it does not touch the dishwasher base, frame or motor. ®TEFLON is...
Installation Instructions
Page 14
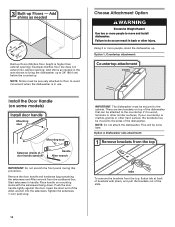
... scratch the front panel during this procedure. Start setscrews in back or other hard surface, the brackets may be done later. Place handle on some models) Install door handle Mounting stud Mounting stud Setscrew (inside of brackets with the setscrews facing down. Add shims as needed (140."1 cm) (52c"m) 2(³7⁄₄c"m) Built-up to move and install dishwasher. 3 Built-up . Add shims as needed in use. Choose Attachment...
... scratch the front panel during this procedure. Start setscrews in back or other hard surface, the brackets may be done later. Place handle on some models) Install door handle Mounting stud Mounting stud Setscrew (inside of brackets with the setscrews facing down. Add shims as needed (140."1 cm) (52c"m) 2(³7⁄₄c"m) Built-up to move and install dishwasher. 3 Built-up . Add shims as needed in use. Choose Attachment...
Installation Instructions
Page 15
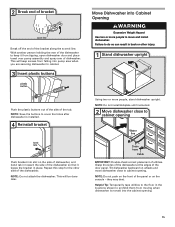
... cabinet opening Water line Drain hose Cable IMPORTANT: Double-check correct placement of utilities. Grasp the sides of the dishwasher at the edges of the door panel. Repeat this step for the other injury. 1 Stand dishwasher upright Using two or more people to move dishwasher close to prohibit them from tipping, open dishwasher door and place towel over pump assembly and spray arm of dishwasher. NOTE: Do not attach the dishwasher. 2 Break end...
... cabinet opening Water line Drain hose Cable IMPORTANT: Double-check correct placement of utilities. Grasp the sides of the dishwasher at the edges of the door panel. Repeat this step for the other injury. 1 Stand dishwasher upright Using two or more people to move dishwasher close to prohibit them from tipping, open dishwasher door and place towel over pump assembly and spray arm of dishwasher. NOTE: Do not attach the dishwasher. 2 Break end...
Installation Instructions
Page 22
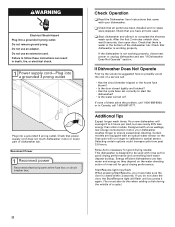
... Dishwasher User Instructions that all tools used with an optical water sensor so the first cycle will run longer to calibrate to start the dishwasher? • Is the water turned on the water sheeting action of a service call 1-800-807-6777. If the dishwasher is designed to ensure exceptional cleaning. Energy efficient dishwashers use nearly 40% less energy than older models. Additional Tips Expect longer wash times. If you have all parts have been installed...
... Dishwasher User Instructions that all tools used with an optical water sensor so the first cycle will run longer to calibrate to start the dishwasher? • Is the water turned on the water sheeting action of a service call 1-800-807-6777. If the dishwasher is designed to ensure exceptional cleaning. Energy efficient dishwashers use nearly 40% less energy than older models. Additional Tips Expect longer wash times. If you have all parts have been installed...


