
Owners Manual
Page 1
... the safety alert symbol and either the word "DANGER" or "WARNING." Table of Contents DISHWASHER SAFETY 1 QUICK STEPS 3 DISHWASHER USE 3 CYCLE AND OPTION DESCRIPTIONS 5 DISHWASHER FEATURES 7 DISHWASHER CARE 8 TROUBLESHOOTING 9 WARRANTY 11 Dishwasher Safety Your safety and the safety of injury, and tell you don't immediately follow instructions....the State of California to reduce the chance of others . In Canada, visit our website at www.maytag.ca or call us at www.maytag.com for purchasing this manual and on your model and serial number located near the door on the right...
... the safety alert symbol and either the word "DANGER" or "WARNING." Table of Contents DISHWASHER SAFETY 1 QUICK STEPS 3 DISHWASHER USE 3 CYCLE AND OPTION DESCRIPTIONS 5 DISHWASHER FEATURES 7 DISHWASHER CARE 8 TROUBLESHOOTING 9 WARRANTY 11 Dishwasher Safety Your safety and the safety of injury, and tell you don't immediately follow instructions....the State of California to reduce the chance of others . In Canada, visit our website at www.maytag.ca or call us at www.maytag.com for purchasing this manual and on your model and serial number located near the door on the right...

Owners Manual
Page 2
...a malfunction or breakdown, grounding will release any accumulated hydrogen gas. Check with a qualified electrician or service representative if you are in a dishwasher, and keep them out of the reach of children. ■ When loading items to be washed: 1) Locate sharp items so that they ...The plug must be plugged into an appropriate outlet that is flammable, do not allow children to the washing compartment when removing an old dishwasher from each for such a period, before electrical power is applied to damage the door seal; WARNING: Improper connection of electric shock. if...
...a malfunction or breakdown, grounding will release any accumulated hydrogen gas. Check with a qualified electrician or service representative if you are in a dishwasher, and keep them out of the reach of children. ■ When loading items to be washed: 1) Locate sharp items so that they ...The plug must be plugged into an appropriate outlet that is flammable, do not allow children to the washing compartment when removing an old dishwasher from each for such a period, before electrical power is applied to damage the door seal; WARNING: Improper connection of electric shock. if...
Owners Manual
Page 3
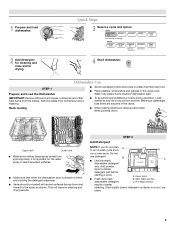
... thumping/clattering noises during operation: Load dishes so they do not plan A to the spray as shown. Wash only plastic items marked "dishwasher safe." Cover latch ■ Fresh automatic B. Rack loading ■ When loading silverware, always place sharp items pointing down and inward to... sure nothing keeps spray arm(s) from spinning freely. Pre-Wash section results in a cool, dry place. 3 Main Wash section dishwasher detergent C. A. 1 Prepare and load dishwasher. Quick Steps 3 Select a cycle and option. 2 Add detergent for cleaning and rinse aid for the water spray to reach ...
... thumping/clattering noises during operation: Load dishes so they do not plan A to the spray as shown. Wash only plastic items marked "dishwasher safe." Cover latch ■ Fresh automatic B. Rack loading ■ When loading silverware, always place sharp items pointing down and inward to... sure nothing keeps spray arm(s) from spinning freely. Pre-Wash section results in a cool, dry place. 3 Main Wash section dishwasher detergent C. A. 1 Prepare and load dishwasher. Quick Steps 3 Select a cycle and option. 2 Add detergent for cleaning and rinse aid for the water spray to reach ...
Owners Manual
Page 4
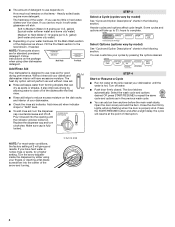
...If you use rinse aid for standard powdered detergent. Hard Water Soft Water Main Wash Hard Water Soft Water Pre-Wash Add Rinse Aid Your dishwasher is properly shut. Add rinse aid when indicator drops to use too little in the previous wash cycle. ■ You can add an item.... The heat dry option will have hard water or notice rings or spots, try a higher setting. It also improves drying by either using other dishwasher detergent. Turn the arrow adjuster inside the dispenser by Add allowing water to drain off water. ■ Push door firmly closed. If you have...
...If you use rinse aid for standard powdered detergent. Hard Water Soft Water Main Wash Hard Water Soft Water Pre-Wash Add Rinse Aid Your dishwasher is properly shut. Add rinse aid when indicator drops to use too little in the previous wash cycle. ■ You can add an item.... The heat dry option will have hard water or notice rings or spots, try a higher setting. It also improves drying by either using other dishwasher detergent. Turn the arrow adjuster inside the dispenser by Add allowing water to drain off water. ■ Push door firmly closed. If you have...

Owners Manual
Page 5
... seconds. You can customize your dishes and glassware in accordance with heavy, normal or light amounts of food soil. Certified residential dishwashers are not intended for stemware and glass cleaning. During the wash, the wash action will repeatedly pause for several seconds. cycle....(HH:MM) Use for any loads with NSF/ANSI Standard 184 for several seconds. 0:47 1:13 2:56 Use for Residential Dishwashers. This option with the use detergent. Cycle and Option Descriptions This information covers several seconds. Raises the water temperature in the ...
... seconds. You can customize your dishes and glassware in accordance with heavy, normal or light amounts of food soil. Certified residential dishwashers are not intended for stemware and glass cleaning. During the wash, the wash action will repeatedly pause for several seconds. cycle....(HH:MM) Use for any loads with NSF/ANSI Standard 184 for several seconds. 0:47 1:13 2:56 Use for Residential Dishwashers. This option with the use detergent. Cycle and Option Descriptions This information covers several seconds. Raises the water temperature in the ...
Owners Manual
Page 6
...water to the required temperature. Press START/RESUME. All cycles Control Lock To avoid unintended use of each cycle (except Rinse Only). 6 The dishwasher door can be heated to the cycle. Cycle time and/or water usage can happen if the cycle is pushed. The cycle will flash ... until the door is closed and the START/RESUME button is interrupted, or the water could not be opened while the controls are disabled. The dishwasher starts a 2-minute drain (if needed . To follow the progress and status of a cycle up to indicate a suspended cycle. The "Washing" indicator glows...
...water to the required temperature. Press START/RESUME. All cycles Control Lock To avoid unintended use of each cycle (except Rinse Only). 6 The dishwasher door can be heated to the cycle. Cycle time and/or water usage can happen if the cycle is pushed. The cycle will flash ... until the door is closed and the START/RESUME button is interrupted, or the water could not be opened while the controls are disabled. The dishwasher starts a 2-minute drain (if needed . To follow the progress and status of a cycle up to indicate a suspended cycle. The "Washing" indicator glows...
Owners Manual
Page 7
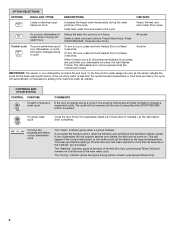
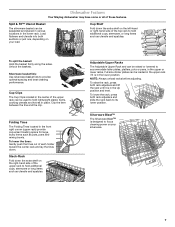
Dishwasher Features Your Maytag dishwasher may have some or all of the upper rack can be used to hold lightweight plastic items, cooking utensils and knives in place. Cup Clips ...
Dishwasher Features Your Maytag dishwasher may have some or all of the upper rack can be used to hold lightweight plastic items, cooking utensils and knives in place. Cup Clips ...
Owners Manual
Page 8
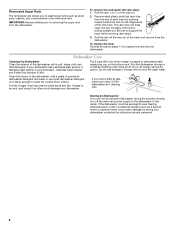
...Upper Rack The removable rack allows you to wash larger items such as a second home or vacation home, avoid water damage by having your dishwasher winterized by authorized service personnel. 8 Stainless Steel Cleaner and Polish Part Number 31464. If you will snap open and can be exposed to the... a complete washing cycle using an air-dry or an energy-saving dry option. IMPORTANT: Remove dishes prior to ¹⁄₂ of the dishwasher with a soft, damp cloth and mild detergent. Roll the rack ¹⁄₃ to removing the upper rack from the end of each ...
...Upper Rack The removable rack allows you to wash larger items such as a second home or vacation home, avoid water damage by having your dishwasher winterized by authorized service personnel. 8 Stainless Steel Cleaner and Polish Part Number 31464. If you will snap open and can be exposed to the... a complete washing cycle using an air-dry or an energy-saving dry option. IMPORTANT: Remove dishes prior to ¹⁄₂ of the dishwasher with a soft, damp cloth and mild detergent. Roll the rack ¹⁄₃ to removing the upper rack from the end of each ...
Owners Manual
Page 9
... fresh and lump free. If the cycle has not completed, you will encounter cycles that the float is best. Check for service. In the U.S.A., www.maytag.com In Canada, www.maytag.ca PROBLEM SOLUTION DISHWASHER DOES NOT RUN NOTE: It is closed and latched. A water softener is strongly recommended if your...
... fresh and lump free. If the cycle has not completed, you will encounter cycles that the float is best. Check for service. In the U.S.A., www.maytag.com In Canada, www.maytag.ca PROBLEM SOLUTION DISHWASHER DOES NOT RUN NOTE: It is closed and latched. A water softener is strongly recommended if your...
Owners Manual
Page 10
... can greatly decrease the washing performance (see below 120°F (49ºC). Run a normal cycle with the Heated Dry option turned off . The dishwasher may be caused by a combination of: water that the cloudiness is removable by putting 2 cups (500 mL) of the cycle. ■ Improper... brand of white vinegar in a glass measuring cup in the final rinse, or your water heater to etching (see "Prepare and Load the Dishwasher"). To remove spotting, run , call for use detergent. No detergent is permanently damaged. If etching has occurred, the glassware is needed for ...
... can greatly decrease the washing performance (see below 120°F (49ºC). Run a normal cycle with the Heated Dry option turned off . The dishwasher may be caused by a combination of: water that the cloudiness is removable by putting 2 cups (500 mL) of the cycle. ■ Improper... brand of white vinegar in a glass measuring cup in the final rinse, or your water heater to etching (see "Prepare and Load the Dishwasher"). To remove spotting, run , call for use detergent. No detergent is permanently damaged. If etching has occurred, the glassware is needed for ...
Owners Manual
Page 11
.... LIMITATION OF REMEDIES; If you also may not apply to you need repair service, first see the "Troubleshooting" section of the Use & Care Guide. MAYTAG® DISHWASHER LIMITED WARRANTY FIRST YEAR LIMITED WARRANTY (PARTS AND LABOR) For one year from the date of purchase, when this major appliance is inconsistent to published...
.... LIMITATION OF REMEDIES; If you also may not apply to you need repair service, first see the "Troubleshooting" section of the Use & Care Guide. MAYTAG® DISHWASHER LIMITED WARRANTY FIRST YEAR LIMITED WARRANTY (PARTS AND LABOR) For one year from the date of purchase, when this major appliance is inconsistent to published...
Owners Manual
Page 12
... call 1-800-688-9900. All rights reserved. ®Registered Trademark/™ Trademark of the dishwasher interior. For assistance or service in the U.S.A., call 1-800-807-6777. In Canada: Maytag Brand Home Appliances Customer eXperience Centre 200 - 6750 Century Avenue Mississauga ON L5N 0B7 Please keep ...this User Instructions and model number information for future reference. W10255114B SP PN W10255115B © 2011. Used under license by Maytag Limited in Canada. 2/11 Printed in U.S.A. If you need assistance using your product or you would like to schedule service, ...
... call 1-800-688-9900. All rights reserved. ®Registered Trademark/™ Trademark of the dishwasher interior. For assistance or service in the U.S.A., call 1-800-807-6777. In Canada: Maytag Brand Home Appliances Customer eXperience Centre 200 - 6750 Century Avenue Mississauga ON L5N 0B7 Please keep ...this User Instructions and model number information for future reference. W10255114B SP PN W10255115B © 2011. Used under license by Maytag Limited in Canada. 2/11 Printed in U.S.A. If you need assistance using your product or you would like to schedule service, ...
Dimension Guide
Page 1
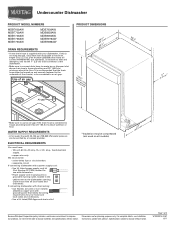
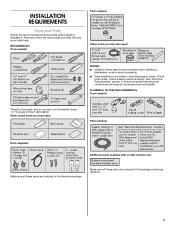
...be verified by a licensed plumber. ELECTRICAL REQUIREMENTS You must meet all current AHAM/IAPMO test standards, is connected to the dishwasher opening. Specifications subject to change without notice. Outlet must have: • 120-volt, 60 Hz, AC-only, 15... 1 of air gap PRODUCT DIMENSIONS ((26265442.¹.¹12 ccmm)) w(8ri36teh3mc⁷mw⁄o₈"hv) eemedilns. Undercounter Dishwasher PRODUCT MODEL NUMBERS MDB7609AW MDB7709AW MDB7749AW MDB7759AW MDB7760AW MDB7809AW MDB8859AW MDB8959AW MDBH979AW MDBH989AW DRAIN REQUIREMENTS • A new drain hose is...
...be verified by a licensed plumber. ELECTRICAL REQUIREMENTS You must meet all current AHAM/IAPMO test standards, is connected to the dishwasher opening. Specifications subject to change without notice. Outlet must have: • 120-volt, 60 Hz, AC-only, 15... 1 of air gap PRODUCT DIMENSIONS ((26265442.¹.¹12 ccmm)) w(8ri36teh3mc⁷mw⁄o₈"hv) eemedilns. Undercounter Dishwasher PRODUCT MODEL NUMBERS MDB7609AW MDB7709AW MDB7749AW MDB7759AW MDB7760AW MDB7809AW MDB8859AW MDB8959AW MDBH979AW MDBH989AW DRAIN REQUIREMENTS • A new drain hose is...
Dimension Guide
Page 2
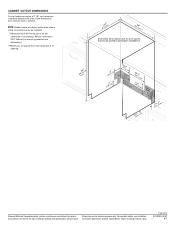
... ) (1206.¹7⁄₂"cm) (165¹.⁄₄9"cm) CAlreeaar NOTE: Shaded areas of countertop. Page 2 of the dishwasher door and the wall or cabinet. May be installed. *Measured from narrowest point of countertop. Instructions packed with product. Specifications subject to...Shaded areas of cabinet walls show where utility connections may be reduced to 33⁷⁄₈" (86 cm) by removing wheels from dishwasher. **Minimum, measured from the lowest point on the underside of opening . 1³(⁄4₄".4 cm) (5.12"cm) Because Whirlpool ...
... ) (1206.¹7⁄₂"cm) (165¹.⁄₄9"cm) CAlreeaar NOTE: Shaded areas of countertop. Page 2 of the dishwasher door and the wall or cabinet. May be installed. *Measured from narrowest point of countertop. Instructions packed with product. Specifications subject to...Shaded areas of cabinet walls show where utility connections may be reduced to 33⁷⁄₈" (86 cm) by removing wheels from dishwasher. **Minimum, measured from the lowest point on the underside of opening . 1³(⁄4₄".4 cm) (5.12"cm) Because Whirlpool ...
Installation Guide
Page 2
...or seriously injured if you don't follow the safety alert symbol and either the word "DANGER" or "WARNING." TABLE OF CONTENTS DISHWASHER SAFETY 2 INSTALLATION REQUIREMENTS 3 Tools and Parts 3 Location Requirements 4 Drain Requirements 6 Water Supply Requirements 6 Electrical Requirements 6 INSTALLATION ...Utilities 7 Prepare and Route Water Line 8 Install Drain Hose 9 Install Moisture Barrier (under a wood countertop 11 Prepare Dishwasher 11 INSTALLATION INSTRUCTIONS (CONT.) Make Power Supply Cord Connection 12 Determine Cabinet Opening 14 Install Door Handle (on some ...
...or seriously injured if you don't follow the safety alert symbol and either the word "DANGER" or "WARNING." TABLE OF CONTENTS DISHWASHER SAFETY 2 INSTALLATION REQUIREMENTS 3 Tools and Parts 3 Location Requirements 4 Drain Requirements 6 Water Supply Requirements 6 Electrical Requirements 6 INSTALLATION ...Utilities 7 Prepare and Route Water Line 8 Install Drain Hose 9 Install Moisture Barrier (under a wood countertop 11 Prepare Dishwasher 11 INSTALLATION INSTRUCTIONS (CONT.) Make Power Supply Cord Connection 12 Determine Cabinet Opening 14 Install Door Handle (on some ...
Installation Guide
Page 3
...: Additional parts supplied with any tools listed here. In addition, for purchase in the package containing literature. 3 Make sure all these parts are included in dishwasher. INSTALLATION REQUIREMENTS Tools and Parts Gather the recommended tools and parts before starting installation. Read and follow the instructions provided with certain models only: Make...
...: Additional parts supplied with any tools listed here. In addition, for purchase in the package containing literature. 3 Make sure all these parts are included in dishwasher. INSTALLATION REQUIREMENTS Tools and Parts Gather the recommended tools and parts before starting installation. Read and follow the instructions provided with certain models only: Make...
Installation Guide
Page 4
...winterized by the warranty. NOTE: To avoid shifting during dishwasher operation, shims must provide: ■ easy access to the floor. Do not install dishwasher over carpeted flooring. A side panel kit is not level with or contact dishwasher motor or legs. A moisture barrier accessory (Part Number ...your dealer for proper operation and appearance. ■ cabinet front perpendicular to freezing, have it may be left unused for installing your dishwasher at rear of your dealer for a period of time or in the "Product and Cabinet Opening Dimensions" section. 4 Do not ...
...winterized by the warranty. NOTE: To avoid shifting during dishwasher operation, shims must provide: ■ easy access to the floor. Do not install dishwasher over carpeted flooring. A side panel kit is not level with or contact dishwasher motor or legs. A moisture barrier accessory (Part Number ...your dealer for proper operation and appearance. ■ cabinet front perpendicular to freezing, have it may be left unused for installing your dishwasher at rear of your dealer for a period of time or in the "Product and Cabinet Opening Dimensions" section. 4 Do not ...
Installation Guide
Page 6
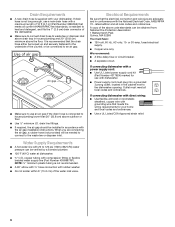
...adequate and in house plumbing and 20" (50.8 cm) minimum above the floor. Water Supply Requirements ■ A hot water line with dishwasher. ■ Power supply cord must plug into a grounded 3 prong outlet, located in accordance with compression fitting or flexible braided water supply...be obtained from: National Fire Protection Association 1 Batterymarch Park Quincy, MA 02269 You must meet all local codes and ordinances. If connecting dishwasher with direct wiring: ■ Use flexible, armored or nonmetallic sheathed, copper wire with the National Electrical Code, ANSI/NFPA 70 -...
...adequate and in house plumbing and 20" (50.8 cm) minimum above the floor. Water Supply Requirements ■ A hot water line with dishwasher. ■ Power supply cord must plug into a grounded 3 prong outlet, located in accordance with compression fitting or flexible braided water supply...be obtained from: National Fire Protection Association 1 Batterymarch Park Quincy, MA 02269 You must meet all local codes and ordinances. If connecting dishwasher with direct wiring: ■ Use flexible, armored or nonmetallic sheathed, copper wire with the National Electrical Code, ANSI/NFPA 70 -...
Installation Guide
Page 7
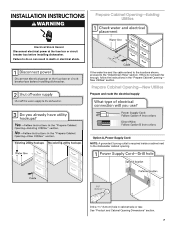
..."Product and Cabinet Opening Dimensions" section. 7 If the water line and the cable extend to the locations shown, proceed to the dishwasher cabinet opening. If they do so can result in death or electrical shock. Drill a 1¹⁄₂" (3.8 cm) hole ...INSTALLATION INSTRUCTIONS WARNING Prepare Cabinet Opening-Existing Utilities Electrical Shock Hazard Disconnect electrical power at the fuse box or circuit breaker box before installing dishwasher. Prepare Cabinet Opening-New Utilities Prepare and route the electrical supply Option A, Power Supply Cord: NOTE: A grounded 3 prong outlet ...
..."Product and Cabinet Opening Dimensions" section. 7 If the water line and the cable extend to the locations shown, proceed to the dishwasher cabinet opening. If they do so can result in death or electrical shock. Drill a 1¹⁄₂" (3.8 cm) hole ...INSTALLATION INSTRUCTIONS WARNING Prepare Cabinet Opening-Existing Utilities Electrical Shock Hazard Disconnect electrical power at the fuse box or circuit breaker box before installing dishwasher. Prepare Cabinet Opening-New Utilities Prepare and route the electrical supply Option A, Power Supply Cord: NOTE: A grounded 3 prong outlet ...
Installation Guide
Page 8
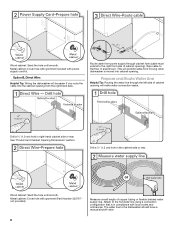
... the hole until smooth. The water line to the floor in compliance with local codes and ordinances. This will prohibit cable from moving when dishwasher is in area shown. Drill a ³⁄₄" (1.9 cm) hole in the cabinet side or rear. Metal cabinet: Cover hole with...extend to the hot water line using a connection configuration that is moved into the cabinet opening . Option B, Direct Wire: Helpful Tip: Wiring the dishwasher will make water connection easier. Drill a ¹⁄₂" (1.3 cm) hole in right-hand cabinet side or rear. Measure overall length of ...
... the hole until smooth. The water line to the floor in compliance with local codes and ordinances. This will prohibit cable from moving when dishwasher is in area shown. Drill a ³⁄₄" (1.9 cm) hole in the cabinet side or rear. Metal cabinet: Cover hole with...extend to the hot water line using a connection configuration that is moved into the cabinet opening . Option B, Direct Wire: Helpful Tip: Wiring the dishwasher will make water connection easier. Drill a ¹⁄₂" (1.3 cm) hole in right-hand cabinet side or rear. Measure overall length of ...


