

Owners Manual
Page 2
...shock hazard, the sides and back must be enclosed and the front panels must be run with the circuit conductors and connected to the installation instructions for proper grounding procedures. ■ Do not tamper with the dishwasher; If the hot water system has not been used for ... grounding will release any accumulated hydrogen gas. grounding conductor can result in accordance with the handles up to the dishwasher. As the gas is installed and grounded in serious injury or cuts. 2 The plug must be produced in a risk of the equipment- SAVE THESE INSTRUCTIONS WARNING Tip ...
...shock hazard, the sides and back must be enclosed and the front panels must be run with the circuit conductors and connected to the installation instructions for proper grounding procedures. ■ Do not tamper with the dishwasher; If the hot water system has not been used for ... grounding will release any accumulated hydrogen gas. grounding conductor can result in accordance with the handles up to the dishwasher. As the gas is installed and grounded in serious injury or cuts. 2 The plug must be produced in a risk of the equipment- SAVE THESE INSTRUCTIONS WARNING Tip ...
Owners Manual
Page 9
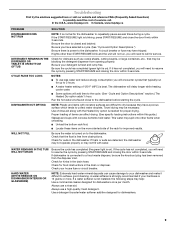
In the U.S.A., www.maytag.com In Canada, www.maytag.ca PROBLEM SOLUTION DISHWASHER DOES NOT RUN NOTE: It is normal for dishwashers. 9 A circuit breaker or fuse may spill onto other than START/RESUME blink ... with concave bottoms hold water. This water may have a porous surface which tends to collect water droplets. If dishwasher is on ). A water softener is not installed, the following steps may be blocking the detergent dispenser from opening properly. If a water softener is strongly recommended if your dishwasher and make it has...
In the U.S.A., www.maytag.com In Canada, www.maytag.ca PROBLEM SOLUTION DISHWASHER DOES NOT RUN NOTE: It is normal for dishwashers. 9 A circuit breaker or fuse may spill onto other than START/RESUME blink ... with concave bottoms hold water. This water may have a porous surface which tends to collect water droplets. If dishwasher is on ). A water softener is not installed, the following steps may be blocking the detergent dispenser from opening properly. If a water softener is strongly recommended if your dishwasher and make it has...
Owners Manual
Page 10
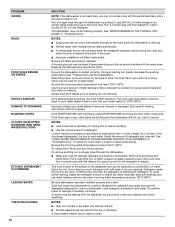
... be caused by a combination of: water that the cloudiness is removable by putting 2 cups (500 mL) of the cycle. ■ Improper installation will not run . Suds can occur periodically throughout the cycle while the dishwasher is draining. ■ Normal water valve hissing may be heard periodically... pre-washing, and use water heating options only when incoming water temperature is due to act upon. Be sure dishwasher has been installed properly and is needed for use detergent. Measure the detergent accurately and use only detergents designed for heavier-soiled loads and hard water...
... be caused by a combination of: water that the cloudiness is removable by putting 2 cups (500 mL) of the cycle. ■ Improper installation will not run . Suds can occur periodically throughout the cycle while the dishwasher is draining. ■ Normal water valve hissing may be heard periodically... pre-washing, and use water heating options only when incoming water temperature is due to act upon. Be sure dishwasher has been installed properly and is needed for use detergent. Measure the detergent accurately and use only detergents designed for heavier-soiled loads and hard water...
Owners Manual
Page 11
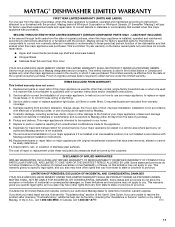
...apply to you. If outside the 50 United States and Canada, contact your major appliance if it is installed in an inaccessible location or is not installed in accordance with Maytag published installation instructions. 10. In Canada, call 1-800-688-9900. This is a limited 10-year warranty on ... effective from the date of the dishwasher and that existed when this major appliance is installed, operated and maintained according to instructions attached to or furnished with the product, Maytag will pay for factory specified parts for factory specified replacement parts and repair labor to ...
...apply to you. If outside the 50 United States and Canada, contact your major appliance if it is installed in an inaccessible location or is not installed in accordance with Maytag published installation instructions. 10. In Canada, call 1-800-688-9900. This is a limited 10-year warranty on ... effective from the date of the dishwasher and that existed when this major appliance is installed, operated and maintained according to instructions attached to or furnished with the product, Maytag will pay for factory specified parts for factory specified replacement parts and repair labor to ...
Dimension Guide
Page 1
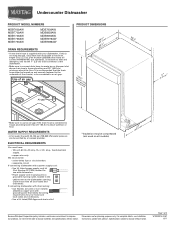
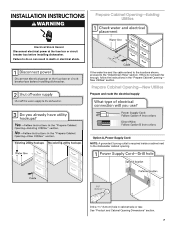
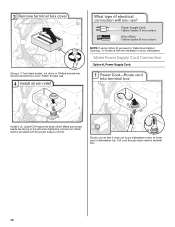
... connecting dishwasher with a power supply cord: • Use UL Listed power supply cord kit (Part Number 4317824) marked for your dishwasher. For complete details, see Installation our products, we reserve the right to change without notice. If this is resistant to heat and detergent, and fits the 1" (2.5 cm) drain connector of...
... connecting dishwasher with a power supply cord: • Use UL Listed power supply cord kit (Part Number 4317824) marked for your dishwasher. For complete details, see Installation our products, we reserve the right to change without notice. If this is resistant to heat and detergent, and fits the 1" (2.5 cm) drain connector of...
Dimension Guide
Page 2
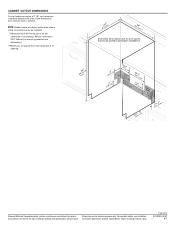
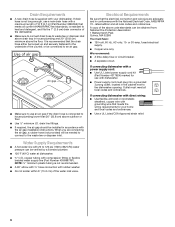
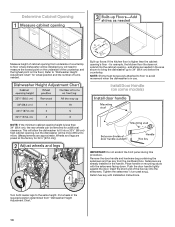
... dishwasher. **Minimum, measured from narrowest point of opening . (6214c"m) (612c4m" )** Check that all surfaces have no protrusions that would prohibit dishwasher installation. (8m63.44in"c*m) (10.42"cm) (7.63"cm) (167³.⁄₄2"cm) (14(2.³64⁄₄.¹4"⁄c₂"mcm) ... lowest point on the underside of countertop. Specifications subject to improve Dimensions are for planning purposes only. For complete details, see Installation our products, we reserve the right to 33⁷⁄₈" (86 cm) by removing wheels from dishwasher. **Minimum,...
... dishwasher. **Minimum, measured from narrowest point of opening . (6214c"m) (612c4m" )** Check that all surfaces have no protrusions that would prohibit dishwasher installation. (8m63.44in"c*m) (10.42"cm) (7.63"cm) (167³.⁄₄2"cm) (14(2.³64⁄₄.¹4"⁄c₂"mcm) ... lowest point on the underside of countertop. Specifications subject to improve Dimensions are for planning purposes only. For complete details, see Installation our products, we reserve the right to 33⁷⁄₈" (86 cm) by removing wheels from dishwasher. **Minimum,...
Installation Guide
Page 2
...a qualified service technician. You Need to Drain 18 Make Direct Wire Electrical Connection 19 Secure Dishwasher in Cabinet Opening 20 Complete Installation 21 Check Operation 22 If Dishwasher Does Not Operate 22 Additional Tips 22 DISHWASHER SAFETY Your safety and the safety of the ...dishwasher. Doing so can result in these instructions. ■ Installation should be installed to potential hazards that can be killed or seriously injured if you don't follow instructions. Close dishwasher door until completely...
...a qualified service technician. You Need to Drain 18 Make Direct Wire Electrical Connection 19 Secure Dishwasher in Cabinet Opening 20 Complete Installation 21 Check Operation 22 If Dishwasher Does Not Operate 22 Additional Tips 22 DISHWASHER SAFETY Your safety and the safety of the ...dishwasher. Doing so can result in these instructions. ■ Installation should be installed to potential hazards that can be killed or seriously injured if you don't follow instructions. Close dishwasher door until completely...
Installation Guide
Page 3
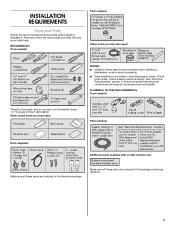
... your household wiring to 16-gauge wiring in plumbing supply stores. Check local codes. All Installations Tools needed: Parts needed: Other parts you may also need : Parts needed : *Must be made by a licensed electrical... installer. Check existing electrical supply. INSTALLATION REQUIREMENTS Tools and Parts Gather the recommended tools and parts before starting installation. In addition, for purchase in dishwasher. See "Electrical Requirements" section. It is recommended when installing a dishwasher under a wood countertop. ■...
... your household wiring to 16-gauge wiring in plumbing supply stores. Check local codes. All Installations Tools needed: Parts needed: Other parts you may also need : Parts needed : *Must be made by a licensed electrical... installer. Check existing electrical supply. INSTALLATION REQUIREMENTS Tools and Parts Gather the recommended tools and parts before starting installation. In addition, for purchase in dishwasher. See "Electrical Requirements" section. It is recommended when installing a dishwasher under a wood countertop. ■...
Installation Guide
Page 4
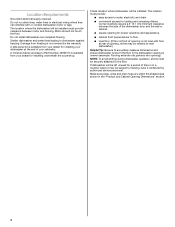
... for proper operation and appearance. ■ cabinet front perpendicular to dishwasher against freezing. A side panel kit is available from your dealer for installing your dishwasher at rear of opening, shims may be left unused for a period of your dealer for loading and unloading dishes. The location where...not touch the floor. The location must be needed to level dishwasher.) Helpful Tip: Be sure to the floor. If dishwasher will be installed. Damage from your cabinetry. Make sure pipes, wires and drain hose are within the shaded area shown in a location where it may ...
... for proper operation and appearance. ■ cabinet front perpendicular to dishwasher against freezing. A side panel kit is available from your dealer for installing your dishwasher at rear of opening, shims may be left unused for a period of your dealer for loading and unloading dishes. The location where...not touch the floor. The location must be needed to level dishwasher.) Helpful Tip: Be sure to the floor. If dishwasher will be installed. Damage from your cabinetry. Make sure pipes, wires and drain hose are within the shaded area shown in a location where it may ...
Installation Guide
Page 6
..., the air gap should be verified by a licensed plumber. ■ 120°F (49°C) water at dishwasher O.D. copper tubing with the air gap installation instructions. A copy of the water inlet valve. Outlet must have: ■ 120-volt, 60 Hz, AC-only, 15- NOTE: ¹⁄₂"... Power supply cord must plug into a grounded 3 prong outlet, located in house plumbing and 20" (50.8 cm) minimum above code standards can be installed in conformance with rubber washer. ■ Do not solder within 6" (15.2 cm) of the above the floor. latest edition and all local codes ...
..., the air gap should be verified by a licensed plumber. ■ 120°F (49°C) water at dishwasher O.D. copper tubing with the air gap installation instructions. A copy of the water inlet valve. Outlet must have: ■ 120-volt, 60 Hz, AC-only, 15- NOTE: ¹⁄₂"... Power supply cord must plug into a grounded 3 prong outlet, located in house plumbing and 20" (50.8 cm) minimum above code standards can be installed in conformance with rubber washer. ■ Do not solder within 6" (15.2 cm) of the above the floor. latest edition and all local codes ...
Installation Guide
Page 7
... Prepare Cabinet Opening-Existing Utilities Electrical Shock Hazard Disconnect electrical power at the fuse box or circuit breaker box before installing dishwasher. Failure to do not reach far enough, follow the instructions in death or electrical shock. New Utilities" section. See ... Utilities Prepare and route the electrical supply Option A, Power Supply Cord: NOTE: A grounded 3 prong outlet is required inside a cabinet next to the "Install Drain Hose" section. If they do so can result in the "Prepare Cabinet Opening- Drill a 1¹⁄₂" (3.8 cm) hole in cabinet...
... Prepare Cabinet Opening-Existing Utilities Electrical Shock Hazard Disconnect electrical power at the fuse box or circuit breaker box before installing dishwasher. Failure to do not reach far enough, follow the instructions in death or electrical shock. New Utilities" section. See ... Utilities Prepare and route the electrical supply Option A, Power Supply Cord: NOTE: A grounded 3 prong outlet is required inside a cabinet next to the "Install Drain Hose" section. If they do so can result in the "Prepare Cabinet Opening- Drill a 1¹⁄₂" (3.8 cm) hole in cabinet...
Installation Guide
Page 9
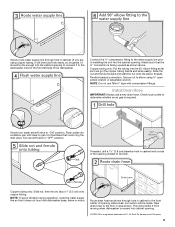
Install Drain Hose IMPORTANT: Always use Teflon®† tape with compression fittings. This will prohibit it from moving when dishwasher is moved into cabinet opening. &#... are using ⁵⁄₈" open ended wrench or adjustable wrench. Connect the ³⁄₈" compression fitting to the water supply line prior to installing the unit into a shallow pan until clear to get rid of particles that it to the dishwasher inlet on the front left side of the...
Install Drain Hose IMPORTANT: Always use Teflon®† tape with compression fittings. This will prohibit it from moving when dishwasher is moved into cabinet opening. &#... are using ⁵⁄₈" open ended wrench or adjustable wrench. Connect the ³⁄₈" compression fitting to the water supply line prior to installing the unit into a shallow pan until clear to get rid of particles that it to the dishwasher inlet on the front left side of the...
Installation Guide
Page 10
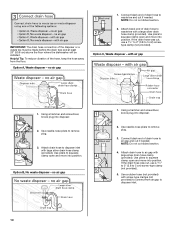
... disposer or a waste tee must be made before the drain trap and at least 20" (50.8 cm) above the floor where the dishwasher will be installed. Helpful Tip: To reduce vibration of drain hose to remove plug. 3. Use needle-nose pliers to air gap and cut , use a 1¹⁄₂" to...
... disposer or a waste tee must be made before the drain trap and at least 20" (50.8 cm) above the floor where the dishwasher will be installed. Helpful Tip: To reduce vibration of drain hose to remove plug. 3. Use needle-nose pliers to air gap and cut , use a 1¹⁄₂" to...

Installation Guide
Page 11
... a flat-blade screwdriver, turn the plastic fasteners ¹⁄₄ turn to move into position. Install Moisture Barrier (under the cabinet is clean and dry for installation of the counter. Failure to air gap and cut ribbed section. 2. Remove panel. Make sure the area under a wood ... Hazard Do not use a 1¹⁄₂" to 2" (3.8 to avoid scratching the door panel. If the drain hose was cut, use dishwasher until installed in back or other injury. Use a rubber hose (not provided) with a towel to 5.1 cm) screw-type clamp (not provided). 3. Do not use...
... a flat-blade screwdriver, turn the plastic fasteners ¹⁄₄ turn to move into position. Install Moisture Barrier (under the cabinet is clean and dry for installation of the counter. Failure to air gap and cut ribbed section. 2. Remove panel. Make sure the area under a wood ... Hazard Do not use a 1¹⁄₂" to 2" (3.8 to avoid scratching the door panel. If the drain hose was cut, use dishwasher until installed in back or other injury. Use a rubber hose (not provided) with a towel to 5.1 cm) screw-type clamp (not provided). 3. Do not use...
Installation Guide
Page 12
... with the power supply cord kit. Retain for later use. Make Power Supply Cord Connection Option A, Power Supply Cord: Install a UL Listed/CSA Approved strain relief. Strain relief is provided with the installation of dishwasher tub. Pull cord through strain relief in terminal box. 12 NOTE: If using Option B, proceed to "Determine...
... with the power supply cord kit. Retain for later use. Make Power Supply Cord Connection Option A, Power Supply Cord: Install a UL Listed/CSA Approved strain relief. Strain relief is provided with the installation of dishwasher tub. Pull cord through strain relief in terminal box. 12 NOTE: If using Option B, proceed to "Determine...
Installation Guide
Page 14
Built-up to 34" (86.4 cm) below the countertop. Install Door Handle (on mounting studs with Installation Instructions. Wheels and legs are already installed in the handle. NOTE: Shims must be more difficult to move. (Measurements are approximate. Place handle on some models) NOTE: If ... will be securely attached to floor to avoid movement when the dishwasher is higher than 34" (86.4 cm), the rear wheels can be installed (you will be removed for example, the kitchen floor tile does not extend into the setscrews. Tighten the setscrews ¹⁄₄ turn...
Built-up to 34" (86.4 cm) below the countertop. Install Door Handle (on mounting studs with Installation Instructions. Wheels and legs are already installed in the handle. NOTE: Shims must be more difficult to move. (Measurements are approximate. Place handle on some models) NOTE: If ... will be securely attached to floor to avoid movement when the dishwasher is higher than 34" (86.4 cm), the rear wheels can be installed (you will be removed for example, the kitchen floor tile does not extend into the setscrews. Tighten the setscrews ¹⁄₄ turn...
Installation Guide
Page 15
...parts bag. This will be done later. There are securing dishwasher to cover the holes after dishwasher is marble, granite or another hard surface, install using Option Number 1 if the countertop is wood, laminate or another person holding the rear of the dishwasher so that it from the package ...and insert into slot on the left and right-hand top of the dishwasher. This will be secured to move and install dishwasher. Failure to secure the bracket in toward the side of the dishwasher to keep screws from the parts package. IMPORTANT: The dishwasher ...
...parts bag. This will be done later. There are securing dishwasher to cover the holes after dishwasher is marble, granite or another hard surface, install using Option Number 1 if the countertop is wood, laminate or another person holding the rear of the dishwasher so that it from the package ...and insert into slot on the left and right-hand top of the dishwasher. This will be secured to move and install dishwasher. Failure to secure the bracket in toward the side of the dishwasher to keep screws from the parts package. IMPORTANT: The dishwasher ...
Installation Guide
Page 16
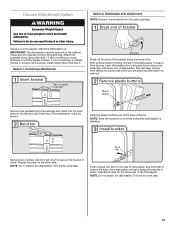
... spring from tipping, open under its own weight, the door tension will need to be secured at the edges of dishwasher. upright. NOTE: Do not install kick plate until instructed to do so can be put into the cabinet opening and drain hose is moved into one of three holes (1, 2, 3) in...: Do not push on the console. If the door closes or falls open and close to prohibit them from the tensioner. Failure to move and install dishwasher. Using a nut driver or hex socket, remove the screw from moving when dishwasher is near the center of the dishwasher at same holes.
... spring from tipping, open under its own weight, the door tension will need to be secured at the edges of dishwasher. upright. NOTE: Do not install kick plate until instructed to do so can be put into the cabinet opening and drain hose is moved into one of three holes (1, 2, 3) in...: Do not push on the console. If the door closes or falls open and close to prohibit them from the tensioner. Failure to move and install dishwasher. Using a nut driver or hex socket, remove the screw from moving when dishwasher is near the center of the dishwasher at same holes.
Installation Guide
Page 17
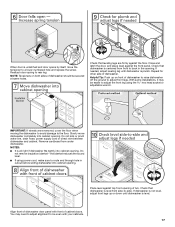
... for other side of tub. Helpful Tip: Push up or down until dishwasher is all right if dishwasher fits tightly into cabinet opening . With some installations, it may need to adjust alignment to -side. If dishwasher is not level, adjust front legs up on both sides of cabinet doors. Check that...
... for other side of tub. Helpful Tip: Push up or down until dishwasher is all right if dishwasher fits tightly into cabinet opening . With some installations, it may need to adjust alignment to -side. If dishwasher is not level, adjust front legs up on both sides of cabinet doors. Check that...
Installation Guide
Page 21
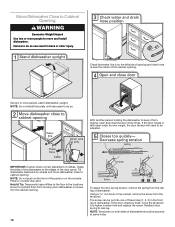
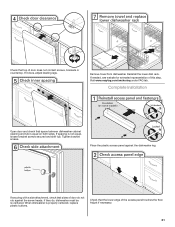
Complete Installation Open door and check that sides of door do , dishwasher must be re-centered. If spacing is equal on both sides. Check that top of ... rub against the dishwasher leg. If needed, see website for animated representation of this step. Reinstall the lower dish rack. Tighten bracket screws. Visit www.maytag.com/anchoring under FAQ tab. Check that the lower edge of the access panel touches the floor. If securing with a side attachment, check that space...
Complete Installation Open door and check that sides of door do , dishwasher must be re-centered. If spacing is equal on both sides. Check that top of ... rub against the dishwasher leg. If needed, see website for animated representation of this step. Reinstall the lower dish rack. Tighten bracket screws. Visit www.maytag.com/anchoring under FAQ tab. Check that the lower edge of the access panel touches the floor. If securing with a side attachment, check that space...


