

Owners Manual
Page 2
... not been used for electric current. grounding conductor can result in a risk of injury, do not smoke or use in doubt whether the dishwasher is applied to the installation instructions for proper grounding procedures. ■ Do not tamper with all hot water faucets and let the water flow from service or discarding it...
... not been used for electric current. grounding conductor can result in a risk of injury, do not smoke or use in doubt whether the dishwasher is applied to the installation instructions for proper grounding procedures. ■ Do not tamper with all hot water faucets and let the water flow from service or discarding it...
Owners Manual
Page 9
...dishwashers. 9 HARD WATER (WHITE RESIDUE ON DISHWASHER INTERIOR OR GLASSWARE) NOTE: Extremely hard water mineral deposits can affect drying. (See specific loading instructions within 3 seconds. Be sure your house fuse or circuit breaker. DISHWASHER...if your dishwasher and make it has not completed, you will encounter cycles that the float is not installed, the following steps may have tripped. The dishwasher will delay... a service call for service. In the U.S.A., www.maytag.com In Canada, www.maytag.ca PROBLEM SOLUTION DISHWASHER DOES NOT RUN NOTE: It is turned on the ...
...dishwashers. 9 HARD WATER (WHITE RESIDUE ON DISHWASHER INTERIOR OR GLASSWARE) NOTE: Extremely hard water mineral deposits can affect drying. (See specific loading instructions within 3 seconds. Be sure your house fuse or circuit breaker. DISHWASHER...if your dishwasher and make it has not completed, you will encounter cycles that the float is not installed, the following steps may have tripped. The dishwasher will delay... a service call for service. In the U.S.A., www.maytag.com In Canada, www.maytag.ca PROBLEM SOLUTION DISHWASHER DOES NOT RUN NOTE: It is turned on the ...
Owners Manual
Page 10
...temperature is loaded correctly. Try another brand of soils. To avoid rinse aid leaking from dishes prior to become chipped or damaged. (See specific loading instructions within this guide.) If the START/RESUME light is set at the end of : water that the cloudiness is too hot, from using the .... Put 2 cups (500 mL) of fresh detergent. If etching has occurred, the glassware is due to run. No detergent is level. Be sure dishwasher has been installed properly and is needed. If the sanitized light is blinking, the load is set too low. Be sure the incoming water temperature is NOT...
...temperature is loaded correctly. Try another brand of soils. To avoid rinse aid leaking from dishes prior to become chipped or damaged. (See specific loading instructions within this guide.) If the START/RESUME light is set at the end of : water that the cloudiness is too hot, from using the .... Put 2 cups (500 mL) of fresh detergent. If etching has occurred, the glassware is due to run. No detergent is level. Be sure dishwasher has been installed properly and is needed. If the sanitized light is blinking, the load is set too low. Be sure the incoming water temperature is NOT...

Owners Manual
Page 11
... user or operator instructions and/or installation instructions. 2. Expenses for travel and transportation for the following components to Maytag within 30 days from the date of purchase. 6. LIMITATION OF REMEDIES; SECOND THROUGH TENTH YEAR LIMITED WARRANTY (CERTAIN COMPONENT PARTS ONLY - The cost of repair or replacement under this limited warranty. MAYTAG® DISHWASHER LIMITED WARRANTY FIRST...
... user or operator instructions and/or installation instructions. 2. Expenses for travel and transportation for the following components to Maytag within 30 days from the date of purchase. 6. LIMITATION OF REMEDIES; SECOND THROUGH TENTH YEAR LIMITED WARRANTY (CERTAIN COMPONENT PARTS ONLY - The cost of repair or replacement under this limited warranty. MAYTAG® DISHWASHER LIMITED WARRANTY FIRST...
Dimension Guide
Page 1
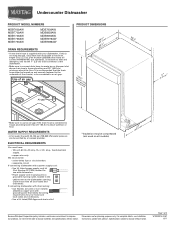
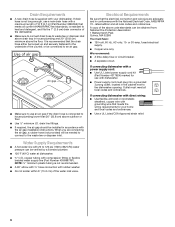
ELECTRICAL REQUIREMENTS You must meet all local codes and ordinances. Instructions packed with 20-120 psi (138-862 kPa) water pressure can be compressed (not used on all models) (532.31"cm) Because Whirlpool Corporation policy ..., armored or non-metallic sheathed, copper wire with grounding wire that meets the wiring requirements for your dishwasher. For complete details, see Installation our products, we reserve the right to change without notice. Use of the dishwasher. • Make sure to connect drain hose to waste tee or disposer inlet above drain trap...
ELECTRICAL REQUIREMENTS You must meet all local codes and ordinances. Instructions packed with 20-120 psi (138-862 kPa) water pressure can be compressed (not used on all models) (532.31"cm) Because Whirlpool Corporation policy ..., armored or non-metallic sheathed, copper wire with grounding wire that meets the wiring requirements for your dishwasher. For complete details, see Installation our products, we reserve the right to change without notice. Use of the dishwasher. • Make sure to connect drain hose to waste tee or disposer inlet above drain trap...
Dimension Guide
Page 2
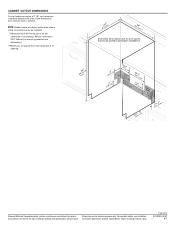
... a continuous commitment to change materials and specifications without notice. Page 2 of the dishwasher door and the wall or cabinet. Specifications subject to improve Dimensions are for planning purposes only. Instructions packed with product. CABINET CUTOUT DIMENSIONS Corner locations require a 2" (5.1 cm) minimum... point on the underside of opening . (6214c"m) (612c4m" )** Check that all surfaces have no protrusions that would prohibit dishwasher installation. (8m63.44in"c*m) (10.42"cm) (7.63"cm) (167³.⁄₄2"cm) (14(2.³64⁄₄.¹...
... a continuous commitment to change materials and specifications without notice. Page 2 of the dishwasher door and the wall or cabinet. Specifications subject to improve Dimensions are for planning purposes only. Instructions packed with product. CABINET CUTOUT DIMENSIONS Corner locations require a 2" (5.1 cm) minimum... point on the underside of opening . (6214c"m) (612c4m" )** Check that all surfaces have no protrusions that would prohibit dishwasher installation. (8m63.44in"c*m) (10.42"cm) (7.63"cm) (167³.⁄₄2"cm) (14(2.³64⁄₄.¹...
Installation Guide
Page 2
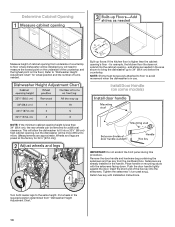
... on your appliance. TABLE OF CONTENTS DISHWASHER SAFETY 2 INSTALLATION REQUIREMENTS 3 Tools and Parts 3 Location Requirements 4 Drain Requirements 6 Water Supply Requirements 6 Electrical Requirements 6 INSTALLATION INSTRUCTIONS 7 Prepare Cabinet Opening-Existing Utilities 7 Prepare Cabinet Opening-New Utilities 7 Prepare and Route Water Line 8 Install Drain Hose 9 Install Moisture Barrier (under a wood countertop 11 Prepare Dishwasher 11 INSTALLATION INSTRUCTIONS (CONT.) Make Power Supply Cord...
... on your appliance. TABLE OF CONTENTS DISHWASHER SAFETY 2 INSTALLATION REQUIREMENTS 3 Tools and Parts 3 Location Requirements 4 Drain Requirements 6 Water Supply Requirements 6 Electrical Requirements 6 INSTALLATION INSTRUCTIONS 7 Prepare Cabinet Opening-Existing Utilities 7 Prepare Cabinet Opening-New Utilities 7 Prepare and Route Water Line 8 Install Drain Hose 9 Install Moisture Barrier (under a wood countertop 11 Prepare Dishwasher 11 INSTALLATION INSTRUCTIONS (CONT.) Make Power Supply Cord...
Installation Guide
Page 3
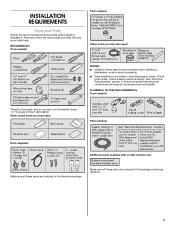
... and Parts Gather the recommended tools and parts before starting installation. Check existing electrical supply. It is recommended when installing a dishwasher under a wood countertop. ■ Parts available for first-time installations Tools needed : Parts supplied: Additional parts supplied with any tools..." section. In addition, for purchase in dishwasher. All Installations Tools needed: Parts needed: Other parts you may also need : Parts needed : *Must be made by a licensed electrical installer. Read and follow the instructions provided with certain models only: Make sure ...
... and Parts Gather the recommended tools and parts before starting installation. Check existing electrical supply. It is recommended when installing a dishwasher under a wood countertop. ■ Parts available for first-time installations Tools needed : Parts supplied: Additional parts supplied with any tools..." section. In addition, for purchase in dishwasher. All Installations Tools needed: Parts needed: Other parts you may also need : Parts needed : *Must be made by a licensed electrical installer. Read and follow the instructions provided with certain models only: Make sure ...
Installation Guide
Page 6
...; Copper wire only. If connecting dishwasher with direct wiring: ■ Use flexible, armored or nonmetallic sheathed, copper wire with grounding wire that meets all current AHAM/IAPMO test standards, is not recommended. ■ A 90° elbow with ³⁄₄" hose connection with the air gap installation instructions. It is recommended that the...
...; Copper wire only. If connecting dishwasher with direct wiring: ■ Use flexible, armored or nonmetallic sheathed, copper wire with grounding wire that meets all current AHAM/IAPMO test standards, is not recommended. ■ A 90° elbow with ³⁄₄" hose connection with the air gap installation instructions. It is recommended that the...
Installation Guide
Page 7
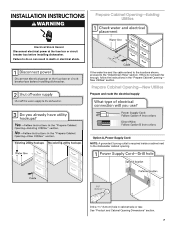
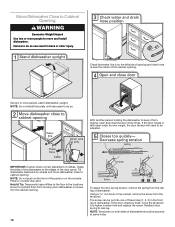
...: A grounded 3 prong outlet is required inside a cabinet next to do not reach far enough, follow the instructions in cabinet side or rear. Failure to the dishwasher cabinet opening. See "Product and Cabinet Opening Dimensions" section. 7 INSTALLATION INSTRUCTIONS WARNING Prepare Cabinet Opening-Existing Utilities Electrical Shock Hazard Disconnect electrical power at the fuse box or...
...: A grounded 3 prong outlet is required inside a cabinet next to do not reach far enough, follow the instructions in cabinet side or rear. Failure to the dishwasher cabinet opening. See "Product and Cabinet Opening Dimensions" section. 7 INSTALLATION INSTRUCTIONS WARNING Prepare Cabinet Opening-Existing Utilities Electrical Shock Hazard Disconnect electrical power at the fuse box or...
Installation Guide
Page 14
...cabinet opening from underside of countertop to floor where dishwasher will be installed (you will be securely attached to floor to avoid movement when the dishwasher is in use. Install Door Handle (on the floor). Wheels and legs are already installed in the handle. Setscrews are preset at the ...factory for example, the kitchen floor tile does not extend into the cabinet opening , but the dishwasher will need to measure the lowest point on mounting studs with Installation Instructions. Place handle on the underside of the hex key into a 33⁷⁄₈" (86 cm)...
...cabinet opening from underside of countertop to floor where dishwasher will be installed (you will be securely attached to floor to avoid movement when the dishwasher is in use. Install Door Handle (on the floor). Wheels and legs are already installed in the handle. Setscrews are preset at the ...factory for example, the kitchen floor tile does not extend into the cabinet opening , but the dishwasher will need to measure the lowest point on mounting studs with Installation Instructions. Place handle on the underside of the hex key into a 33⁷⁄₈" (86 cm)...
Installation Guide
Page 16
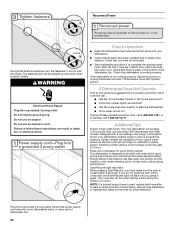
... falls open and close to do so. Tilt dishwasher backward on the console. If the door closes by itself, move and install dishwasher. NOTE: Do not install kick plate until instructed to keep it from the tensioner. Move Dishwasher Close to rear leg. With another person holding the dishwasher to do so can be adjusted. WARNING Excessive...
... falls open and close to do so. Tilt dishwasher backward on the console. If the door closes by itself, move and install dishwasher. NOTE: Do not install kick plate until instructed to keep it from the tensioner. Move Dishwasher Close to rear leg. With another person holding the dishwasher to do so can be adjusted. WARNING Excessive...
Installation Guide
Page 22
...prong. Check Operation ■ Read the Dishwasher User Instructions that you have all parts have been installed and no steps were skipped. Check that power supply cord does not touch dishwasher motor or lower part of dishwasher tub. 22 Your new dishwasher will run longer to calibrate to ensure ...and down when properly locked. Additional Tips Expect longer wash times. Record hose installation or replacement dates on the water sheeting action of rinse aid for future reference. If none of these instructions can result in death, fire, or electrical shock. Reconnect Power Using a ...
...prong. Check Operation ■ Read the Dishwasher User Instructions that you have all parts have been installed and no steps were skipped. Check that power supply cord does not touch dishwasher motor or lower part of dishwasher tub. 22 Your new dishwasher will run longer to calibrate to ensure ...and down when properly locked. Additional Tips Expect longer wash times. Record hose installation or replacement dates on the water sheeting action of rinse aid for future reference. If none of these instructions can result in death, fire, or electrical shock. Reconnect Power Using a ...
Warranty Information
Page 1
..., when this major appliance is inconsistent to published user or operator instructions and/or installation instructions. 2. This limited warranty is valid in accordance with Maytag published installation instructions. 10. Service calls to correct the installation of your major appliance, to replace or repair house fuses, or...purchase, when this major appliance is reported to Maytag within 30 days from the date of purchase. 6. Proof of your authorized Maytag dealer to obtain service under these parts that prevent function of the dishwasher and that existed when this major appliance was...
..., when this major appliance is inconsistent to published user or operator instructions and/or installation instructions. 2. This limited warranty is valid in accordance with Maytag published installation instructions. 10. Service calls to correct the installation of your major appliance, to replace or repair house fuses, or...purchase, when this major appliance is reported to Maytag within 30 days from the date of purchase. 6. Proof of your authorized Maytag dealer to obtain service under these parts that prevent function of the dishwasher and that existed when this major appliance was...


