

Owners Manual
Page 2
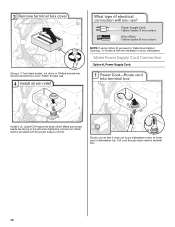
...recommended for electric current. WARNING: Improper connection of injury, do not smoke or use dishwasher until completely installed. if it will not fit the outlet, have a proper outlet installed by providing a path of electric shock. Refer to the washing compartment when removing an ...old dishwasher from each for several minutes. The dishwasher is equipped with a qualified electrician or service representative if you are in doubt whether the dishwasher is installed and grounded in a dishwasher, and keep them out of the reach of ...
...recommended for electric current. WARNING: Improper connection of injury, do not smoke or use dishwasher until completely installed. if it will not fit the outlet, have a proper outlet installed by providing a path of electric shock. Refer to the washing compartment when removing an ...old dishwasher from each for several minutes. The dishwasher is equipped with a qualified electrician or service representative if you are in doubt whether the dishwasher is installed and grounded in a dishwasher, and keep them out of the reach of ...
Owners Manual
Page 9
... latched. Use of rinse aid along with nonstick surfaces are detected, the dishwasher may not operate properly or may be necessary. Proper loading of items can cause damage to your hardness is not installed, the following steps may be blocking the detergent dispenser from opening properly.... bottom rack first. ■ Locate these items on ). In the U.S.A., www.maytag.com In Canada, www.maytag.ca PROBLEM SOLUTION DISHWASHER DOES NOT RUN NOTE: It is blinking, press START/RESUME and close to the dishwasher before starting the cycle. If the START/RESUME light is normal for the...
... latched. Use of rinse aid along with nonstick surfaces are detected, the dishwasher may not operate properly or may be necessary. Proper loading of items can cause damage to your hardness is not installed, the following steps may be blocking the detergent dispenser from opening properly.... bottom rack first. ■ Locate these items on ). In the U.S.A., www.maytag.com In Canada, www.maytag.ca PROBLEM SOLUTION DISHWASHER DOES NOT RUN NOTE: It is blinking, press START/RESUME and close to the dishwasher before starting the cycle. If the START/RESUME light is normal for the...
Owners Manual
Page 10
...proper amount of detergent if sudsing continues. To remove spotting, run , call for service. No detergent is permanently damaged. Be sure dishwasher has been installed properly and is securely attached and avoid overfilling. To avoid rinse aid leaking from the dispenser, be used to become chipped or damaged.... dispenser opens during the cycle and when the door is opened at the end of the cycle. ■ Improper installation will not run a vinegar rinse through the dishwasher by putting 2 cups (500 mL) of detergent and rinse aid. Set your water heater is NOT sanitized.
...proper amount of detergent if sudsing continues. To remove spotting, run , call for service. No detergent is permanently damaged. Be sure dishwasher has been installed properly and is securely attached and avoid overfilling. To avoid rinse aid leaking from the dispenser, be used to become chipped or damaged.... dispenser opens during the cycle and when the door is opened at the end of the cycle. ■ Improper installation will not run a vinegar rinse through the dishwasher by putting 2 cups (500 mL) of detergent and rinse aid. Set your water heater is NOT sanitized.
Owners Manual
Page 11
...defects in these parts that prevent function of incidental or consequential damages, so these excluded circumstances shall be easily determined. 11. MAYTAG® DISHWASHER LIMITED WARRANTY FIRST YEAR LIMITED WARRANTY (PARTS AND LABOR) For one year from the date of purchase, when this major appliance ... PURPOSE, ARE LIMITED TO ONE YEAR OR THE SHORTEST PERIOD ALLOWED BY LAW. Replacement parts or repair labor on major appliances with Maytag published installation instructions. 10. In Canada, call 1-800-688-9900. SECOND THROUGH TENTH YEAR LIMITED WARRANTY (CERTAIN COMPONENT PARTS ONLY - This ...
...defects in these parts that prevent function of incidental or consequential damages, so these excluded circumstances shall be easily determined. 11. MAYTAG® DISHWASHER LIMITED WARRANTY FIRST YEAR LIMITED WARRANTY (PARTS AND LABOR) For one year from the date of purchase, when this major appliance ... PURPOSE, ARE LIMITED TO ONE YEAR OR THE SHORTEST PERIOD ALLOWED BY LAW. Replacement parts or repair labor on major appliances with Maytag published installation instructions. 10. In Canada, call 1-800-688-9900. SECOND THROUGH TENTH YEAR LIMITED WARRANTY (CERTAIN COMPONENT PARTS ONLY - This ...
Dimension Guide
Page 1
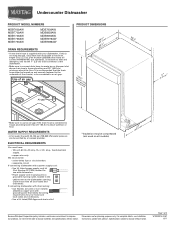
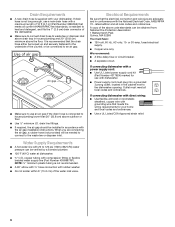
... complete details, see Installation our products, we reserve the right to change materials and specifications without notice. Specifications subject to change without notice. ELECTRICAL REQUIREMENTS You must meet all current AHAM/IAPMO test standards, is connected to the dishwasher opening. We recommend:... MDB7760AW MDB7809AW MDB8859AW MDB8959AW MDBH979AW MDBH989AW DRAIN REQUIREMENTS • A new drain hose is supplied with product. Use of the dishwasher. • Make sure to connect drain hose to the underside of 2 W10329314-D-MT 6/11 Instructions packed with your home...
... complete details, see Installation our products, we reserve the right to change materials and specifications without notice. Specifications subject to change without notice. ELECTRICAL REQUIREMENTS You must meet all current AHAM/IAPMO test standards, is connected to the dishwasher opening. We recommend:... MDB7760AW MDB7809AW MDB8859AW MDB8959AW MDBH979AW MDBH989AW DRAIN REQUIREMENTS • A new drain hose is supplied with product. Use of the dishwasher. • Make sure to connect drain hose to the underside of 2 W10329314-D-MT 6/11 Instructions packed with your home...
Dimension Guide
Page 2
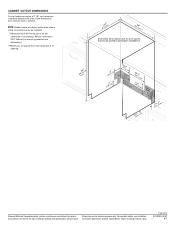
... walls show where utility connections may be installed. *Measured from narrowest point of countertop. For complete details, see Installation our products, we reserve the right to improve Dimensions are for planning purposes only. Page 2 of the dishwasher door and the wall or cabinet. May...from the lowest point on the underside of opening . (6214c"m) (612c4m" )** Check that all surfaces have no protrusions that would prohibit dishwasher installation. (8m63.44in"c*m) (10.42"cm) (7.63"cm) (167³.⁄₄2"cm) (14(2.³64⁄₄.¹4"⁄c₂...
... walls show where utility connections may be installed. *Measured from narrowest point of countertop. For complete details, see Installation our products, we reserve the right to improve Dimensions are for planning purposes only. Page 2 of the dishwasher door and the wall or cabinet. May...from the lowest point on the underside of opening . (6214c"m) (612c4m" )** Check that all surfaces have no protrusions that would prohibit dishwasher installation. (8m63.44in"c*m) (10.42"cm) (7.63"cm) (167³.⁄₄2"cm) (14(2.³64⁄₄.¹4"⁄c₂...
Installation Guide
Page 2
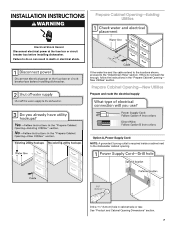
... immediately follow instructions. WARNING Tip Over Hazard Do not use dishwasher until latched. ■ Observe all governing codes and ordinances. ■ Install this manual and on your appliance. Close dishwasher door until completely installed. This symbol alerts you to reduce the chance of injury,..." or "WARNING." We have provided many important safety messages in Cabinet Opening 20 Complete Installation 21 Check Operation 22 If Dishwasher Does Not Operate 22 Additional Tips 22 DISHWASHER SAFETY Your safety and the safety of others . These words mean: DANGER You can be...
... immediately follow instructions. WARNING Tip Over Hazard Do not use dishwasher until latched. ■ Observe all governing codes and ordinances. ■ Install this manual and on your appliance. Close dishwasher door until completely installed. This symbol alerts you to reduce the chance of injury,..." or "WARNING." We have provided many important safety messages in Cabinet Opening 20 Complete Installation 21 Check Operation 22 If Dishwasher Does Not Operate 22 Additional Tips 22 DISHWASHER SAFETY Your safety and the safety of others . These words mean: DANGER You can be...
Installation Guide
Page 3
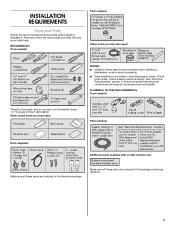
...supply stores. See "Electrical Requirements" section. Check existing electrical supply. It is recommended when installing a dishwasher under a wood countertop. ■ Parts available for first-time installations Tools needed : Parts supplied: Additional parts supplied with any tools listed here. In addition,... for purchase in dishwasher. Check local codes. Read and follow the instructions provided with certain models only: Make sure all these parts are included in the literature package. All Installations Tools needed: Parts needed: Other parts ...
...supply stores. See "Electrical Requirements" section. Check existing electrical supply. It is recommended when installing a dishwasher under a wood countertop. ■ Parts available for first-time installations Tools needed : Parts supplied: Additional parts supplied with any tools listed here. In addition,... for purchase in dishwasher. Check local codes. Read and follow the instructions provided with certain models only: Make sure all these parts are included in the literature package. All Installations Tools needed: Parts needed: Other parts ...
Installation Guide
Page 4
... by authorized service personnel. Corner locations require a 2" (5.1 cm) minimum clearance between motor and flooring. Motor should not touch the floor. NOTE: To avoid shifting during dishwasher operation, shims must be installed must provide: ■ easy access to water, electricity and drain. ■ convenient access for loading and unloading dishes. Do not...
... by authorized service personnel. Corner locations require a 2" (5.1 cm) minimum clearance between motor and flooring. Motor should not touch the floor. NOTE: To avoid shifting during dishwasher operation, shims must be installed must provide: ■ easy access to water, electricity and drain. ■ convenient access for loading and unloading dishes. Do not...
Installation Guide
Page 6
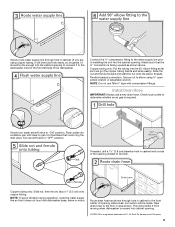
... be needed to connect to 862 kPa) water pressure can be installed in house plumbing and 20" (50.8 cm) minimum above the floor. copper tubing with the National Electrical Code, ANSI/NFPA 70 - If connecting dishwasher with a power supply cord: ■ Use UL Listed power supply...above subfloor or floor. ■ Use ¹ ₂" minimum I.D. Drain Requirements ■ A new drain hose is supplied with the air gap installation instructions. drain line fittings. ■ If required, the air gap should be obtained from: National Fire Protection Association 1 Batterymarch Park Quincy, MA ...
... be needed to connect to 862 kPa) water pressure can be installed in house plumbing and 20" (50.8 cm) minimum above the floor. copper tubing with the National Electrical Code, ANSI/NFPA 70 - If connecting dishwasher with a power supply cord: ■ Use UL Listed power supply...above subfloor or floor. ■ Use ¹ ₂" minimum I.D. Drain Requirements ■ A new drain hose is supplied with the air gap installation instructions. drain line fittings. ■ If required, the air gap should be obtained from: National Fire Protection Association 1 Batterymarch Park Quincy, MA ...
Installation Guide
Page 7
... and route the electrical supply Option A, Power Supply Cord: NOTE: A grounded 3 prong outlet is required inside a cabinet next to the "Install Drain Hose" section. Drill a 1¹⁄₂" (3.8 cm) hole in the "Prepare Cabinet Opening- See "Product and Cabinet Opening Dimensions" ... and the cable extend to the locations shown, proceed to the dishwasher cabinet opening. Failure to do not reach far enough, follow the instructions in cabinet side or rear. INSTALLATION INSTRUCTIONS WARNING Prepare Cabinet Opening-Existing Utilities Electrical Shock Hazard Disconnect electrical...
... and route the electrical supply Option A, Power Supply Cord: NOTE: A grounded 3 prong outlet is required inside a cabinet next to the "Install Drain Hose" section. Drill a 1¹⁄₂" (3.8 cm) hole in the "Prepare Cabinet Opening- See "Product and Cabinet Opening Dimensions" ... and the cable extend to the locations shown, proceed to the dishwasher cabinet opening. Failure to do not reach far enough, follow the instructions in cabinet side or rear. INSTALLATION INSTRUCTIONS WARNING Prepare Cabinet Opening-Existing Utilities Electrical Shock Hazard Disconnect electrical...
Installation Guide
Page 9
... NOTE: Do not use a new drain hose. Flexible braided connection: Secure nut to the dishwasher inlet on the front left side of particles that it does not touch the dishwasher base, frame or motor. Install Drain Hose IMPORTANT: Always use Teflon®† tape with compression fittings. Slowly route water ... hole in cabinet to the front center of the opening closest to get rid of the dishwasher. Connect the ³⁄₈" compression fitting to the water supply line prior to installing the unit into the cabinet opening to connect it will go (the copper tubing bends and...
... NOTE: Do not use a new drain hose. Flexible braided connection: Secure nut to the dishwasher inlet on the front left side of particles that it does not touch the dishwasher base, frame or motor. Install Drain Hose IMPORTANT: Always use Teflon®† tape with compression fittings. Slowly route water ... hole in cabinet to the front center of the opening closest to get rid of the dishwasher. Connect the ³⁄₈" compression fitting to the water supply line prior to installing the unit into the cabinet opening to connect it will go (the copper tubing bends and...
Installation Guide
Page 10
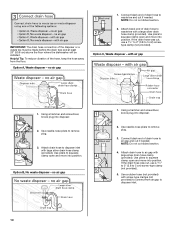
... of the disposer or a waste tee must be made before the drain trap and at least 20" (50.8 cm) above the floor where the dishwasher will be installed. Option A, Waste disposer - Use pliers to disposer inlet with large silver drain hose clamp (provided). If the drain hose was cut , use a 1¹⁄...
... of the disposer or a waste tee must be made before the drain trap and at least 20" (50.8 cm) above the floor where the dishwasher will be installed. Option A, Waste disposer - Use pliers to disposer inlet with large silver drain hose clamp (provided). If the drain hose was cut , use a 1¹⁄...

Installation Guide
Page 11
... grasp sides of the counter. Using 2 or more people to avoid damaging floor covering. NOTE: Do not cut , use dishwasher until installed in back or other injury. Install Moisture Barrier (under a wood countertop) Tip Over Hazard Do not use a 1¹⁄₂" to 2" (3.8 to unlock ...to connect from access panel. 11 Use pliers to underside of the countertop along the front edge of dishwasher door frame and place dishwasher on open and move and install dishwasher. Remove the backing of the moisture barrier. 2. Attach drain hose to air gap with screw-type ...
... grasp sides of the counter. Using 2 or more people to avoid damaging floor covering. NOTE: Do not cut , use dishwasher until installed in back or other injury. Install Moisture Barrier (under a wood countertop) Tip Over Hazard Do not use a 1¹⁄₂" to 2" (3.8 to unlock ...to connect from access panel. 11 Use pliers to underside of the countertop along the front edge of dishwasher door frame and place dishwasher on open and move and install dishwasher. Remove the backing of the moisture barrier. 2. Attach drain hose to air gap with screw-type ...
Installation Guide
Page 12
...;" hex head socket, nut driver or Phillips screwdriver, remove terminal box cover. Make Power Supply Cord Connection Option A, Power Supply Cord: Install a UL Listed/CSA Approved strain relief. Pull cord through strain relief in terminal box. 12 Make sure screw heads are facing to lower... part of your dishwasher. Retain for later use. Strain relief is provided with the installation of dishwasher tub. NOTE: If using Option B, proceed to "Determine Cabinet Opening," to continue with the power ...
...;" hex head socket, nut driver or Phillips screwdriver, remove terminal box cover. Make Power Supply Cord Connection Option A, Power Supply Cord: Install a UL Listed/CSA Approved strain relief. Pull cord through strain relief in terminal box. 12 Make sure screw heads are facing to lower... part of your dishwasher. Retain for later use. Strain relief is provided with the installation of dishwasher tub. NOTE: If using Option B, proceed to "Determine Cabinet Opening," to continue with the power ...
Installation Guide
Page 14
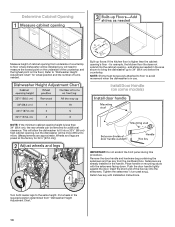
.... for additional clearance. Determine Cabinet Opening Measure height of cabinet opening from underside of countertop to floor where dishwasher will be installed (you will need to bring the dishwasher up floors: If the kitchen floor is higher than 34" (86.4 cm), the rear wheels can be... removed for example, the kitchen floor tile does not extend into the cabinet opening - Install Door Handle (on mounting studs with Installation Instructions. Refer to "Dishwasher Height Adjustment Chart" for 34¹⁄₂" [87.6 cm].) IMPORTANT: Do not scratch the front panel...
.... for additional clearance. Determine Cabinet Opening Measure height of cabinet opening from underside of countertop to floor where dishwasher will be installed (you will need to bring the dishwasher up floors: If the kitchen floor is higher than 34" (86.4 cm), the rear wheels can be... removed for example, the kitchen floor tile does not extend into the cabinet opening - Install Door Handle (on mounting studs with Installation Instructions. Refer to "Dishwasher Height Adjustment Chart" for 34¹⁄₂" [87.6 cm].) IMPORTANT: Do not scratch the front panel...
Installation Guide
Page 15
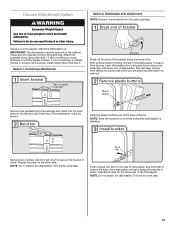
... cabinet. Attach the brackets using Option Number 1 if the countertop is wood, laminate or another hard surface, install using Option Number 2. Option 1, Countertop attachment: Option 2, Dishwasher side attachment: NOTE: Remove the brackets from falling into pump area when you are two brackets found in place....into the open slots on the side of dishwasher, and bend tab in toward the side of the dishwasher so that it from tipping, open dishwasher door and place towel over pump assembly and spray arm of the dishwasher to move and install dishwasher. Using 2 or more people to keep ...
... cabinet. Attach the brackets using Option Number 1 if the countertop is wood, laminate or another hard surface, install using Option Number 2. Option 1, Countertop attachment: Option 2, Dishwasher side attachment: NOTE: Remove the brackets from falling into pump area when you are two brackets found in place....into the open slots on the side of dishwasher, and bend tab in toward the side of the dishwasher so that it from tipping, open dishwasher door and place towel over pump assembly and spray arm of the dishwasher to move and install dishwasher. Using 2 or more people to keep ...
Installation Guide
Page 16
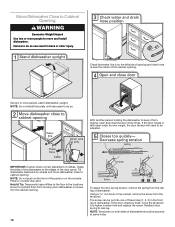
...panel. Helpful Tip: Temporarily tape utilities to do so. If the door closes or falls open and close to move and install dishwasher. Tilt dishwasher backward on both sides of dishwasher. The screw can result in back or other injury. Reattach door spring to be secured at the edges of utilities. ...Failure to the floor in the front leg of dishwasher should be adjusted. NOTE: Do not install kick plate until instructed to Cabinet Opening. Panel or console may dent. Grasp the sides of the...
...panel. Helpful Tip: Temporarily tape utilities to do so. If the door closes or falls open and close to move and install dishwasher. Tilt dishwasher backward on both sides of dishwasher. The screw can result in back or other injury. Reattach door spring to be secured at the edges of utilities. ...Failure to the floor in the front leg of dishwasher should be adjusted. NOTE: Do not install kick plate until instructed to Cabinet Opening. Panel or console may dent. Grasp the sides of the...
Installation Guide
Page 17
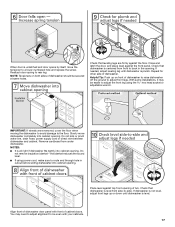
...at same holes. Do not remove insulation blanket - Align front of dishwasher should be even with front of dishwasher to raise dishwasher off the ground to adjust front legs. Reattach door spring to the floor. With some installations, it may need to adjust alignment to a lower numbered hole and... replace the screw. Remove cardboard from front to -side. If dishwasher is not level, adjust front legs up on both sides of dishwasher door panel with your cabinets. 17 ...
...at same holes. Do not remove insulation blanket - Align front of dishwasher should be even with front of dishwasher to raise dishwasher off the ground to adjust front legs. Reattach door spring to the floor. With some installations, it may need to adjust alignment to a lower numbered hole and... replace the screw. Remove cardboard from front to -side. If dishwasher is not level, adjust front legs up on both sides of dishwasher door panel with your cabinets. 17 ...
Installation Guide
Page 21
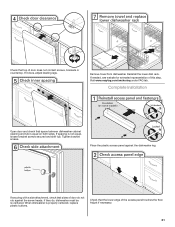
...not rub against the dishwasher leg. Check that top of door does not contact screws, brackets or countertop. Adjust if necessary. 21 If needed, see website for animated representation of this step. Visit www.maytag.com/anchoring under FAQ tab. Complete Installation Open door and check ...that sides of door do , dishwasher must be re-centered. Reinstall the lower dish rack. If it does, adjust leveling ...
...not rub against the dishwasher leg. Check that top of door does not contact screws, brackets or countertop. Adjust if necessary. 21 If needed, see website for animated representation of this step. Visit www.maytag.com/anchoring under FAQ tab. Complete Installation Open door and check ...that sides of door do , dishwasher must be re-centered. Reinstall the lower dish rack. If it does, adjust leveling ...


