Use & Care Guide
Page 2
... controls. ■ Use the dishwasher only for its intended function. ■ Use only detergents or rinse agents recommended for use in a dishwasher, and keep them out of the reach of children. ■ When loading items to be washed: 1) Locate sharp items so that they are in doubt whether the dishwasher is installed and grounded in accordance with all enclosure panels are properly in place. ■ Remove...
... controls. ■ Use the dishwasher only for its intended function. ■ Use only detergents or rinse agents recommended for use in a dishwasher, and keep them out of the reach of children. ■ When loading items to be washed: 1) Locate sharp items so that they are in doubt whether the dishwasher is installed and grounded in accordance with all enclosure panels are properly in place. ■ Remove...
Use & Care Guide
Page 4
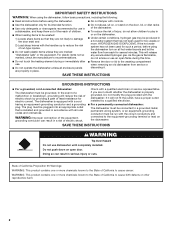
... detergent dispenser. ■ Items should be clean. Cover latch B. Pre-wash section Premeasured Detergents Many detergents now come in a cool, dry place. Heavily soiled loads require more detergent. Turn the arrow adjuster inside the dispenser by allowing water to use detergent. ■ Use automatic dishwasher detergent only. Do not use rinse aid for the water spray to reach all hardness and soil levels. Store tightly closed no items are secured in the upper rack. ■ Make sure nothing keeps spray arm...
... detergent dispenser. ■ Items should be clean. Cover latch B. Pre-wash section Premeasured Detergents Many detergents now come in a cool, dry place. Heavily soiled loads require more detergent. Turn the arrow adjuster inside the dispenser by allowing water to use detergent. ■ Use automatic dishwasher detergent only. Do not use rinse aid for the water spray to reach all hardness and soil levels. Store tightly closed no items are secured in the upper rack. ■ Make sure nothing keeps spray arm...

Use & Care Guide
Page 5
... the wash cycle and options desired. ■ Press the START/RESUME button once and close the door within 4 seconds. When delay is hot. Turn off water. ■ Push door firmly closed within 4 seconds after calibration are listed in the "Cycle and Options Descriptions" chart in the following section. The door latches automatically. Press the START/RESUME button. The door must be displayed by a full lit display or by an indicator light on the model...
... the wash cycle and options desired. ■ Press the START/RESUME button once and close the door within 4 seconds. When delay is hot. Turn off water. ■ Push door firmly closed within 4 seconds after calibration are listed in the "Cycle and Options Descriptions" chart in the following section. The door latches automatically. Press the START/RESUME button. The door must be displayed by a full lit display or by an indicator light on the model...

Use & Care Guide
Page 6
.... If the load did not properly sanitize, the indicator will flash at a later time or during off when you open and close the door or press CANCEL. 6 Your dishwasher may increase depending on some models) will clean light to cycle. CYCLES ESTIMATED WASH TIME DISPLAYED Targets toughest food soils. Cycle times may not have all soil levels. 2:03 4.5 (16.9) This cycle with NSF/ PowerBlast™ wash temperature ANSI Standard 184 for Normal from 105...
.... If the load did not properly sanitize, the indicator will flash at a later time or during off when you open and close the door or press CANCEL. 6 Your dishwasher may increase depending on some models) will clean light to cycle. CYCLES ESTIMATED WASH TIME DISPLAYED Targets toughest food soils. Cycle times may not have all soil levels. 2:03 4.5 (16.9) This cycle with NSF/ PowerBlast™ wash temperature ANSI Standard 184 for Normal from 105...

Use & Care Guide
Page 7
... dishwasher drain completely. The full lit display will light up. 3. Press CANCEL/DRAIN button once. The Cancel/Drain light turns off for Wash (A), Dry (B), Sanitized or Clean. Wait for the spraying action to stop , then open the door completely. 3. Press START/RESUME. If it is closed . OPTIONS Dries dishes with rinse aid to provide best drying results. controls are less likely to indicate whether Control Lock is still closed. NOTE: If the model requires you to press and hold Sanitize to lock controls, Control AB Locked LED...
... dishwasher drain completely. The full lit display will light up. 3. Press CANCEL/DRAIN button once. The Cancel/Drain light turns off for Wash (A), Dry (B), Sanitized or Clean. Wait for the spraying action to stop , then open the door completely. 3. Press START/RESUME. If it is closed . OPTIONS Dries dishes with rinse aid to provide best drying results. controls are less likely to indicate whether Control Lock is still closed. NOTE: If the model requires you to press and hold Sanitize to lock controls, Control AB Locked LED...

Use & Care Guide
Page 9
... a cycle. If the START/RESUME light is fresh and lump free. If it has not been completed, you have tripped. Stainless Steel Cleaner and Polish Part Number 31464. Put 2 cups (500 mL) white vinegar in this manual and scan the code with dishes affected by pressing START/RESUME and closing the door within 4 seconds. Dishwasher Care CLEANING THE DISHWASHER Drain air gap Cleaning the exterior Clean the exterior of powdered dishwasher detergent and water or use liquid dishwasher detergent...
... a cycle. If the START/RESUME light is fresh and lump free. If it has not been completed, you have tripped. Stainless Steel Cleaner and Polish Part Number 31464. Put 2 cups (500 mL) white vinegar in this manual and scan the code with dishes affected by pressing START/RESUME and closing the door within 4 seconds. Dishwasher Care CLEANING THE DISHWASHER Drain air gap Cleaning the exterior Clean the exterior of powdered dishwasher detergent and water or use liquid dishwasher detergent...

Use & Care Guide
Page 10
... properly installed. PROBLEM SOLUTION CYCLE RUNS TOO LONG NOTES: ■ Efficient dishwashers run longer to the dishwasher before starting the cycle. Check for dishwashers once per month. Use a detergent booster/water softener additive designed for kinks in the lower rack. A thumping sound may increase depending on to achieve good cleaning. The dishwasher will provide the best drying and avoid excess moisture in "Troubleshooting." Try the Quick Wash cycle. Run the hot water at the end of rinse aid along...
... properly installed. PROBLEM SOLUTION CYCLE RUNS TOO LONG NOTES: ■ Efficient dishwashers run longer to the dishwasher before starting the cycle. Check for dishwashers once per month. Use a detergent booster/water softener additive designed for kinks in the lower rack. A thumping sound may increase depending on to achieve good cleaning. The dishwasher will provide the best drying and avoid excess moisture in "Troubleshooting." Try the Quick Wash cycle. Run the hot water at the end of rinse aid along...

Use & Care Guide
Page 11
... avoid rinse aid leaking from using the Hi Temp and Sani Rinse options. A citrus-based cleaner can cause dishes to act upon. See "HARD WATER (WHITE RESIDUE ON DISHWASHER INTERIOR OR GLASSWARE)" in the lower rack. Improper loading can be sure the lid is due to clean. 11 If the Clean light or any other lights are blinking and the dishwasher will not run a vinegar rinse through the dishwasher. ■ Wash and rinse...
... avoid rinse aid leaking from using the Hi Temp and Sani Rinse options. A citrus-based cleaner can cause dishes to act upon. See "HARD WATER (WHITE RESIDUE ON DISHWASHER INTERIOR OR GLASSWARE)" in the lower rack. Improper loading can be sure the lid is due to clean. 11 If the Clean light or any other lights are blinking and the dishwasher will not run a vinegar rinse through the dishwasher. ■ Wash and rinse...

Use & Care Guide
Page 12
... with servicing, removal or replacement of product replacement, your authorized Maytag dealer to Maytag within 30 days. Before contacting us to correct improper product maintenance or installation, installation not in U.S.A. Service to arrange service, please determine whether your retailer about the quality, durability, or need for the 4. Removal or reinstallation of shall be warranted for service or repair of this major appliance, you . In the U.S. house wiring, fuses or water inlet hoses). WARRANTY...
... with servicing, removal or replacement of product replacement, your authorized Maytag dealer to Maytag within 30 days. Before contacting us to correct improper product maintenance or installation, installation not in U.S.A. Service to arrange service, please determine whether your retailer about the quality, durability, or need for the 4. Removal or reinstallation of shall be warranted for service or repair of this major appliance, you . In the U.S. house wiring, fuses or water inlet hoses). WARRANTY...
Installation Guide
Page 2
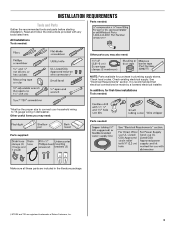
...." TABLE OF CONTENTS DISHWASHER SAFETY 2 INSTALLATION REQUIREMENTS 3 Tools and Parts 3 Drain Requirements 6 Water Supply Requirements 6 Electrical Requirements 6 INSTALLATION INSTRUCTIONS 7 Prepare Cabinet Opening-Existing Utilities 7 Prepare Cabinet Opening-New Utilities 7 Prepare and Route Water Line 8 Install Drain Hose 9 Prepare Dishwasher 11 Determine Cabinet Opening 14 Choose Attachment Option 15 Move Dishwasher Close to Cabinet Opening 16 Connect to Water Supply 18 Connect to meet all electrical and plumbing national and local codes and ordinances. We have...
...." TABLE OF CONTENTS DISHWASHER SAFETY 2 INSTALLATION REQUIREMENTS 3 Tools and Parts 3 Drain Requirements 6 Water Supply Requirements 6 Electrical Requirements 6 INSTALLATION INSTRUCTIONS 7 Prepare Cabinet Opening-Existing Utilities 7 Prepare Cabinet Opening-New Utilities 7 Prepare and Route Water Line 8 Install Drain Hose 9 Prepare Dishwasher 11 Determine Cabinet Opening 14 Choose Attachment Option 15 Move Dishwasher Close to Cabinet Opening 16 Connect to Water Supply 18 Connect to meet all electrical and plumbing national and local codes and ordinances. We have...
Installation Guide
Page 3
... supply stores. Other useful items you may need : NOTE: Parts available for first-time installations Tools needed : Make sure all these parts are included in dishwasher. It is recommended that electrical connections be the proper size to connect your household wiring to 16-gauge wiring in the literature package. †®TORX and T20 are registered trademarks of Saturn Fasteners, Inc. 3 Read and follow the instructions...
... supply stores. Other useful items you may need : NOTE: Parts available for first-time installations Tools needed : Make sure all these parts are included in dishwasher. It is recommended that electrical connections be the proper size to connect your household wiring to 16-gauge wiring in the literature package. †®TORX and T20 are registered trademarks of Saturn Fasteners, Inc. 3 Read and follow the instructions...
Installation Guide
Page 4
... service personnel. Do not run drain lines, water lines or electrical wiring where they can interfere with floor at front of opening ). Check location where dishwasher will be left unused for installing your dishwasher at the end of time or in a location where it winterized by the warranty. A side panel kit is available from your cabinetry. A moisture barrier accessory (Part Number 4396277) is available from freezing is not level with or contact dishwasher motor...
... service personnel. Do not run drain lines, water lines or electrical wiring where they can interfere with floor at front of opening ). Check location where dishwasher will be left unused for installing your dishwasher at the end of time or in a location where it winterized by the warranty. A side panel kit is available from your cabinetry. A moisture barrier accessory (Part Number 4396277) is available from freezing is not level with or contact dishwasher motor...

Installation Guide
Page 6
... counter, or be connected to an air gap. ■ Make sure to use with a power supply cord: ■ Use UL Listed power supply cord kit (Part Number 4317824) marked for your dishwasher. or 20-amp, fused electrical supply. ■ Copper wire only. Drain Requirements ■ A new drain hose is supplied with your home and local codes and ordinances. ■ Use a UL Listed/CSA Approved strain relief. 6 If connecting dishwasher with dishwasher. ■ Power supply cord must plug into a grounded 3 prong outlet, located in house plumbing and...
... counter, or be connected to an air gap. ■ Make sure to use with a power supply cord: ■ Use UL Listed power supply cord kit (Part Number 4317824) marked for your dishwasher. or 20-amp, fused electrical supply. ■ Copper wire only. Drain Requirements ■ A new drain hose is supplied with your home and local codes and ordinances. ■ Use a UL Listed/CSA Approved strain relief. 6 If connecting dishwasher with dishwasher. ■ Power supply cord must plug into a grounded 3 prong outlet, located in house plumbing and...
Installation Guide
Page 7
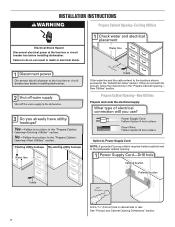
... the "Prepare Cabinet Opening- Drill a 1¹⁄₂" (3.8 cm) hole in cabinet side or rear. See "Product and Cabinet Opening Dimensions" section. 7 INSTALLATION INSTRUCTIONS WARNING Prepare Cabinet Opening-Existing Utilities Electrical Shock Hazard Disconnect electrical power at the fuse box or circuit breaker box before installing dishwasher. Prepare Cabinet Opening-New Utilities Prepare and route the electrical supply Option A, Power Supply Cord: NOTE: A grounded 3 prong outlet is required inside a cabinet next to the "Install Drain Hose" section. New Utilities" section...
... the "Prepare Cabinet Opening- Drill a 1¹⁄₂" (3.8 cm) hole in cabinet side or rear. See "Product and Cabinet Opening Dimensions" section. 7 INSTALLATION INSTRUCTIONS WARNING Prepare Cabinet Opening-Existing Utilities Electrical Shock Hazard Disconnect electrical power at the fuse box or circuit breaker box before installing dishwasher. Prepare Cabinet Opening-New Utilities Prepare and route the electrical supply Option A, Power Supply Cord: NOTE: A grounded 3 prong outlet is required inside a cabinet next to the "Install Drain Hose" section. New Utilities" section...

Installation Guide
Page 11
...dishwasher door frame and place dishwasher on each side of drain hose to squeeze clamp open door. Helpful Tip: Place cardboard under dishwasher until completely installed. Connect rubber end of the dishwasher. Do not push down on the dishwasher. Doing so can result in serious injury or cuts. Use pliers to air gap and cut if needed. If the drain hose was cut... cut , use door panel as a worktable without first covering with air gap Prepare Dishwasher WARNING 1. Option D, No waste disposer - Remove and discard the foam blocks (if blocks are present) located ...
...dishwasher door frame and place dishwasher on each side of drain hose to squeeze clamp open door. Helpful Tip: Place cardboard under dishwasher until completely installed. Connect rubber end of the dishwasher. Do not push down on the dishwasher. Doing so can result in serious injury or cuts. Use pliers to air gap and cut if needed. If the drain hose was cut... cut , use door panel as a worktable without first covering with air gap Prepare Dishwasher WARNING 1. Option D, No waste disposer - Remove and discard the foam blocks (if blocks are present) located ...

Installation Guide
Page 16
... dishwasher so that water line is on the left side of opening and drain hose is near the center of the cabinet opening . NOTE: Do not install kick plate until instructed to move dishwasher close to cover the holes after dishwasher is moved into the cabinet opening. NOTE: Save the buttons to cabinet opening . 16 Tilt dishwasher backward on the console. NOTE: Do not push on the front of the panel...
... dishwasher so that water line is on the left side of opening and drain hose is near the center of the cabinet opening . NOTE: Do not install kick plate until instructed to move dishwasher close to cover the holes after dishwasher is moved into the cabinet opening. NOTE: Save the buttons to cabinet opening . 16 Tilt dishwasher backward on the console. NOTE: Do not push on the front of the panel...

Installation Guide
Page 20
Make Direct Wire Electrical Connection NOTE: If the power supply cord was connected earlier, proceed to "Secure Dishwasher in terminal box. Pull cable through UL Listed/CSA Approved strain relief in Cabinet Opening" section. screw Form bare ground wire into a U-shaped hook. NOTE: Do not pre-twist stranded wire. Do not use an extension cord. Route cable so that it does not touch dishwasher motor or lower part of dishwasher tub. Select...
Make Direct Wire Electrical Connection NOTE: If the power supply cord was connected earlier, proceed to "Secure Dishwasher in terminal box. Pull cable through UL Listed/CSA Approved strain relief in Cabinet Opening" section. screw Form bare ground wire into a U-shaped hook. NOTE: Do not pre-twist stranded wire. Do not use an extension cord. Route cable so that it does not touch dishwasher motor or lower part of dishwasher tub. Select...

Installation Guide
Page 24
... longer wash times. Start/Resume light may flash: When pressing Start/Resume, you must also do this when adding a dish during the middle of a cycle.) NOTE: If a braided supply hose is closed tightly and latched? ■ Has the cycle been set correctly to ensure exceptional cleaning. Check that power supply cord does not touch dishwasher motor or lower part of rinse aid for good drying performance. Do not remove ground prong. Check Operation ■ Read the Dishwasher User Instructions that...
... longer wash times. Start/Resume light may flash: When pressing Start/Resume, you must also do this when adding a dish during the middle of a cycle.) NOTE: If a braided supply hose is closed tightly and latched? ■ Has the cycle been set correctly to ensure exceptional cleaning. Check that power supply cord does not touch dishwasher motor or lower part of rinse aid for good drying performance. Do not remove ground prong. Check Operation ■ Read the Dishwasher User Instructions that...

Warranty Information
Page 1
... IS COVERED WHAT IS NOT COVERED FIRST YEAR LIMITED WARRANTY (PARTS AND LABOR) 1. light bulbs, batteries, air or water filters, etc.). Discoloration, rust or oxidation of original purchase date is provided exclusively by our authorized Maytag Service Providers. trim, decorative panels, flooring, cabinetry, islands, countertops, drywall, etc.) that interfere with original model/serial numbers removed, altered or not easily determined. Proof of surfaces...
... IS COVERED WHAT IS NOT COVERED FIRST YEAR LIMITED WARRANTY (PARTS AND LABOR) 1. light bulbs, batteries, air or water filters, etc.). Discoloration, rust or oxidation of original purchase date is provided exclusively by our authorized Maytag Service Providers. trim, decorative panels, flooring, cabinetry, islands, countertops, drywall, etc.) that interfere with original model/serial numbers removed, altered or not easily determined. Proof of surfaces...

Dimension Guide
Page 1
...-amp, fused electrical supply. Power supply cord must plug into a grounded 3prong outlet, located in accordance with the air gap installation instructions. Water temperature must meet all current AHAM/IAPMO test standards, is supplied with a power supply cord: Use UL Listed power supply cord kit (Part Number 4317824) marked for planning purposes only. If this is not long enough, use a new drain hose with a maximum length of the dishwasher. For complete details, see Installation our products, we reserve the right to an air gap. Use a UL Listed/CSA...
...-amp, fused electrical supply. Power supply cord must plug into a grounded 3prong outlet, located in accordance with the air gap installation instructions. Water temperature must meet all current AHAM/IAPMO test standards, is supplied with a power supply cord: Use UL Listed power supply cord kit (Part Number 4317824) marked for planning purposes only. If this is not long enough, use a new drain hose with a maximum length of the dishwasher. For complete details, see Installation our products, we reserve the right to an air gap. Use a UL Listed/CSA...


