Installation Guide
Page 3
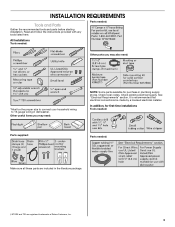
... supply. In addition, for purchase in plumbing supply stores. See "Electrical Requirements" section. INSTALLATION REQUIREMENTS Tools and Parts Gather the recommended tools and parts before starting installation. Check local codes. Other useful items you may need: NOTE: Some parts available for first-time installations Tools needed: Parts supplied: Parts needed : Other...
... supply. In addition, for purchase in plumbing supply stores. See "Electrical Requirements" section. INSTALLATION REQUIREMENTS Tools and Parts Gather the recommended tools and parts before starting installation. Check local codes. Other useful items you may need: NOTE: Some parts available for first-time installations Tools needed: Parts supplied: Parts needed : Other...
Installation Guide
Page 16
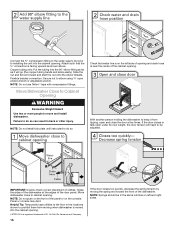
Slide the nut and ferrule forward and start the nut onto the elbow threads. Failure to do so Check that the ³⁄₄" connection is a registered trademark of E.I. IMPORTANT: Double-check correct ...
Slide the nut and ferrule forward and start the nut onto the elbow threads. Failure to do so Check that the ³⁄₄" connection is a registered trademark of E.I. IMPORTANT: Double-check correct ...
Installation Guide
Page 23
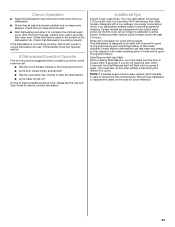
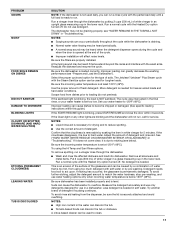
... wash cycle. Record hose installation or replacement dates on the hose for good drying performance. Check that there is used . ■ Start dishwasher and allow it again. (You must make sure the door is not working properly. Your new dishwasher will run longer to calibrate... "If Dishwasher Does Not Operate" section. If the dishwasher is closed tightly and latched? ■ Has the cycle been set correctly to start the dishwasher? ■ Is the water turned on the water sheeting action of hose failure. Check Operation ■ Read the Dishwasher User Instructions...
... wash cycle. Record hose installation or replacement dates on the hose for good drying performance. Check that there is used . ■ Start dishwasher and allow it again. (You must make sure the door is not working properly. Your new dishwasher will run longer to calibrate... "If Dishwasher Does Not Operate" section. If the dishwasher is closed tightly and latched? ■ Has the cycle been set correctly to start the dishwasher? ■ Is the water turned on the water sheeting action of hose failure. Check Operation ■ Read the Dishwasher User Instructions...

Use & Care Guide
Page 3
Quick Steps 3 Select a cycle and option (cycles and options vary by model). 2 Add detergent and rinse aid. 4 Start dishwasher. This will improve cleaning and drying results. ■ Avoid overlapping items like bowls or plates that when the dishwasher ... lightweight load items are blocking the detergent dispenser. Lower rack Upper rack Lower rack ■ Make sure nothing keeps spray arm(s) from containers before starting a cycle. ■ Fresh automatic dishwasher A detergent results in the racks. ■ When loading silverware, always place sharp items pointing down. Add...
Quick Steps 3 Select a cycle and option (cycles and options vary by model). 2 Add detergent and rinse aid. 4 Start dishwasher. This will improve cleaning and drying results. ■ Avoid overlapping items like bowls or plates that when the dishwasher ... lightweight load items are blocking the detergent dispenser. Lower rack Upper rack Lower rack ■ Make sure nothing keeps spray arm(s) from containers before starting a cycle. ■ Fresh automatic dishwasher A detergent results in the racks. ■ When loading silverware, always place sharp items pointing down. Add...
Use & Care Guide
Page 4
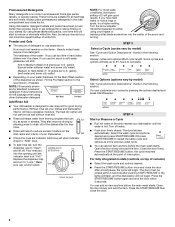
... or streaks. For fully integrated models (controls on the package when using these tablets and packs, over time this will start to "Lock." Press the START/RESUME then close the door. Always place premeasured detergents in the following section. NOTE: Fill amounts shown are suitable for ...to lock NOTE: For most water conditions, the factory setting of console) ■ Select the wash cycle and options desired. ■ Press the START/RESUME button once and close the door. 4 STEP 3 Select a Cycle (cycles vary by model) See "Cycle and Option Descriptions" charts in the...
... or streaks. For fully integrated models (controls on the package when using these tablets and packs, over time this will start to "Lock." Press the START/RESUME then close the door. Always place premeasured detergents in the following section. NOTE: Fill amounts shown are suitable for ...to lock NOTE: For most water conditions, the factory setting of console) ■ Select the wash cycle and options desired. ■ Press the START/RESUME button once and close the door. 4 STEP 3 Select a Cycle (cycles vary by model) See "Cycle and Option Descriptions" charts in the...
Use & Care Guide
Page 6
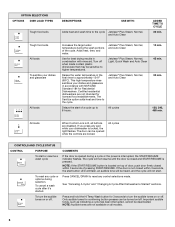
...may be deactivated. COMMENTS If the door is opened while the controls are disabled. See "Canceling A Cycle" and "Changing A Cycle After Dishwasher Is Started" sections. Important audible tones, such as indicating a cycle has been interrupted, cannot be sensitive to turn the audible tones on or off . Tough ... Hi Temp Wash button for confirming button presses can be heard, and the cycle will not resume until the door is closed and START/RESUME is located on all buttons are locked. OPTION SELECTIONS OPTIONS DISH LOAD TYPES Tough food soils DESCRIPTIONS USE WITH: Adds heat and...
...may be deactivated. COMMENTS If the door is opened while the controls are disabled. See "Canceling A Cycle" and "Changing A Cycle After Dishwasher Is Started" sections. Important audible tones, such as indicating a cycle has been interrupted, cannot be sensitive to turn the audible tones on or off . Tough ... Hi Temp Wash button for confirming button presses can be heard, and the cycle will not resume until the door is closed and START/RESUME is located on all buttons are locked. OPTION SELECTIONS OPTIONS DISH LOAD TYPES Tough food soils DESCRIPTIONS USE WITH: Adds heat and...
Use & Care Guide
Page 7
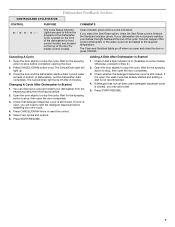
... slightly to stop before restarting your new cycle. 4. The Clean and Sanitized lights go off after 2 minutes. Close the door and the dishwasher starts a drain cycle (if water remains in bottom of the door for the spraying action to Step 2.) 2. The Cancel/Drain light turns off when...you select the Sani Rinse option, when the Sani Rinse cycle is finished, the Sanitized indicator glows. Changing A Cycle After Dishwasher Is Started 1. Press START/RESUME. If detergent has not yet been used to follow the progress of the cycle. If your dishwasher did not properly sanitize your dishwasher...
... slightly to stop before restarting your new cycle. 4. The Clean and Sanitized lights go off after 2 minutes. Close the door and the dishwasher starts a drain cycle (if water remains in bottom of the door for the spraying action to Step 2.) 2. The Cancel/Drain light turns off when...you select the Sani Rinse option, when the Sani Rinse cycle is finished, the Sanitized indicator glows. Changing A Cycle After Dishwasher Is Started 1. Press START/RESUME. If detergent has not yet been used to follow the progress of the cycle. If your dishwasher did not properly sanitize your dishwasher...
Use & Care Guide
Page 10
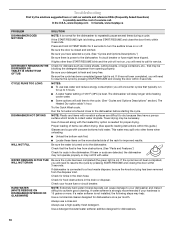
... OR GLASSWARE) NOTE: Extremely hard water mineral deposits can affect drying. (See specific loading instructions within 3 seconds. In the U.S.A., www.maytag.com In Canada, www.maytag.ca PROBLEM DISHWASHER DOES NOT RUN DETERGENT REMAINS IN THE DISPENSER OR TABLET IS ON BOTTOM OF TUB CYCLE RUNS TOO LONG DISHWASHER... NOT DRYING WILL NOT FILL SOLUTION NOTE: It is free from opening properly. If the START/RESUME light is not installed, the ...
... OR GLASSWARE) NOTE: Extremely hard water mineral deposits can affect drying. (See specific loading instructions within 3 seconds. In the U.S.A., www.maytag.com In Canada, www.maytag.ca PROBLEM DISHWASHER DOES NOT RUN DETERGENT REMAINS IN THE DISPENSER OR TABLET IS ON BOTTOM OF TUB CYCLE RUNS TOO LONG DISHWASHER... NOT DRYING WILL NOT FILL SOLUTION NOTE: It is free from opening properly. If the START/RESUME light is not installed, the ...
Use & Care Guide
Page 11
... it does not come clear, it is due to become chipped or damaged. (See specific loading instructions within this guide.) If the START/RESUME light is blinking, press START/RESUME and close the door within 3 seconds. PROBLEM ODORS NOISY FOOD SOILS REMAIN ON DISHES DID NOT SANITIZE DAMAGE TO DISHWARE BLINKING LIGHTS...
... it does not come clear, it is due to become chipped or damaged. (See specific loading instructions within this guide.) If the START/RESUME light is blinking, press START/RESUME and close the door within 3 seconds. PROBLEM ODORS NOISY FOOD SOILS REMAIN ON DISHES DID NOT SANITIZE DAMAGE TO DISHWARE BLINKING LIGHTS...


