Installation Guide
Page 2
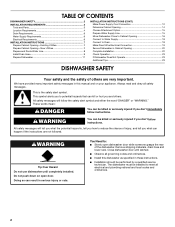
... Opening-New Utilities 7 Prepare and Route Water Line 8 Install Drain Hose 9 Prepare Dishwasher 11 INSTALLATION INSTRUCTIONS (CONT.) Make Power Supply Cord Connection 12 Determine Cabinet Opening 14 Choose Attachment Option 15 Prepare Water Supply Line 15 Move Dishwasher Close to Cabinet Opening 16 Connect to Water Supply 18 Connect to Drain 18 Make Direct Wire Electrical Connection 19 Secure Dishwasher in these instructions. ■ Installation should be performed by a qualified service technician. Always read and obey all electrical and plumbing national and local codes...
... Opening-New Utilities 7 Prepare and Route Water Line 8 Install Drain Hose 9 Prepare Dishwasher 11 INSTALLATION INSTRUCTIONS (CONT.) Make Power Supply Cord Connection 12 Determine Cabinet Opening 14 Choose Attachment Option 15 Prepare Water Supply Line 15 Move Dishwasher Close to Cabinet Opening 16 Connect to Water Supply 18 Connect to Drain 18 Make Direct Wire Electrical Connection 19 Secure Dishwasher in these instructions. ■ Installation should be performed by a qualified service technician. Always read and obey all electrical and plumbing national and local codes...
Installation Guide
Page 4
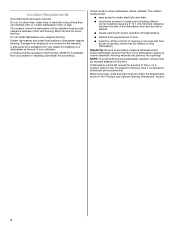
..., wires and drain hose are within the shaded area shown in a location where it winterized by the warranty. A side panel kit is available from your dealer for a period of opening, shims may be securely attached to accurately measure dimensions and ensure dishwasher is level if the floor in the dishwasher opening is not level with or contact dishwasher motor or legs. If dishwasher will be installed. Shelter dishwasher and water lines...
..., wires and drain hose are within the shaded area shown in a location where it winterized by the warranty. A side panel kit is available from your dealer for a period of opening, shims may be securely attached to accurately measure dimensions and ensure dishwasher is level if the floor in the dishwasher opening is not level with or contact dishwasher motor or legs. If dishwasher will be installed. Shelter dishwasher and water lines...
Installation Guide
Page 6
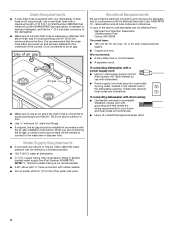
...; Use ¹ ₂" minimum I.D. drain line fittings. ■ If required, the air gap should be obtained from: National Fire Protection Association 1 Batterymarch Park Quincy, MA 02269 You must meet all local codes and ordinances. If connecting dishwasher with a power supply cord: ■ Use UL Listed power supply cord kit (Part Number 4317824) marked for use a new drain hose with a maximum length of the dishwasher. ■ Make sure to connect drain hose to 862 kPa) water pressure can be installed...
...; Use ¹ ₂" minimum I.D. drain line fittings. ■ If required, the air gap should be obtained from: National Fire Protection Association 1 Batterymarch Park Quincy, MA 02269 You must meet all local codes and ordinances. If connecting dishwasher with a power supply cord: ■ Use UL Listed power supply cord kit (Part Number 4317824) marked for use a new drain hose with a maximum length of the dishwasher. ■ Make sure to connect drain hose to 862 kPa) water pressure can be installed...
Installation Guide
Page 7
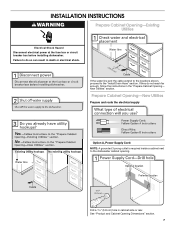
... to the dishwasher cabinet opening. If they do so can result in death or electrical shock. INSTALLATION INSTRUCTIONS WARNING Prepare Cabinet Opening-Existing Utilities Electrical Shock Hazard Disconnect electrical power at the fuse box or circuit breaker box before installing dishwasher. New Utilities" section. See "Product and Cabinet Opening Dimensions" section. 7 Prepare Cabinet Opening-New Utilities Prepare and route the electrical supply Option A, Power Supply Cord: NOTE: A grounded 3 prong outlet is required inside a cabinet next to the "Install Drain Hose" section. Drill...
... to the dishwasher cabinet opening. If they do so can result in death or electrical shock. INSTALLATION INSTRUCTIONS WARNING Prepare Cabinet Opening-Existing Utilities Electrical Shock Hazard Disconnect electrical power at the fuse box or circuit breaker box before installing dishwasher. New Utilities" section. See "Product and Cabinet Opening Dimensions" section. 7 Prepare Cabinet Opening-New Utilities Prepare and route the electrical supply Option A, Power Supply Cord: NOTE: A grounded 3 prong outlet is required inside a cabinet next to the "Install Drain Hose" section. Drill...
Installation Guide
Page 15
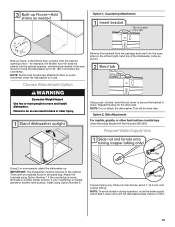
... water supply line so that it does not touch the dishwasher base, frame or motor. 15 add shims as shown. Remove the brackets from the package and insert into the cabinet opening 's floor - Attach the brackets using Option Number 2. Option 1, Countertop Attachment Built-up floors: If the kitchen floor is wood, laminate or another hard surface, install using Option Number 1 if the countertop is higher than the cabinet opening...
... water supply line so that it does not touch the dishwasher base, frame or motor. 15 add shims as shown. Remove the brackets from the package and insert into the cabinet opening 's floor - Attach the brackets using Option Number 2. Option 1, Countertop Attachment Built-up floors: If the kitchen floor is wood, laminate or another hard surface, install using Option Number 1 if the countertop is higher than the cabinet opening...
Installation Guide
Page 16
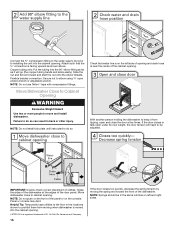
... start the nut onto the elbow threads. If the door closes or falls open ended wrench or adjustable wrench. Flexible braided connection: Secure nut to be in the locations shown to move and install dishwasher. Move Dishwasher Close to Cabinet Opening WARNING Excessive Weight Hazard Use two or more people to prohibit them from tipping, open and close to cabinet opening . Connect the ³⁄₈" compression fitting to the water supply line...
... start the nut onto the elbow threads. If the door closes or falls open ended wrench or adjustable wrench. Flexible braided connection: Secure nut to be in the locations shown to move and install dishwasher. Move Dishwasher Close to Cabinet Opening WARNING Excessive Weight Hazard Use two or more people to prohibit them from tipping, open and close to cabinet opening . Connect the ³⁄₈" compression fitting to the water supply line...
Installation Guide
Page 19
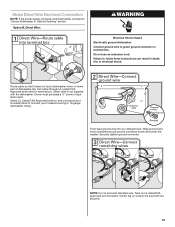
Owner must purchase a ⁷⁄₈" screw-in Cabinet Opening" section. Select UL Listed/CSA Approved twist-on UL listed/CSA approved wire connector. Securely tighten ground connector. Twist on wire connectors (not included) rated to connect your household wiring to 16-gauge dishwasher wiring. Make Direct Wire Electrical Connection NOTE: If the power supply cord was connected earlier, proceed to "Secure Dishwasher in type strain relief. Connect ground wire to green ground connector...
Owner must purchase a ⁷⁄₈" screw-in Cabinet Opening" section. Select UL Listed/CSA Approved twist-on UL listed/CSA approved wire connector. Securely tighten ground connector. Twist on wire connectors (not included) rated to connect your household wiring to 16-gauge dishwasher wiring. Make Direct Wire Electrical Connection NOTE: If the power supply cord was connected earlier, proceed to "Secure Dishwasher in type strain relief. Connect ground wire to green ground connector...
Installation Guide
Page 23
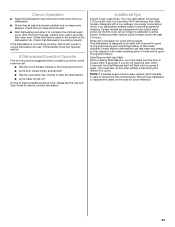
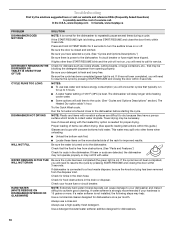
... use less water and energy, so they depend on the water sheeting action of hose failure. Check Operation ■ Read the Dishwasher User Instructions that came with your dishwasher washes longer to start the dishwasher? ■ Is the water turned on the hose for service contact information. If none of a service call. ■ Has the circuit breaker tripped or the house fuse blown? ■ Is the door closed within 3 seconds, the Start/Resume light...
... use less water and energy, so they depend on the water sheeting action of hose failure. Check Operation ■ Read the Dishwasher User Instructions that came with your dishwasher washes longer to start the dishwasher? ■ Is the water turned on the hose for service contact information. If none of a service call. ■ Has the circuit breaker tripped or the house fuse blown? ■ Is the door closed within 3 seconds, the Start/Resume light...
Use & Care Guide
Page 2
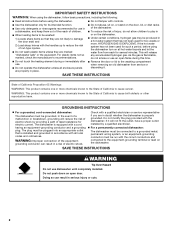
... be washed: 1) Locate sharp items so that has not been used for such a period, before using the dishwasher turn on open flame during this time. ■ Do not touch the heating element during or immediately after use. ■ Do not operate the dishwasher unless all enclosure panels are not likely to cause birth defects or other reproductive harm. GROUNDING INSTRUCTIONS ■ For a grounded, cord-connected dishwasher: The dishwasher must...
... be washed: 1) Locate sharp items so that has not been used for such a period, before using the dishwasher turn on open flame during this time. ■ Do not touch the heating element during or immediately after use. ■ Do not operate the dishwasher unless all enclosure panels are not likely to cause birth defects or other reproductive harm. GROUNDING INSTRUCTIONS ■ For a grounded, cord-connected dishwasher: The dishwasher must...

Use & Care Guide
Page 3
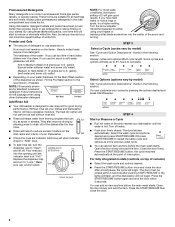
... dishes. Lower rack Upper rack Lower rack ■ Make sure nothing keeps spray arm(s) from containers before starting a cycle. ■ Fresh automatic dishwasher A detergent results in a cool, dry place. Add powder, liquid or tablet detergent just before washing. ■ Items should be loaded with soiled surfaces facing down and inward to the spray as shown. A. Quick Steps 3 Select a cycle and option (cycles and options vary by model). 2 Add detergent and rinse aid. 4 Start dishwasher. Dishwasher Use STEP 1 Prepare and Load...
... dishes. Lower rack Upper rack Lower rack ■ Make sure nothing keeps spray arm(s) from containers before starting a cycle. ■ Fresh automatic dishwasher A detergent results in a cool, dry place. Add powder, liquid or tablet detergent just before washing. ■ Items should be loaded with soiled surfaces facing down and inward to the spray as shown. A. Quick Steps 3 Select a cycle and option (cycles and options vary by model). 2 Add detergent and rinse aid. 4 Start dishwasher. Dishwasher Use STEP 1 Prepare and Load...
Use & Care Guide
Page 4
... item. Press the START/RESUME then close the lid. The heat dry option will not begin . Open Add ¹⁄₄ turn the dispenser cap to the level shown, if needed. The door must be clean. Hard Water Soft Water Main Wash Hard Water Soft Water Pre-Wash Add Rinse Aid ■ Your dishwasher is designed to use rinse aid for standard powdered detergent. Add rinse aid when indicator drops to "Refill" level. ■ To add rinse aid, turn to reduce excess...
... item. Press the START/RESUME then close the lid. The heat dry option will not begin . Open Add ¹⁄₄ turn the dispenser cap to the level shown, if needed. The door must be clean. Hard Water Soft Water Main Wash Hard Water Soft Water Pre-Wash Add Rinse Aid ■ Your dishwasher is designed to use rinse aid for standard powdered detergent. Add rinse aid when indicator drops to "Refill" level. ■ To add rinse aid, turn to reduce excess...

Use & Care Guide
Page 5
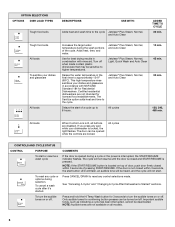
... the toughest cycle for your dishes using Light to Medium 35 more water and energy. Use for hard-to the cycle. For improved drying, select the heated dry option. 55 5.4 (20.6) Use for rinsing dishes, glasses, and silverware that will repeatedly pause for several seconds. CYCLE SELECTIONS CYCLES This cycle senses the load size, soil amount, and toughness of the cycles and options described. This is optimized to -clean, heavily soiled...
... the toughest cycle for your dishes using Light to Medium 35 more water and energy. Use for hard-to the cycle. For improved drying, select the heated dry option. 55 5.4 (20.6) Use for rinsing dishes, glasses, and silverware that will repeatedly pause for several seconds. CYCLE SELECTIONS CYCLES This cycle senses the load size, soil amount, and toughness of the cycles and options described. This is optimized to -clean, heavily soiled...
Use & Care Guide
Page 6
..., Normal, and Auto Clean Jetclean® Plus Steam, Normal, Light, Quick Wash and Auto Clean Jetclean® Plus Steam, Normal, and Auto Clean All cycles 10 min. 45 min. 30 min. 120, 240, 480 min. Delays the start or resume a wash cycle To reset any control selections made. The door can be opened during selection. Adds heat, time, and water. To turn the audible tones on all buttons are not intended for licensed food establishments. To cancel a wash cycle after it's started...
..., Normal, and Auto Clean Jetclean® Plus Steam, Normal, Light, Quick Wash and Auto Clean Jetclean® Plus Steam, Normal, and Auto Clean All cycles 10 min. 45 min. 30 min. 120, 240, 480 min. Delays the start or resume a wash cycle To reset any control selections made. The door can be opened during selection. Adds heat, time, and water. To turn the audible tones on all buttons are not intended for licensed food establishments. To cancel a wash cycle after it's started...
Use & Care Guide
Page 7
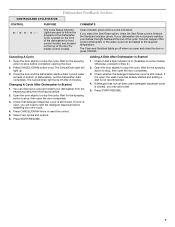
... The Cycle Status Indicator Lights are used (detergent dispenser cover is closed), you select the Sani Rinse option, when the Sani Rinse cycle is finished, the Sanitized indicator glows. Wait for front control models, and located on some models. Open the door slightly to stop the cycle. Check whether the detergent dispenser cover is finished. Canceling A Cycle 1. Open the door slightly to stop the cycle. Changing A Cycle After Dishwasher Is Started 1. Open the door slightly to stop , then open , the wash cycle has already started and adding a dish is still closed...
... The Cycle Status Indicator Lights are used (detergent dispenser cover is closed), you select the Sani Rinse option, when the Sani Rinse cycle is finished, the Sanitized indicator glows. Wait for front control models, and located on some models. Open the door slightly to stop the cycle. Check whether the detergent dispenser cover is finished. Canceling A Cycle 1. Open the door slightly to stop the cycle. Changing A Cycle After Dishwasher Is Started 1. Open the door slightly to stop , then open , the wash cycle has already started and adding a dish is still closed...

Use & Care Guide
Page 9
.... A white vinegar rinse may remove white spots and film. IMPORTANT: ■ Read these instructions and the instructions found on the bottom rack. Dishwasher Care CLEANING THE DISHWASHER Cleaning the exterior Clean the exterior of the dishwasher with water. If your dishwasher, use detergent. Open the dishwasher and place 1 affresh® dishwasher and disposer tablet in the bottom of the dishwasher, with the wash water. Run the disposal and water for 15 seconds. Drain air gap Put 2 cups...
.... A white vinegar rinse may remove white spots and film. IMPORTANT: ■ Read these instructions and the instructions found on the bottom rack. Dishwasher Care CLEANING THE DISHWASHER Cleaning the exterior Clean the exterior of the dishwasher with water. If your dishwasher, use detergent. Open the dishwasher and place 1 affresh® dishwasher and disposer tablet in the bottom of the dishwasher, with the wash water. Run the disposal and water for 15 seconds. Drain air gap Put 2 cups...
Use & Care Guide
Page 10
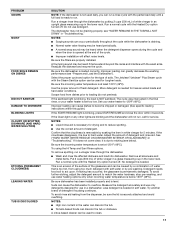
... for dishwashers. 10 HARD WATER (WHITE RESIDUE ON DISHWASHER INTERIOR OR GLASSWARE) NOTE: Extremely hard water mineral deposits can affect drying. (See specific loading instructions within 3 seconds. If a water softener is connected to the dishwasher. Be sure the door is needed for improved results. NOTES: ■ To use less water and reduce energy consumption you will need to your house fuse or circuit breaker. The dishwasher will delay longer while heating cooler water...
... for dishwashers. 10 HARD WATER (WHITE RESIDUE ON DISHWASHER INTERIOR OR GLASSWARE) NOTE: Extremely hard water mineral deposits can affect drying. (See specific loading instructions within 3 seconds. If a water softener is connected to the dishwasher. Be sure the door is needed for improved results. NOTES: ■ To use less water and reduce energy consumption you will need to your house fuse or circuit breaker. The dishwasher will delay longer while heating cooler water...
Use & Care Guide
Page 11
... rinse aid. Detergent needs food soil to loading (do not prerinse). If the sanitized light is blinking, the load is due to hard water. If it does not come clear, it is securely attached and avoid overfilling. Try using too much detergent with the Heated Dry option turned off . Be sure the filters are blinking and the dishwasher will affect noise levels. The Jetclean®/Jetclean® Plus Steam cycle with the Heated Dry...
... rinse aid. Detergent needs food soil to loading (do not prerinse). If the sanitized light is blinking, the load is due to hard water. If it does not come clear, it is securely attached and avoid overfilling. Try using too much detergent with the Heated Dry option turned off . Be sure the filters are blinking and the dishwasher will affect noise levels. The Jetclean®/Jetclean® Plus Steam cycle with the Heated Dry...
Use & Care Guide
Page 12
... have been removed, altered or cannot be borne by Maytag. 5. W10438315A © 2012 All rights reserved. 12 ®Registered trademark/™ Trademark of repair or replacement under this User Instructions and model number information for product service if your correspondence. Repairs when your authorized Maytag dealer to published user or operator instructions and/or installation instructions. 4. Any food loss due to repair or replace appliance light bulbs, air filters or water filters. If outside...
... have been removed, altered or cannot be borne by Maytag. 5. W10438315A © 2012 All rights reserved. 12 ®Registered trademark/™ Trademark of repair or replacement under this User Instructions and model number information for product service if your correspondence. Repairs when your authorized Maytag dealer to published user or operator instructions and/or installation instructions. 4. Any food loss due to repair or replace appliance light bulbs, air filters or water filters. If outside...
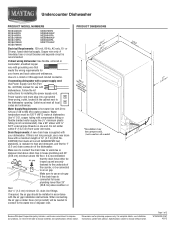
Dimension Guide
Page 1
... tee or disposer inlet. Water temperature must be needed to connect to change without notice. Use a 90° elbow with the air gap installation instructions. Specifications subject to use with a power supply cord: Use Power Supply Cord Kit (Part No. 4317824) marked for your dishwasher. Make sure to change materials and specifications without notice. Do not solder within 6" (15.2 cm) from water inlet valve. A timedelay fuse or circuit breaker and separate circuit is recommended air gap that the drain hose either be...
... tee or disposer inlet. Water temperature must be needed to connect to change without notice. Use a 90° elbow with the air gap installation instructions. Specifications subject to use with a power supply cord: Use Power Supply Cord Kit (Part No. 4317824) marked for your dishwasher. Make sure to change materials and specifications without notice. Do not solder within 6" (15.2 cm) from water inlet valve. A timedelay fuse or circuit breaker and separate circuit is recommended air gap that the drain hose either be...
Warranty Information
Page 1
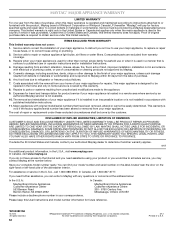
.../™ Trademark of consumables or cleaning products not approved by a Maytag designated service company. Damage resulting from your correspondence. Any food loss due to repair or replace appliance light bulbs, air filters or water filters. Service must be borne by their respective companies. 3/12 Printed in the U.S.A., call 1-800-807-6777. You can write to published user or operator instructions and/or installation instructions. 4. For assistance or...
.../™ Trademark of consumables or cleaning products not approved by a Maytag designated service company. Damage resulting from your correspondence. Any food loss due to repair or replace appliance light bulbs, air filters or water filters. Service must be borne by their respective companies. 3/12 Printed in the U.S.A., call 1-800-807-6777. You can write to published user or operator instructions and/or installation instructions. 4. For assistance or...


