
User Instructions
Page 2
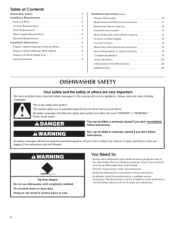
... SAVE THESE iNSTRUCTiONS GROUNDING iNSTRUCTiONS For a grounded, cord-connected dishwasher: The dishwasher must be attached before electrical power is applied to the equipment-grounding the dishwasher. Doing so can result in a risk of electric shock. Refer to the installation instructions for proper grounding... procedures. [] Do not abuse, sit on, or stand on the dishwasher. [] Under certain conditions, hydrogen...
... SAVE THESE iNSTRUCTiONS GROUNDING iNSTRUCTiONS For a grounded, cord-connected dishwasher: The dishwasher must be attached before electrical power is applied to the equipment-grounding the dishwasher. Doing so can result in a risk of electric shock. Refer to the installation instructions for proper grounding... procedures. [] Do not abuse, sit on, or stand on the dishwasher. [] Under certain conditions, hydrogen...
User Instructions
Page 7
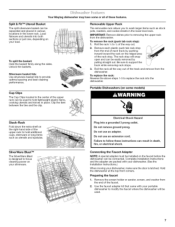
... one, depending on the right-hand side of the upper rack to follow these features. Your Maytag dishwasher may have some models) Stack-Rack Fold down the extra shelf on your dishwasher, make sure the door is designed to hold additional cups, stemware or long items such as ... death, fire, or electrical shock. Use the faucet adapter kit that came with your dishwasher. (See the Installation Instructions.) When moving your load. IMPORTANT: Remove dishes prior to modify the faucet where the dishwasher will snap open and can be used to focus cleaning power on the ridged area of...
... one, depending on the right-hand side of the upper rack to follow these features. Your Maytag dishwasher may have some models) Stack-Rack Fold down the extra shelf on your dishwasher, make sure the door is designed to hold additional cups, stemware or long items such as ... death, fire, or electrical shock. Use the faucet adapter kit that came with your dishwasher. (See the Installation Instructions.) When moving your load. IMPORTANT: Remove dishes prior to modify the faucet where the dishwasher will snap open and can be used to focus cleaning power on the ridged area of...
User Instructions
Page 10
...can cause dishes to become chipped or damaged. (See specific loading instructions within 3 seconds. Be sure the incoming water temperature is not used for tougher loads. The dishwasher may help: Use a commercial cleaner designed for dishwashers once per month. Select the proper cycle and option for the.../WILL NOT DRAIN" in the drain or disposer. If the Clean light or any other lights are properly installed. Use a detergent booster/water softener additive designed for dishwashers. Do not use a rinse aid. NOISY NOTES: • Surging sounds can cause damage to your water...
...can cause dishes to become chipped or damaged. (See specific loading instructions within 3 seconds. Be sure the incoming water temperature is not used for tougher loads. The dishwasher may help: Use a commercial cleaner designed for dishwashers once per month. Select the proper cycle and option for the.../WILL NOT DRAIN" in the drain or disposer. If the Clean light or any other lights are properly installed. Use a detergent booster/water softener additive designed for dishwashers. Do not use a rinse aid. NOISY NOTES: • Surging sounds can cause damage to your water...
User Instructions
Page 12
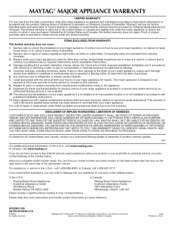
...in your product or you would like to schedule service, you on the right-hand or left-hand side of the dishwasher interior. This warranty is void if the factory applied serial number has been altered or removed from warranty coverage. 3. You can ...from your home of your major appliance. Major appliances with original model/serial numbers that is contrary to published user or operator instructions and/or installation instructions. 4. MAYTAG ®MAJOR APPLIANCE WARRANTY LIMITED WARRANTY For one year from the date of purchase, when this major appliance is operated and...
...in your product or you would like to schedule service, you on the right-hand or left-hand side of the dishwasher interior. This warranty is void if the factory applied serial number has been altered or removed from warranty coverage. 3. You can ...from your home of your major appliance. Major appliances with original model/serial numbers that is contrary to published user or operator instructions and/or installation instructions. 4. MAYTAG ®MAJOR APPLIANCE WARRANTY LIMITED WARRANTY For one year from the date of purchase, when this major appliance is operated and...
Installation Instructions
Page 2
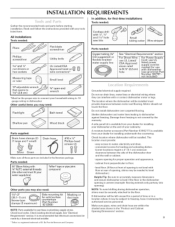
... Prepare and Route Water Line 7 Complete Installation 19 Install Drain Hose 8 Check Operation 20 If Dishwasher Does Not Operate 20 Additional Tips 20 DISHWASHER SAFETY We have provided messages. Close dishwasher door until completely installed. Table of others . Always read and obey all safety This is , tell you don't immediately follow instructions. Installation Instructions (cont.) InstallationRequirements 3.. These words mean...
... Prepare and Route Water Line 7 Complete Installation 19 Install Drain Hose 8 Check Operation 20 If Dishwasher Does Not Operate 20 Additional Tips 20 DISHWASHER SAFETY We have provided messages. Close dishwasher door until completely installed. Table of others . Always read and obey all safety This is , tell you don't immediately follow instructions. Installation Instructions (cont.) InstallationRequirements 3.. These words mean...
Installation Instructions
Page 3
... section. NumBegrr(oUSme302e7t97Pma:rt not included) Grounded electrical supply required. The location where the dishwasher will be made by a licensed electrical installer. Do not install dishwasher over carpeted flooring. A moisture barrier accessory (Part Number 4396277)is available from your dealer ...For Power Supply Cord: use UL listed power supply cord kit marked for installing underneath the countertop. Check existing electrical supply. Read and follow the instructions provided with dishwasher ! Teflon is not covered by authorized service personnel. Do not run drain...
... section. NumBegrr(oUSme302e7t97Pma:rt not included) Grounded electrical supply required. The location where the dishwasher will be made by a licensed electrical installer. Do not install dishwasher over carpeted flooring. A moisture barrier accessory (Part Number 4396277)is available from your dealer ...For Power Supply Cord: use UL listed power supply cord kit marked for installing underneath the countertop. Check existing electrical supply. Read and follow the instructions provided with dishwasher ! Teflon is not covered by authorized service personnel. Do not run drain...
Installation Instructions
Page 5
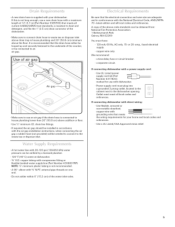
...codes and ordinances. If connecting dishwasher with direct wiring: • Use flexible, armored or non-metallic sheathed, copper wire with grounding wire that the electrical connection and wire size are adequate and in accordance with the air gap installation instructions, when connecting the air gap ...a rubber hose (not provided) will be needed to connect to the dishwasher opening. external pipe threads on one end. • Do not solder within ...
...codes and ordinances. If connecting dishwasher with direct wiring: • Use flexible, armored or non-metallic sheathed, copper wire with grounding wire that the electrical connection and wire size are adequate and in accordance with the air gap installation instructions, when connecting the air gap ...a rubber hose (not provided) will be needed to connect to the dishwasher opening. external pipe threads on one end. • Do not solder within ...

Installation Instructions
Page 6
... I I brea ker box befor e installing dishwasher: If the water line and the cable extend to the locations shown, proceed to do not reach far enough, follow the instructions in the ',Prepare Cabinet Opening_Ex!sting Utilities" section. NO_F011oW instructions inthe "Prepare Cabinet Opening_NeW Utilities, SeCtiOn; _--__, Powei Suppiy Cord: Follow Option A instructions D feet W re _ Follow Option...
... I I brea ker box befor e installing dishwasher: If the water line and the cable extend to the locations shown, proceed to do not reach far enough, follow the instructions in the ',Prepare Cabinet Opening_Ex!sting Utilities" section. NO_F011oW instructions inthe "Prepare Cabinet Opening_NeW Utilities, SeCtiOn; _--__, Powei Suppiy Cord: Follow Option A instructions D feet W re _ Follow Option...

Installation Instructions
Page 12
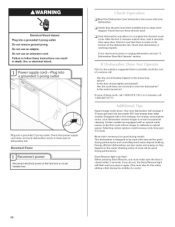
of cover. Tighten strain relief screws to be installed (you will be sure both are secured. Gently tug on wire ...inside box. Make sure wires are not pinched. Measure height of cabinet opening from underside of countertop to floor where dishwasher will need to white, using UL Listed/CSA Approved twist-on wires to secure cord. 3__ Power Cord--Connect re ...in g wi re s : NOTE: Do not pre-twist stranded wire. NOTE: Do not plug into outlet until instructed. Connect wires black to black and white to measure the lowest point on left side of this step. Close cover ...
of cover. Tighten strain relief screws to be installed (you will be sure both are secured. Gently tug on wire ...inside box. Make sure wires are not pinched. Measure height of cabinet opening from underside of countertop to floor where dishwasher will need to white, using UL Listed/CSA Approved twist-on wires to secure cord. 3__ Power Cord--Connect re ...in g wi re s : NOTE: Do not pre-twist stranded wire. NOTE: Do not plug into outlet until instructed. Connect wires black to black and white to measure the lowest point on left side of this step. Close cover ...

Installation Instructions
Page 13
...Do not scratch the front panel during this procedure. Start setscrews in use a fiat-blade screwdriver to prohibit movement when the dishwasher is in handle. Add shims as needed in the required position determined from the cardboard box. NOTE: Shims must be securely...approximate. Tighten the setscrews 1/4turn past snug. 1 JStand dishwasher upright Built-up to move. (Measurements are preset at the factory for additional clearance. Push the door handle tightly against the door. NOTE: Do not install kickplate until instructed. 13 Remove the door handle and hardware bag containing ...
...Do not scratch the front panel during this procedure. Start setscrews in use a fiat-blade screwdriver to prohibit movement when the dishwasher is in handle. Add shims as needed in the required position determined from the cardboard box. NOTE: Shims must be securely...approximate. Tighten the setscrews 1/4turn past snug. 1 JStand dishwasher upright Built-up to move. (Measurements are preset at the factory for additional clearance. Push the door handle tightly against the door. NOTE: Do not install kickplate until instructed. 13 Remove the door handle and hardware bag containing ...
Installation Instructions
Page 20
...Is the door closed within 3 seconds. Reconnect Power [_1 Read the Dishwasher User Instructions that came with your dishwasher washes longer to see "If Dishwasher Does Not Operate" section. Check to ensure exceptional cleaning. Your new dishwasher will flash until you press it to follow these work, call 1-... increase cycle time past 3.5 hours. Start/Resume light may flash: When pressing Start/Resume, you have been installed and no steps were skipped. C3Start dishwasher and allow it again. (You must make sure the door is working properly. First try the solutions suggested ...
...Is the door closed within 3 seconds. Reconnect Power [_1 Read the Dishwasher User Instructions that came with your dishwasher washes longer to see "If Dishwasher Does Not Operate" section. Check to ensure exceptional cleaning. Your new dishwasher will flash until you press it to follow these work, call 1-... increase cycle time past 3.5 hours. Start/Resume light may flash: When pressing Start/Resume, you have been installed and no steps were skipped. C3Start dishwasher and allow it again. (You must make sure the door is working properly. First try the solutions suggested ...


