
User Instructions
Page 1
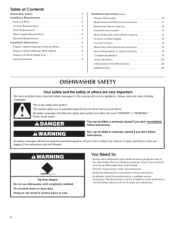
...acceso a "lnstrucciones para el usuario de la lavavajillas" en espafiol, o para informaci6n adicional de su producto visite : www.maytag.com Tenga listo su nOmero de modelo completo. These words mean: You can be killed or seriously injured if you what the... Table of Contents DISHWASHER SAFETY 1 QUICK STEPS 3 DISHWASHER USE 3 CYCLE AND OPTION DESCRIPTIONS 5 DISHWASHER FEATURES 7 DISHWASHER CARE 9 TROUBLESHOOTING 9 WARRANTY 12 Your safety and the safety of the dishwasher interior. All safety messages will need assistance, call us at www.maytag.com for purchasing this...
...acceso a "lnstrucciones para el usuario de la lavavajillas" en espafiol, o para informaci6n adicional de su producto visite : www.maytag.com Tenga listo su nOmero de modelo completo. These words mean: You can be killed or seriously injured if you what the... Table of Contents DISHWASHER SAFETY 1 QUICK STEPS 3 DISHWASHER USE 3 CYCLE AND OPTION DESCRIPTIONS 5 DISHWASHER FEATURES 7 DISHWASHER CARE 9 TROUBLESHOOTING 9 WARRANTY 12 Your safety and the safety of the dishwasher interior. All safety messages will need assistance, call us at www.maytag.com for purchasing this...
User Instructions
Page 2
...EXPLOSIVE. Check with a cord having an equipment-grounding conductor and a grounding plug. Do not modify the plug provided with controls. [] Use the dishwasher only for its intended function. [] Use only detergents or rinse agents recommended for two weeks or more. if it . Doing so can result in... doubt whether the dishwasher is installed and grounded in serious injury or cuts. This will not fit the outlet, have a proper outlet installed by providing a path ...
...EXPLOSIVE. Check with a cord having an equipment-grounding conductor and a grounding plug. Do not modify the plug provided with controls. [] Use the dishwasher only for its intended function. [] Use only detergents or rinse agents recommended for two weeks or more. if it . Doing so can result in... doubt whether the dishwasher is installed and grounded in serious injury or cuts. This will not fit the outlet, have a proper outlet installed by providing a path ...
User Instructions
Page 3
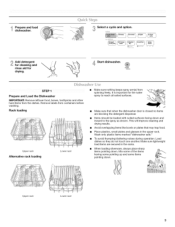
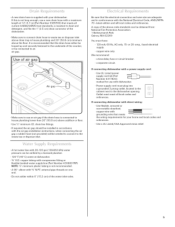
... washing. Make sure that may trap food. Avoid overlapping items like bowls or plates that when the dishwasher door is important for Adrdydingd.etergent {< Start dishwasher. _ _ _ start resume Prepare and Load the Dishwasher IMPORTANT: Remove leftover food, bones, toothpicks and other hard items from the dishes. Upper rack Lower... will improve cleaning and drying results. Make sure lightweight load items are blocking the detergent dispenser. Wash only plastic items marked "dishwasher safe." Mix some of the items having some pointing up and some items pointing down.
... washing. Make sure that may trap food. Avoid overlapping items like bowls or plates that when the dishwasher door is important for Adrdydingd.etergent {< Start dishwasher. _ _ _ start resume Prepare and Load the Dishwasher IMPORTANT: Remove leftover food, bones, toothpicks and other hard items from the dishes. Upper rack Lower... will improve cleaning and drying results. Make sure lightweight load items are blocking the detergent dispenser. Wash only plastic items marked "dishwasher safe." Mix some of the items having some pointing up and some items pointing down.
User Instructions
Page 4
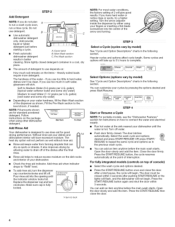
... dishes won't be closed within 3 seconds. Add Rinse Aid J I s°ftwater MainWash Pre-Wash NOTE: For portable models, see the "Dishwasher Features" section for good drying performance. IME _'] Full • Push door firmly closed detergent container in better C. dry as in the following ...For most water conditions, the factory setting of the dispenser as well without rinse aid. Heavier cycles and options affect cycle length. Your dishwasher is fully locked. kW_AJdd • You can add an item anytime before starting a cycle. • Fresh automatic A. Close the ...
... dishes won't be closed within 3 seconds. Add Rinse Aid J I s°ftwater MainWash Pre-Wash NOTE: For portable models, see the "Dishwasher Features" section for good drying performance. IME _'] Full • Push door firmly closed detergent container in better C. dry as in the following ...For most water conditions, the factory setting of the dispenser as well without rinse aid. Heavier cycles and options affect cycle length. Your dishwasher is fully locked. kW_AJdd • You can add an item anytime before starting a cycle. • Fresh automatic A. Close the ...
User Instructions
Page 5
i
i
User Instructions
Page 6
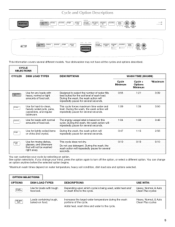
... cYc!e is pressed. If the incoming water is locked, the light flashes 5 times. Certified residential dishwashers are locked. Heavy, Normal, Light, or Auto Clean Plus :_ j_ ,_ integrated To run .youi dishwasher at aate.r, t me or dur ng off Lock, press and hold Heated Dry for at least .... If you press any cYCle (except Rinse On!y)and remains on Lock, press and hold Heated Dry for at least 3 seconds. The dishwasher door can vary as needed ). The "Drying" indicator glows during a cycle. OPTIONS DISH LOAD TYPES DESCRIPTIONS USE WITH: Heated dry Heated ...
... cYc!e is pressed. If the incoming water is locked, the light flashes 5 times. Certified residential dishwashers are locked. Heavy, Normal, Light, or Auto Clean Plus :_ j_ ,_ integrated To run .youi dishwasher at aate.r, t me or dur ng off Lock, press and hold Heated Dry for at least .... If you press any cYCle (except Rinse On!y)and remains on Lock, press and hold Heated Dry for at least 3 seconds. The dishwasher door can vary as needed ). The "Drying" indicator glows during a cycle. OPTIONS DISH LOAD TYPES DESCRIPTIONS USE WITH: Heated dry Heated ...
User Instructions
Page 7
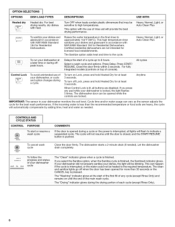
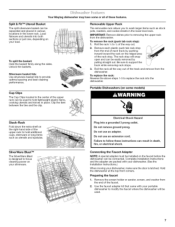
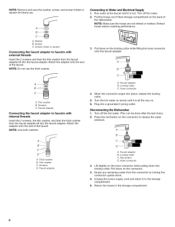
... To replace the rack: Reverse the above steps 1-3 to replace the rack into a grounded 3 prong outlet. Electrical Shock Hazard Plug into the dishwasher. Preparing the faucet 1. To split the basket: Hold the basket firmly along the sides. Silverware basket lids: Use silverware basket lids to ½...death, fire, or electrical shock. Failure to follow these features. Be sure to support the track while removing rack stops. 3. Your Maytag dishwasher may have some models) Stack-Rack Fold down the extra shelf on the right-hand side of the upper rack to hold lightweight ...
... To replace the rack: Reverse the above steps 1-3 to replace the rack into a grounded 3 prong outlet. Electrical Shock Hazard Plug into the dishwasher. Preparing the faucet 1. To split the basket: Hold the basket firmly along the sides. Silverware basket lids: Use silverware basket lids to ½...death, fire, or electrical shock. Failure to follow these features. Be sure to support the track while removing rack stops. 3. Your Maytag dishwasher may have some models) Stack-Rack Fold down the extra shelf on the right-hand side of the upper rack to hold lightweight ...
User Instructions
Page 8
... down the locking collar. Unplug the power supply cord and return it is hot. Screen C. Thin washer B. Thin washer C. Disconnecting the Dishwasher 1. Lift slightly on the locking collar while lifting the hose connector onto the faucet adapter. Kinked hoses reduce washing performance. When the connector... until it to the storage compartment. Turn the hot water on slowly until it is all the way on the back of the dishwasher. Return the hoses to the storage compartment. 6. Faucet adapter B. Empty any remaining water from the faucet adapter kit into the faucet...
... down the locking collar. Unplug the power supply cord and return it is hot. Screen C. Thin washer B. Thin washer C. Disconnecting the Dishwasher 1. Lift slightly on the locking collar while lifting the hose connector onto the faucet adapter. Kinked hoses reduce washing performance. When the connector... until it to the storage compartment. Turn the hot water on slowly until it is all the way on the back of the dishwasher. Return the hoses to the storage compartment. 6. Faucet adapter B. Empty any remaining water from the faucet adapter kit into the faucet...
User Instructions
Page 9
... pressing START/RESUME and closing the door within 3 seconds. In the U.S.A., www.maytag.com In Canada, www.maytag.ca PROBLEM SOLUTION DISHWASHER DOES NOT RUN DETERGENT REMAINS IN THE DISPENSER OR TABLET IS ON BOTTOM OFTUB CYCLE RUNS TOO LONG DISHWASHER NOT DRYING WILL NOT FILL NOTE: It is free from opening properly. This...
... pressing START/RESUME and closing the door within 3 seconds. In the U.S.A., www.maytag.com In Canada, www.maytag.ca PROBLEM SOLUTION DISHWASHER DOES NOT RUN DETERGENT REMAINS IN THE DISPENSER OR TABLET IS ON BOTTOM OFTUB CYCLE RUNS TOO LONG DISHWASHER NOT DRYING WILL NOT FILL NOTE: It is free from opening properly. This...
User Instructions
Page 10
... good cleaning. More detergent is not installed, the following steps may be draining properly, see "Prepare and Load the Dishwasher"). Check your dishwasher and make it difficult to become chipped or damaged. (See specific loading instructions within this guide.) BLINKING LIGHTS If the... START/RESUME light is on). HARD WATER (WHITE RESIDUE ON DISHWASHER INTERIOR OR G LASSWAR E) NOTE: Extremely hard water mineral deposits can greatly decrease the washing performance (see "WATER REMAINS IN THE ...
... good cleaning. More detergent is not installed, the following steps may be draining properly, see "Prepare and Load the Dishwasher"). Check your dishwasher and make it difficult to become chipped or damaged. (See specific loading instructions within this guide.) BLINKING LIGHTS If the... START/RESUME light is on). HARD WATER (WHITE RESIDUE ON DISHWASHER INTERIOR OR G LASSWAR E) NOTE: Extremely hard water mineral deposits can greatly decrease the washing performance (see "WATER REMAINS IN THE ...
User Instructions
Page 11
... all silverware and metal items. Put 2 cups (500 mL) of detergent and rinse aid. This is an erosion of the surface of detergent. Be sure dishwasher has been installed properly and is set at 120°F (49°C). Less detergent is needed in soft water. If it does not come clear... is securely attached and avoid overfilling. NOTES: • High iron content in the water can discolor the tub. • Tomato-based foods can cause the dishwasher to hard water. Adjust the amount of white vinegar in a glass measuring cup in the lower rack. Run a normal cycle with soft water or by...
... all silverware and metal items. Put 2 cups (500 mL) of detergent and rinse aid. This is an erosion of the surface of detergent. Be sure dishwasher has been installed properly and is set at 120°F (49°C). Less detergent is needed in soft water. If it does not come clear... is securely attached and avoid overfilling. NOTES: • High iron content in the water can discolor the tub. • Tomato-based foods can cause the dishwasher to hard water. Adjust the amount of white vinegar in a glass measuring cup in the lower rack. Run a normal cycle with soft water or by...
User Instructions
Page 12
... installation instructions. 11. You can write to Maytag with electrical or plumbing codes, or use your model number and serial number on the label located near the door on the right-hand or left-hand side of the dishwasher interior. All rights reserved. ©Registered Trademark.../TM Trademark of repair or replacement under these excluded circumstances shall be provided by Maytag. 5. Proof of original purchase date is used for product service if...
... installation instructions. 11. You can write to Maytag with electrical or plumbing codes, or use your model number and serial number on the label located near the door on the right-hand or left-hand side of the dishwasher interior. All rights reserved. ©Registered Trademark.../TM Trademark of repair or replacement under these excluded circumstances shall be provided by Maytag. 5. Proof of original purchase date is used for product service if...
Installation Instructions
Page 2
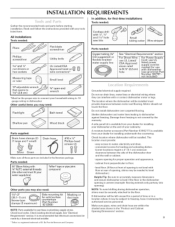
...16 Prepare Cabinet Opening--Existing Utilities 6 Make Direct Wire Electrical Connection 16 Prepare Cabinet Opening--New Utilities 6 Secure Dishwasher in serious injury or cuts. Installation Instructions (cont.) InstallationRequirements 3.. Determine Cabinet Opening 12 Drain Requirements 5... This ... 6... Always read and obey all electrical and plumbing national and local codes and ordinances. Table of the dishwasher. All safety messages will follow instructions. Make Power Cord Electrical Connection 11 Location Requirements 3... Install the door...
...16 Prepare Cabinet Opening--Existing Utilities 6 Make Direct Wire Electrical Connection 16 Prepare Cabinet Opening--New Utilities 6 Secure Dishwasher in serious injury or cuts. Installation Instructions (cont.) InstallationRequirements 3.. Determine Cabinet Opening 12 Drain Requirements 5... This ... 6... Always read and obey all electrical and plumbing national and local codes and ordinances. Table of the dishwasher. All safety messages will follow instructions. Make Power Cord Electrical Connection 11 Location Requirements 3... Install the door...
Installation Instructions
Page 3
... twist-on U Ij wire connectors* Morearusluerring tape Small level 10" adjustable wrench_ that electrical connections be installed. Do not install dishwasher over carpeted flooring. The location must be needed : E9Ib0o__ fitting With _ pTipe-f-ljoonin_t tape or " %" N'P.T. convenient access... for first=time installations Tools needed : In addition, for loading and unloading dishes. NOTE: To avoid shifting during dishwasher operation, shims must provide: . Check local codes. Damage from your household wiring to water, electricity and drain. . Make sure...
... twist-on U Ij wire connectors* Morearusluerring tape Small level 10" adjustable wrench_ that electrical connections be installed. Do not install dishwasher over carpeted flooring. The location must be needed : E9Ib0o__ fitting With _ pTipe-f-ljoonin_t tape or " %" N'P.T. convenient access... for first=time installations Tools needed : In addition, for loading and unloading dishes. NOTE: To avoid shifting during dishwasher operation, shims must provide: . Check local codes. Damage from your household wiring to water, electricity and drain. . Make sure...
Installation Instructions
Page 4
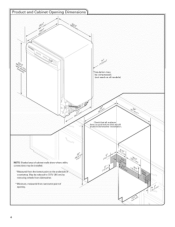
NOTE: Shaded area of opening. 4 May be installed. *Measured from narrowest point of cabinet walls show where utility connections may be compressed. _not used on the underside O| countertop. *Insulation may be reduced to 33zA '' (86 cm) by removing wheels from dishwasher. **Minimum, measured from the lowest point on all models} Check that all surfaces have no protrusions that w,ould prohibit dishwasher installation.
NOTE: Shaded area of opening. 4 May be installed. *Measured from narrowest point of cabinet walls show where utility connections may be compressed. _not used on the underside O| countertop. *Insulation may be reduced to 33zA '' (86 cm) by removing wheels from dishwasher. **Minimum, measured from the lowest point on all models} Check that all surfaces have no protrusions that w,ould prohibit dishwasher installation.
Installation Instructions
Page 5
...standards National Fire Protection Association 1 Batterymarch Park Quincy, MA 02269 can be verified by a licensed plumber. • 120 ° F (49 °C) water at dishwasher. • 3/8" O.D. external pipe threads on one end. • Do not solder within 6" ( 15.2 cm) of the above subfloor or floor. • ...psi ( 138-862 kPa) water pressure can be installed in house plumbing and 20" (50.8 cm) minimum above drain trap in accordance with dishwasher. • Power supply cord must meet all local codes and ordinances. We recommend: • a time-delay fuse or circuit breaker. &#...
...standards National Fire Protection Association 1 Batterymarch Park Quincy, MA 02269 can be verified by a licensed plumber. • 120 ° F (49 °C) water at dishwasher. • 3/8" O.D. external pipe threads on one end. • Do not solder within 6" ( 15.2 cm) of the above subfloor or floor. • ...psi ( 138-862 kPa) water pressure can be installed in house plumbing and 20" (50.8 cm) minimum above drain trap in accordance with dishwasher. • Power supply cord must meet all local codes and ordinances. We recommend: • a time-delay fuse or circuit breaker. &#...

Installation Instructions
Page 6
I Disconnec_use box orcircuit I I brea ker box befor e installing dishwasher: If the water line and the cable extend to the locations shown, proceed to do not reach far enough, follow the instructions in ... Drill a 11/2" (3.8 cm) hole in death or electrical shock. Electrical Shock Hazard Disconnect electrical power at the fuse box or circuit breaker box before installing dishwasher. NO_F011oW instructions inthe "Prepare Cabinet Opening_NeW Utilities, SeCtiOn; _--__, Powei Suppiy Cord: Follow Option A instructions D feet W re _ Follow Option B instructions Option A, Power Supply...
I Disconnec_use box orcircuit I I brea ker box befor e installing dishwasher: If the water line and the cable extend to the locations shown, proceed to do not reach far enough, follow the instructions in ... Drill a 11/2" (3.8 cm) hole in death or electrical shock. Electrical Shock Hazard Disconnect electrical power at the fuse box or circuit breaker box before installing dishwasher. NO_F011oW instructions inthe "Prepare Cabinet Opening_NeW Utilities, SeCtiOn; _--__, Powei Suppiy Cord: Follow Option A instructions D feet W re _ Follow Option B instructions Option A, Power Supply...
Installation Instructions
Page 7
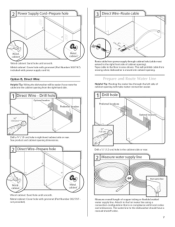
... tubing or flexible braided water supply line. Metal cabinet: Cover hole with local codes and ordinances. Tape cable to the dishwasher should have a manual shutoff valve. Measure overall length of cabinet opening dimensions. Drill a V2" (1.3 cm) hole in... must extend to the hot water line using a connection configuration that is moved into cabinet opening ). Route cable from moving when dishwasher is in area shown. This will make water connection easier. MetaclabineCt:ovehrolewithgromm(ePt arNt umbe3r02797) includewdithpowesrupplcyordkit. l Direct Wire - Drill...
... tubing or flexible braided water supply line. Metal cabinet: Cover hole with local codes and ordinances. Tape cable to the dishwasher should have a manual shutoff valve. Measure overall length of cabinet opening dimensions. Drill a V2" (1.3 cm) hole in... must extend to the hot water line using a connection configuration that is moved into cabinet opening ). Route cable from moving when dishwasher is in area shown. This will make water connection easier. MetaclabineCt:ovehrolewithgromm(ePt arNt umbe3r02797) includewdithpowesrupplcyordkit. l Direct Wire - Drill...
Installation Instructions
Page 8
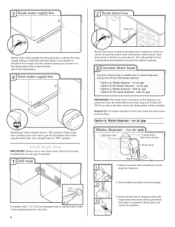
... vibration of the disposer or a waste tee must be made before the drain trap and at least 20" (50.8 cm) above the floor where the dishwasher will be installed. Use needle-nose pliers to squeeze clamp open and move into disposer. 2. Ifneededr,illa 11/(23".8cm)diametheor leincabinewtallorside oftheopenincglosetsotthesink. 3. Routderainhoseasshowtnhrougholeincabinetot thefront...
... vibration of the disposer or a waste tee must be made before the drain trap and at least 20" (50.8 cm) above the floor where the dishwasher will be installed. Use needle-nose pliers to squeeze clamp open and move into disposer. 2. Ifneededr,illa 11/(23".8cm)diametheor leincabinewtallorside oftheopenincglosetsotthesink. 3. Routderainhoseasshowtnhrougholeincabinetot thefront...
Installation Instructions
Page 10
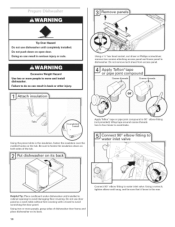
.... Using a wrench, tighten elbow until snug, and be sure that it faces to avoid leaks. Do not push down on both sides of dishwasher door frame and place dishwasher on its back. 10 Connect 90 ° elbow fitting to avoid damaging floor covering. Doing so can result in serious injury or cuts... the precut slots in cabinet opening to water inlet valve. Wrap tape around coarse threads two to four times to the rear. Do not use dishwasher until installed in the insulation, fasten the insulation over the molded hooks on open door. Apply Teflon : tape or pipe joint compound to...
.... Using a wrench, tighten elbow until snug, and be sure that it faces to avoid leaks. Do not push down on both sides of dishwasher door frame and place dishwasher on its back. 10 Connect 90 ° elbow fitting to avoid damaging floor covering. Doing so can result in serious injury or cuts... the precut slots in cabinet opening to water inlet valve. Wrap tape around coarse threads two to four times to the rear. Do not use dishwasher until installed in the insulation, fasten the insulation over the molded hooks on open door. Apply Teflon : tape or pipe joint compound to...


