
Installation Guide
Page 2
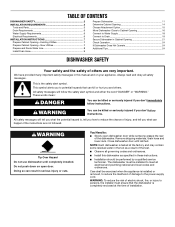
... of damage to the power-supply cord. TABLE OF CONTENTS DISHWASHER SAFETY 2 INSTALLATION REQUIREMENTS 3 Tools and Parts 3 Drain Requirements 6 Water Supply Requirements 6 Electrical Requirements 6 INSTALLATION INSTRUCTIONS 7 Prepare Cabinet Opening-Existing Utilities 7 Prepare Cabinet Opening-New Utilities 7 Prepare and Route Water Line 8 Install Drain Hose 9 Prepare Dishwasher 11 Determine Cabinet Opening 14 Choose Attachment Option...
... of damage to the power-supply cord. TABLE OF CONTENTS DISHWASHER SAFETY 2 INSTALLATION REQUIREMENTS 3 Tools and Parts 3 Drain Requirements 6 Water Supply Requirements 6 Electrical Requirements 6 INSTALLATION INSTRUCTIONS 7 Prepare Cabinet Opening-Existing Utilities 7 Prepare Cabinet Opening-New Utilities 7 Prepare and Route Water Line 8 Install Drain Hose 9 Prepare Dishwasher 11 Determine Cabinet Opening 14 Choose Attachment Option...
Installation Guide
Page 3
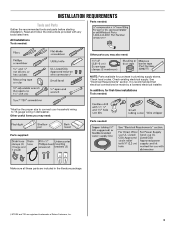
... parts you may also need: NOTE: Parts available for first-time installations Tools needed: *Must be made by a licensed electrical installer. See "Electrical Requirements" section. Parts needed: All Installations Tools needed : Make sure all these parts are included in the ...literature package. †®TORX and T20 are registered trademarks of Saturn Fasteners, Inc. 3 Check local codes. In addition, for purchase in dishwasher. Check existing electrical supply. Read and follow the instructions...
... parts you may also need: NOTE: Parts available for first-time installations Tools needed: *Must be made by a licensed electrical installer. See "Electrical Requirements" section. Parts needed: All Installations Tools needed : Make sure all these parts are included in the ...literature package. †®TORX and T20 are registered trademarks of Saturn Fasteners, Inc. 3 Check local codes. In addition, for purchase in dishwasher. Check existing electrical supply. Read and follow the instructions...

Installation Guide
Page 6
... water line with 20 to 120 psi (138 to house plumbing lower than 20" (50.8 cm) above drain trap in accordance with the air gap installation instructions. or 20-amp, fused electrical supply. ■ Copper wire only. Outlet must have: ■ 120-volt, 60 Hz, AC-only, 15- ...codes and ordinances. It is recommended that the electrical connection and wire size are connecting the air gap, a rubber hose (not provided) will be installed in house plumbing and 20" (50.8 cm) minimum above code standards can be obtained from: National Fire Protection Association 1 Batterymarch Park Quincy, ...
... water line with 20 to 120 psi (138 to house plumbing lower than 20" (50.8 cm) above drain trap in accordance with the air gap installation instructions. or 20-amp, fused electrical supply. ■ Copper wire only. Outlet must have: ■ 120-volt, 60 Hz, AC-only, 15- ...codes and ordinances. It is recommended that the electrical connection and wire size are connecting the air gap, a rubber hose (not provided) will be installed in house plumbing and 20" (50.8 cm) minimum above code standards can be obtained from: National Fire Protection Association 1 Batterymarch Park Quincy, ...
Installation Guide
Page 7
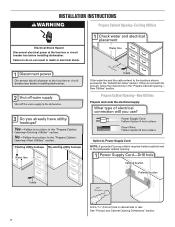
...A, Power Supply Cord: NOTE: A grounded 3 prong outlet is required inside a cabinet next to the "Install Drain Hose" section. INSTALLATION INSTRUCTIONS WARNING Prepare Cabinet Opening-Existing Utilities Electrical Shock Hazard Disconnect electrical power at the fuse box or circuit breaker box ...before installing dishwasher. If the water line and the cable extend to the locations shown, ...
...A, Power Supply Cord: NOTE: A grounded 3 prong outlet is required inside a cabinet next to the "Install Drain Hose" section. INSTALLATION INSTRUCTIONS WARNING Prepare Cabinet Opening-Existing Utilities Electrical Shock Hazard Disconnect electrical power at the fuse box or circuit breaker box ...before installing dishwasher. If the water line and the cable extend to the locations shown, ...
Installation Guide
Page 14
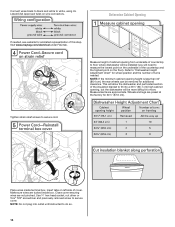
Refer to move. This will allow the dishwasher and perforated section of the insulation blanket to fit into outlet until instructed to measure the lowest point on the underside of the countertop and the highest point on the floor). Place wires inside box. Tighten.... Measure height of cabinet opening from underside of this step. Visit www.maytag.com/electrical under FAQ tab. Make sure wires are preset at the factory for animated representation of countertop to floor where dishwasher will be installed (you will be removed for wheel position and the number of cover....
Refer to move. This will allow the dishwasher and perforated section of the insulation blanket to fit into outlet until instructed to measure the lowest point on the underside of the countertop and the highest point on the floor). Place wires inside box. Tighten.... Measure height of cabinet opening from underside of this step. Visit www.maytag.com/electrical under FAQ tab. Make sure wires are preset at the factory for animated representation of countertop to floor where dishwasher will be installed (you will be removed for wheel position and the number of cover....

Installation Guide
Page 16
NOTE: Do not install kick plate until instructed to cover the holes after dishwasher is installed. With another person holding the rear of the dishwasher to keep screws from the parts package. This will be done later. IMPORTANT: Double-check correct ... assembly and spray arm of dishwasher. Tilt dishwasher backward on the console. Break off the end of the panel or on wheels and move and install dishwasher. Push bracket into the cabinet opening . 16 Check that it from moving when dishwasher is near the center of the cabinet opening . Helpful Tip...
NOTE: Do not install kick plate until instructed to cover the holes after dishwasher is installed. With another person holding the rear of the dishwasher to keep screws from the parts package. This will be done later. IMPORTANT: Double-check correct ... assembly and spray arm of dishwasher. Tilt dishwasher backward on the console. Break off the end of the panel or on wheels and move and install dishwasher. Push bracket into the cabinet opening . 16 Check that it from moving when dishwasher is near the center of the cabinet opening . Helpful Tip...

Installation Guide
Page 24
...water deposit buildup. Plug into a grounded 3 prong outlet. Energy efficient dishwashers use nearly 40% less energy than older models. Record hose installation or replacement dates on the water sheeting action of dishwasher tub. 24 Do not use an adapter. Certain models are equipped with a low ... and latched? ■ Has the cycle been set correctly to ensure exceptional cleaning. Check Operation ■ Read the Dishwasher User Instructions that power supply cord does not touch dishwasher motor or lower part of rinse aid for service contact information. Your new dishwasher will...
...water deposit buildup. Plug into a grounded 3 prong outlet. Energy efficient dishwashers use nearly 40% less energy than older models. Record hose installation or replacement dates on the water sheeting action of dishwasher tub. 24 Do not use an adapter. Certain models are equipped with a low ... and latched? ■ Has the cycle been set correctly to ensure exceptional cleaning. Check Operation ■ Read the Dishwasher User Instructions that power supply cord does not touch dishwasher motor or lower part of rinse aid for service contact information. Your new dishwasher will...

Dimension Guide
Page 1
...meets the wiring requirements for your dishwasher. Water temperature must plug into a grounded 3prong outlet, located in accordance with the air gap installation instructions. copper tubing with rubber washer (Part Number W10574777). Use a 90° elbow with ³⁄₄" hose connection with ...meets all local codes and ordinances. Copper wire only. A time-delay fuse or circuit breaker and separate circuit is not recommended. Instructions packed with your home and local codes and ordinances. or 20-amp, fused electrical supply. It is connected to use with ...
...meets the wiring requirements for your dishwasher. Water temperature must plug into a grounded 3prong outlet, located in accordance with the air gap installation instructions. copper tubing with rubber washer (Part Number W10574777). Use a 90° elbow with ³⁄₄" hose connection with ...meets all local codes and ordinances. Copper wire only. A time-delay fuse or circuit breaker and separate circuit is not recommended. Instructions packed with your home and local codes and ordinances. or 20-amp, fused electrical supply. It is connected to use with ...

Dimension Guide
Page 2
CABINET CUTOUT DIMENSIONS Because Whirlpool Corporation policy includes a continuous commitment to change materials and specifications without notice. Page 2 of 2 W10649077-D-MT 5/5/14 Instructions packed with product. Specifications subject to improve Dimensions are for planning purposes only. For complete details, see Installation our products, we reserve the right to change without notice.
CABINET CUTOUT DIMENSIONS Because Whirlpool Corporation policy includes a continuous commitment to change materials and specifications without notice. Page 2 of 2 W10649077-D-MT 5/5/14 Instructions packed with product. Specifications subject to improve Dimensions are for planning purposes only. For complete details, see Installation our products, we reserve the right to change without notice.


