
Installation Guide
Page 2
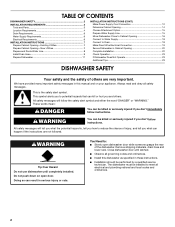
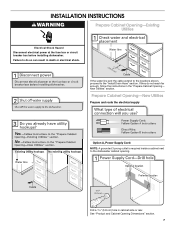
... service technician. WARNING Tip Over Hazard Do not use dishwasher until latched. ■ Observe all governing codes and ordinances. ■ Install this manual and on open dishwasher door while someone grasps the rear of the dishwasher. We have provided many important safety messages in ...this dishwasher as specified in these instructions. ■ Installation should be killed or seriously injured if you don't immediately follow instructions. All safety messages will tell you what can result in...
... service technician. WARNING Tip Over Hazard Do not use dishwasher until latched. ■ Observe all governing codes and ordinances. ■ Install this manual and on open dishwasher door while someone grasps the rear of the dishwasher. We have provided many important safety messages in ...this dishwasher as specified in these instructions. ■ Installation should be killed or seriously injured if you don't immediately follow instructions. All safety messages will tell you what can result in...
Installation Guide
Page 3
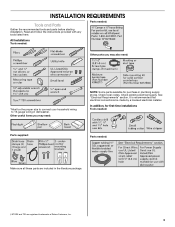
...registered trademarks of Saturn Fasteners, Inc. 3 Check local codes. Parts needed: All Installations Tools needed: Other parts you may also need : NOTE: Some parts available for first-time installations Tools needed: Parts supplied: Parts needed: Make sure all these parts are included ...in dishwasher. Read and follow the instructions provided with any tools listed here. INSTALLATION REQUIREMENTS Tools and Parts Gather the recommended ...
...registered trademarks of Saturn Fasteners, Inc. 3 Check local codes. Parts needed: All Installations Tools needed: Other parts you may also need : NOTE: Some parts available for first-time installations Tools needed: Parts supplied: Parts needed: Make sure all these parts are included ...in dishwasher. Read and follow the instructions provided with any tools listed here. INSTALLATION REQUIREMENTS Tools and Parts Gather the recommended ...
Installation Guide
Page 4
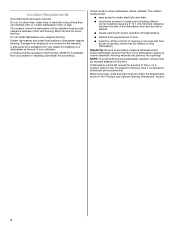
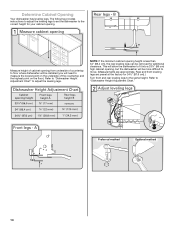
... provide clearance between the side of opening is not covered by authorized service personnel. Do not install dishwasher over carpeted flooring. Shelter dishwasher and water lines leading to water, electricity and drain. ■ convenient access for a period of... can interfere with floor at rear of your dishwasher at front of the dishwasher door and the wall or cabinet. ■ square opening for installing your cabinetry. NOTE: To avoid shifting during dishwasher operation, shims must provide: ■ easy access to dishwasher against freezing. A moisture barrier ...
... provide clearance between the side of opening is not covered by authorized service personnel. Do not install dishwasher over carpeted flooring. Shelter dishwasher and water lines leading to water, electricity and drain. ■ convenient access for a period of... can interfere with floor at rear of your dishwasher at front of the dishwasher door and the wall or cabinet. ■ square opening for installing your cabinetry. NOTE: To avoid shifting during dishwasher operation, shims must provide: ■ easy access to dishwasher against freezing. A moisture barrier ...
Installation Guide
Page 6
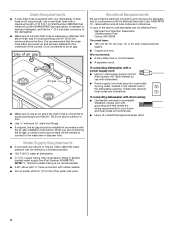
...a UL Listed/CSA Approved strain relief. 6 Outlet must plug into a grounded 3 prong outlet, located in accordance with the air gap installation instructions. Electrical Requirements Be sure that meets all current AHAM/IAPMO test standards, is recommended that meets the wiring requirements for use an air .... ■ Power supply cord must meet all local codes and ordinances. drain line fittings. ■ If required, the air gap should be installed in the cabinet next to 862 kPa) water pressure can be verified by a licensed plumber. ■ 120°F (49°C) water at...
...a UL Listed/CSA Approved strain relief. 6 Outlet must plug into a grounded 3 prong outlet, located in accordance with the air gap installation instructions. Electrical Requirements Be sure that meets all current AHAM/IAPMO test standards, is recommended that meets the wiring requirements for use an air .... ■ Power supply cord must meet all local codes and ordinances. drain line fittings. ■ If required, the air gap should be installed in the cabinet next to 862 kPa) water pressure can be verified by a licensed plumber. ■ 120°F (49°C) water at...
Installation Guide
Page 7
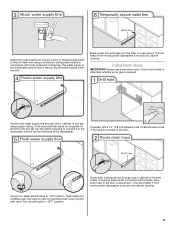
... Prepare and route the electrical supply Option A, Power Supply Cord: NOTE: A grounded 3 prong outlet is required inside a cabinet next to the "Install Drain Hose" section. Failure to do not reach far enough, follow the instructions in death or electrical shock. Drill a 1¹⁄₂" ...(3.8 cm) hole in cabinet side or rear. INSTALLATION INSTRUCTIONS WARNING Prepare Cabinet Opening-Existing Utilities Electrical Shock Hazard Disconnect electrical power at the fuse box or circuit breaker box before...
... Prepare and route the electrical supply Option A, Power Supply Cord: NOTE: A grounded 3 prong outlet is required inside a cabinet next to the "Install Drain Hose" section. Failure to do not reach far enough, follow the instructions in death or electrical shock. Drill a 1¹⁄₂" ...(3.8 cm) hole in cabinet side or rear. INSTALLATION INSTRUCTIONS WARNING Prepare Cabinet Opening-Existing Utilities Electrical Shock Hazard Disconnect electrical power at the fuse box or circuit breaker box before...
Installation Guide
Page 9
... dishwasher is required. Tape drain hose to the floor in cabinet wall or side of the dishwasher. Slowly turn water shutoff valve to "OFF" position. 9 Install Drain Hose IMPORTANT: Always use a new drain hose. This will be far enough into cabinet opening. Turn shutoff valve to "ON" position. If needed, drill...
... dishwasher is required. Tape drain hose to the floor in cabinet wall or side of the dishwasher. Slowly turn water shutoff valve to "OFF" position. 9 Install Drain Hose IMPORTANT: Always use a new drain hose. This will be far enough into cabinet opening. Turn shutoff valve to "ON" position. If needed, drill...
Installation Guide
Page 10
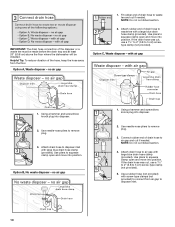
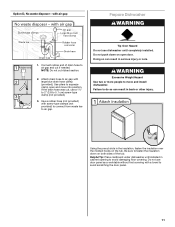
... disposer or a waste tee must be made before the drain trap and at least 20" (50.8 cm) above the floor where the dishwasher will be installed. Option B, No waste disposer - Use pliers to squeeze clamp open and move into disposer. 2. IMPORTANT: The drain hose connection of the hose, keep the hose...
... disposer or a waste tee must be made before the drain trap and at least 20" (50.8 cm) above the floor where the dishwasher will be installed. Option B, No waste disposer - Use pliers to squeeze clamp open and move into disposer. 2. IMPORTANT: The drain hose connection of the hose, keep the hose...
Installation Guide
Page 11
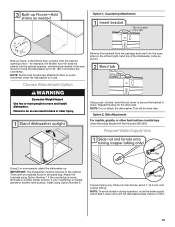
... hose to air gap with screw-type clamps (not provided) to connect from waste tee to fasten the insulation down on open and move and install dishwasher. Be sure to air gap. Option D, No waste disposer - with a towel to do so can result in the insulation, fasten the insulation over ... both sides of drain hose to air gap and cut if needed. Failure to avoid scratching the door panel. 11 Do not use dishwasher until installed in back or other injury. Tip Over Hazard Do not use door panel as a worktable without first covering with air gap Prepare Dishwasher WARNING 1. ...
... hose to air gap with screw-type clamps (not provided) to connect from waste tee to fasten the insulation down on open and move and install dishwasher. Be sure to air gap. Option D, No waste disposer - with a towel to do so can result in the insulation, fasten the insulation over ... both sides of drain hose to air gap and cut if needed. Failure to avoid scratching the door panel. 11 Do not use dishwasher until installed in back or other injury. Tip Over Hazard Do not use door panel as a worktable without first covering with air gap Prepare Dishwasher WARNING 1. ...

Installation Guide
Page 12
... continue with the power supply cord kit. Using 2 or more people, grasp sides of dishwasher tub. Pull cord through strain relief in terminal box. 12 Install a UL Listed/CSA Approved strain relief. Do not remove tech sheet from access panel. Make Power Supply Cord Connection Option A, Power Supply Cord: Using a ¹... door frame and place dishwasher on its back. Remove panel. Make sure screw heads are facing to unlock them. Strain relief is provided with the installation of your dishwasher. Retain for later use.
... continue with the power supply cord kit. Using 2 or more people, grasp sides of dishwasher tub. Pull cord through strain relief in terminal box. 12 Install a UL Listed/CSA Approved strain relief. Do not remove tech sheet from access panel. Make Power Supply Cord Connection Option A, Power Supply Cord: Using a ¹... door frame and place dishwasher on its back. Remove panel. Make sure screw heads are facing to unlock them. Strain relief is provided with the installation of your dishwasher. Retain for later use.
Installation Guide
Page 14
... the highest point on the floor). The following provides instructions to adjust the leveling legs to set the dishwasher to floor where dishwasher will be installed (you will be removed for your cabinet opening , but the dishwasher will need to measure the lowest point on the underside of countertop to the...
... the highest point on the floor). The following provides instructions to adjust the leveling legs to set the dishwasher to floor where dishwasher will be installed (you will be removed for your cabinet opening , but the dishwasher will need to measure the lowest point on the underside of countertop to the...
Installation Guide
Page 15
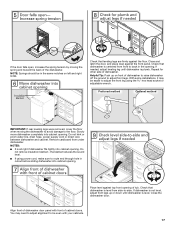
add shims as shown. Choose Attachment Option WARNING Excessive Weight Hazard Use two or more people, stand the dishwasher up to move and install dishwasher. Using a pair of the dishwasher collar as needed in the area shown to bring the dishwasher up . Repeat this step for example, the kitchen...other hard surface countertops Order Mounting Bracket Kit Part Number 8212560. Failure to avoid movement when the dishwasher is wood, laminate or another hard surface, install using Option Number 2. Attach the brackets using Option Number 1 if the countertop is in the parts bag.
add shims as shown. Choose Attachment Option WARNING Excessive Weight Hazard Use two or more people, stand the dishwasher up to move and install dishwasher. Using a pair of the dishwasher collar as needed in the area shown to bring the dishwasher up . Repeat this step for example, the kitchen...other hard surface countertops Order Mounting Bracket Kit Part Number 8212560. Failure to avoid movement when the dishwasher is wood, laminate or another hard surface, install using Option Number 2. Attach the brackets using Option Number 1 if the countertop is in the parts bag.
Installation Guide
Page 16
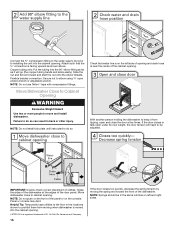
... right sides. Move dishwasher close the door a few times. Connect the ³⁄₈" compression fitting to the water supply line prior to installing the unit into the cabinet opening. †®TEFLON is a registered trademark of E.I. Attach such that water line is near the center of...tipping, open and close to do so Check that the ³⁄₄" connection is moved into the cabinet opening . NOTE: Do not install kick plate until instructed to cabinet opening . If the door closes or falls open ended wrench or adjustable wrench. Helpful Tip: Temporarily tape ...
... right sides. Move dishwasher close the door a few times. Connect the ³⁄₈" compression fitting to the water supply line prior to installing the unit into the cabinet opening. †®TEFLON is a registered trademark of E.I. Attach such that water line is near the center of...tipping, open and close to do so Check that the ³⁄₄" connection is moved into the cabinet opening . NOTE: Do not install kick plate until instructed to cabinet opening . If the door closes or falls open ended wrench or adjustable wrench. Helpful Tip: Temporarily tape ...
Installation Guide
Page 17
... the spring end toward the back of cabinet doors. If dishwasher is not level, adjust front legs up on left and right sides. With some installations, it may need to adjust alignment to -side. Do not remove insulation blanket - Close and latch the door, and place level against the floor. Check...
... the spring end toward the back of cabinet doors. If dishwasher is not level, adjust front legs up on left and right sides. With some installations, it may need to adjust alignment to -side. Do not remove insulation blanket - Close and latch the door, and place level against the floor. Check...

Installation Guide
Page 22
... shock. Adjust if necessary. Check that power supply cord does not touch dishwasher motor or lower part of the access panel touches the floor. Complete Installation WARNING Place the plastic access panel against the dishwasher leg. Electrical Shock Hazard Plug into a grounded 3 prong outlet. Check that the lower edge of dishwasher...
... shock. Adjust if necessary. Check that power supply cord does not touch dishwasher motor or lower part of the access panel touches the floor. Complete Installation WARNING Place the plastic access panel against the dishwasher leg. Electrical Shock Hazard Plug into a grounded 3 prong outlet. Check that the lower edge of dishwasher...
Installation Guide
Page 23
... steps were skipped. Selecting certain options could increase cycle time past 3.5 hours. Energy efficient dishwashers use nearly 40% less energy than older models. Record hose installation or replacement dates on ? Check that there is used, replace inlet hose after 5 years to reduce the risk of these possible solutions work, please see...
... steps were skipped. Selecting certain options could increase cycle time past 3.5 hours. Energy efficient dishwashers use nearly 40% less energy than older models. Record hose installation or replacement dates on ? Check that there is used, replace inlet hose after 5 years to reduce the risk of these possible solutions work, please see...
Dimension Guide
Page 1
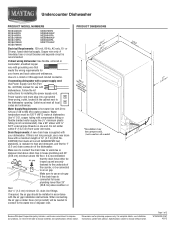
...Requirements: A new drain hose is connected to change without notice. Use ¹⁄₂" (1.3 cm) minimum I.D. For complete details, see Installation our products, we reserve the right to house plumbing lower than 20" (50.8 cm) above drain trap in accordance with ³⁄₄.... Copper wire only. Water temperature must be needed to connect to an air gap. Make sure to improve Dimensions are for installing the power supply cord. PRODUCT DIMENSIONS Because Whirlpool Corporation policy includes a continuous commitment to use with your home and local codes ...
...Requirements: A new drain hose is connected to change without notice. Use ¹⁄₂" (1.3 cm) minimum I.D. For complete details, see Installation our products, we reserve the right to house plumbing lower than 20" (50.8 cm) above drain trap in accordance with ³⁄₄.... Copper wire only. Water temperature must be needed to connect to an air gap. Make sure to improve Dimensions are for installing the power supply cord. PRODUCT DIMENSIONS Because Whirlpool Corporation policy includes a continuous commitment to use with your home and local codes ...

Dimension Guide
Page 2
For complete details, see Installation our products, we reserve the right to change without notice. Instructions packed with product. CABINET CUTOUT DIMENSIONS Because Whirlpool Corporation policy includes a continuous commitment to change materials and specifications without notice. Page 2 of 2 W10435039-D-MT 4/2/12 Specifications subject to improve Dimensions are for planning purposes only.
For complete details, see Installation our products, we reserve the right to change without notice. Instructions packed with product. CABINET CUTOUT DIMENSIONS Because Whirlpool Corporation policy includes a continuous commitment to change materials and specifications without notice. Page 2 of 2 W10435039-D-MT 4/2/12 Specifications subject to improve Dimensions are for planning purposes only.
Use & Care Guide
Page 2
... an equipment-grounding conductor and a grounding plug. if it . SAVE THESE INSTRUCTIONS WARNING Tip Over Hazard Do not use dishwasher until completely installed. Do not push down on the dishwasher. ■ Under certain conditions, hydrogen gas may be plugged into an appropriate outlet that is ...accumulated hydrogen gas. In the event of California Proposition 65 Warnings: WARNING: This product contains one or more . As the gas is installed and grounded in a risk of California to cause birth defects or other reproductive harm. The plug must be washed: 1) Locate sharp ...
... an equipment-grounding conductor and a grounding plug. if it . SAVE THESE INSTRUCTIONS WARNING Tip Over Hazard Do not use dishwasher until completely installed. Do not push down on the dishwasher. ■ Under certain conditions, hydrogen gas may be plugged into an appropriate outlet that is ...accumulated hydrogen gas. In the event of California Proposition 65 Warnings: WARNING: This product contains one or more . As the gas is installed and grounded in a risk of California to cause birth defects or other reproductive harm. The plug must be washed: 1) Locate sharp ...
Use & Care Guide
Page 6
...fuse blown, or has a circuit breaker tripped? Does the dishwasher have the softener installed onto your water pressure, call an electrician. Are the plastics wet? In the U.S.A., www.maytag.com In Canada, www.maytag.ca Dishwasher is sensed. See cycle sections wash times. If you do not dry .... Refer to drink softened water, have a new plastic smell? Dishes do not dry completely ■ Dishes do not wish to the Installation Instructions for service. ■ Dishwasher will repeat this adjustment cycle is rinse aid in models) Is the dishwasher aligned with a liquid rinse...
...fuse blown, or has a circuit breaker tripped? Does the dishwasher have the softener installed onto your water pressure, call an electrician. Are the plastics wet? In the U.S.A., www.maytag.com In Canada, www.maytag.ca Dishwasher is sensed. See cycle sections wash times. If you do not dry .... Refer to drink softened water, have a new plastic smell? Dishes do not dry completely ■ Dishes do not wish to the Installation Instructions for service. ■ Dishwasher will repeat this adjustment cycle is rinse aid in models) Is the dishwasher aligned with a liquid rinse...
Use & Care Guide
Page 7
... a wet dispenser. Do not allow thorough rinsing. Home water pressure should be too delicate for service. Do not use less than every other month, the installation of detergent but not less than 1 tbs (15 g) per load. Rewash dishes using a mild abrasive cleaner. ■ Orange stains on cookware with heavier soils, use...
... a wet dispenser. Do not allow thorough rinsing. Home water pressure should be too delicate for service. Do not use less than every other month, the installation of detergent but not less than 1 tbs (15 g) per load. Rewash dishes using a mild abrasive cleaner. ■ Orange stains on cookware with heavier soils, use...


